1 什么是MVC
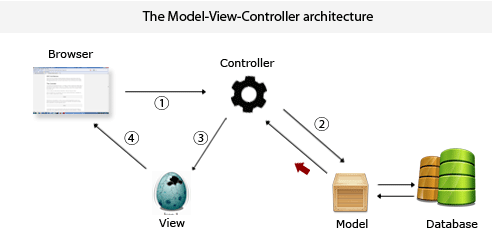
MVC模式(Model-View-Controller)是软件工程中的一种软件架构模式,把软件系统分为三个基本部分:模型(Model)、视图(View)和控制器(Controller)。
PHP中MVC模式也称Web MVC,从上世纪70年代进化而来。MVC的目的是实现一种动态的程序设计,便于后续对程序的修改和扩展简化,并且使程序某一部分的重复利用成为可能。除 此之外,此模式通过对复杂度的简化,使程序结构更加直观。软件系统通过对自身基本部份分离的同时,也赋予了各个基本部分应有的功能。
MVC各部分的职能:
模型Model – 管理大部分的业务逻辑和所有的数据库逻辑。模型提供了连接和操作数据库的抽象层。
控制器Controller - 负责响应用户请求、准备数据,以及决定如何展示数据。
视图View – 负责渲染数据,通过HTML方式呈现给用户。

一个典型的Web MVC流程:
Controller截获用户发出的请求;
Controller调用Model完成状态的读写操作;
Controller把数据传递给View;
View渲染最终结果并呈献给用户。
2 为什么要自己开发MVC框架
网络上有大量优秀的MVC框架可供使用,本教程并不是为了开发一个全面的、终极的MVC框架解决方案,而是将它看作是一个很好的从内部学习PHP的机会,在此过程中,你将学习面向对象编程和MVC设计模式,并学习到开发中的一些注意事项。
更重要的是,你可以完全控制你的框架,并将你的想法融入到你开发的框架中。虽然不一定是做好的,但是你可以按照你的方式去开发功能和模块。
3 开始开发自己的MVC框架
3.1 目录准备
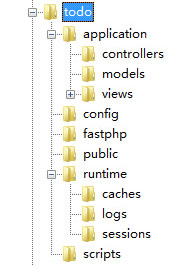
在开始开发前,让我们先来把项目建立好,假设我们建立的项目为 todo,MVC的框架可以命名为 FastPHP,那么接下来的第一步就是把目录结构先设置好。

虽然在这个教程中不会使用到上面的所有的目录,但是为了以后程序的可拓展性,在一开始就把程序目录设置好使非常必要的。下面就具体说说每个目录的作用:
application – 应用代码
config – 程序配置或数据库配置
fastphp - 框架核心目录
public – 静态文件
runtime - 临时数据目录
scripts – 命令行工具
3.2 代码规范
在目录设置好以后,我们接下来就要来规定一下代码的规范:
MySQL的表名需小写,如:item,car
模块名(Models)需首字母大写,,并在名称后添加“Model”,如:ItemModel,CarModel
控制器(Controllers)需首字母大写,,并在名称中添加“Controller”,如:ItemController,CarController
视图(Views)部署结构为“控制器名/行为名”,如:item/view.php,car/buy.php
上述的一些规则是为了能在程序中更好的进行互相的调用。接下来就开始真正的PHP MVC编程了。
3.3 重定向
将所有的数据请求都重定向 index.php 文件,在 todo 目录下新建一个 .htaccess 文件,文件内容为:
<IfModule mod_rewrite.c>
    RewriteEngine On

    # 确保请求路径不是一个文件名或目录
    RewriteCond %{REQUEST_FILENAME} !-f
    RewriteCond %{REQUEST_FILENAME} !-d

    # 重定向所有请求到 index.php?url=PATHNAME
    RewriteRule ^(.*)$ index.php?url=$1 [PT,L]
</IfModule>这样做的主要原因有:
程序有一个单一的入口;
除静态程序,其他所有程序都重定向到 index.php 上;
可以用来生成利于SEO的URL,想要更好的配置URL,后期可能会需要URL路由,这里先不做介绍了。
3.4 入口文件
做完上面的操作,就应该知道我们需要做什么了,没错!在 public 目录下添加 index.php 文件,文件内容为:
<?php // 应用目录为当前目录 define('APP_PATH', __DIR__.'/'); // 开启调试模式 define('APP_DEBUG', true); // 网站根URL define('APP_URL', 'http://localhost/fastphp'); // 加载框架 require './fastphp/FastPHP.php';
注意,上面的PHP代码中,并没有添加PHP结束符号”?>”,这么做的主要原因是,对于只有 PHP 代码的文件,结束标志(“?>”)最好不存在,PHP自身并不需要结束符号,不添加结束符号可以很大程度上防止末尾被添加额外的注入内容,让程序更加安全。
3.5 配置文件和主请求
在 index.php 中,我们对 fastphp 文件夹下的 FastPHP.php 发起了请求,那么 FastPHP.php 这个启动文件中到底会包含哪些内容呢?
<?php// 初始化常量 defined('FRAME_PATH') or define('FRAME_PATH', __DIR__.'/'); defined('APP_PATH') or define('APP_PATH', dirname($_SERVER['SCRIPT_FILENAME']).'/'); defined('APP_DEBUG') or define('APP_DEBUG', false); defined('CONFIG_PATH') or define('CONFIG_PATH', APP_PATH.'config/'); defined('RUNTIME_PATH') or define('RUNTIME_PATH', APP_PATH.'runtime/');// 包含配置文件require APP_PATH . 'config/config.php';//包含核心框架类require FRAME_PATH . 'Core.php';// 实例化核心类 $fast = new Core; $fast->run();
以上文件都其实可以直接在 index.php 文件中包含,常量也可以直接在 index.php 中定义,我们这么做的原因是为了在后期管理和拓展中更加的方便,所以把需要在一开始的时候就加载运行的程序统一放到一个单独的文件中引用。
先来看看config文件下的 config .php 文件,该文件的主要作用是设置一些程序的配置项及数据库连接等,主要内容为:
<?php /** 变量配置 **/ define('DB_NAME', 'todo'); define('DB_USER', 'root'); define('DB_PASSWORD', 'root'); define('DB_HOST', 'localhost');
应该说 config.php 涉及到的内容并不多,不过是一些基础数据库的设置,再来看看 fastphp下的共用框架入口文件 Core.php 应该怎么写。
<?php/**
* FastPHP核心框架
*/class Core
{ // 运行程序 function run()
{
spl_autoload_register(array($this, 'loadClass'));
$this->setReporting();
$this->removeMagicQuotes();
$this->unregisterGlobals();
$this->Route();
} // 路由处理 function Route()
{
$controllerName = 'Index';
$action = 'index'; if (!empty($_GET['url'])) {
$url = $_GET['url'];
$urlArray = explode('/', $url);
// 获取控制器名
$controllerName = ucfirst($urlArray[0]);
// 获取动作名
array_shift($urlArray);
$action = empty($urlArray[0]) ? 'index' : $urlArray[0];
//获取URL参数
array_shift($urlArray);
$queryString = empty($urlArray) ? array() : $urlArray;
} // 数据为空的处理
$queryString = empty($queryString) ? array() : $queryString; // 实例化控制器
$controller = $controllerName . 'Controller';
$dispatch = new $controller($controllerName, $action); // 如果控制器存和动作存在,这调用并传入URL参数 if ((int)method_exists($controller, $action)) {
call_user_func_array(array($dispatch, $action), $queryString);
} else { exit($controller . "控制器不存在");
}
} // 检测开发环境 function setReporting()
{ if (APP_DEBUG === true) {
error_reporting(E_ALL);
ini_set('display_errors','On');
} else {
error_reporting(E_ALL);
ini_set('display_errors','Off');
ini_set('log_errors', 'On');
ini_set('error_log', RUNTIME_PATH. 'logs/error.log');
}
} // 删除敏感字符 function stripSlashesDeep($value)
{
$value = is_array($value) ? array_map('stripSlashesDeep', $value) : stripslashes($value); return $value;
} // 检测敏感字符并删除 function removeMagicQuotes()
{ if ( get_magic_quotes_gpc()) {
$_GET = stripSlashesDeep($_GET );
$_POST = stripSlashesDeep($_POST );
$_COOKIE = stripSlashesDeep($_COOKIE);
$_SESSION = stripSlashesDeep($_SESSION);
}
} // 检测自定义全局变量(register globals)并移除 function unregisterGlobals()
{ if (ini_get('register_globals')) {
$array = array('_SESSION', '_POST', '_GET', '_COOKIE', '_REQUEST', '_SERVER', '_ENV', '_FILES'); foreach ($array as $value) { foreach ($GLOBALS[$value] as $key => $var) { if ($var === $GLOBALS[$key]) { unset($GLOBALS[$key]);
}
}
}
}
} // 自动加载控制器和模型类
static function loadClass($class)
{
$frameworks = FRAME_PATH . $class . '.class.php';
$controllers = APP_PATH . 'application/controllers/' . $class . '.class.php';
$models = APP_PATH . 'application/models/' . $class . '.class.php'; if (file_exists($frameworks)) { // 加载框架核心类 include $frameworks;
} elseif (file_exists($controllers)) { // 加载应用控制器类 include $controllers;
} elseif (file_exists($models)) { //加载应用模型类 include $models;
} else { /* 错误代码 */
}
}
}下面重点讲解主请求方法 callHook(),首先我们想看看我们的 URL 会这样:
yoursite.com/controllerName/actionName/queryString
callHook()的作用就是,从全局变量 GET[′url′]变量中获取URL,并将其分割成三部分:GET[′url′]变量中获取URL,并将其分割成三部分:controller、action和action和queryString。
例如,URL链接为:todo.com/item/view/1/first-item,那么
$controller 就是:item
$action 就是:view
查询字符串Query String就是:array(1, first-item)
分割完成后,会实例化一个新的控制器:$controller.'Controller'(其中“.”是连字符),并调用其方法 $action。
3.6 控制器/Controller基类
接下来的操作就是在 fastphp 中建立程序所需的基类,包括控制器、模型和视图的基类。
新建控制器基类为 Controller.class.php,控制器的主要功能就是总调度,具体具体内容如下:
<?php
/**
 * 控制器基类
 */class Controller
{    protected $_controller;    protected $_action;    protected $_view;
    // 构造函数,初始化属性,并实例化对应模型    function __construct($controller, $action)
    {
        $this->_controller = $controller;
        $this->_action = $action;
        $this->_view = new View($controller, $action);
    }    // 分配变量    function assign($name, $value)
    {
        $this->_view->assign($name, $value);
    }    // 渲染视图    function __destruct()
    {
        $this->_view->render();
    }
}Controller 类实现所有控制器、模型和视图(View类)的通信。在执行析构函数时,我们可以调用 render() 来显示视图(view)文件。
3.7 模型Model基类
新建模型基类为 Model.class.php,模型基类 Model.class.php 代码如下:
<?phpclass Model extends Sql
{ protected $_model; protected $_table;
function __construct()
{ // 连接数据库
$this->connect(DB_HOST, DB_USER, DB_PASSWORD, DB_NAME);
// 获取模型名称
$this->_model = get_class($this);
$this->_model = rtrim($this->_model, 'Model');
// 数据库表名与类名一致
$this->_table = strtolower($this->_model);
}
function __destruct()
{
}
}考虑到模型需要对数据库进行处理,所以单独建立一个数据库基类 Sql.class.php,模型基类继承 Sql.class.php,代码如下:
<?php
class Sql
{ protected $_dbHandle; protected $_result; // 连接数据库 public function connect($host, $user, $pass, $dbname)
{ try {
$dsn = sprintf("mysql:host=%s;dbname=%s;charset=utf8", $host, $dbname);
$this->_dbHandle = new PDO($dsn, $user, $pass, array(PDO::ATTR_DEFAULT_FETCH_MODE => PDO::FETCH_ASSOC));
} catch (PDOException $e) { exit('错误: ' . $e->getMessage());
}
} // 查询所有 public function selectAll()
{
$sql = sprintf("select * from `%s`", $this->_table);
$sth = $this->_dbHandle->prepare($sql);
$sth->execute(); return $sth->fetchAll();
} // 根据条件 (id) 查询 public function select($id)
{
$sql = sprintf("select * from `%s` where `id` = '%s'", $this->_table, $id);
$sth = $this->_dbHandle->prepare($sql);
$sth->execute();
return $sth->fetch();
} // 根据条件 (id) 删除 public function delete($id)
{
$sql = sprintf("delete from `%s` where `id` = '%s'", $this->_table, $id);
$sth = $this->_dbHandle->prepare($sql);
$sth->execute(); return $sth->rowCount();
} // 自定义SQL查询,返回影响的行数 public function query($sql)
{
$sth = $this->_dbHandle->prepare($sql);
$sth->execute(); return $sth->rowCount();
} // 新增数据 public function add($data)
{
$sql = sprintf("insert into `%s` %s", $this->_table, $this->formatInsert($data)); return $this->query($sql);
} // 修改数据 public function update($id, $data)
{
$sql = sprintf("update `%s` set %s where `id` = '%s'", $this->_table, $this->formatUpdate($data), $id); return $this->query($sql);
} // 将数组转换成插入格式的sql语句 private function formatInsert($data)
{
$fields = array();
$values = array(); foreach ($data as $key => $value) {
$fields[] = sprintf("`%s`", $key);
$values[] = sprintf("'%s'", $value);
}
$field = implode(',', $fields);
$value = implode(',', $values); return sprintf("(%s) values (%s)", $field, $value);
} // 将数组转换成更新格式的sql语句 private function formatUpdate($data)
{
$fields = array(); foreach ($data as $key => $value) {
$fields[] = sprintf("`%s` = '%s'", $key, $value);
} return implode(',', $fields);
}
}应该说,Sql.class.php 是框架的核心部分。为什么?因为通过它,我们创建了一个 SQL 抽象层,可以大大减少了数据库的编程工作。虽然 PDO 接口本来已经很简洁,但是抽象之后框架的可灵活性更高。
3.8 视图View类
视图类 View.class.php 内容如下:
<?php/**
* 视图基类
*/class View
{ protected $variables = array(); protected $_controller; protected $_action; function __construct($controller, $action)
{
$this->_controller = $controller;
$this->_action = $action;
}
/** 分配变量 **/ function assign($name, $value)
{
$this->variables[$name] = $value;
}
/** 渲染显示 **/ function render()
{
extract($this->variables);
$defaultHeader = APP_PATH . 'application/views/header.php';
$defaultFooter = APP_PATH . 'application/views/footer.php';
$controllerHeader = APP_PATH . 'application/views/' . $this->_controller . '/header.php';
$controllerFooter = APP_PATH . 'application/views/' . $this->_controller . '/footer.php';
// 页头文件 if (file_exists($controllerHeader)) { include ($controllerHeader);
} else { include ($defaultHeader);
} // 页内容文件 include (APP_PATH . 'application/views/' . $this->_controller . '/' . $this->_action . '.php');
// 页脚文件 if (file_exists($controllerFooter)) { include ($controllerFooter);
} else { include ($defaultFooter);
}
}
}这样我们的核心的PHP MVC框架就编写完成了,下面我们开始编写应用来测试框架功能。
4 应用
4.1 数据库部署
在 SQL 中新建一个 todo 数据库,使用下面的语句增加 item 数据表并插入2条记录:
CREATE DATABASE `todo` DEFAULT CHARACTER SET utf8 COLLATE utf8_general_ci;USE `todo`;CREATE TABLE `item` (    `id` int(11) NOT NULL auto_increment,    `item_name` varchar(255) NOT NULL,
    PRIMARY KEY (`id`)
) ENGINE=InnoDB AUTO_INCREMENT=1 DEFAULT CHARSET=utf8;
INSERT INTO `item` VALUES(1, 'Hello World.');INSERT INTO `item` VALUES(2, 'Lets go!');4.2 部署模型
然后,我们还需要在 models 目录中创建一个 ItemModel.php 模型,内容如下:
<?phpclass ItemModel extends Model
{    /* 业务逻辑层实现 */
}模型内容为空。因为 Item 模型继承了 Model,所以它拥有 Model 的所有功能。
4.3 部署控制器
在 controllers 目录下创建一个 ItemController.php 控制器,内容如下:
<?php
class ItemController extends Controller
{ // 首页方法,测试框架自定义DB查询 public function index()
{
$items = (new ItemModel)->selectAll();
$this->assign('title', '全部条目');
$this->assign('items', $items);
}
// 添加记录,测试框架DB记录创建(Create) public function add()
{
$data['item_name'] = $_POST['value'];
$count = (new ItemModel)->add($data);
$this->assign('title', '添加成功');
$this->assign('count', $count);
}
// 查看记录,测试框架DB记录读取(Read) public function view($id = null)
{
$item = (new ItemModel)->select($id);
$this->assign('title', '正在查看' . $item['item_name']);
$this->assign('item', $item);
}
// 更新记录,测试框架DB记录更新(Update) public function update()
{
$data = array('id' => $_POST['id'], 'item_name' => $_POST['value']);
$count = (new ItemModel)->update($data['id'], $data);
$this->assign('title', '修改成功');
$this->assign('count', $count);
}
// 删除记录,测试框架DB记录删除(Delete) public function delete($id = null)
{
$count = (new ItemModel)->delete($id);
$this->assign('title', '删除成功');
$this->assign('count', $count);
}
}4.4 部署视图
在 views 目录下新建 header.php 和 footer.php 两个页头页脚模板,内容如下。
header.php,内容:
<html><head>    <meta http-equiv="Content-Type" content="text/html; charset=utf-8" />    <title><?php echo $title ?></title>    <style>
        .item {            width:400px;
        }
        input {            color:#222222;            font-family:georgia,times;            font-size:24px;            font-weight:normal;            line-height:1.2em;            color:black;
        }
        a {            color:blue;            font-family:georgia,times;            font-size:20px;            font-weight:normal;            line-height:1.2em;            text-decoration:none;
         }
        a:hover {            text-decoration:underline;
        }        h1 {            color:#000000;            font-size:41px;            letter-spacing:-2px;            line-height:1em;            font-family:helvetica,arial,sans-serif;            border-bottom:1px dotted #cccccc;
        }
        h2 {            color:#000000;            font-size:34px;            letter-spacing:-2px;            line-height:1em;            font-family:helvetica,arial,sans-serif;
        }    </style></head><body>    <h1><?php echo $title ?></h1>
footer.php,内容:
</body></html>然后,在 views/item 创建以下几个视图文件。
index.php,浏览数据库内 item 表的所有记录,内容:
<form action="<?php echo APP_URL ?>/item/add" method="post"> <input type="text" value="点击添加" onclick="this.value=''" name="value"> <input type="submit" value="添加"></form><br/><br/><?php $number = 0?>
<?php foreach ($items as $item): ?> <a class="big" href="<?php echo APP_URL ?>/item/view/<?php echo $item['id'] ?>" title="点击修改"> <span class="item"> <?php echo ++$number ?> <?php echo $item['item_name'] ?> </span> </a>
---- <a class="big" href="<?php echo APP_URL ?>/item/delete/<?php echo $item['id']?>">删除</a><br/><?php endforeach ?>
add.php,添加记录,内容:
<a class="big" href="<?php echo APP_URL ?>/item/index">成功添加<?php echo $count ?>条记录,点击返回</a>
view.php,查看单条记录,内容:
<form action="<?php echo APP_URL ?>/item/update" method="post"> <input type="text" name="value" value="<?php echo $item['item_name'] ?>"> <input type="hidden" name="id" value="<?php echo $item['id'] ?>"> <input type="submit" value="修改"></form><a class="big" href="<?php echo APP_URL ?>/item/index">返回</a>
update.php,更改记录,内容:
<a class="big" href="<?php echo APP_URL ?>/item/index">成功修改<?php echo $count ?>项,点击返回</a>
delete.php,删除记录,内容:
<a href="<?php echo APP_URL ?>/item/index">成功删除<?php echo $count ?>项,点击返回</a>4.5 应用测试
这样,在浏览器中访问 todo 程序:http://localhost/todo/item/index/,就可以看到效果了。

以上代码已经全部发布到 github 上,关键部分加航了注释,仓库地址:https://github.com/yeszao/fastphp,欢迎克隆、提交。
要设计更好的MVC,或使用得更加规范,请看《MVC架构的职责划分原则》。
 PHP Tutorial
 parentnode usage
 What currency is STAKE?
 How to restore videos that have been officially removed from Douyin
 How to repair lsp
 What should I do if my computer won't turn on?
 What is the transfer limit of Alipay?
 How to open the download permission of Douyin
 Java environment variable configuration tutorial


