

The following editor will bring you an article on how to implement [HTML element] embedding images. The editor thinks it’s pretty good, so I’ll share it with you now and give it as a reference. Let’s follow the editor and take a look. The img element allows us to embed images in HTML documents.
To embed an image, you need to use the src and alt attributes. The code is as follows:
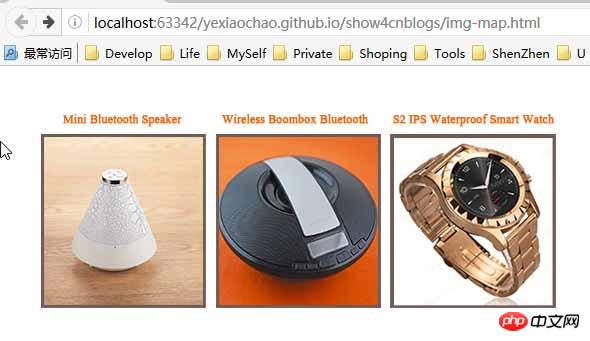
<img src="../img/example/img-map.jpg" alt="Products Image" width="580" height="266" />
Display effect:
XML/HTML Code
Copy content to the clipboard
<a href="otherpage.html">
    <img src="../img/example/img-map.jpg" ismap alt="Products Image" width="580" height="266" />
</a>
Copy content to clipboard
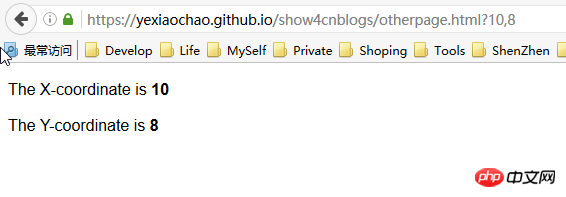
https://yexiaochao.github.io/show4cnblogs/otherpage.html?10,8
Copy the content to the clipboard
<body>
<p>The X-coordinate is <b><span id="xco">??</span></b></p>
<p>The Y-coordinate is <b><span id="yco">??</span></b></p>
<script type="application/javascript">
var coords = window.location.href.split('?')[1].split(',');
document.getElementById("xco").innerHTML = coords[0];
document.getElementById("yco").innerHTML = coords[1];
</script>
</body>The server-side partition response graph usually means that the server will react differently based on the area the user clicks on the image, such as returning different response information. If the ismap attribute on the img element is omitted, the coordinates of the mouse click will not be included in the request URL.
2 Create a client-side partition response graph
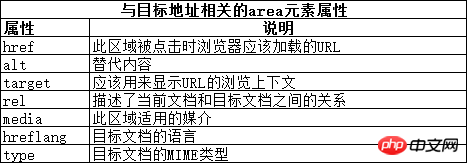
We can create a client-side partition response graph and let the browser navigate to different URLs by clicking on different areas on an image. This process does not need to be bootstrapped through a server, so elements are used to define the various areas on the image and the behavior they represent. The key element of the client-side partition response graph is map. The map element contains one or more area elements, each of which represents a clickable area on the image.The attributes of the area element can be divided into two categories. The first category deals with the URL that the browser will navigate to after the image area represented by the area is clicked by the user. The diagram below illustrates this class of properties, which are similar to corresponding properties seen on other elements.
The second category contains more interesting attributes: shape and coords attributes. You can use these attributes to indicate various areas of the image that the user can click on. The shape and coords properties work together. The meaning of the coords attribute depends on the value of the shape attribute, as shown in the figure below:
After introducing these elements, for example, the code is as follows:
<body>
<img src="../img/example/img-map.jpg" ismap alt="Products Image" usemap="#mymap" width="580" height="266" />
<map name="mymap">
<area href="javascript:show_page(1)" shape="rect" coords="'34,60,196,230" alt="product 1" />
<area href="javascript:show_page(2)" shape="rect" coords="'210,60,370,230" alt="product 2" />
<area href="javascript:show_page(3)" shape="rect" coords="'383,60,545,230" alt="product 3" />
</map>
<script type="application/javascript">
function show_page(num){
//通过对话框显示产品,表示对应的跳转页面
alert("This is product "+num);
}
</script>
</body>The display effect is the same, just click on the corresponding For product pictures, the corresponding product name will pop up, indicating the jumped product page. 


![[Web front-end] Node.js quick start](https://img.php.cn/upload/course/000/000/067/662b5d34ba7c0227.png)


