Let's talk about what exactly Canvas is
The HTML5 standard has been out for a long time, but it seems that Canvas is not used in too many places now. A very important reason is that the standard of Canvas has not been completely determined and is not suitable for large-scale use in production environments. However, the advantages of Canvas are also very obvious. For example, when drawing charts containing a large number of elements, SVG is often unable to do the job due to performance issues. For example, in the lottery session of a technology sharing meeting I saw, although the effect was relatively dazzling, it was not possible because of the performance issues. Each avatar is a DOM, and the animation is controlled by CSS3, resulting in very low performance. In addition, with the improvement of hardware performance, functions such as video screenshots and image processing can gradually be implemented on web pages. Most websites use Flash, but the performance of Flash is not high on Mac computers, and you need to learn some additional knowledge. . Canvas uses JavaScript directly for drawing and is Mac-friendly, so it can be regarded as a successor to Flash.
Use Canvas
Having said so much, what exactly is Canvas?
Canvas in English means "canvas", but the Canvas mentioned here is a new element in HTML5, on which developers can draw a series of graphics. The way Canvas is written in an HTML file is very simple:
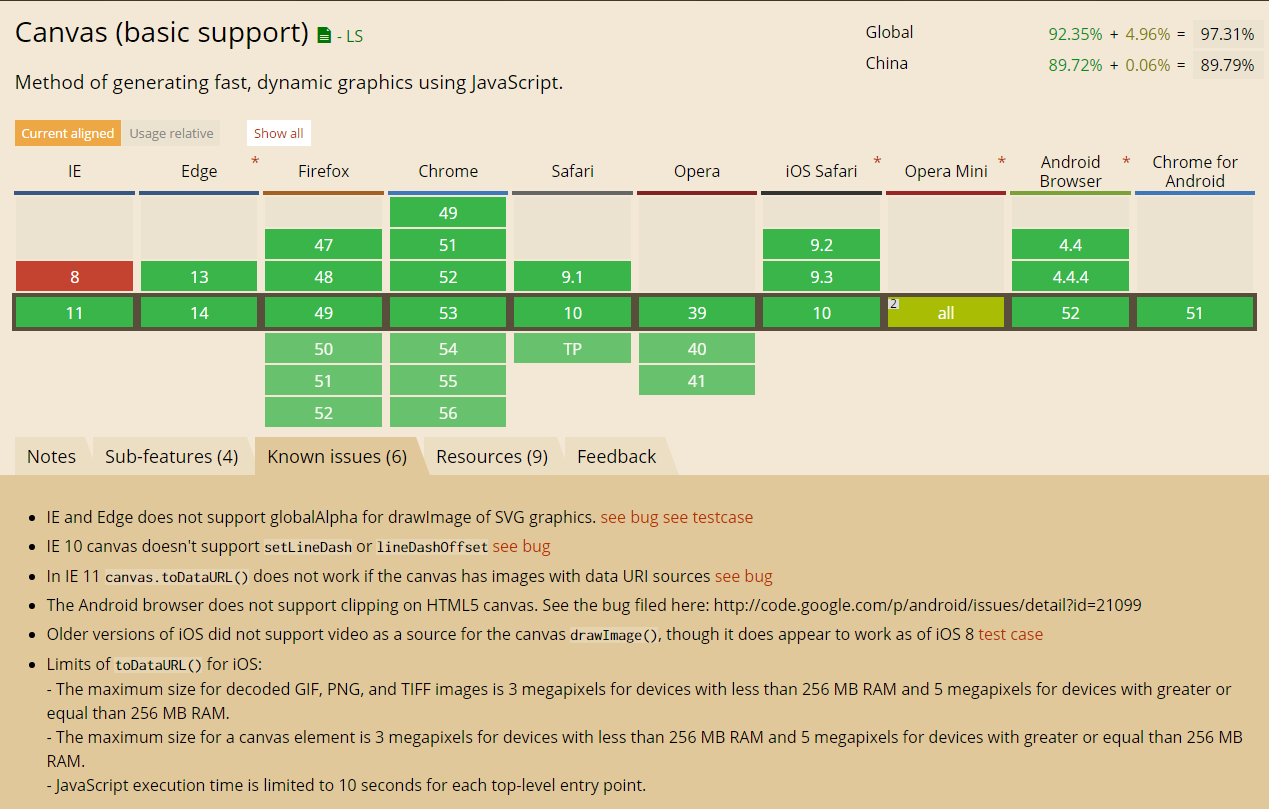
The id attribute can be used by all HTML elements. The only attributes that come with Canvas are the last two (controlling width and height respectively), and there are no others. . As for compatibility, CanIUse stated above that the basic functions are currently supported by 90% of the browsers used by users, so in most cases it can be used with confidence.

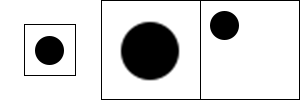
Note that you must use the width and height properties that come with Canvas. Do not use CSS to control it, because CSS control will cause the Canvas to deform. You can try to compare it with PhptpShop. The latter changes the "image size", while the former is the correct way to change the "canvas size". For example, the picture below is a horizontal splicing of three pictures: the black box on the far left is the original picture with a size of 50px * 50px; the middle is the effect of changing the image size to 100px * 100px. The image becomes blurry, but for the image itself It is said that the coordinate range has not become larger; the rightmost one is the correct 100px * 100px Canvas.

Canvas Most of the drawing methods have nothing to do with the
We first get this element:
var canvas = document.getElementById('canvas');
Then we use a method to get the entrance that can call all Canvas APIs:
var ctx = canvas.getContext('2d');
When you see 2d, are you excited and think about 3d? There is no way to write 3D, but if you want to open the door to the 3D world, you can write canvas.getContext('webgl'). However, WebGL is a set of standards based on OpenGL ES 2.0, which is completely different from this article, so it will not be discussed here.
The basic concepts in Canvas
Coordinates
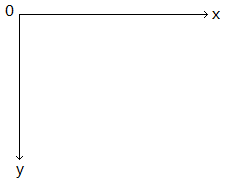
are not the same as the common Cartesian coordinate system in mathematics. The coordinate system of Canvas is a common coordinate system in computers. It looks like this:

The upper left corner of the canvas The angle is (0,0), x increases to the right, y increases downward, and x and y are both integers (even if they are not integers during calculation, they will be treated as integers when drawing), and the unit is pixels.
绘图
带大家怀旧一下。不知道有多少同学小时候玩过 logo 语言,在里面你可以控制一只小海龟在一块板子上行走、画画、提笔、落笔。Canvas 中也一样,你需要控制一只画笔的移动和绘制。然而 Canvas 更高级一些,你可以直接利用一些函数来画图,不用去控制那只画笔的位置。
Canvas 中的基本图形
通过上文定义的 ctx 变量可以干许多有意思的事情,我们先看看如何绘制一些基本图形。
线条
我们指定画笔移动到某一点,然后告诉画笔需要从当前这一点画到另一点。我们可以让画笔多次移动、绘制,最后统一输出到屏幕上。例子如下:
ctx.moveTo(10, 10);
ctx.lineTo(150, 50);
ctx.lineTo(10, 50);
ctx.moveTo(10, 20);
ctx.lineTo(40, 70);
ctx.stroke();
上面的代码中,lineTo 是产生线条用的函数,执行完之后画笔就移到了线条的终点。需要注意的是,线条此时并没有显示在屏幕上,必须调用 stroke 才会显示。这样设计是有道理的,因为向屏幕上输出内容需要耗费大量的资源,我们完全可以先攒够一波 lineTo,最后用 stroke 放一个大的。
路径
绘制路径非常简单,只需要先告诉 ctx 一声“我要开始画路径了”,然后通过各种方法(例如 lineTo)绘制路径。如果需要画一个封闭路径,那就最后告诉 ctx一声:“我画完了,你把它封闭起来吧。”当然,不要忘记利用 stroke 输出到屏幕上。
一个简单的例子:
ctx.beginPath();
ctx.moveTo(10, 10);
ctx.lineTo(150, 50);
ctx.lineTo(10, 50);
ctx.closePath();
ctx.stroke();
如果我不想只描绘路径线条,而是想填充整个路径呢?可以将最后一行的 stroke 改成 fill,这样就跟使用了画图中的油漆桶一样,封闭路径里面的内容就都被填充上颜色了:
ctx.fill();
弧 / 圆形
绘制弧的函数参数比较多:
ctx.arc(圆心 x 坐标, 圆心 y 坐标, 半径, 起始角度, 终止角度, 是否为逆时针);
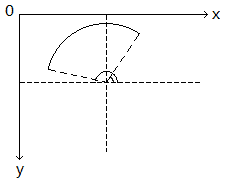
注意,在 Canvas 的坐标系中,角的一边是以圆心为中心的水平向右的直线。角度单位均为弧度。例如下图,确定了圆心、起始角度(图中标明的锐角)和终止角度(图中标明的钝角),方向为逆时针,于是就有了这么一个弧。如果方向为顺时针,那么就会是一个跟它互补的、非常非常大的弧……

所以如果转了 2π 圈之后,弧就成了圆形,因此也可以使用绘制弧的方式来绘制圆形:
ctx.beginPath();
ctx.arc(圆心 x 坐标, 圆心 y 坐标, 半径, 0, Math.PI * 2, true);
ctx.closePath();
最后一个参数随便填(当然也可以不填),因为不管是顺时针还是逆时针,转了 2π 圈之后都是一个圆。
矩形
如果只是想绘制一个横平竖直的矩形,可以使用下面的两个方法:
// 只描边
ctx.strokeRect(左上角 x 坐标, 左上角 y 坐标, 宽度, 高度);
// 只填充
ctx.fillRect(左上角 x 坐标, 左上角 y 坐标, 宽度, 高度);
线条样式 / 填充样式
之前绘制的所有图形都是黑色的,但是 Canvas 肯定不止这么一种颜色(不然标准的制定者会被喷的很惨)。事实上,Canvas 可以单独设置线条样式和填充样式,分别使用的是 strokeStyle 和 fillStyle。可能的值有三种:纯色、渐变、图像。既然线条样式与填充样式的使用方法相同,那么下面统一以填充样式为例。如果想设置线条样式,直接将所有的 fillStyle 改成 strokeStyle 即可,里面的参数都不变。
/* 纯色填充 */
// 普通的颜色
ctx.fillStyle = '#0000ff';
// 带有透明度的颜色
ctx.fillStyle = 'rgba(64, 0, 127, 0.5)';

/* 渐变填充 */
// 设置渐变的尺寸(参数分别为起始点的 x 和 y、终止点的 x 和 y)
var gradient = ctx.createLinearGradient(0, 0, 170, 0);
// 设置过渡色,第一个参数是渐变的位置,第二个参数是颜色
gradient.addColorStop(0, 'magenta');
gradient.addColorStop(0.5, 'blue');
gradient.addColorStop(1.0, 'red');
// 设置填充样式
ctx.fillStyle = gradient;

/* 图片填充 */
// 创建图片
var image = new Image;
image.src = '/path/to/image.png';
// 创建图片笔触,可以指定图片的平铺方式,这里是横向平铺
var pattern = ctx.createPattern(image, 'repeat-x');
// 设置笔触填充
ctx.fillStyle = pattern;
关于渐变,除了代码中提到的线性渐变以外,还有 createRadialGradient,也就是径向渐变。
设置完填充样式之后,就可以使用 fill 来填充啦!如果设置的是线条样式,那么就可以使用 stroke 来描边。
当然,对于线条样式,还有个额外的方法叫 lineWidth 可以用来控制线条的宽度。
文字
要想在画布上画文字,首先需要知道所使用的字体和字号:
ctx.font = '30px Verdana';
然后就可以通过 strokeText 或者 fillText 来对字体描边或者填充字体。
ctx.strokeText("Hello Coding!", 23, 33);
ctx.fillText("Hello Coding!", 23, 66);图片
在 Canvas 中绘制图片有三种方法:
// 指定绘制位置
ctx.drawImage(image, x, y);
// 指定绘制位置和图像宽高
ctx.drawImage(image, x, y, width, height);
// 指定剪裁区域、绘制位置和图像宽高
ctx.drawImage(image, sx, sy, swidth, sheight, x, y, width, height);
参数的含义依次如下:
image:   要使用的 Image、Canvas 或 Video
sx:      可选,开始剪切的 x 坐标
sy:      可选,开始剪切的 y 坐标
swidth:  可选,被剪切图像的宽度
sheight: 可选,被剪切图像的高度
x:       在画布上放置图像的 x 坐标
y:       在画布上放置图像的 y 坐标
width:   可选,要使用的图像的宽度
height:  可选,要使用的图像的高度
画布设置
细心的同学可能会发现,刚才有些属性是直接对 ctx 变量做设置,例如 ctx.lineWidth,只要设置了它,那么后续画出来的线条全都是这么个宽度。
其实,Canvas 的设置项还有许多,例如我们可以直接移动画布、旋转画布、设置全局的绘制透明度等等。这些设置还可以随时保存和恢复。
要注意的一点是,所有已经画在画布上的东西,是已经定死了的,不管之后再次进行任何设置都不会再改变。这个很像 Windows 下的画图程序。
废话不多说,直接上代码:
// 移动画布,其实就是移动坐标系
ctx.translate(往右移动的量, 往下移动的量);
// 旋转画布,旋转中心为坐标系原点
ctx.rotate(顺时针旋转的角度);
// 以坐标系原点为中心缩放画布
ctx.scale(横向放大倍数, 纵向放大倍数);
// 设置绘制透明度,如果 fillStyle 等属性设置了透明度则会叠加
ctx.globalAlpha(零到一的小数);
// 设置全局组合操作
ctx.globalCompositeOperation = 'lighter';
// 保存当前设置
ctx.save();
// 恢复上次保存的设置
ctx.restore();
移动、旋转、缩放其实就是在控制绘图的坐标系,如果你在调用这三个方法的时候,脑子里时刻有一个带刻度的坐标系,效果会非常好。
In fact, the coordinate transformation of Canvas follows the knowledge of computer graphics: transformation matrix. Simply put, a coordinate can be regarded as a matrix. The coordinate transformation can be realized by multiplying the matrix corresponding to the coordinate by the transformation matrix. In order to improve the efficiency of calculation, you can first calculate the transformation matrix after combining several transformations, and then directly transform the current coordinate system through the transform function, or reset the coordinate system to its initial state through the setTransform function and then perform the transformation. As for the content of the transformation matrix, it is a bit out of scope for this article.
The global combination operation is a bit like the "mixing option" in PhotoShop. The specific implementation method has not been completely determined. Currently, the common browsers have unified implementation methods: source-over, source-atop, destination-over, destination- out, lighter, xor. Specific behaviors can be found in Mozilla's official documentation, but since the standard has not yet been fully determined, other browsers do not guarantee that all behaviors will be consistent with Mozilla's standards. Generally speaking, the more common ones are source-over and lighter, and the standards of these two are undisputed in the browser industry.
As for saving and restoring settings, it’s a bit fun. First, you need to understand something called “stack”.
The stack is a one-dimensional array that can only be operated from one direction. The stack is empty at the beginning. We can push elements into the array from this direction, and we can only pop out the last element (the top element of the stack) from this direction. Apart from this, there are no extra operations. Of course, the number of pops cannot be more than the number of pushes, because when the pop reaches the bottom of the stack, there are no elements in the stack, and it is meaningless to pop again at this time. The stack has many uses, such as bracket matching, expression evaluation, depth-first search, and even function calls in most languages use the stack.
Every time we call the save function, we actually push the current global settings onto a special stack. Every time we call the restore function, we pop out the last saved content and use it to overwrite the current global settings, so that the top of the stack This is the most recently saved content. Saving and restoring are useful in some situations. For example, I need to draw a crooked figure and then continue to draw the upright figure. In this way, I can call save first, then rotate, and then restore after drawing the figure and continue. Draw other shapes.
In fact, Canvas has many methods, such as toDataURL directly converts the content on the current canvas into hexadecimal data-url, getImageData directly converts the image into an RGBA array for use by image processing algorithms, and putImageData converts the RGBA array into The picture is displayed on the canvas and so on. If coupled with regular JavaScript updates (preferably using requestAnimationFrame instead of setInterval), animation effects can be produced. There are also many Canvas libraries on the Internet that allow programmers to more easily write their own special effects or functions based on Canvas. Here I want to say something: How powerful is everyone’s imagination, how powerful Canvas is~

Hot AI Tools

Undresser.AI Undress
AI-powered app for creating realistic nude photos

AI Clothes Remover
Online AI tool for removing clothes from photos.

Undress AI Tool
Undress images for free

Clothoff.io
AI clothes remover

AI Hentai Generator
Generate AI Hentai for free.

Hot Article

Hot Tools

Notepad++7.3.1
Easy-to-use and free code editor

SublimeText3 Chinese version
Chinese version, very easy to use

Zend Studio 13.0.1
Powerful PHP integrated development environment

Dreamweaver CS6
Visual web development tools

SublimeText3 Mac version
God-level code editing software (SublimeText3)

Hot Topics
 1386
1386
 52
52
 What is the purpose of the <progress> element?
Mar 21, 2025 pm 12:34 PM
The article discusses the HTML <progress> element, its purpose, styling, and differences from the <meter> element. The main focus is on using <progress> for task completion and <meter> for stati
 Is HTML easy to learn for beginners?
Apr 07, 2025 am 12:11 AM
HTML is suitable for beginners because it is simple and easy to learn and can quickly see results. 1) The learning curve of HTML is smooth and easy to get started. 2) Just master the basic tags to start creating web pages. 3) High flexibility and can be used in combination with CSS and JavaScript. 4) Rich learning resources and modern tools support the learning process.
 What is the purpose of the <datalist> element?
Mar 21, 2025 pm 12:33 PM
The article discusses the HTML <datalist> element, which enhances forms by providing autocomplete suggestions, improving user experience and reducing errors.Character count: 159
 What is the purpose of the <meter> element?
Mar 21, 2025 pm 12:35 PM
The article discusses the HTML <meter> element, used for displaying scalar or fractional values within a range, and its common applications in web development. It differentiates <meter> from <progress> and ex
 What is the viewport meta tag? Why is it important for responsive design?
Mar 20, 2025 pm 05:56 PM
The article discusses the viewport meta tag, essential for responsive web design on mobile devices. It explains how proper use ensures optimal content scaling and user interaction, while misuse can lead to design and accessibility issues.
 What is the purpose of the <iframe> tag? What are the security considerations when using it?
Mar 20, 2025 pm 06:05 PM
The article discusses the <iframe> tag's purpose in embedding external content into webpages, its common uses, security risks, and alternatives like object tags and APIs.
 The Roles of HTML, CSS, and JavaScript: Core Responsibilities
Apr 08, 2025 pm 07:05 PM
HTML defines the web structure, CSS is responsible for style and layout, and JavaScript gives dynamic interaction. The three perform their duties in web development and jointly build a colorful website.
 What is an example of a starting tag in HTML?
Apr 06, 2025 am 12:04 AM
AnexampleofastartingtaginHTMLis,whichbeginsaparagraph.StartingtagsareessentialinHTMLastheyinitiateelements,definetheirtypes,andarecrucialforstructuringwebpagesandconstructingtheDOM.


