How to implement the front-end cropping and uploading image function
Since the front-end cannot directly operate local files, either the user clicks to select files or drags and drops, or uses third-party controls such as flash. However, flash is declining day by day, so the use of flash is still not recommended. At the same time, the rise of HTML5 provides a lot of API control. You can use the native API on the front end to process images, which can reduce the pressure on the back-end server and is also user-friendly.
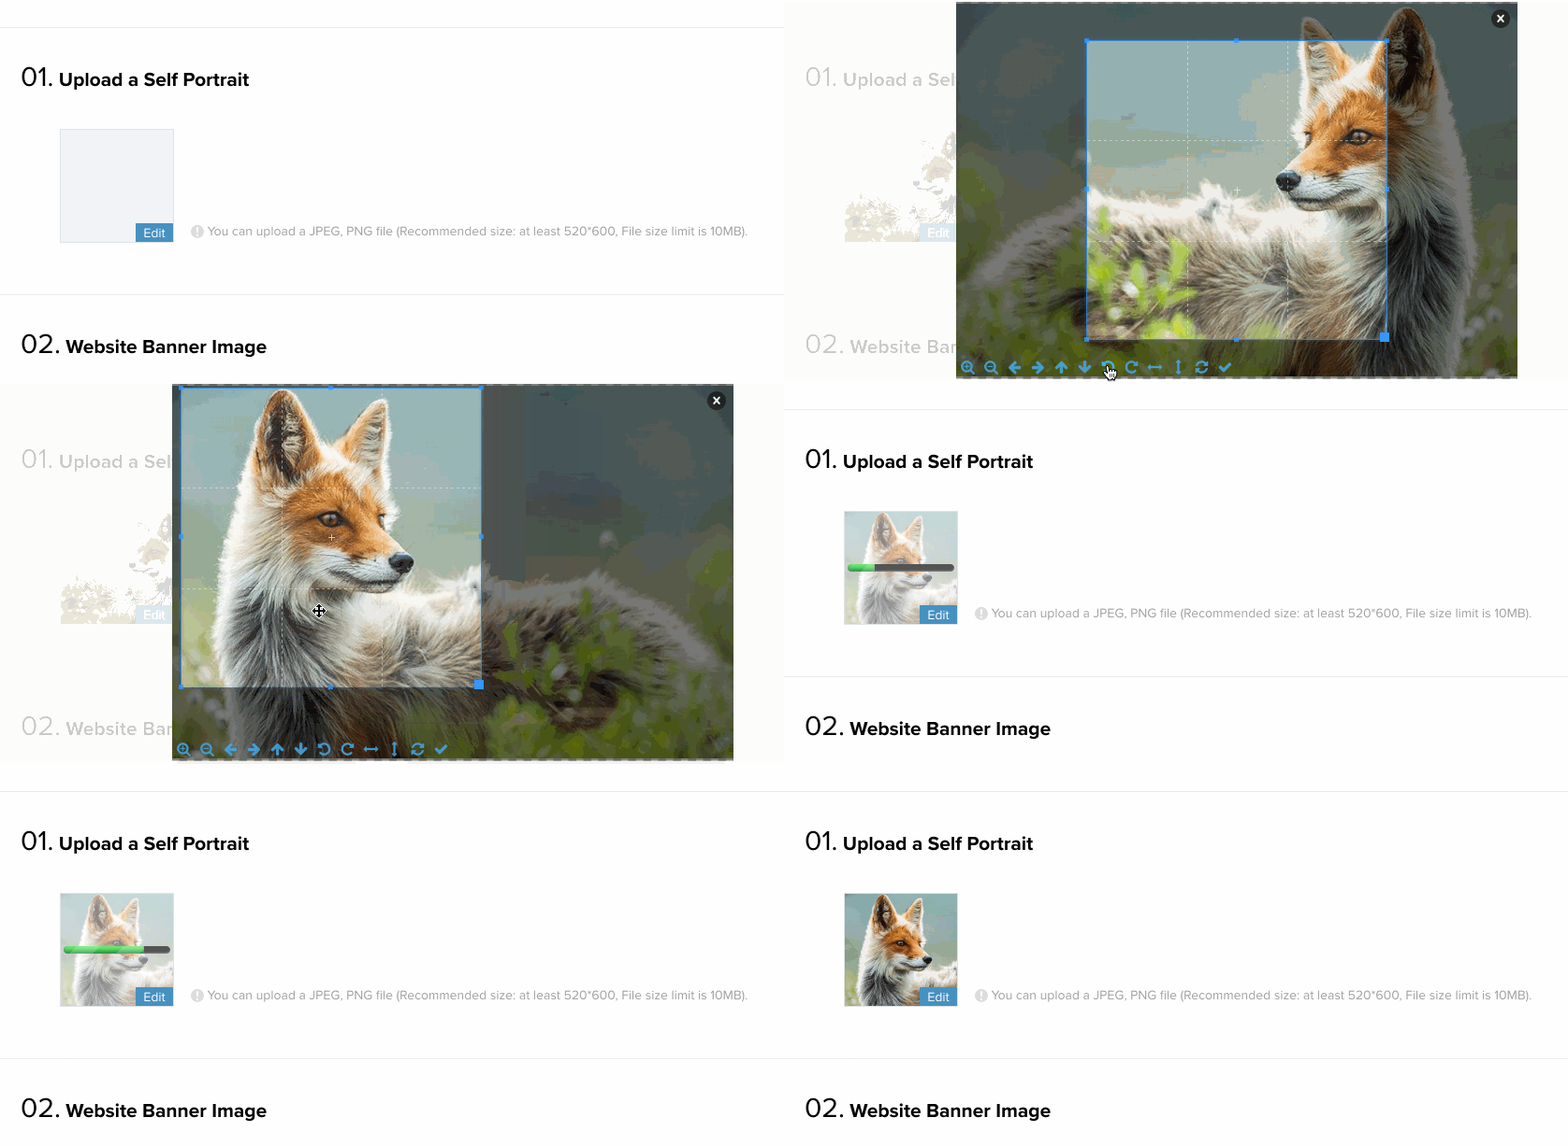
The final effect is as follows:

There are several functions in it, the first is to support drag and drop, the second is to compress, the third is to crop and edit, the fourth is to upload and upload progress display, below The implementation of each function is introduced in turn:
1. Drag and drop to display pictures
The drag and drop reading function is mainly to listen to the drag event of html5. There is nothing to say about this. You will know how to do it by checking the API. The main thing is How to read the image dragged over by the user and convert it to base64 for local display.
Listen to drag and drop events
varhandler={
    init:function($container){
        //需要把dragover的默认行为禁掉,不然会跳页
        $container.on("dragover",function(event){
            event.preventDefault();
        });
        $container.on("drop",function(event){
            event.preventDefault();
            //这里获取拖过来的图片文件,为一个File对象
            varfile=event.originalEvent.dataTransfer.files[0];
            handler.handleDrop($(this),file);
        });
     }
}The 10th line of the code obtains the image file, and then passes it to the 11th line for processing.
If input is used, listen to the change event of input:
        $container.on("change","input[type=file]",function(event){
            if(!this.value)return;
            varfile=this.files[0];
            handler.handleDrop($(this).closest(".container"),file);
            this.value="";
});In line 3 of the code, obtain the File object and also pass it to handleDrop for processing
Next, in the handleDrop function, read the content of the file and transfer it Into base64 format:
handleDrop:function($container,file){
    var$img=  $container.find("img");
    handler.readImgFile(file,$img,$container);
},I added a readImgFile function in my code. There are many helper functions, mainly to disassemble large modules and reuse small modules.
Read the image file content in readImgFile:
Use FileReader to read the file
readImgFile:function(file,$img,$container){
    varreader=newFileReader(file);
    //检验用户是否选则是图片文件
    if(file.type.split("/")[0]!=="image"){
        util.toast("You should choose an image file");
        return;
    }
    reader.onload=function(event){
        varbase64=event.target.result;
        handler.compressAndUpload($img,base64,file,  $container);
    }
    reader.readAsDataURL(file);
}Here is reading the file content through FileReader, calling readAsDataURL. This API can convert the binary image content into base64 format and read After completion, the onload event will be triggered and displayed and uploaded in onload:
//获取图片base64内容
varbase64=event.target.result;
//如果图片大于1MB,将body置半透明
if(file.size>ONE_MB){
    $("body").css("opacity",0.5);
}
//因为这里图片太大会被卡一下,整个页面会不可操作
$img.attr("src",baseUrl);
//还原
if(file.size>ONE_MB){
    $("body").css("opacity",1);
}
//然后再调一个压缩和上传的函数
handler.compressAndUpload($img,file,$container);If the image is several Mb in size, it will be stuck when displayed in line 8 above. The author has tried to use web worker multi-threading to solve the problem, but due to Multithreading does not have a window object, and it cannot operate DOM, so it cannot solve this problem well. A compensatory measure has been taken: by making the page blank, it tells the user that it is currently being processed and the page is not operable. Please wait for a while
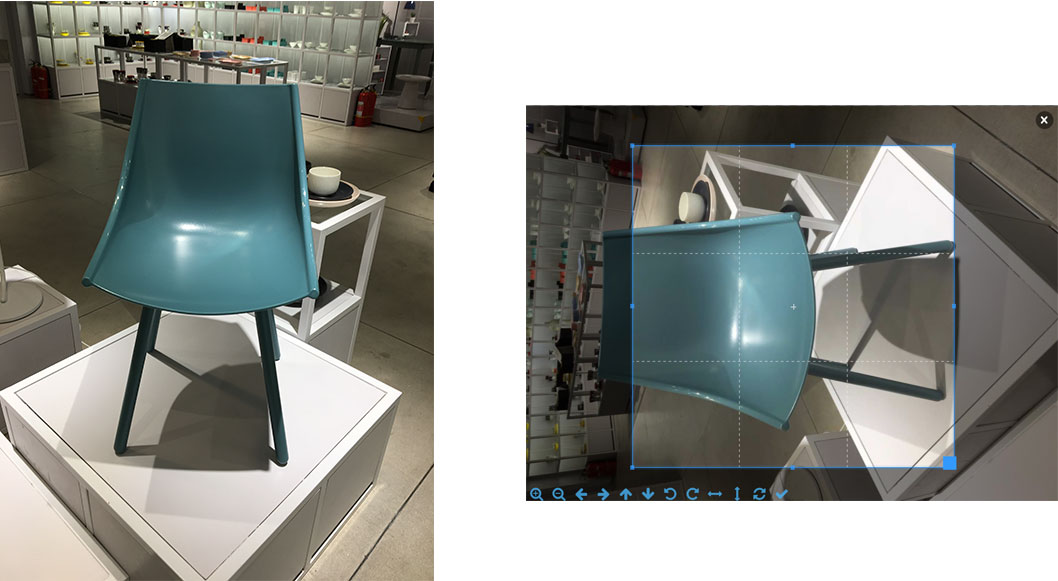
There is another problem here, that is, if the photos taken by the iOS system are not taken horizontally, the display There will be problems with the rotation angle of the photos taken. The following photo taken vertically reads like this:

That is, no matter how you take it, the actual pictures saved by iOS are placed horizontally, so the user needs to Manually rotate. The angle of rotation is placed in the exif data structure. You can know the angle of rotation by reading this out. Use an EXIF library to read it:
Read exif information
readImgFile:function(file,$img,$container){
    EXIF.getData(file,function(){
        varorientation=this.exifdata.Orientation,
            rotateDeg=0;
        //如果不是ios拍的照片或者是横拍的,则不用处理,直接读取
        if(typeoforientation==="undefined"||orientation===1){
            //原本的readImgFile,添加一个rotateDeg的参数
            handler.doReadImgFile(file,$img,$container,rotateDeg);
        }
        //否则用canvas旋转一下
        else{
            rotateDeg=orientation===6?90*Math.PI/180:
                            orientation===8?-90*Math.PI/180:
                            orientation===3?180*Math.PI/180:0;
            handler.doReadImgFile(file,$img,$container,rotateDeg);
        }
    });
}After knowing the angle, you can use canvas Processed, the following compressed pictures will be explained, because compression also uses canvas
2. Compressed pictures
Compressed pictures can use canvas. Canvas can easily achieve compression. The principle is to draw a picture into a A small canvas, and then export the content of the canvas to base64, you can get a compressed picture:
//设定图片最大压缩宽度为1500px
varmaxWidth=1500;
varresultImg=handler.compress($img[0],maxWidth,file.type);
compress function performs compression. In this function, first create a canvas object, and then calculate the size of the canvas Size:
compress:function(img,maxWidth,mimeType){
    //创建一个canvas对象
    varcvs=document.createElement('canvas');
    varwidth=img.naturalWidth,
        height=img.naturalHeight,
        imgRatio=width/height;
    //如果图片维度超过了给定的maxWidth 1500,
    //为了保持图片宽高比,计算画布的大小
    if(width>maxWidth){
        width=maxWidth;
        height=width/imgRatio;
    }
    cvs.width=width;
    cvs.height=height;
}Next, draw the large picture onto a small canvas, and then export:
Compression processing
    //把大图片画到一个小画布
    varctx=cvs.getContext("2d").drawImage(img,0,0,img.naturalWidth,img.naturalHeight,0,0,width,height);
    //图片质量进行适当压缩
    varquality=width>=1500?0.5:
                    width>600?0.6:1;
    //导出图片为base64
    varnewImageData=cvs.toDataURL(mimeType,quality);

    varresultImg=newImage();
    resultImg.src=newImageData;
returnresultImg;The last line returns a compressed small picture, and the picture can be cropped.
Before explaining the cropping, since the second point mentioned that the photos taken on iOS need to be rotated, they can be processed together when compressing. In other words, if you need to rotate, then draw it on the canvas and rotate it:
rotate canvas
varctx=cvs.getContext("2d");
vardestX=0,
    destY=0;
if(rotateDeg){
    ctx.translate(cvs.width/2,cvs.height/2);
    ctx.rotate(rotateDeg);
    destX=-width/2,
    destY=-height/2;
}
ctx.drawImage(img,0,0,img.naturalWidth,img.naturalHeight,destX,destY,width,height);This solves the problem of ios image rotation. After getting a rotated and compressed image, Then use it for cropping and editing
3. Crop pictures
Crop pictures. I found a plug-in cropper on the Internet. This plug-in is quite powerful and supports cropping, rotation, and flipping, but it does not actually process the pictures, it just records them. Know what transformations the user has made, and then handle it yourself. The transformed data can be passed to the backend for processing. Here we handle it on the front end because we don't have to be compatible with IE8.
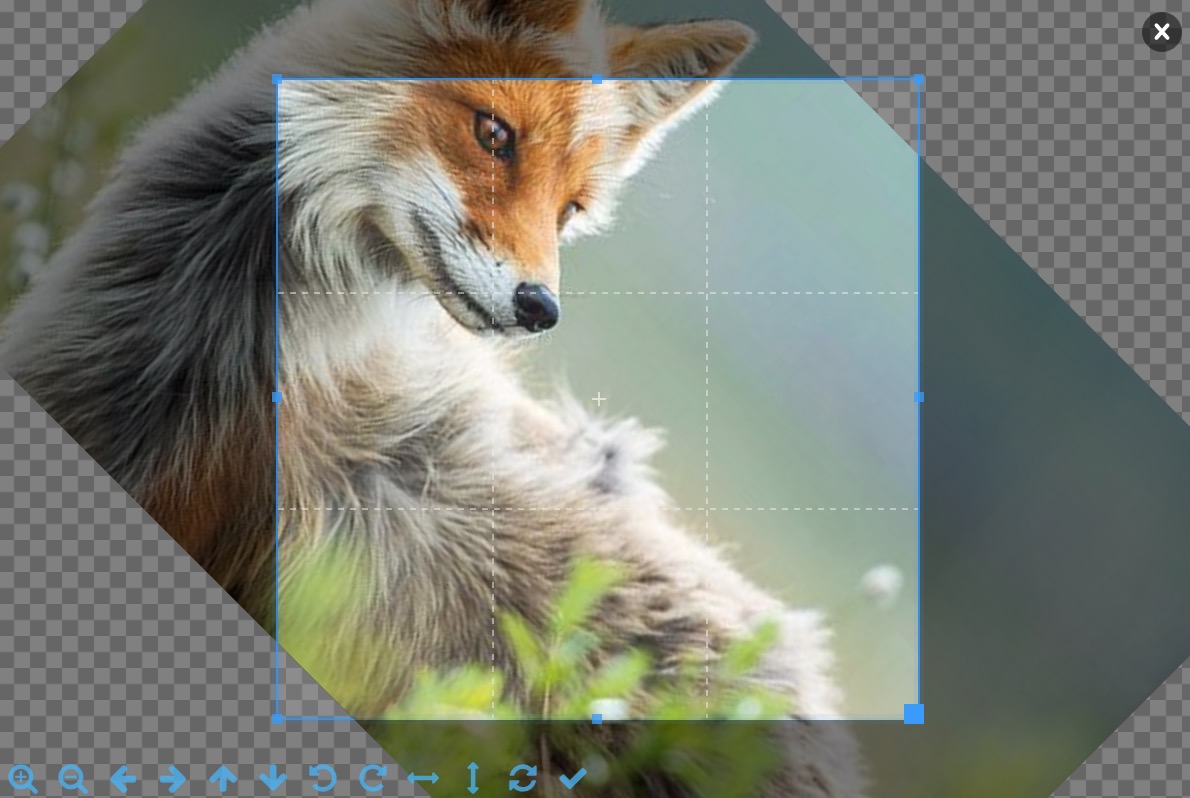
如下,我把一张图片,旋转了一下,同时翻转了一下:

它的输出是:
{
    height:319.2000000000001,
    rotate:45,
    scaleX:-1,
    scaleY:1,
    width:319.2000000000001
    x:193.2462838120872
    y:193.2462838120872
}通过这些信息就知道了:图片被左右翻转了一下,同时顺时针转了45度,还知道裁剪选框的位置和大小。通过这些完整的信息就可以做一对一的处理。
在展示的时候,插件使用的是img标签,设置它的css的transform属性进行变换。真正的处理还是要借助canvas,这里分三步说明:
1. 假设用户没有进行旋转和翻转,只是选了简单地选了下区域裁剪了一下,那就简单很多。最简单的办法就是创建一个canvas,它的大小就是选框的大小,然后根据起点x、y和宽高把图片相应的位置画到这个画布,再导出图片就可以了。由于考虑到需要翻转,所以用第二种方法,创建一个和图片一样大小的canvas,把图片原封不动地画上去,然后把选中区域的数据imageData存起来,重新设置画布的大小为选中框的大小,再把imageData画上去,最后再导出就可以了:
简单裁剪实现
varcvs=document.createElement('canvas');
varimg=$img[0];
varwidth=img.naturalWidth,
    height=img.naturalHeight;
cvs.width=width;
cvs.height=height;

varctx=cvs.getContext("2d");
vardestX=0,
    destY=0;
ctx.drawImage(img,destX,destY);

//把选中框里的图片内容存起来
varimageData=ctx.getImageData(cropOptions.x,cropOptions.y,cropOptions.width,cropOptions.height);
cvs.width=cropOptions.width;
cvs.height=cropOptions.height;
//然后再画上去
ctx.putImageData(imageData,0,0);代码14行,通过插件给的数据,保存选中区域的图片数据,18行再把它画上去
2. 如果用户做了翻转,用上面的结构很容易可以实现,只需要在第11行drawImage之前对画布做一下翻转变化:
canvas flip实现
//fip
if(cropOptions.scaleX===-1||cropOptions.scaleY===-1){
    destX=cropOptions.scaleX===-1?width*-1:0;      // Set x position to -100% if flip horizontal
    destY=cropOptions.scaleY===-1?height*-1:0;     // Set y position to -100% if flip vertical
    ctx.scale(cropOptions.scaleX,cropOptions.scaleY);
}
ctx.drawImage(img,destX,destY);其它的都不用变,就可以实现上下左右翻转了,难点在于既要翻转又要旋转
3. 两种变换叠加没办法直接通过变化canvas的坐标,一次性drawImage上去。还是有两种办法,第一种是用imageData进行数学变换,计算一遍得到imageData里面,从第一行到最后一行每个像素新的rgba值是多少,然后再画上去;第二种办法,就是创建第二个canvas,第一个canvas作翻转,把它的结果画到第二个canvas,然后再旋转,最后导到。由于第二种办法相对比较简单,我们采取第二种办法:
同上,在第一个canvas画完之后:
实现旋转、翻转结合
ctx.drawImage(img,destX,destY);
//rotate
if(cropOptions.rotate!==0){
    varnewCanvas=document.createElement("canvas"),
        deg=cropOptions.rotate/180*Math.PI;
    //旋转之后,导致画布变大,需要计算一下
    newCanvas.width=Math.abs(width*Math.cos(deg))+Math.abs(height*Math.sin(deg));
    newCanvas.height=Math.abs(width*Math.sin(deg))+Math.abs(height*Math.cos(deg));
    varnewContext=newCanvas.getContext("2d");
    newContext.save();
    newContext.translate(newCanvas.width/2,newCanvas.height/2);
    newContext.rotate(deg);
    destX=-width/2,
    destY=-height/2;
    //将第一个canvas的内容在经旋转后的坐标系画上来
    newContext.drawImage(cvs,destX,destY);
    newContext.restore();
    ctx=newContext;
    cvs=newCanvas;
}将第二步的代码插入第一步,再将第三步的代码插入第二步,就是一个完整的处理过程了。
最后再介绍下上传
4. 文件上传和上传进度
文件上传只能通过表单提交的形式,编码方式为multipart/form-data,这个我在《三种上传文件不刷新页面的方法讨论:iframe/FormData/FileReader》已做详细讨论,可以通过写一个form标签进行提交,但也可以模拟表单提交的格式,表单提交的格式在那篇文章已提及。
首先创建一个ajax请求:
varxhr=newXMLHttpRequest();
xhr.open('POST',upload_url,true);
varboundary='someboundary';
xhr.setRequestHeader('Content-Type','multipart/form-data; boundary='+boundary);
并设置编码方式,然后拼表单格式的数据进行上传:
ajax上传
vardata=img.src;
data=data.replace('data:'+file.type+';base64,','');
xhr.sendAsBinary([
    //name=data
    '--'+boundary,
        'Content-Disposition: form-data; name="data"; filename="'+file.name+'"',
        'Content-Type: '+file.type,'',
        atob(data),'--'+boundary,
    //name=docName
    '--'+boundary,
        'Content-Disposition: form-data; name="docName"','',
        file.name,
    '--'+boundary+'--'
].join('\r\n'));表单数据不同的字段是用boundary的随机字符串分隔的。拼好之后用sendAsBinary发出去,在调这个函数之前先监听下它的事件,包括
1) 上传的进度:
xhr.upload.onprogress=function(event){
    if(event.lengthComputable){
        duringCallback((event.loaded/event.total)*100);
    }
};这里凋duringCallback的回调函数,给这个回调函数传了当前进度的参数,用这个参数就可以设置进度条的过程了。进度条可以自己实现,或者直接上网找一个,随便一搜就有了。
2) 成功和失败:
xhr.onreadystatechange=function(){
    if(this.readyState==4){
        if(this.status==200){
            successCallback(this.responseText);
        }elseif(this.status>=400){
            if(errorCallback&&  errorCallback instanceofFunction){
                errorCallback(this.responseText);
            }
        }
    }
};这个上传功能参考了一个JIC插件
至此整个功能就拆解说明完了,上面的代码可以兼容到IE10,FileReader的api到IE10才兼容,问题应该不大,因为微软都已经放弃了IE11以下的浏览器,为啥我们还要去兼容呢。
这个东西一来减少了后端的压力,二来不用和后端来回交互,对用户来说还是比较好的,除了上面说的一个地方会被卡一下之外。核心代码已在上面说明,完整代码和demo就不再放出来了。

Hot AI Tools

Undresser.AI Undress
AI-powered app for creating realistic nude photos

AI Clothes Remover
Online AI tool for removing clothes from photos.

Undress AI Tool
Undress images for free

Clothoff.io
AI clothes remover

AI Hentai Generator
Generate AI Hentai for free.

Hot Article

Hot Tools

Notepad++7.3.1
Easy-to-use and free code editor

SublimeText3 Chinese version
Chinese version, very easy to use

Zend Studio 13.0.1
Powerful PHP integrated development environment

Dreamweaver CS6
Visual web development tools

SublimeText3 Mac version
God-level code editing software (SublimeText3)

Hot Topics
 1385
1385
 52
52
 How to run the h5 project
Apr 06, 2025 pm 12:21 PM
Running the H5 project requires the following steps: installing necessary tools such as web server, Node.js, development tools, etc. Build a development environment, create project folders, initialize projects, and write code. Start the development server and run the command using the command line. Preview the project in your browser and enter the development server URL. Publish projects, optimize code, deploy projects, and set up web server configuration.
 What exactly does H5 page production mean?
Apr 06, 2025 am 07:18 AM
H5 page production refers to the creation of cross-platform compatible web pages using technologies such as HTML5, CSS3 and JavaScript. Its core lies in the browser's parsing code, rendering structure, style and interactive functions. Common technologies include animation effects, responsive design, and data interaction. To avoid errors, developers should be debugged; performance optimization and best practices include image format optimization, request reduction and code specifications, etc. to improve loading speed and code quality.
 How to make h5 click icon
Apr 06, 2025 pm 12:15 PM
The steps to create an H5 click icon include: preparing a square source image in the image editing software. Add interactivity in the H5 editor and set the click event. Create a hotspot that covers the entire icon. Set the action of click events, such as jumping to the page or triggering animation. Export H5 documents as HTML, CSS, and JavaScript files. Deploy the exported files to a website or other platform.
 What is the H5 programming language?
Apr 03, 2025 am 12:16 AM
H5 is not a standalone programming language, but a collection of HTML5, CSS3 and JavaScript for building modern web applications. 1. HTML5 defines the web page structure and content, and provides new tags and APIs. 2. CSS3 controls style and layout, and introduces new features such as animation. 3. JavaScript implements dynamic interaction and enhances functions through DOM operations and asynchronous requests.
 What application scenarios are suitable for H5 page production
Apr 05, 2025 pm 11:36 PM
H5 (HTML5) is suitable for lightweight applications, such as marketing campaign pages, product display pages and corporate promotion micro-websites. Its advantages lie in cross-platformity and rich interactivity, but its limitations lie in complex interactions and animations, local resource access and offline capabilities.
 How to make pop-up windows with h5
Apr 06, 2025 pm 12:12 PM
H5 pop-up window creation steps: 1. Determine the triggering method (click, time, exit, scroll); 2. Design content (title, text, action button); 3. Set style (size, color, font, background); 4. Implement code (HTML, CSS, JavaScript); 5. Test and deployment.
 Is H5 page production a front-end development?
Apr 05, 2025 pm 11:42 PM
Yes, H5 page production is an important implementation method for front-end development, involving core technologies such as HTML, CSS and JavaScript. Developers build dynamic and powerful H5 pages by cleverly combining these technologies, such as using the <canvas> tag to draw graphics or using JavaScript to control interaction behavior.
 What Does H5 Refer To? Exploring the Context
Apr 12, 2025 am 12:03 AM
H5referstoHTML5,apivotaltechnologyinwebdevelopment.1)HTML5introducesnewelementsandAPIsforrich,dynamicwebapplications.2)Itsupportsmultimediawithoutplugins,enhancinguserexperienceacrossdevices.3)SemanticelementsimprovecontentstructureandSEO.4)H5'srespo


