
 Web Front-end
JS Tutorial
Bootstrap Ace template worth sharing to achieve menu and tab page effects_javascript skills
Web Front-end
JS Tutorial
Bootstrap Ace template worth sharing to achieve menu and tab page effects_javascript skills
Bootstrap Ace template worth sharing to achieve menu and tab page effects_javascript skills

This article shares the menu style and iframe-based Tab page effect using the Ace template in the project.
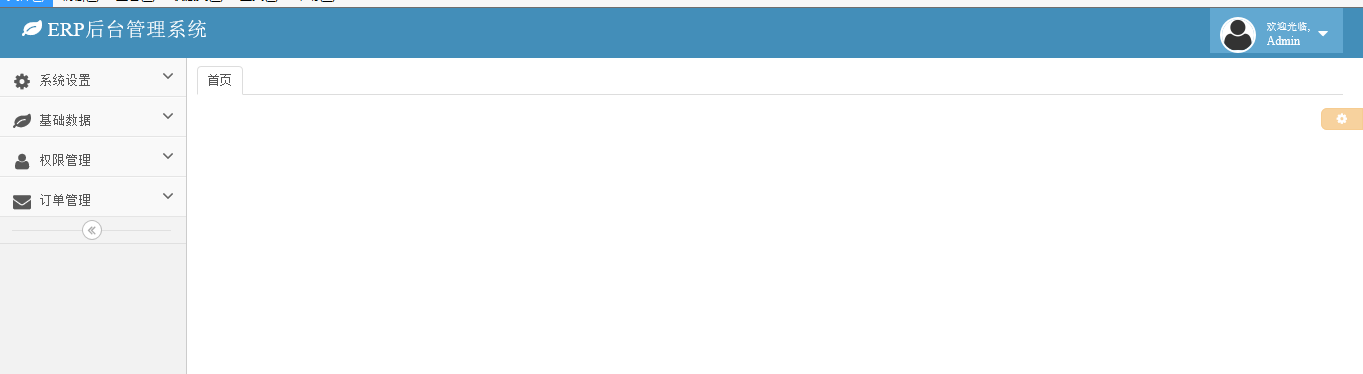
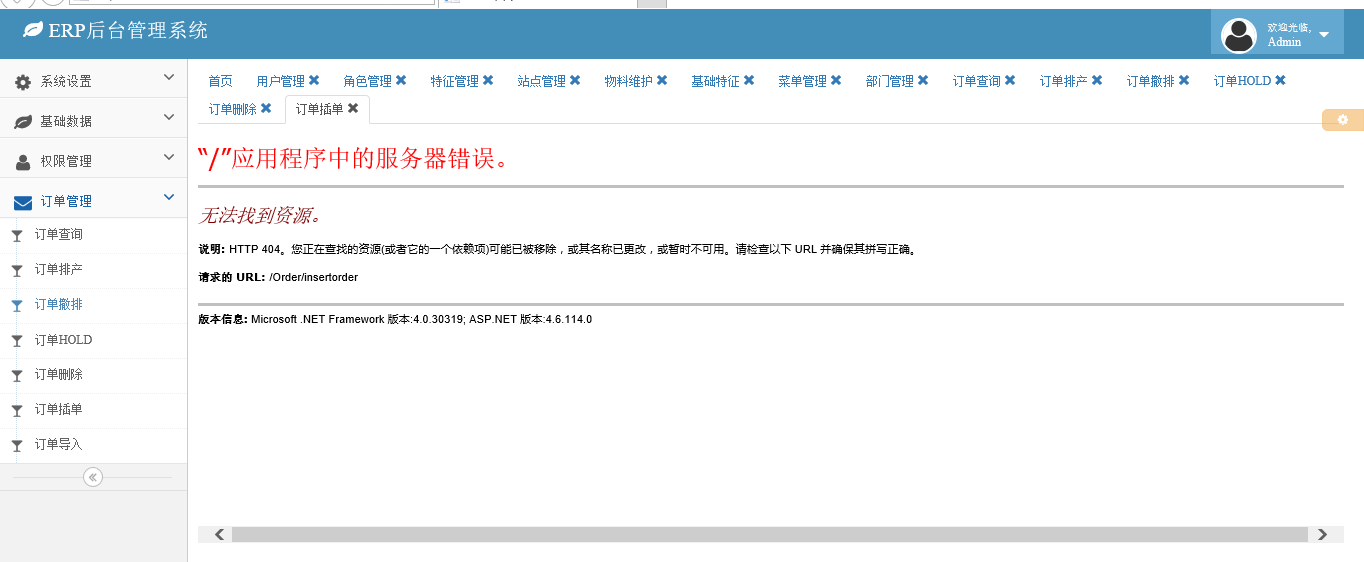
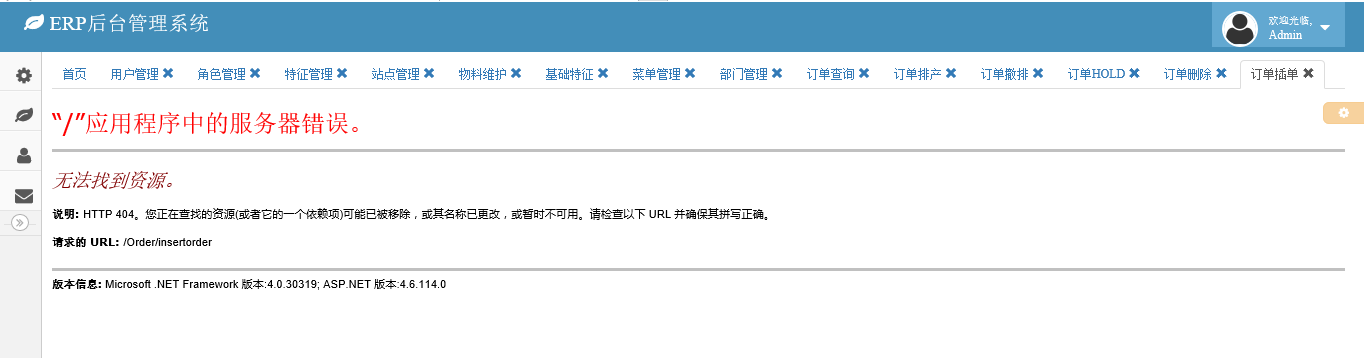
1. Effect display
After struggling for a long time, I finally extracted the menu style and Tab page effects from the project.
1. The effect of initial loading
2. Expand menu (supports multi-level expansion, code introduction below)
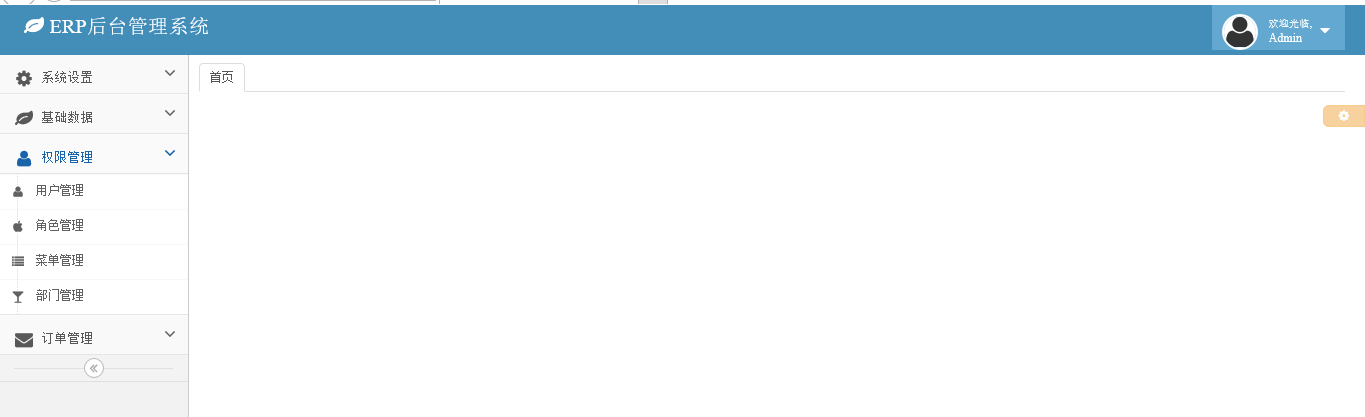
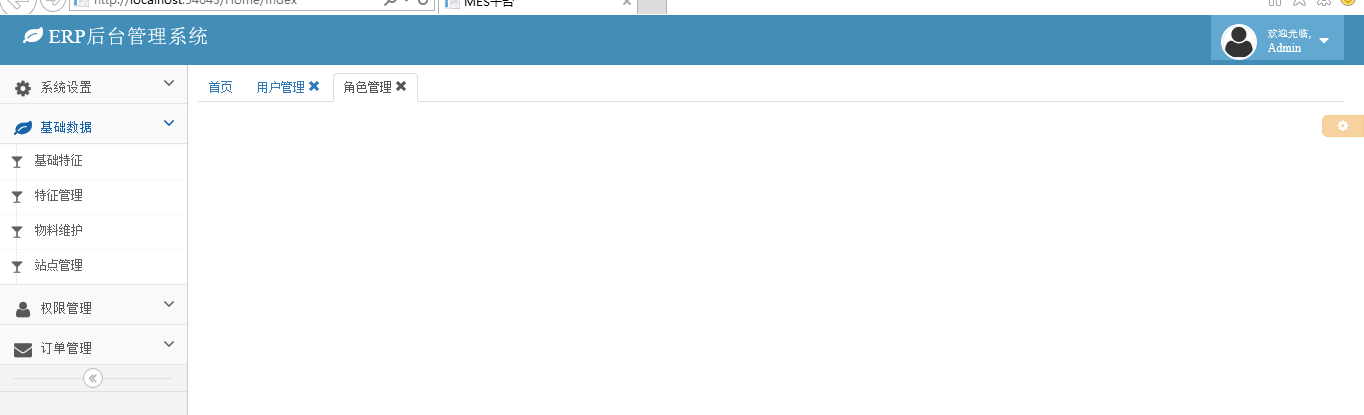
3. Click the submenu to open the corresponding page in the form of a Tab page
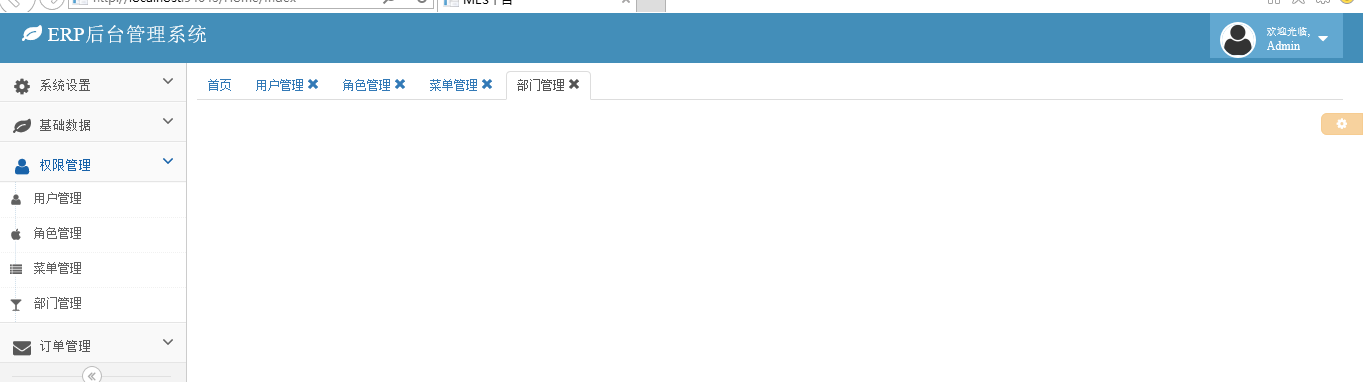
4. Support menu folding
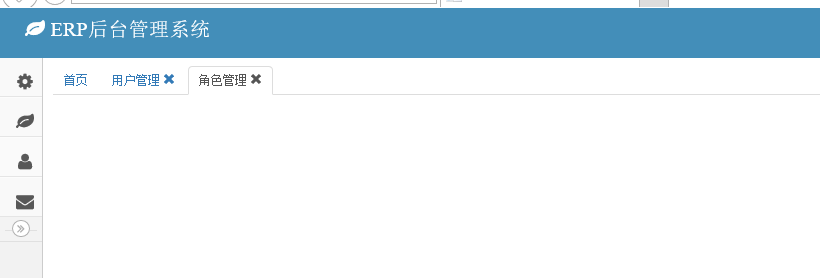
5. When there are too many open menus, they will automatically wrap into new lines and display automatically after folding
2. Code examples
There are ready-made things that are very convenient to use. Generally speaking, the functions of the Bootstrap Ace template are relatively powerful and support various terminal devices. This article mainly uses the effect of its menu. Let’s take a look at the implementation code of the Ace template menu effect.
1. Menu effect
Since Ace is based on Bootstrap, you first need to reference the jquery and bootstrap components. Let's take a general look at which files it needs to reference.
<script src="/Scripts/jquery-1.9.1.min.js"></script>

  <script src="/Content/bootstrap/js/bootstrap.min.js"></script>
  <link href="/Content/bootstrap/css/bootstrap.min.css" rel="stylesheet" />

  <link href="/Content/font-awesome/css/font-awesome.min.css" rel="stylesheet" />
  <link href="/Content/ace/css/ace-rtl.min.css" rel="stylesheet" />
  <link href="/Content/ace/css/ace-skins.min.css" rel="stylesheet" />
  <link href="/Content/sidebar-menu/sidebar-menu.css" rel="stylesheet"/>

  <script src="/Content/ace/js/ace-extra.min.js"></script>
  <script src="/Content/ace/js/ace.min.js"></script>

  <script src="/Content/sidebar-menu/sidebar-menu.js"></script>
Haha, it looks like there are quite a lot. Except for the last js file () which is encapsulated by the blogger himself, the others are basically the feature components required by the components. . Take a look at which html tags should be placed on the page:
 <div class="sidebar" id="sidebar">
        <ul class="nav nav-list" id="menu"></ul>
        <div class="sidebar-collapse" id="sidebar-collapse">
          <i class="icon-double-angle-left" data-icon1="icon-double-angle-left" data-icon2="icon-double-angle-right"></i>
        </div>
      </div>
Let’s take a look at the encapsulation method in the sidebar-menu.js file:
(function ($) {
  $.fn.sidebarMenu = function (options) {
    options = $.extend({}, $.fn.sidebarMenu.defaults, options || {});
    var target = $(this);
    target.addClass('nav');
    target.addClass('nav-list');
    if (options.data) {
      init(target, options.data);
    }
    else {
      if (!options.url) return;
      $.getJSON(options.url, options.param, function (data) {
        init(target, data);
      });
    }
    var url = window.location.pathname;
    //menu = target.find("[href='" + url + "']");
    //menu.parent().addClass('active');
    //menu.parent().parentsUntil('.nav-list', 'li').addClass('active').addClass('open');
    function init(target, data) {
      $.each(data, function (i, item) {
        var li = $('<li></li>');
        var a = $('<a></a>');
        var icon = $('<i></i>');
        //icon.addClass('glyphicon');
        icon.addClass(item.icon);
        var text = $('<span></span>');
        text.addClass('menu-text').text(item.text);
        a.append(icon);
        a.append(text);
        if (item.menus&&item.menus.length>0) {
          a.attr('href', '#');
          a.addClass('dropdown-toggle');
          var arrow = $('<b></b>');
          arrow.addClass('arrow').addClass('icon-angle-down');
          a.append(arrow);
          li.append(a);
          var menus = $('<ul></ul>');
          menus.addClass('submenu');
          init(menus, item.menus);
          li.append(menus);
        }
        else {
          var href = 'javascript:addTabs({id:\'' + item.id + '\',title: \'' + item.text + '\',close: true,url: \'' + item.url + '\'});';
          a.attr('href', href);
          //if (item.istab)
          //  a.attr('href', href);
          //else {
          //  a.attr('href', item.url);
          //  a.attr('title', item.text);
          //  a.attr('target', '_blank')
          //}
          li.append(a);
        }
        target.append(li);
      });
    }
  }

  $.fn.sidebarMenu.defaults = {
    url: null,
    param: null,
    data: null
  };
})(jQuery);
Call the sidebar-menu method directly on the page
$(function () {
      $('#menu').sidebarMenu({
        data: [{
          id: '1',
          text: '系统设置',
          icon: 'icon-cog',
          url: '',
          menus: [{
            id: '11',
            text: '编码管理',
            icon: 'icon-glass',
            url: '/CodeType/Index'
          }]
        }, {
          id: '2',
          text: '基础数据',
          icon: 'icon-leaf',
          url: '',
          menus: [{
            id: '21',
            text: '基础特征',
            icon: 'icon-glass',
            url: '/BasicData/BasicFeature/Index'
          }, {
            id: '22',
            text: '特征管理',
            icon: 'icon-glass',
            url: '/BasicData/Features/Index'
          }, {
            id: '23',
            text: '物料维护',
            icon: 'icon-glass',
            url: '/Model/Index'
          }, {
            id: '24',
            text: '站点管理',
            icon: 'icon-glass',
            url: '/Station/Index'
          }]
        }, {
          id: '3',
          text: '权限管理',
          icon: 'icon-user',
          url: '',
          menus: [{
            id: '31',
            text: '用户管理',
            icon: 'icon-user',
            url: '/SystemSetting/User'
          }, {
            id: '32',
            text: '角色管理',
            icon: 'icon-apple',
            url: '/SystemSetting/Role'
          }, {
            id: '33',
            text: '菜单管理',
            icon: 'icon-list',
            url: '/SystemSetting/Menu'
          }, {
            id: '34',
            text: '部门管理',
            icon: 'icon-glass',
            url: '/SystemSetting/Department'
          }]
        }, {
          id: '4',
          text: '订单管理',
          icon: 'icon-envelope',
          url: '',
          menus: [{
            id: '41',
            text: '订单查询',
            icon: 'icon-glass',
            url: '/Order/Query'
          }, {
            id: '42',
            text: '订单排产',
            icon: 'icon-glass',
            url: '/Order/PLANTPRODUCT'
          }, {
            id: '43',
            text: '订单撤排',
            icon: 'icon-glass',
            url: '/Order/cancelPRODUCT'
          }, {
            id: '44',
            text: '订单HOLD',
            icon: 'icon-glass',
            url: '/Order/hold'
          }, {
            id: '45',
            text: '订单删除',
            icon: 'icon-glass',
            url: '/Order/delete'
          }, {
            id: '47',
            text: '订单插单',
            icon: 'icon-glass',
            url: '/Order/insertorder'
          }, {
            id: '48',
            text: '订单导入',
            icon: 'icon-glass',
            url: '/Order/Import'
          }]
        }]
      });
    });
A very important point to note here is about the small icon in front of the menu:
When the value of con is icon-user, a small icon as shown in the picture will be displayed on the menu. Of course, under normal circumstances, the menu must be loaded dynamically. If you need to get data from the background, you can call this method directly:
$('#menu').sidebarMenu({ url: "/api/UserApi/GetMenuByUser/", param: { strUser: 'admin' } });
That’s it, haha, it’s very simple.
2. Tab page effect
The effect of the Tab page is actually closely related to the left menu. First, let’s take a look at the js reference of the Tab page effect.
HTML tag of the page:
 <div class="main-content"><div class="page-content">
          <div class="row">
            <div class="col-xs-12" style="padding-left:5px;">
              <ul class="nav nav-tabs" role="tablist">
                <li class="active"><a href="#Index" role="tab" data-toggle="tab">首页</a></li>
              </ul>
              <div class="tab-content">
                <div role="tabpanel" class="tab-pane active" id="Index">
                </div>
              </div>
            </div>
          </div>
        </div>
      </div>
var addTabs = function (options) {
  //var rand = Math.random().toString();
  //var id = rand.substring(rand.indexOf('.') + 1);
  var url = window.location.protocol + '//' + window.location.host;
  options.url = url + options.url;
  id = "tab_" + options.id;
  $(".active").removeClass("active");
  //如果TAB不存在,创建一个新的TAB
  if (!$("#" + id)[0]) {
    //固定TAB中IFRAME高度
    mainHeight = $(document.body).height() - 90;
    //创建新TAB的title
    title = '<li role="presentation" id="tab_' + id + '"><a href="#' + id + '" aria-controls="' + id + '" role="tab" data-toggle="tab">' + options.title;
    //是否允许关闭
    if (options.close) {
      title += ' <i class="glyphicon glyphicon-remove" tabclose="' + id + '"></i>';
    }
    title += '</a></li>';
    //是否指定TAB内容
    if (options.content) {
      content = '<div role="tabpanel" class="tab-pane" id="' + id + '">' + options.content + '</div>';
    } else {//没有内容,使用IFRAME打开链接
      content = '<div role="tabpanel" class="tab-pane" id="' + id + '"><iframe src="' + options.url + '" width="100%" height="' + mainHeight +
          '" frameborder="no" border="0" marginwidth="0" marginheight="0" scrolling="yes" allowtransparency="yes"></iframe></div>';
    }
    //加入TABS
    $(".nav-tabs").append(title);
    $(".tab-content").append(content);
  }
  //激活TAB
  $("#tab_" + id).addClass('active');
  $("#" + id).addClass("active");
};
var closeTab = function (id) {
  //如果关闭的是当前激活的TAB,激活他的前一个TAB
  if ($("li.active").attr('id') == "tab_" + id) {
    $("#tab_" + id).prev().addClass('active');
    $("#" + id).prev().addClass('active');
  }
  //关闭TAB
  $("#tab_" + id).remove();
  $("#" + id).remove();
};
$(function () {
  mainHeight = $(document.body).height() - 45;
  $('.main-left,.main-right').height(mainHeight);
  $("[addtabs]").click(function () {
    addTabs({ id: $(this).attr("id"), title: $(this).attr('title'), close: true });
  });

  $(".nav-tabs").on("click", "[tabclose]", function (e) {
    id = $(this).attr("tabclose");
    closeTab(id);
  });
});
So, when is the Addtabs method called? The answer is when registering the menu click event. This part of the code is available when the sidebar-menu component is encapsulated earlier. You can look at it above.
The above is a display of the menu and Tab page effects of the bootstrap ace template. In general, the basic functions are available, but the style of the menu needs to be adjusted. For example, after clicking a menu, the clicked menu needs to be selected. status. If your project also uses the bootstrap style, study the ace template and try it out.

Hot AI Tools

Undresser.AI Undress
AI-powered app for creating realistic nude photos

AI Clothes Remover
Online AI tool for removing clothes from photos.

Undress AI Tool
Undress images for free

Clothoff.io
AI clothes remover

AI Hentai Generator
Generate AI Hentai for free.

Hot Article
Hot Tools

Notepad++7.3.1
Easy-to-use and free code editor

SublimeText3 Chinese version
Chinese version, very easy to use

Zend Studio 13.0.1
Powerful PHP integrated development environment

Dreamweaver CS6
Visual web development tools

SublimeText3 Mac version
God-level code editing software (SublimeText3)
Hot Topics
 1376
1376
 52
52

 How to do vertical centering of bootstrap
Apr 07, 2025 pm 03:21 PM
How to do vertical centering of bootstrap
Apr 07, 2025 pm 03:21 PM
Use Bootstrap to implement vertical centering: flexbox method: Use the d-flex, justify-content-center, and align-items-center classes to place elements in the flexbox container. align-items-center class method: For browsers that do not support flexbox, use the align-items-center class, provided that the parent element has a defined height.
 How to use bootstrap button
Apr 07, 2025 pm 03:09 PM
How to use bootstrap button
Apr 07, 2025 pm 03:09 PM
How to use the Bootstrap button? Introduce Bootstrap CSS to create button elements and add Bootstrap button class to add button text
 How to resize bootstrap
Apr 07, 2025 pm 03:18 PM
How to resize bootstrap
Apr 07, 2025 pm 03:18 PM
To adjust the size of elements in Bootstrap, you can use the dimension class, which includes: adjusting width: .col-, .w-, .mw-adjust height: .h-, .min-h-, .max-h-
 How to get the bootstrap search bar
Apr 07, 2025 pm 03:33 PM
How to get the bootstrap search bar
Apr 07, 2025 pm 03:33 PM
How to use Bootstrap to get the value of the search bar: Determines the ID or name of the search bar. Use JavaScript to get DOM elements. Gets the value of the element. Perform the required actions.
 How to set up the framework for bootstrap
Apr 07, 2025 pm 03:27 PM
How to set up the framework for bootstrap
Apr 07, 2025 pm 03:27 PM
To set up the Bootstrap framework, you need to follow these steps: 1. Reference the Bootstrap file via CDN; 2. Download and host the file on your own server; 3. Include the Bootstrap file in HTML; 4. Compile Sass/Less as needed; 5. Import a custom file (optional). Once setup is complete, you can use Bootstrap's grid systems, components, and styles to create responsive websites and applications.
 How to verify bootstrap date
Apr 07, 2025 pm 03:06 PM
How to verify bootstrap date
Apr 07, 2025 pm 03:06 PM
To verify dates in Bootstrap, follow these steps: Introduce the required scripts and styles; initialize the date selector component; set the data-bv-date attribute to enable verification; configure verification rules (such as date formats, error messages, etc.); integrate the Bootstrap verification framework and automatically verify date input when form is submitted.
 How to insert pictures on bootstrap
Apr 07, 2025 pm 03:30 PM
How to insert pictures on bootstrap
Apr 07, 2025 pm 03:30 PM
There are several ways to insert images in Bootstrap: insert images directly, using the HTML img tag. With the Bootstrap image component, you can provide responsive images and more styles. Set the image size, use the img-fluid class to make the image adaptable. Set the border, using the img-bordered class. Set the rounded corners and use the img-rounded class. Set the shadow, use the shadow class. Resize and position the image, using CSS style. Using the background image, use the background-image CSS property.
 How to view the date of bootstrap
Apr 07, 2025 pm 03:03 PM
How to view the date of bootstrap
Apr 07, 2025 pm 03:03 PM
Answer: You can use the date picker component of Bootstrap to view dates in the page. Steps: Introduce the Bootstrap framework. Create a date selector input box in HTML. Bootstrap will automatically add styles to the selector. Use JavaScript to get the selected date.
