Node.js development environment setup
1. Install the Linux system
(You can skip this step if you have installed Linux)
Recommended virtual machine options: VirtualBox or Vmware (Professional version permanent activation code: 5A02H-AU243-TZJ49-GTC7K-3C61N)
I use Vmware here .
After installing Vmware, click on New Virtual Machine, select to install the operating system later, and then configure it. The virtual machine settings are as follows:
{
Guest operating system: other;
Version: other 64-bit;
Virtual machine name: node.js;
Location: D: VMnode.js;
Other defaults;
}
The virtual machine is built and the configuration is as shown on the right. 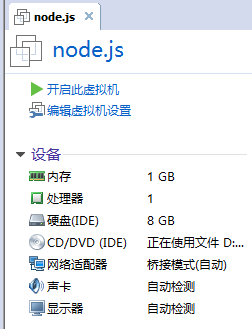
There is a problem that needs attention here: it is the network adapter of the virtual machine. I choose bridge mode here. In this mode, the operating system virtualized by VMWare is like an independent host in the LAN (the host and the virtual machine are in a peer-to-peer status), and it can access any machine in the network. (My host IP here is 192.168.1.49 and the virtual machine IP is 192.168.1.59). If your network environment is not suitable for bridging, please select NAT mode.
Then download the image. I choose centos as the system here. Of course, other Linux systems are also available. Directly click on the first one on Baidu centos download, and then download DVDISO. About 4GB.
After downloading the image, click Virtual Machine Settings and select the ISO image file in the CD/DVD tab.
Click Start, go to our virtual machine and select the first one to start the installation.
1. The installation process is in progress, use the default language (English), and then click continue to continue.
2. Click here 
to select Basic Web Server, select Development Tools on the right, and then click Done to return.

3. Click  , although it is the default and selected here, you still need to click again to select
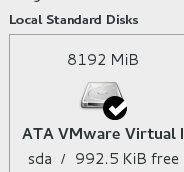
and then click the button in the lower right corner to start the installation. .
While waiting for the installation, click 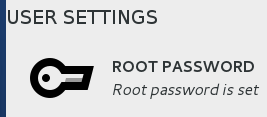 to start setting the administrator password. After setting up, wait for the installation to complete, about 3-5 minutes. After the installation is complete, click the reboot button to restart.
Username after restart: root Password: The password you just set during the installation process.
CENTOS is now installed. Let’s simply make some settings.
Use vi to modify the network card configuration file in the etc/sysconfig/network-scripts/ directory, and modify the last ONBOOT to yes. Because by default in centos7, the network card is turned off. After the modification is completed, wq save and exit. As shown in the figure below
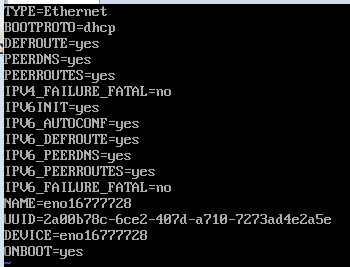
After modifying the configuration file, enter the command systemctl restart network to restart the virtual machine network.
Enter the command ifconfig and you can see that the IP address has been obtained.
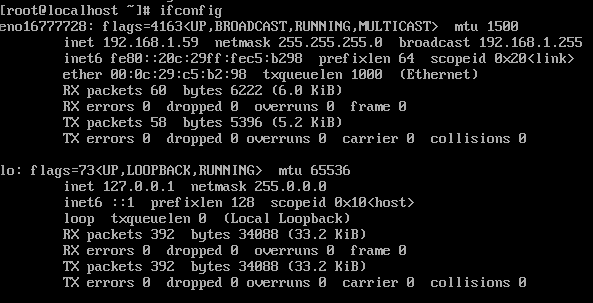
If you are worried, you can also try pinging www.baidu.com. At this time, the virtual machine has been connected to the external network.
2. Nodejs and related software installation
First write an xshell installation. (Optional, not installing will not affect Nodejs development)
xshell: Xshell can be used to access remote servers under different systems under the Windows interface, so as to better achieve the purpose of remote control of the terminal.
Please download from Baidu, and click Next to install.
Personally, I find it easier to use. After the installation is complete, click New, enter the name node, host node, port number 22, and then enter the login name root and password to enter centos. Because the virtual machine here is bridged, so that the IP of the virtual machine will not change in the future, I added 192.168.1.59 node at the end of the C:WindowsSystem32driversetchosts file. In the future, the IP of the virtual machine will be fixed here to facilitate subsequent development.
/*****************I am the willful dividing line*******************************/
Now install a few things in centos (must!)
1. Install an epel, enter the command yum install epel-release
2. To install nodejs, enter the command yum install nodejs. After the download and installation is completed, enter the command node --version to check whether the version number is installed.
3. To install the mongodb server, enter the command yum install mongodb-server
4. To install the mongodb client, enter the command yum install mongodb, wait for the download and installation to complete, enter the command mongo --version to check whether the version number is installed
5. To install redis, enter the command yum install redis. After waiting for the download and installation to complete, enter the command redis-cli --version to check whether the version number is installed.
node.js
After all the above steps are completed, the development environment for node.js is completed. It deserves applause and congratulations! ! !
Three.node test run
Let’s simply write a small program to run it.
vim test.js
var name = "qin";console.log("hello "+name);wq Save and exit, enter the command node test.js to see the results.

Hot AI Tools

Undresser.AI Undress
AI-powered app for creating realistic nude photos

AI Clothes Remover
Online AI tool for removing clothes from photos.

Undress AI Tool
Undress images for free

Clothoff.io
AI clothes remover

AI Hentai Generator
Generate AI Hentai for free.

Hot Article

Hot Tools

Notepad++7.3.1
Easy-to-use and free code editor

SublimeText3 Chinese version
Chinese version, very easy to use

Zend Studio 13.0.1
Powerful PHP integrated development environment

Dreamweaver CS6
Visual web development tools

SublimeText3 Mac version
God-level code editing software (SublimeText3)

Hot Topics
 How to delete node in nvm
Dec 29, 2022 am 10:07 AM
How to delete node with nvm: 1. Download "nvm-setup.zip" and install it on the C drive; 2. Configure environment variables and check the version number through the "nvm -v" command; 3. Use the "nvm install" command Install node; 4. Delete the installed node through the "nvm uninstall" command.
 How to use express to handle file upload in node project
Mar 28, 2023 pm 07:28 PM
How to handle file upload? The following article will introduce to you how to use express to handle file uploads in the node project. I hope it will be helpful to you!
 How to do Docker mirroring of Node service? Detailed explanation of extreme optimization
Oct 19, 2022 pm 07:38 PM
During this period, I was developing a HTML dynamic service that is common to all categories of Tencent documents. In order to facilitate the generation and deployment of access to various categories, and to follow the trend of cloud migration, I considered using Docker to fix service content and manage product versions in a unified manner. . This article will share the optimization experience I accumulated in the process of serving Docker for your reference.
 An in-depth analysis of Node's process management tool 'pm2”
Apr 03, 2023 pm 06:02 PM
This article will share with you Node's process management tool "pm2", and talk about why pm2 is needed, how to install and use pm2, I hope it will be helpful to everyone!
 Pi Node Teaching: What is a Pi Node? How to install and set up Pi Node?
Mar 05, 2025 pm 05:57 PM
Detailed explanation and installation guide for PiNetwork nodes This article will introduce the PiNetwork ecosystem in detail - Pi nodes, a key role in the PiNetwork ecosystem, and provide complete steps for installation and configuration. After the launch of the PiNetwork blockchain test network, Pi nodes have become an important part of many pioneers actively participating in the testing, preparing for the upcoming main network release. If you don’t know PiNetwork yet, please refer to what is Picoin? What is the price for listing? Pi usage, mining and security analysis. What is PiNetwork? The PiNetwork project started in 2019 and owns its exclusive cryptocurrency Pi Coin. The project aims to create a one that everyone can participate
 Let's talk about how to use pkg to package Node.js projects into executable files.
Dec 02, 2022 pm 09:06 PM
How to package nodejs executable file with pkg? The following article will introduce to you how to use pkg to package a Node project into an executable file. I hope it will be helpful to you!
 Token-based authentication with Angular and Node
Sep 01, 2023 pm 02:01 PM
Authentication is one of the most important parts of any web application. This tutorial discusses token-based authentication systems and how they differ from traditional login systems. By the end of this tutorial, you will see a fully working demo written in Angular and Node.js. Traditional Authentication Systems Before moving on to token-based authentication systems, let’s take a look at traditional authentication systems. The user provides their username and password in the login form and clicks Login. After making the request, authenticate the user on the backend by querying the database. If the request is valid, a session is created using the user information obtained from the database, and the session information is returned in the response header so that the session ID is stored in the browser. Provides access to applications subject to
 How to configure and install node.js in IDEA? Brief analysis of methods
Dec 21, 2022 pm 08:28 PM
How to run node in IDEA? The following article will introduce to you how to configure, install and run node.js in IDEA. I hope it will be helpful to you!


