1. Canvas drawing
Steps
Add canvas element, define id and range
Get the canvas element in js
Get the 2D drawing environment through the getContext() method
Through different functions Carry out graphics drawing
Coordinate positioning
The drawn graphics positioning is based on the upper left corner of the canvas as the (0,0) origin
Draw a straight line
moveTo(): Specify the starting point
lineTo(): Draw a straight line from the starting point to the specified coordinates
stroke(): Implement the function of drawing a straight line
fill(): Implement the filling function
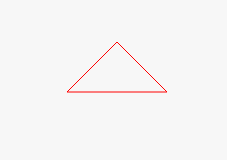
Example: Draw a triangle
html Code
<body> <canvas id="canvas"></canvas> </body>
js code
window.onload = function(){ var canvas = document.getElementById("canvas");
  canvas.width = 800;
  canvas.height = 800; var context  = canvas.getContext('2d');
  context.strokeStyle = "red";
  context.moveTo(100, 100);
  context.lineTo(200, 100);
  context.lineTo(150,50);
  context.lineTo(100,100);
  context.stroke();
};
Draw a rectangle
fillStyle(): Set the rectangle fill color.
fillRect(x,y,width,height).
strokeStyle(): Set the rectangle outline color.
strokeRect(x,y,width,height).
Draw a circle (arc)
beginPath(): Start drawing the route
arc(x,y,radius,startAngle,endAngle,anticlockwise)
Set the drawing center point, radius, starting point starting angle, ending angle and drawing direction.
Bezier Curve
Quadratic Bezier Curve
quadraticCurveTo(cp1x,cp1y,x,y)
cp1x,cp1y represents a control point coordinate; x,y represents the end point coordinates.
Cubic Bezier Curve
bezierCurveTo(cp1x,cp1y,cp2x,cp2y,x,y)
cp1x, cp1y and cp2x, cp2y respectively represent
two control points.
Example 1: Draw a five-pointed star
window.onload = function() { var canvas = document.getElementById("canvas"); var context = canvas.getContext('2d');
    drawStar(context, 120, 120, 80, 30, 10, "yellow", 0);
} function drawStar(context, x, y, R, r, width, color, rotation) {
    context.beginPath(); for (var i = 0; i < 5; i++) {
        context.lineTo(Math.cos((18 + i * 72 - rotation) / 180 * Math.PI) * R + x, -Math.sin((18 + i * 72 - rotation) / 180 * Math.PI) * R + y);
        context.lineTo(Math.cos((54 + i * 72 - rotation) / 180 * Math.PI) * r + x, -Math.sin((54 + i * 72 - rotation) / 180 * Math.PI) * r + y);
    }
    context.closePath();
    context.lineWidth = width;
    context.fillStyle = color;
    context.fill();
}
Example 2: Draw the BMW logo
window.onload = function() { var canvas = document.getElementById("canvas");
    canvas.width = 800;
    canvas.height = 800; var context = canvas.getContext('2d'); //圆心坐标x,y  内圆半径r  外圆半径R var x = 100; var y = 100; var r = 100; var R = r + 50; var colors = Array("#87CEFA", "#FAFAFA", "#000");
    context.beginPath();
    context.translate(100, 100);
    context.arc(x, y, R, 0, Math.PI * 2);
    line_gra = context.createLinearGradient(-10, -10,20, 50);
    line_gra.addColorStop(0, "#ddd");
    line_gra.addColorStop(1, "#262626");
    context.lineWidth = 3;
    context.strokeStyle = "#000";
    context.fillStyle = line_gra;
    context.closePath();
    context.stroke();
    context.fill();
    drawBigRound(context, x, y, r, 53, "#ADD8E6", 7);
    drawBm(context, x, y, r, colors);
    drawBigRound(context, x, y, r, 3, "#9FB6CD", 5);
    context.beginPath();
    context.fillStyle = "#fff";
    context.font = "bold 40px verdana";
    context.fillText("M", 80, -10);
    context.rotate(Math.PI / 6);
    context.fillText("W", 125, -75);
    context.rotate(-(Math.PI / 2));
    context.fillText("B", 0, 35);
    context.restore();
} function drawBm(context, x, y, r, colors) { var color; for (var i = 0; i < 4; i++) {
        context.beginPath();
        context.moveTo(x, y);
        context.arc(x, y, r, Math.PI * i / 2, Math.PI * (i + 1) / 2); if (i == 0 || i == 2) {
            color = colors[0];
        } else {
            color = colors[1];
        }
        context.fillStyle = color;
        context.lineWidth = 2;
        context.strokeStyle = colors[2];
        context.closePath();
        context.fill();
        context.stroke();
    }
} function drawBigRound(context, x, y, r, addr, color, lineWidth) {
    context.beginPath();
    context.arc(x, y, r + addr, 0, Math.PI * 2);
    context.lineWidth = lineWidth;
    context.strokeStyle = color;
    context.closePath();
    context.stroke();
}
2. CSS3 shadow box-shadow
box-shadow: h-shadow v -shadow blur spread color inset;
h-shadow required. The position of the horizontal shadow. Negative values are allowed.
v-shadow required. The position of the vertical shadow. Negative values are allowed.
blur Optional. Fuzzy distance.
spread optional. The size of the shadow.
color optional. The color of the shadow. See CSS color values.
inset optional. Change the outer shadow (outset) to the inner shadow.
3.CSS3 transform attribute
transform: none|transform-functions;
transform:rotate(): Rotation, deg means degree
transform: rotate(-10deg);
transform:skew() : Tilt
transform:skew(20deg);
transform:scale(): Scale, 2 times in the x direction, 1.5 times in the y direction
transform: scale(2, 1.5);
transform:translate(): Translate, translate 120px in the x direction, 10px in the y direction
transform:translate(120px,10px);
4.CSS3 transition property
transition: property duration timing-function delay;
transition-property specifies the name of the CSS property that sets the transition effect.
transition-duration specifies how many seconds or milliseconds it takes to complete the transition effect.
transition-timing-function 规定速度效果的速度曲线。
transition-delay 定义过渡效果何时开始。
div { width:100px; transition: width 2s; -moz-transition: width 2s; /* Firefox 4 */ -webkit-transition: width 2s; /* Safari 和 Chrome */ -o-transition: width 2s; /* Opera */ }


