Install JDK on Linux system
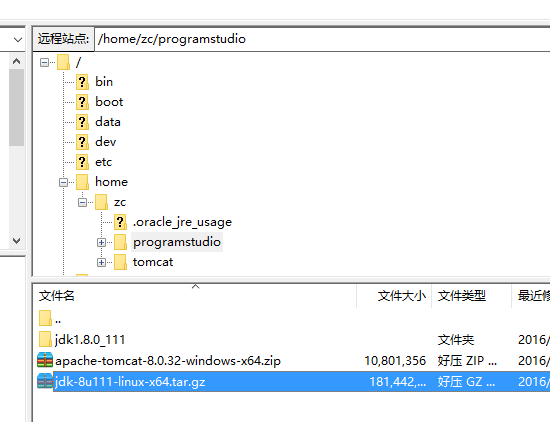
1. Upload the JDK installation package to the Linux server
Use the FileZilla tool to upload the jdk Linux installation package to any directory on the server

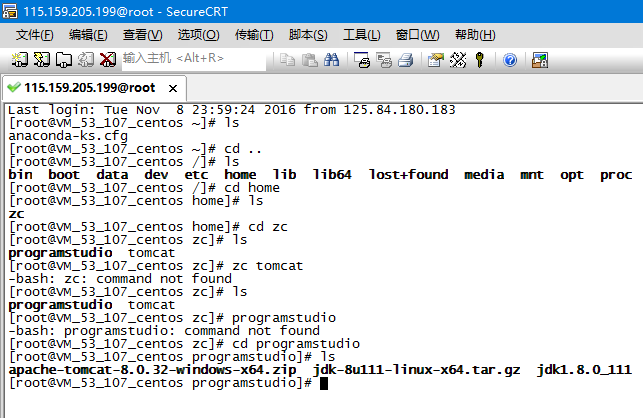
2. Use the SecureCRT tool to connect to the Linux server
Use the SecureCRT tool to connect to the server, and use ls and cd Command to enter the directory where the jdk installation package is located

3. Decompress the JDK installation package
Use the tar -zxvf command to decompress the jdk installation package. The command is as follows:
tar -zxvf The full name of the compressed file
tar -zxvf jdk-8u111 -linux-x64.tar.gz

4. Enter the system environment variable configuration file
Use the vim /etc/profile command to enter the system environment variable configuration file

5. Add JDK environment variables on the Linux server
Press i to enter edit insert mode and add the following code at the bottom
JAVA_HOME=JDK installation directory
JRE_HOME=JDK installation directory/jre
CLASSPATH=$JAVA_HOME/lib:$JAVA_HOME/jre/lib
PATH=$JAVA_HOME/bin :$PATH
export PATH CLASSPATH JAVA_HOME
In this example, the JDK installation directory is as follows
JAVA_HOME=/home/zc/programstudio/jdk1.8.0_111
JRE_HOME=/home/zc/programstudio/jdk1.8.0_111/jre
CLASSPATH =$JAVA_HOME/lib:$JAVA_HOME/jre/lib
PATH=$JAVA_HOME/bin:$PATH
export PATH CLASSPATH JAVA_HOME
After adding it, press the ESC key to exit the edit insertion mode

Then enter the following command: wq and press Enter to exit the edit mode
6. Make the configuration file take effect immediately
Use the source /etc/profile command to make the environment variable configuration just take effect immediately

7. Verify whether the installation is complete
Use java -version Command to verify whether the environment variables are configured


Hot AI Tools

Undresser.AI Undress
AI-powered app for creating realistic nude photos

AI Clothes Remover
Online AI tool for removing clothes from photos.

Undress AI Tool
Undress images for free

Clothoff.io
AI clothes remover

Video Face Swap
Swap faces in any video effortlessly with our completely free AI face swap tool!

Hot Article

Hot Tools

Notepad++7.3.1
Easy-to-use and free code editor

SublimeText3 Chinese version
Chinese version, very easy to use

Zend Studio 13.0.1
Powerful PHP integrated development environment

Dreamweaver CS6
Visual web development tools

SublimeText3 Mac version
God-level code editing software (SublimeText3)

Hot Topics
 1393
1393
 52
52
 37
37
 110
110


