java GUI
1. Overview of GUI
GUI:
Graphical User Interface Graphical User Interface.
Use graphics to display the computer operation interface, which is more convenient and intuitive.
CLI:
Command Line User Interface Command Line User Interface
It is a common Dos command line operation. You need to remember some common commands, and the operation is not intuitive.
The objects provided by java for GUI exist in the two packages java.awt and javax.swing.
2. Overview of awt and swing packages
java.awt: Abstract Window ToolKit abstract window tool kit, which needs to call local system methods to implement functions, and is a heavyweight control.
javax.swing: A graphical interface system established on the basis of AWT, which provides more components and is completely implemented in Java, which enhances portability and is a lightweight control.
3. GUI inheritance system
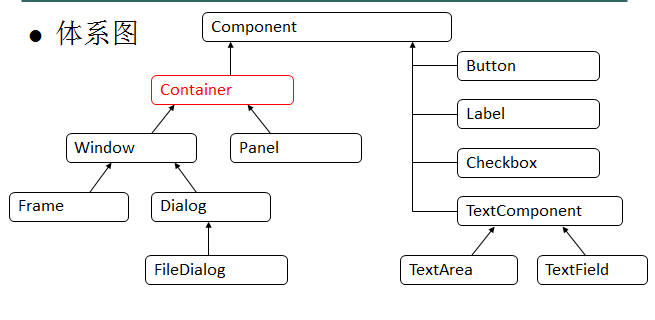
container: It is a container, which is a special component. Other components can be added to this component through the add method.
package cn5;

import java.awt.Frame;
/**
 * 创建一个最简单的窗体
 */
public class AWTDemo {
    public static void main(String[] args) {
        //创建一个最初不可见的窗体对象
        Frame f = new Frame();
        //设置窗体标题
        f.setTitle("哈哈 呵呵 嘻嘻 笨笨");
        //设置窗体大小
        f.setSize(400, 300);//单位:默认像素
        //设置窗体坐标
        f.setLocation(400, 200);
        //让窗体可见
        f.setVisible(true);
    }

}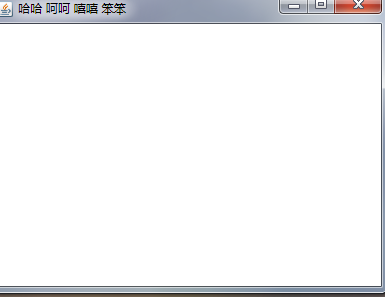
Other ways to achieve the effect in the picture above
package cn5;

import java.awt.Dimension;
import java.awt.Frame;
import java.awt.Point;

public class AWTDemo2 {
    public static void main(String[] args) {
        //创建一个不可见的窗体
        Frame f = new Frame();
        //设置标题
        f.setTitle("哈哈");
        //设置位置
        f.setLocation(new Point(400, 200));
        //设置大小
        f.setSize(new Dimension(400, 300));
        //使得窗体可见
        f.setVisible(true);
    }

}package cn5;
import java.awt.Frame;
public class AWTDemo2 {
public static void main(String[] args) {
//创建一个不可见的窗体
Frame f = new Frame();
//设置标题
f.setTitle("哈哈");
f.setBounds(400,200,400,300);
//使得窗体可见
f.setVisible(true);
}
}To achieve window closing
package cn5;

import java.awt.Frame;
import java.awt.event.WindowEvent;
import java.awt.event.WindowListener;
/**
 * 事件监听机制
 *        事件源:事件发生的地方。
 *        事件:就是要发生的事情。
 *        事件处理:就是针对发生的事情做出的处理方案。
 *        事件监听:就是把事件源和事件关联起来。
 *
 * 举例:人受伤事件
 *        事件源:人(具体的对象)
 *            Person p1 = new Person("张三");
 *            Person p2 = new Person("李四");
 *        事件:受伤
 *            interface 受伤接口{
 *                一拳();
 *                一脚();
 *                一板砖();
 *            }
 *        事件处理:
 *            事件处理类 implements 受伤接口{
 *                一拳(){
 *                    System.out.println("鼻子流血了,去医院");
 *                }
 *                一脚(){
 *                    System.out.println("晕倒了");
 *                }
 *                一板砖(){
 *                    System.out.println("头破血流");
 *                }
 *            }
 *     事件监听:
 *         p1.注册监听(受伤接口)
 *         p2.注册监听(受伤接口)
 */
public class AWTDemo3 {
    public static void main(String[] args) {
        //创建一个最初不可见的窗体对象
        Frame f = new Frame("窗体关闭");
        //设置窗体属性
        f.setBounds(400, 200, 400, 300);

        //让窗体关闭
        //事件源:窗体f
        //事件:对窗体的处理
        //事件处理:关闭窗体(System.exit(0))
        //事件监听:
        f.addWindowListener(new WindowListener() {

            @Override
            public void windowOpened(WindowEvent e) {

            }

            @Override
            public void windowIconified(WindowEvent e) {

            }

            @Override
            public void windowDeiconified(WindowEvent e) {

            }

            @Override
            public void windowDeactivated(WindowEvent e) {
            }

            @Override
            public void windowClosing(WindowEvent e) {
                System.exit(0);
            }

            @Override
            public void windowClosed(WindowEvent e) {

            }

            @Override
            public void windowActivated(WindowEvent e) {

            }
        });
        //使得窗体可见
        f.setVisible(true);

    }

}According to the above code, is there a lot of redundant code? Why? Let’s look at the breakdown below.
4. Adapter mode
package cn6;

public interface IUserDAO {
    /**
     * 增加用户
     */
    public void add();
    /**
     * 删除用户
     */
    public void delete();
    /**
     * 修改用户
     */
    public void update();
    /**
     * 查询用户
     */
    public void find();

}package cn6;
public class UserDAOImpl implements IUserDAO {
@Override
public void add() {
System.out.println("用户增加");
}
@Override
public void delete() {
System.out.println("用户删除");
}
@Override
public void update() {
System.out.println("用户修改");
}
@Override
public void find() {
System.out.println("用户查询");
}
}package cn6;
public class Test {
public static void main(String[] args) {
IUserDAO userDAO = new UserDAOImpl();
userDAO.add();
userDAO.delete();
userDAO.find();
userDAO.update();
}
}User addition
User deletion
User query
User modification
But if I only want users to add functions, at this time, you will think, I don’t call delete(), find Aren't the () and update() methods sufficient?
package cn6;
public interface IUserDAO {
/**
* 增加用户
*/
public void add();
/**
* 删除用户
*/
public void delete();
/**
* 修改用户
*/
public void update();
/**
* 查询用户
*/
public void find();
}package cn6;
public class UserDAOImpl implements IUserDAO {
@Override
public void add() {
System.out.println("用户增加");
}
@Override
public void delete() {
System.out.println("用户删除");
}
@Override
public void update() {
System.out.println("用户修改");
}
@Override
public void find() {
System.out.println("用户查询");
}
}package cn6;
public class Test {
public static void main(String[] args) {
IUserDAO userDAO = new UserDAOImpl();
userDAO.add();
}
}Yes, but do you still need to override the methods defined in the interface in the implementation class of the interface, even if you do not write a specific implementation? However, I just hate writing a lot of redundant code. I have mysophobia, what should you do with me?
Hmph, add an abstract class (adapter class) between the interface and the specific implementation class.
Interface - adapter (abstract class) - concrete implementation class
package cn6;
public interface IUserDAO {
/**
* 增加用户
*/
public void add();
/**
* 删除用户
*/
public void delete();
/**
* 修改用户
*/
public void update();
/**
* 查询用户
*/
public void find();
}package cn6;
public abstract class UserAdapter implements IUserDAO {
@Override
public void add() {
}
@Override
public void delete() {
}
@Override
public void update() {
}
@Override
public void find() {
}
}package cn6;
public class UserDAOAddImpl extends UserAdapter {
@Override
public void add() {
System.out.println("用户添加");
}
}Note: If you do not write any method in the UserDAOAddImpl class at this time, no error will be reported, because the abstract class UserAdapter has already implemented the interface, although it is only It's just an empty implementation.
package cn6;
public class UserDAOAddImpl extends UserAdapter {
}But since I only want users to add functionality, so what? I just wrote a class to implement the user addition function. Isn't this very trouble-free? I don't have to implement 4 methods anymore.
package cn6;
public class UserDAOAddImpl extends UserAdapter {
@Override
public void add() {
System.out.println("用户增加");
}
}If I only want the user deletion function now, I will just write a class to implement the user deletion function. Of course, I must inherit this abstract class.
package cn6;
public class UserDAODeleteImpl extends UserAdapter {
@Override
public void delete() {
System.out.println("用户删除");
}
}Others can be deduced in sequence.
package cn6;
public class Test {
public static void main(String[] args) {
//用户增加
IUserDAO userDAO = new UserDAOAddImpl();
userDAO.add();
//用户删除
userDAO = new UserDAODeleteImpl();
userDAO.delete();
}
}But looking at this, you can feel that it is no different from the beginning.
package cn6;

public class UserDAOImpl implements IUserDAO {

    @Override
    public void add() {
        System.out.println("用户增加");
    }

    @Override
    public void delete() {
        System.out.println("用户删除");
    }

    @Override
    public void update() {
        System.out.println("用户修改");
    }

    @Override
    public void find() {
        System.out.println("用户查询");
    }

}However, this is not the case in reality. The above code generates a lot of garbage code, because I only want users to add functions, but you have achieved user addition, user deletion, etc. At this time, you may be thinking, Let me go, you want users to add functions, right? Look at the code below.
package cn6;

public class UserDAOImpl implements IUserDAO {

    @Override
    public void add() {
        System.out.println("用户增加");
    }

    @Override
    public void delete() {
    }

    @Override
    public void update() {
    }

    @Override
    public void find() {
    }

}However, now I want users to add and modify functions. This will make you depressed. Is it annoying to have to modify the code? There is no way. Customers are novices, and customer needs are always changing. We All we can do is remain unchanged in the face of change. So, if you use the adapter mode, how do you want to change the requirements? Yes, I will create an implementation class for you that meets your functions, so you have nothing to say.
【Note】If there is only one function in the interface, there is no need to use the adapter mode. Is there any difference between using it and not using it?
5. Use the adapter pattern to solve the redundant code of window closing

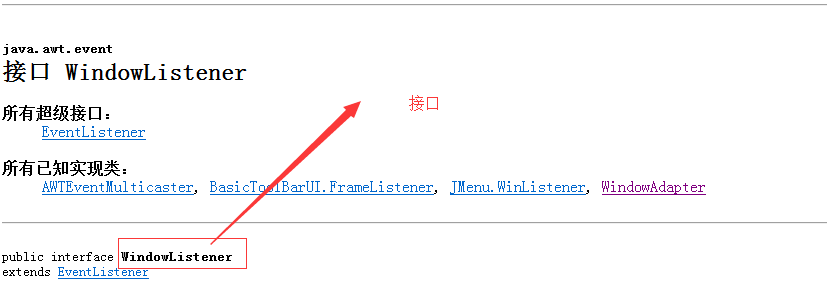
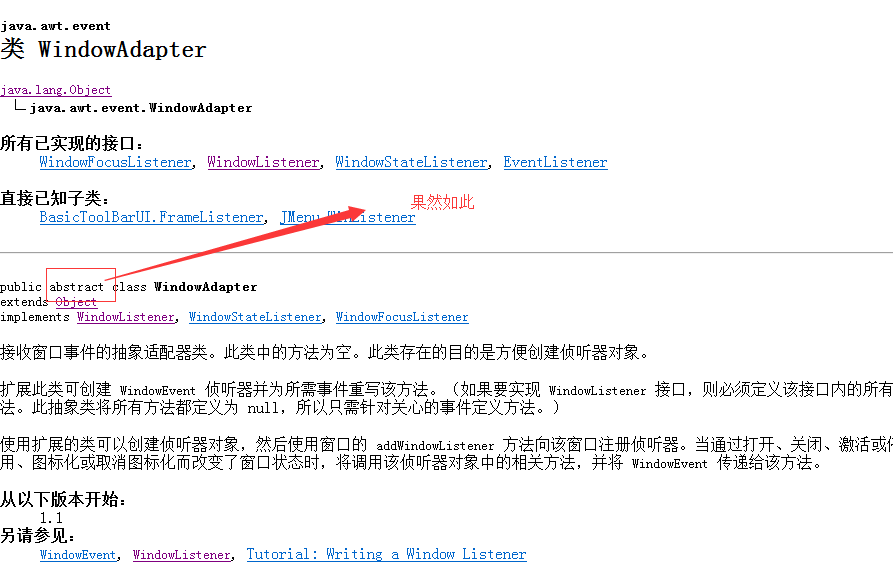
package cn5;

import java.awt.Frame;
import java.awt.event.WindowAdapter;
import java.awt.event.WindowEvent;
import java.awt.event.WindowListener;
/**
 * 事件监听机制
 *        事件源:事件发生的地方。
 *        事件:就是要发生的事情。
 *        事件处理:就是针对发生的事情做出的处理方案。
 *        事件监听:就是把事件源和事件关联起来。
 *
 * 举例:人受伤事件
 *        事件源:人(具体的对象)
 *            Person p1 = new Person("张三");
 *            Person p2 = new Person("李四");
 *        事件:受伤
 *            interface 受伤接口{
 *                一拳();
 *                一脚();
 *                一板砖();
 *            }
 *        事件处理:
 *            事件处理类 implements 受伤接口{
 *                一拳(){
 *                    System.out.println("鼻子流血了,去医院");
 *                }
 *                一脚(){
 *                    System.out.println("晕倒了");
 *                }
 *                一板砖(){
 *                    System.out.println("头破血流");
 *                }
 *            }
 *     事件监听:
 *         p1.注册监听(受伤接口)
 *         p2.注册监听(受伤接口)
 */
public class AWTDemo3 {
    public static void main(String[] args) {
        //创建一个最初不可见的窗体对象
        Frame f = new Frame("窗体关闭");
        //设置窗体属性
        f.setBounds(400, 200, 400, 300);

        //让窗体关闭
        //事件源:窗体f
        //事件:对窗体的处理
        //事件处理:关闭窗体(System.exit(0))
        //事件监听:
        f.addWindowListener(new WindowAdapter() {
            @Override
            public void windowClosing(WindowEvent e) {
                System.exit(0);
            }
        });
        //使得窗体可见
        f.setVisible(true);

    }

}6. Add the button to the form and add the click event
package cn7;

import java.awt.Button;
import java.awt.Frame;
import java.awt.event.WindowAdapter;
import java.awt.event.WindowEvent;

/**
 * 需求:把按钮添加到窗体,并对按钮添加一个点击事件
 *        1.创建窗体对象
 *      2.创建按钮对象
 *      3.把按钮添加到窗体
 *      4.窗体显示
 *
 */
public class AWTDemo {
    public static void main(String[] args) {
        //创建窗体对象
        Frame f = new Frame("把按钮添加到窗体,并对按钮添加一个点击事件");
        //设置窗体属性
        f.setBounds(400, 200, 400, 300);
        //创建按钮对象
        Button button = new Button("我是按钮");
        button.setSize(20,10);
        //把按钮添加到窗体
        f.add(button);
        //设置窗体可以关闭
        f.addWindowListener(new WindowAdapter() {
            @Override
            public void windowClosing(WindowEvent e) {
                System.exit(0);
            }
        });
        //窗体显示
        f.setVisible(true);
    }
}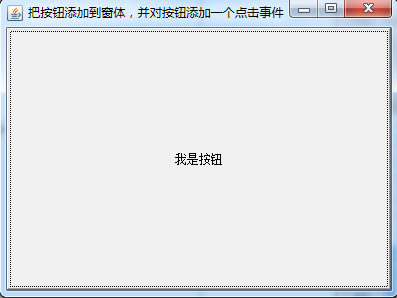
Ugly me I can't even eat. How can there be such a big button? And I set the size of the button, but why doesn't it work?
package cn7;

import java.awt.Button;
import java.awt.FlowLayout;
import java.awt.Frame;
import java.awt.event.ActionEvent;
import java.awt.event.ActionListener;
import java.awt.event.WindowAdapter;
import java.awt.event.WindowEvent;

/**
 * 需求:把按钮添加到窗体,并对按钮添加一个点击事件
 *        1.创建窗体对象
 *      2.创建按钮对象
 *      3.把按钮添加到窗体
 *      4.窗体显示
 *
 */
public class AWTDemo {
    public static void main(String[] args) {
        //创建窗体对象
        Frame f = new Frame("把按钮添加到窗体,并对按钮添加一个点击事件");
        //设置窗体属性
        f.setBounds(400, 200, 400, 300);
        //创建按钮对象
        Button button = new Button("我是按钮");
        //设置点击事件
        button.addActionListener(new ActionListener() {

            @Override
            public void actionPerformed(ActionEvent e) {
                System.out.println("你再看试试");
            }
        });
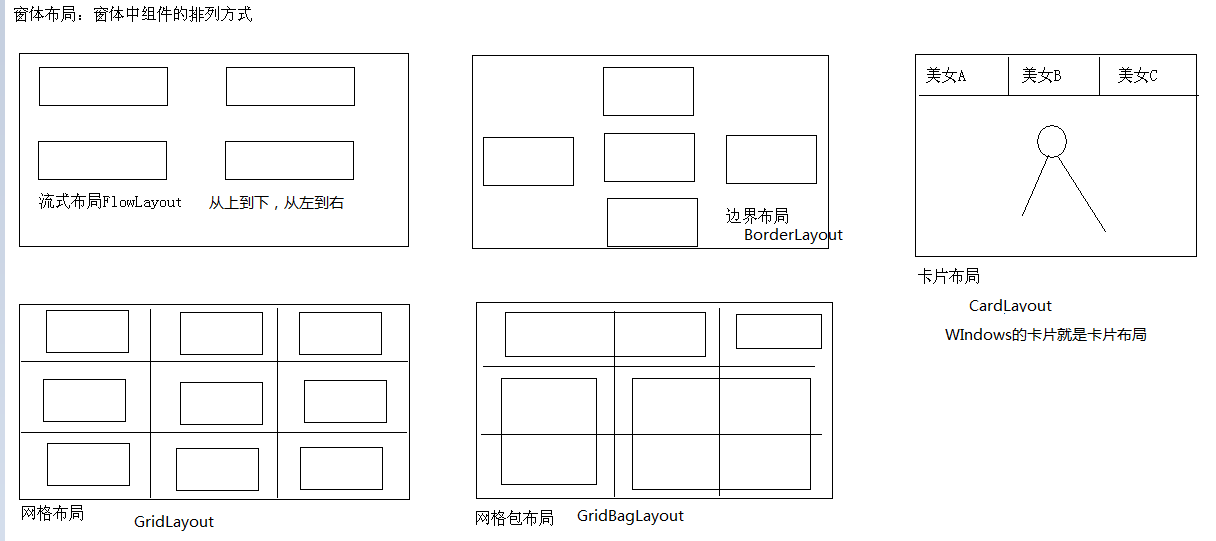
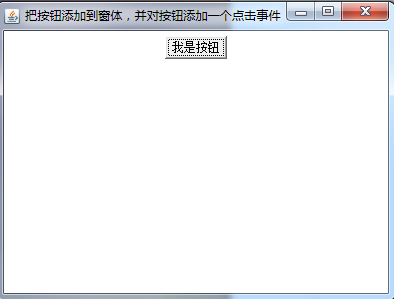
        //Frame的布局默认是边界布局,现在修改为流式布局
        f.setLayout(new FlowLayout());
        //把按钮添加到窗体
        f.add(button);
        //设置窗体可以关闭
        f.addWindowListener(new WindowAdapter() {
            @Override
            public void windowClosing(WindowEvent e) {
                System.exit(0);
            }
        });
        //窗体显示
        f.setVisible(true);
    }
}
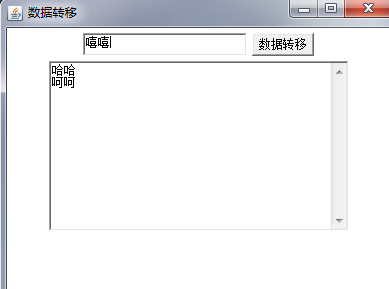
Seven. Practice
package cn8;

import java.awt.Button;
import java.awt.FlowLayout;
import java.awt.Frame;
import java.awt.TextArea;
import java.awt.TextField;
import java.awt.event.ActionEvent;
import java.awt.event.ActionListener;
import java.awt.event.WindowAdapter;
import java.awt.event.WindowEvent;

public class AWTDemo {
    public static void main(String[] args) {
        //创建窗体对象
        Frame f = new Frame("数据转移");
        //设置窗体属性
        f.setBounds(400, 200, 400, 300);
        //设置窗体布局
        f.setLayout(new FlowLayout());

        //创建文本框
        final TextField tf = new TextField(20);
        //创建按钮
        Button bt = new Button("数据转移");
        //创建文本域
        final TextArea tx = new TextArea(10,40);

        //把组件添加到窗体
        f.add(tf);
        f.add(bt);
        f.add(tx);

        //设置关闭事件
        f.addWindowListener(new WindowAdapter() {
            @Override
            public void windowClosing(WindowEvent e) {
                System.exit(0);
            }
        });

        //对按钮添加事件
        bt.addActionListener(new ActionListener() {

            @Override
            public void actionPerformed(ActionEvent e) {
                //获取文本框的值
                String tf_str = tf.getText().trim();
                //清空数据
                tf.setText("");
                //设置给文本库并换行
                tx.append(tf_str+"\r\n");
                //文本框获取光标
                tf.requestFocus();
            }
        });
        //让窗体显示
        f.setVisible(true);
    }

}
package cn9;
/**
*鼠标点击事件
*/
import java.awt.Button;
import java.awt.Color;
import java.awt.FlowLayout;
import java.awt.Frame;
import java.awt.event.ActionEvent;
import java.awt.event.ActionListener;
import java.awt.event.WindowAdapter;
import java.awt.event.WindowEvent;

public class AWTDemo {
    public static void main(String[] args) {
        final Frame f = new Frame("更改背景色");
        f.setBounds(400, 200, 400, 300);
        f.setLayout(new FlowLayout());

        //创建按钮
        Button bt1 = new Button("红色");
        Button bt2 = new Button("黑色");
        Button bt3 = new Button("绿色");
        Button bt4 = new Button("黄色");

        //添加按钮
        f.add(bt1);
        f.add(bt2);
        f.add(bt3);
        f.add(bt4);


        f.addWindowListener(new WindowAdapter() {
            @Override
            public void windowClosing(WindowEvent e) {
                System.exit(0);
            }
        });
        bt1.addActionListener(new ActionListener() {

            @Override
            public void actionPerformed(ActionEvent e) {
                f.setBackground(Color.RED);
            }
        });
        bt2.addActionListener(new ActionListener() {

            @Override
            public void actionPerformed(ActionEvent e) {
                f.setBackground(Color.BLACK);
            }
        });
        bt3.addActionListener(new ActionListener() {

            @Override
            public void actionPerformed(ActionEvent e) {
                f.setBackground(Color.GREEN);
            }
        });
        bt4.addActionListener(new ActionListener() {

            @Override
            public void actionPerformed(ActionEvent e) {
                f.setBackground(Color.YELLOW);
            }
        });
        f.setVisible(true);
    }
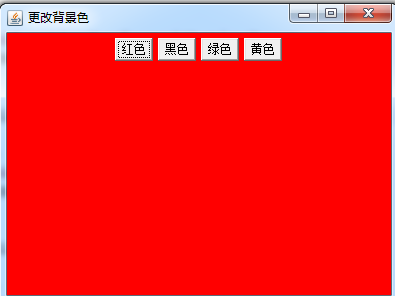
}
package cn9;

import java.awt.Button;
import java.awt.Color;
import java.awt.FlowLayout;
import java.awt.Frame;
import java.awt.event.MouseAdapter;
import java.awt.event.MouseEvent;
import java.awt.event.WindowAdapter;
import java.awt.event.WindowEvent;
/**
 * 鼠标移动事件
 */
public class AWTDemo {
    public static void main(String[] args) {
        final Frame f = new Frame("更改背景色");
        f.setBounds(400, 200, 400, 300);
        f.setLayout(new FlowLayout());

        //创建按钮
        Button bt1 = new Button("红色");
        Button bt2 = new Button("黑色");
        Button bt3 = new Button("绿色");
        Button bt4 = new Button("黄色");

        //添加按钮
        f.add(bt1);
        f.add(bt2);
        f.add(bt3);
        f.add(bt4);


        f.addWindowListener(new WindowAdapter() {
            @Override
            public void windowClosing(WindowEvent e) {
                System.exit(0);
            }
        });
        bt1.addMouseListener(new MouseAdapter() {
            @Override
            public void mouseEntered(MouseEvent e) {
                f.setBackground(Color.RED);
            }
        });
        bt2.addMouseListener(new MouseAdapter() {
            @Override
            public void mouseEntered(MouseEvent e) {
                f.setBackground(Color.BLACK);
            }
        });
        bt3.addMouseListener(new MouseAdapter() {
            @Override
            public void mouseEntered(MouseEvent e) {
                f.setBackground(Color.GREEN);
            }
        });
        bt4.addMouseListener(new MouseAdapter() {
            @Override
            public void mouseEntered(MouseEvent e) {
                f.setBackground(Color.YELLOW);
            }
        });
        f.setVisible(true);
    }
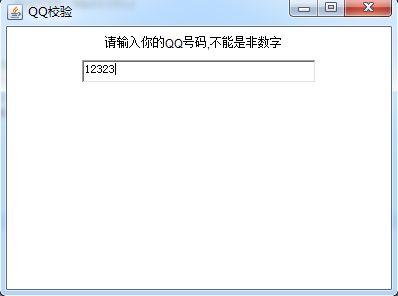
}
package cn10;
import java.awt.FlowLayout;
import java.awt.Frame;
import java.awt.Label;
import java.awt.TextField;
import java.awt.event.KeyAdapter;
import java.awt.event.KeyEvent;
import java.awt.event.WindowAdapter;
import java.awt.event.WindowEvent;
public class AWTDemo {
public static void main(String[] args) {
Frame f = new Frame("QQ校验");
f.setBounds(400, 200, 400, 300);
f.setLayout(new FlowLayout());
Label l = new Label("请输入你的QQ号码,不能是非数字");
TextField tf = new TextField(30);
f.add(l);
f.add(tf);
tf.addKeyListener(new KeyAdapter() {
@Override
public void keyPressed(KeyEvent e) {
char c = e.getKeyChar();
if(!(c >= '0' && c <='9')){
e.consume();
}
}
});
f.addWindowListener(new WindowAdapter() {
@Override
public void windowClosing(WindowEvent e) {
System.exit(0);
}
});
f.setVisible(true);
}
}八、菜单组件
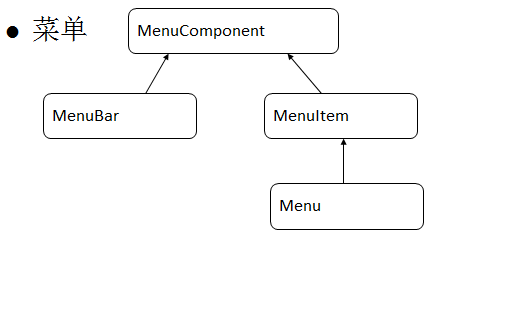
菜单组件概述
MenuBar,Menu,MenuItem
先创建菜单条,再创建菜单,每一个菜单中建立菜单项。
也可以菜单添加到菜单中,作为子菜单。
通过setMenuBar()方法,将菜单添加到Frame中。
package cn11;

import java.awt.Frame;
import java.awt.Menu;
import java.awt.MenuBar;
import java.awt.MenuItem;
import java.awt.event.ActionEvent;
import java.awt.event.ActionListener;
import java.awt.event.WindowAdapter;
import java.awt.event.WindowEvent;
/**
 * 一级菜单
 */
public class Demo {
    public static void main(String[] args) {
        Frame f = new Frame("一级菜单");
        f.setBounds(400, 200, 400, 300);

        //创建菜单栏
        MenuBar bar = new MenuBar();
        //创建菜单
        Menu m = new Menu("文件");
        //创建菜单项
        MenuItem mi = new MenuItem("退出系统");

        //设置菜单栏
        f.setMenuBar(bar);
        bar.add(m);
        m.add(mi);


        mi.addActionListener(new ActionListener() {

            @Override
            public void actionPerformed(ActionEvent e) {
                System.exit(0);

            }
        });

        f.addWindowListener(new WindowAdapter() {
            @Override
            public void windowClosing(WindowEvent e) {
                System.exit(0);
            }
        });
        f.setVisible(true);


    }

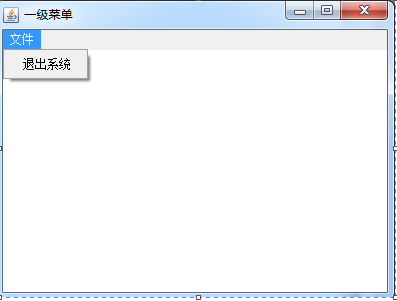
}

Hot AI Tools

Undresser.AI Undress
AI-powered app for creating realistic nude photos

AI Clothes Remover
Online AI tool for removing clothes from photos.

Undress AI Tool
Undress images for free

Clothoff.io
AI clothes remover

AI Hentai Generator
Generate AI Hentai for free.

Hot Article

Hot Tools

Notepad++7.3.1
Easy-to-use and free code editor

SublimeText3 Chinese version
Chinese version, very easy to use

Zend Studio 13.0.1
Powerful PHP integrated development environment

Dreamweaver CS6
Visual web development tools

SublimeText3 Mac version
God-level code editing software (SublimeText3)

Hot Topics
 1385
1385
 52
52
 Perfect Number in Java
Aug 30, 2024 pm 04:28 PM
Guide to Perfect Number in Java. Here we discuss the Definition, How to check Perfect number in Java?, examples with code implementation.
 Weka in Java
Aug 30, 2024 pm 04:28 PM
Guide to Weka in Java. Here we discuss the Introduction, how to use weka java, the type of platform, and advantages with examples.
 Smith Number in Java
Aug 30, 2024 pm 04:28 PM
Guide to Smith Number in Java. Here we discuss the Definition, How to check smith number in Java? example with code implementation.
 Java Spring Interview Questions
Aug 30, 2024 pm 04:29 PM
In this article, we have kept the most asked Java Spring Interview Questions with their detailed answers. So that you can crack the interview.
 Break or return from Java 8 stream forEach?
Feb 07, 2025 pm 12:09 PM
Java 8 introduces the Stream API, providing a powerful and expressive way to process data collections. However, a common question when using Stream is: How to break or return from a forEach operation? Traditional loops allow for early interruption or return, but Stream's forEach method does not directly support this method. This article will explain the reasons and explore alternative methods for implementing premature termination in Stream processing systems. Further reading: Java Stream API improvements Understand Stream forEach The forEach method is a terminal operation that performs one operation on each element in the Stream. Its design intention is
 TimeStamp to Date in Java
Aug 30, 2024 pm 04:28 PM
Guide to TimeStamp to Date in Java. Here we also discuss the introduction and how to convert timestamp to date in java along with examples.
 Java Program to Find the Volume of Capsule
Feb 07, 2025 am 11:37 AM
Capsules are three-dimensional geometric figures, composed of a cylinder and a hemisphere at both ends. The volume of the capsule can be calculated by adding the volume of the cylinder and the volume of the hemisphere at both ends. This tutorial will discuss how to calculate the volume of a given capsule in Java using different methods. Capsule volume formula The formula for capsule volume is as follows: Capsule volume = Cylindrical volume Volume Two hemisphere volume in, r: The radius of the hemisphere. h: The height of the cylinder (excluding the hemisphere). Example 1 enter Radius = 5 units Height = 10 units Output Volume = 1570.8 cubic units explain Calculate volume using formula: Volume = π × r2 × h (4
 How to Run Your First Spring Boot Application in Spring Tool Suite?
Feb 07, 2025 pm 12:11 PM
Spring Boot simplifies the creation of robust, scalable, and production-ready Java applications, revolutionizing Java development. Its "convention over configuration" approach, inherent to the Spring ecosystem, minimizes manual setup, allo


