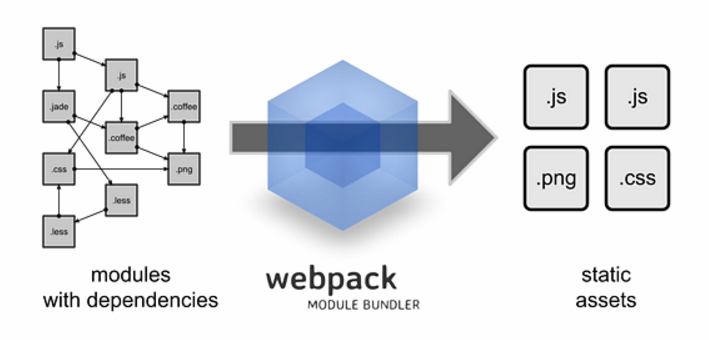
In the project currently under development, in order to achieve separate development of front-end and back-end, we decided to use vue.js 2.0 and koa 2.0, which were just released, for development, and used webpack as a front-end packaging tool in depth. In order to better master it, I plan to strengthen my understanding of webpack through exercises. Next, we will do in-depth exercises and write a series of articles on related technologies during development.

The main purpose of this article is to make a summary of the use of webpack in project development and own practice. This article introduces how to use webpack for packaging when developing vue.js single-page front-end applications. This article is also a continuation of the previous series of react articles.
As a complete Demo, the complete project in the series of articles will implement a single-page web application for file upload and management
1 Install dependency packages
The project uses vue.js, webpack, gulp, and Since the open source elementUI uses es2015, babel needs to be introduced to convert the es6 js code into es5.
The dependencies that must be used are as follows
"dependencies": {
    "babel-core": "^6.18.2",
    "babel-preset-es2015": "^6.18.0",
    "config": "^1.24.0",
    "element-ui": "^1.0.0",
    "es6-promise": "^4.0.5",
    "vue": "^2.0.5",
    "vue-router": "^2.0.1"
  },
  "devDependencies": {
    "babel-cli": "^6.18.0",
    "babel-loader": "^6.2.7",
    "vue-loader": "^9.8.1",
    "style-loader": "^0.13.1",
    "extract-text-webpack-plugin": "^1.0.1",
    "gulp": "^3.9.1",
    "webpack": "^1.13.3",
},In addition, it is best to use global installation of gulp-cli, webpack and babel-cli, npm install -g webpack, so that you can use the command conveniently on the command line. In addition, the installation and download speed of npm is also a criticized issue. In order to improve the speed of installing dependent packages, you can install cnpm or yarn. Currently, I use cnpm myself.
2 webpack configuration file
After installing the dependent packages, you can directly use the webpack command to package. Through the webpacke.config.js configuration file, you can instruct webpack according to what rules it needs to be built.
var webpack = require('webpack');
var path = require('path');

module.exports = {
    entry: "./client/main.js",
    resolve: {
        extensions: ['', '.js', '.vue', '.scss','.css'],
    },
    output: {
        path: path.join(__dirname, "./build/assets/"),
        filename: '[name].[chunkhash:8].js',
        chunkFilename: '[id].js',
        publicPath: '/assets/',
    },
    module: {
        loaders: [
            { test: /\.vue$/, loader: 'vue'},
            {
                test: /\.js$/,
                exclude: /node_modules|vue\/dist|vue-router\/|vue-loader\/|vue-hot-reload-API\//,
                loader: 'babel'
            }
        ]
    },
    plugins:[
        new webpack.optimize.CommonsChunkPlugin({
            names: ['bundle']
        }),
    ]
};
ded in Files and paths;
Output: Set the output path and file name of the packaged files;
Module: Mainly loaders, loaders are webpack packaging parsers, css, vue, babel, scss are all needed npm installs the corresponding loader so that webpack can parse and process files in this format;
Plugins: They are some webpack packaging plug-ins, which have nothing to do with the parsed language. They are used to assist construction and provide rich additional functions.
3 Parse files
In the process of parsing dependent modules from entry, webpack supports css, sass and various external font files used. Webpack itself does not have built-in processing capabilities for all formats, but through Install and configure different loader implementations. According to the actual needs of the project, introduce the corresponding loader, and webpack can parse and package different applications.
Compiling es6 code into es5 is also achieved by installing babel-loader; to parse the syntax of vue.js that puts template/script/style in a file, vue-loader is also required.
By using style-loader, css-loader, and sass-loader, webpack can have the ability to parse scss files. As shown in the example below, the syntax of loader can be written in a variety of ways:
loaders: [
    { test: /\.vue$/, loader: 'vue'},
    {
        test: /\.css$/,
        loader: "style!css"
    },
    {
        test: /\.scss$/,
        loaders: ["style", "css", "sass"]
    },
    {
        test: /\.js$/,
        exclude: /node_modules|vue\/dist|vue-router\/|vue-loader\/|vue-hot-reload-api\//,
        loader: 'babel'
    },
    {
        test   : /\.(ttf|eot|svg|svg|woff|woff(2))(\?t\=[0-9]+)?$/,
        loader : 'file'
    }
] Based on actual project needs, combined with some webpack plug-ins, powerful functions can be achieved without additional use. gulp or grunt.
4.1 Generate hash fingerprint
In order to achieve incremental updates of front-end static resources, use the function that comes with webpack to generate hash fingerprints for bundle files. By setting the rules for the generated file names in the output, you can generate hash fingerprints bundle file. An example is as follows:
output:{
  ...
  //filename: '[name].[hash:8].js',
  filename: '[name].[chunkhash:8].js',
  //filename: '[name].[contenthash:8].js',
  ...
} Hash: Calculate the hash value based on the compilation process corresponding to the compilation resource
Chunkhash: Calculate the hash value based on the module content
Contenthash: Calculate the hash value based on the content of the file
4.2 Package the independent js dependency package into a vendor separately
If the project uses jquery, bootstrap, fetch or other js files that do not support require, you can use webpack to package these files into a separate vendor file to optimize the deployment and loading of static files.
This operation is achieved by configuring in the entry, using the CommonsChunkPlugin plug-in, which is packaged as different modules; the configuration is as follows:
...
entry: {
bundle: ['./ client/main.js'],
// The rules are the same as require reference
vendor: ['whatwg-fetch','jquery']
},
...
plugins ; Copy code
4.3 将样式打包成独立的css文件
同样是因为部署的需要,我们可以使用 ExtractTextPlugin 插件,将引用到的样式打包成单独的css或其他样式文件;同样可以生成hash指纹。
...
module: {
    loaders: [
        ...
        {
            test: /\.css$/,
            loader: ExtractTextPlugin.extract("style-loader", "css-loader")
        },
        {
            test: /\.scss$/,
            loaders: ExtractTextPlugin.extract("style-loader", "css-loader","sass-loader")
        }
        ...
    ]
},
...
plugins:[
    new ExtractTextPlugin("[name].[contenthash:8].css", {
        allChunks: true
    }),
]
... 4.4 在html文件中引入带hash指纹的bundle文件
最后我们需要类似gulp-rev的功能,自动在html文件中,引入打包编译好的带hash指纹的bundle和vendor文件;这个过程可以由webpack自动完成,使用的是 HtmlWebpackPlugin 插件。如果需要对js文件进行压缩,可以使用 UglifyJsPlugin 插件,插件配置如下:
plugins:[
    ...
    new HtmlWebpackPlugin({
        title: 'My App',
        template: 'index.html',
        filename: '../index.html'
    }),
    new webpack.optimize.UglifyJsPlugin({
        compress: {
            warnings: false
        }
    }),
] 5 配合gulp使用
除了使用之前的gulp-webpack插件,还可以直接在gulp中require('webpack')的方式,来配合gulp使用webpack。配置比较简单
webpack(require("./webpack.config.js"), function(err, stats) {
    if(err) throw new gutil.PluginError("webpack:build", err);
    gutil.log("[webpack:build]", stats.toString({
        colors: true
    }));
    callback();
});6 源代码
最后,整个项目的源代码在 github 上;稍后的其他文章,会跟项目同时更新。
// 使用gulp调用webpack打包,打包好的代码在build目录下
npm run build
// 运行有watch自动刷新触发webpack编译的静态服务器
// http://localhost:3333
npm run dev


