Install mysql via brew on Mac
I originally thought that installing and configuring mysql on Mac would be a very simple matter, but I encountered a lot of trouble in the process. It took almost two hours to solve the problem. The purpose of writing this article is to hope that everyone can quickly install and configure mysql on Mac and avoid detours!
How to install mysql on Mac?
Of course you use Homebrew. As for what Homebrew is and how to install Homebrew, please go to the Homebrew official website. After successfully installing Homebrew, run the following command to install mysql:
brew install mysql
After the installation is complete, you can use the following command to view the mysql installation information:
brew info mysql
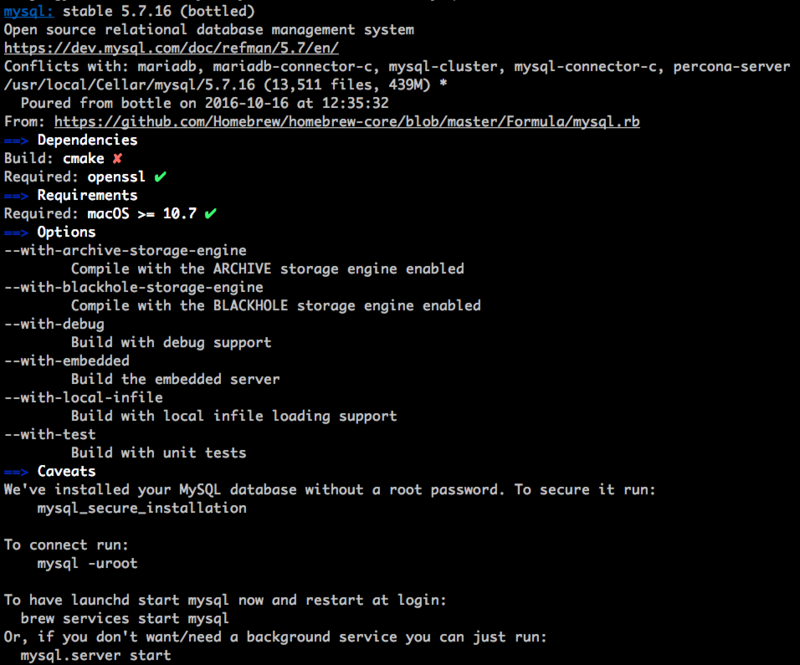
The detailed installation information is as follows:

You can see a red behind cmake under Dependencies small cross, use the following command to reinstall cmake:
brew unlink cmake
brew install cmake
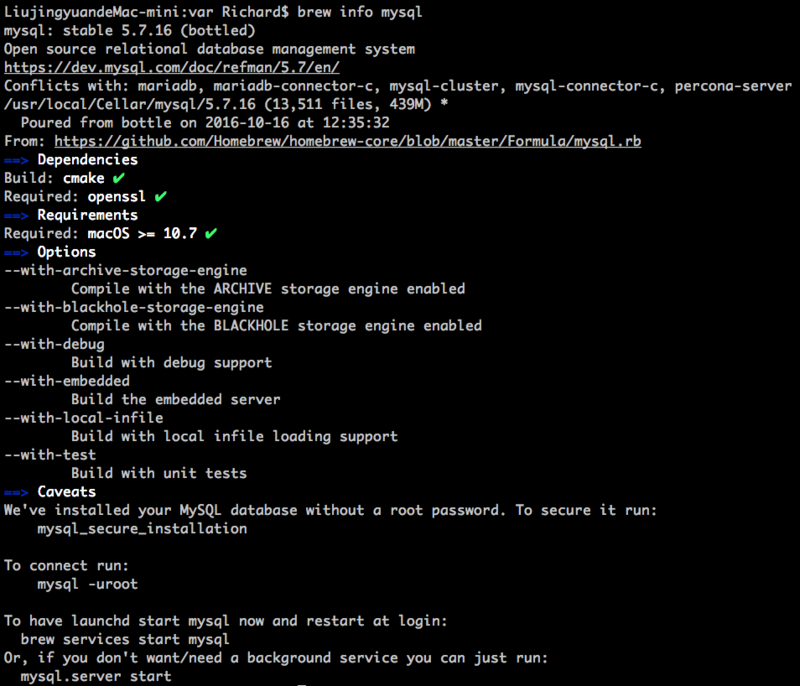
Check the mysql installation information again, and you can find that the red small cross has turned into a green small check, indicating that the dependency problem has been solved:

The problem is here!
When I thought mysql had been installed successfully and used mysql -uroot to connect to the database, the following error occurred:
ERROR 2002 (HY000): Can't connect to local MySQL server through socket '/tmp/mysql.sock' (62)
Check the system cache folder, and there is no mysql.sock file underneath. There are some posts on the Internet that say to find or create my.conf and then modify the path of mysql.sock. I tried it for a long time and found that it didn’t work at all! Then I calmed down and thought about it, and I felt that there was no mysql.sock file in the system cache folder (/tmp). It should be that it was not successfully generated, so why was it not successfully generated? After checking around, I found a post saying that the basic table was not created, so I used mysql_install_db to create the basic table, but the following error occurred:
ERROR! The server quit without updating PID file (/usr/local/var/mysql/xxx.local.pid).
Inexplicably, it said that the PID could not be updated successfully. Where are the files? I browsed the Internet for a long time, and there was a post saying that you can kill the mysql process first, and then do whatever you want. After trying it for a long time, I found that it still didn't work! After suffering for a long time, I finally saw an expert's advice in a reply to a post, saying that I can check the mysql error log. The command to check the mysql error log is as follows:
cat /usr/local/var/mysql/xxx-mini.local.err
You can ignore the [note] and [warning] in the log. It, I directly found [error] which is the error message:

You know what the problem is! It turns out that the lack of read and write permissions caused trouble! Use dscl . list /Users | grep my to find out that the username of mysql in the mac is _mysql, and then modify the owner of the mysql folder:
sudo chown _mysql -R /usr/local/var/mysql/
You’re done! Use sudo mysql.server start to see Starting MySQL .. SUCCESS!, which means that mysql has started normally!

Hot AI Tools

Undresser.AI Undress
AI-powered app for creating realistic nude photos

AI Clothes Remover
Online AI tool for removing clothes from photos.

Undress AI Tool
Undress images for free

Clothoff.io
AI clothes remover

Video Face Swap
Swap faces in any video effortlessly with our completely free AI face swap tool!

Hot Article

Hot Tools

Notepad++7.3.1
Easy-to-use and free code editor

SublimeText3 Chinese version
Chinese version, very easy to use

Zend Studio 13.0.1
Powerful PHP integrated development environment

Dreamweaver CS6
Visual web development tools

SublimeText3 Mac version
God-level code editing software (SublimeText3)

Hot Topics
 1389
1389
 52
52
 How to open phpmyadmin
Apr 10, 2025 pm 10:51 PM
You can open phpMyAdmin through the following steps: 1. Log in to the website control panel; 2. Find and click the phpMyAdmin icon; 3. Enter MySQL credentials; 4. Click "Login".
 MySQL: An Introduction to the World's Most Popular Database
Apr 12, 2025 am 12:18 AM
MySQL is an open source relational database management system, mainly used to store and retrieve data quickly and reliably. Its working principle includes client requests, query resolution, execution of queries and return results. Examples of usage include creating tables, inserting and querying data, and advanced features such as JOIN operations. Common errors involve SQL syntax, data types, and permissions, and optimization suggestions include the use of indexes, optimized queries, and partitioning of tables.
 How to use single threaded redis
Apr 10, 2025 pm 07:12 PM
Redis uses a single threaded architecture to provide high performance, simplicity, and consistency. It utilizes I/O multiplexing, event loops, non-blocking I/O, and shared memory to improve concurrency, but with limitations of concurrency limitations, single point of failure, and unsuitable for write-intensive workloads.
 Why Use MySQL? Benefits and Advantages
Apr 12, 2025 am 12:17 AM
MySQL is chosen for its performance, reliability, ease of use, and community support. 1.MySQL provides efficient data storage and retrieval functions, supporting multiple data types and advanced query operations. 2. Adopt client-server architecture and multiple storage engines to support transaction and query optimization. 3. Easy to use, supports a variety of operating systems and programming languages. 4. Have strong community support and provide rich resources and solutions.
 MySQL's Place: Databases and Programming
Apr 13, 2025 am 12:18 AM
MySQL's position in databases and programming is very important. It is an open source relational database management system that is widely used in various application scenarios. 1) MySQL provides efficient data storage, organization and retrieval functions, supporting Web, mobile and enterprise-level systems. 2) It uses a client-server architecture, supports multiple storage engines and index optimization. 3) Basic usages include creating tables and inserting data, and advanced usages involve multi-table JOINs and complex queries. 4) Frequently asked questions such as SQL syntax errors and performance issues can be debugged through the EXPLAIN command and slow query log. 5) Performance optimization methods include rational use of indexes, optimized query and use of caches. Best practices include using transactions and PreparedStatemen
 Monitor Redis Droplet with Redis Exporter Service
Apr 10, 2025 pm 01:36 PM
Effective monitoring of Redis databases is critical to maintaining optimal performance, identifying potential bottlenecks, and ensuring overall system reliability. Redis Exporter Service is a powerful utility designed to monitor Redis databases using Prometheus. This tutorial will guide you through the complete setup and configuration of Redis Exporter Service, ensuring you seamlessly build monitoring solutions. By studying this tutorial, you will achieve fully operational monitoring settings
 How to view sql database error
Apr 10, 2025 pm 12:09 PM
The methods for viewing SQL database errors are: 1. View error messages directly; 2. Use SHOW ERRORS and SHOW WARNINGS commands; 3. Access the error log; 4. Use error codes to find the cause of the error; 5. Check the database connection and query syntax; 6. Use debugging tools.
 How to connect to the database of apache
Apr 13, 2025 pm 01:03 PM
Apache connects to a database requires the following steps: Install the database driver. Configure the web.xml file to create a connection pool. Create a JDBC data source and specify the connection settings. Use the JDBC API to access the database from Java code, including getting connections, creating statements, binding parameters, executing queries or updates, and processing results.


