Building microservices: Getting started with Spring boot
What is spring boot
Spring Boot is a new framework provided by the Pivotal team. It is designed to simplify the initial construction and development process of new Spring applications. The framework uses an ad hoc approach to configuration, eliminating the need for developers to define boilerplate configurations. To understand it in my words, spring boot is actually not a new framework. It configures the use of many frameworks by default, just like maven integrates all jar packages, and spring boot integrates all frameworks (I don’t know if this metaphor is appropriate. ).
What are the benefits of using spring boot
In fact, it is simple, fast and convenient! What should we do if we need to build a spring web project?
1) Configure web.xml, load spring and spring mvc
2) Configure database connection, configure spring transactions
3) Configure reading of loading configuration files, enable annotations
4) Configure log files
.. .
After the configuration is completed, deploy tomcat for debugging
...
Microservices are very popular now. If my project just needs to send an email, if my project just needs to produce a point; I need to do this all over again!
But what if you use spring boot?
It’s very simple. I only need a few configurations to quickly and easily set up a web project or build a microservice!
Quick Start
Having said so much, my hands are itchy, let’s give it a try right away!
maven build project
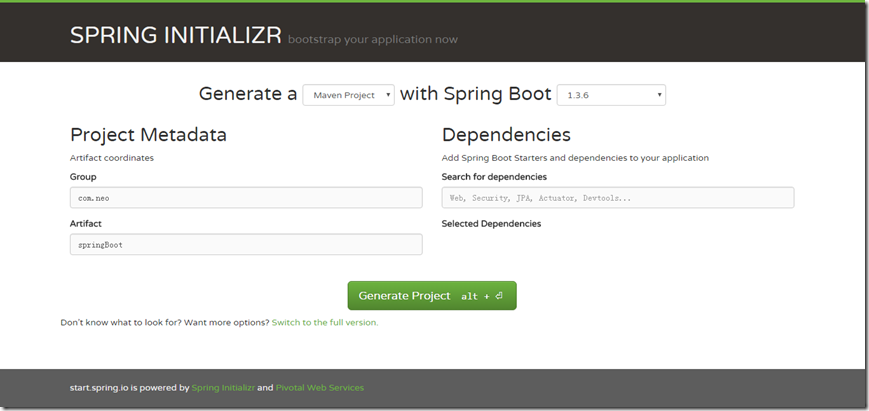
1. Visit http://start.spring.io/
2 , select the build tool Maven Project, Spring Boot version 1.3.6 and some basic project information, click "Switch to the full version." Select 1.7 for the java version, as shown in the figure below:

3. Click Generate Project Download the project compressed package
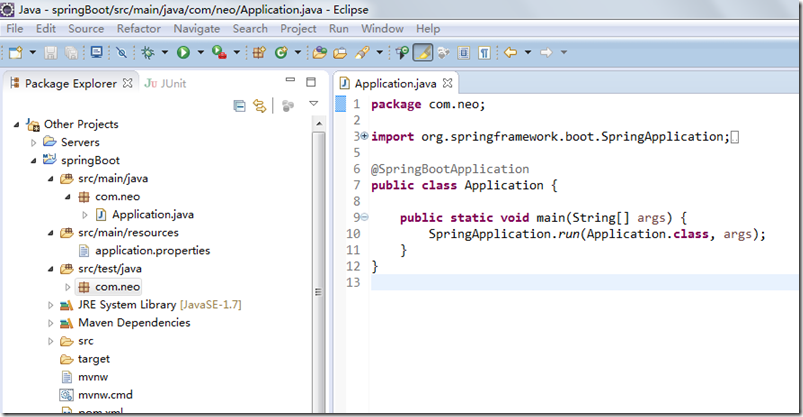
4. After unzipping, use eclipse, Import -> Existing Maven Projects -> Next -> Select the unzipped folder -> Finsh, OK done!
Project structure introduction

As shown in the picture above, the basic structure of Spring Boot has three files:
l src/main/java program development and main program entry
l src/main/resources configuration file
l src/test/ java test program
In addition, the directory results recommended by spingboot are as follows:
root package structure: com.example.myproject
com +- example +- myproject +- Application.java | +- domain | +- Customer.java | +- CustomerRepository.java | +- service | +- CustomerService.java | +- controller | +- CustomerController.java |
1. Application.java is recommended to be placed under the following directory, mainly used for some framework configuration
2. The domain directory is mainly used for the entity (Entity) and data access layer (Repository)
3. The service layer is mainly business code
4. The controller is responsible for page access control
Using the default configuration can save a lot Configuration, of course, you can also change it according to your own preferences
Finally, start the Application main method, and now a java project is set up!
Introducing the web module
1. Add web-supporting modules to pom. , logs and YAML;
spring-boot-starter-test: test modules, including JUnit, Hamcrest, Mockito.
2. Write controller content
<dependency>
        <groupId>org.springframework.boot</groupId>
        <artifactId>spring-boot-starter-web</artifactId>
</dependency>@RestController means that all methods in the controller are output in json format, and there is no need to write any jackjson configuration!
3. Start the main program, open the browser and visit http://localhost:8080/hello, and you can see the effect. It’s very simple!
How to do unit testing
打开的src/test/下的测试入口,编写简单的http请求来测试;使用mockmvc进行,利用MockMvcResultHandlers.print()打印出执行结果。
@RunWith(SpringJUnit4ClassRunner.class) @SpringApplicationConfiguration(classes = MockServletContext.class) @WebAppConfiguration public class HelloWorldControlerTests { private MockMvc mvc; @Before public void setUp() throws Exception { mvc = MockMvcBuilders.standaloneSetup(new HelloWorldController()).build(); } @Test public void getHello() throws Exception { mvc.perform(MockMvcRequestBuilders.get("/hello").accept(MediaType.APPLICATION_JSON)) .andExpect(MockMvcResultMatchers.status().isOk()) .andDo(MockMvcResultHandlers.print()) .andReturn(); } }开发环境的调试
热启动在正常开发项目中已经很常见了吧,虽然平时开发web项目过程中,改动项目启重启总是报错;但springBoot对调试支持很好,修改之后可以实时生效,需要添加以下的配置:
该模块在完整的打包环境下运行的时候会被禁用。如果你使用java -jar启动应用或者用一个特定的classloader启动,它会认为这是一个“生产环境”。
总结
使用spring boot可以非常方便、快速搭建项目,使我们不用关心框架之间的兼容性,适用版本等各种问题,我们想使用任何东西,仅仅添加一个配置就可以,所以使用sping boot非常适合构建微服务。

Hot AI Tools

Undresser.AI Undress
AI-powered app for creating realistic nude photos

AI Clothes Remover
Online AI tool for removing clothes from photos.

Undress AI Tool
Undress images for free

Clothoff.io
AI clothes remover

AI Hentai Generator
Generate AI Hentai for free.

Hot Article

Hot Tools

Notepad++7.3.1
Easy-to-use and free code editor

SublimeText3 Chinese version
Chinese version, very easy to use

Zend Studio 13.0.1
Powerful PHP integrated development environment

Dreamweaver CS6
Visual web development tools

SublimeText3 Mac version
God-level code editing software (SublimeText3)

Hot Topics
 1378
1378
 52
52
 Spring Boot+MyBatis+Atomikos+MySQL (with source code)
Aug 15, 2023 pm 04:12 PM
In actual projects, we try to avoid distributed transactions. However, sometimes it is really necessary to do some service splitting, which will lead to distributed transaction problems. At the same time, distributed transactions are also asked in the market during interviews. You can practice with this case, and you can talk about 123 in the interview.
 How to use Spring Boot to build blockchain applications and smart contracts
Jun 22, 2023 am 09:33 AM
With the rise of digital currencies such as Bitcoin, blockchain technology has gradually become a hot topic. Smart contracts can be regarded as an important part of blockchain technology. SpringBoot, as a popular Java back-end development framework, can also be used to build blockchain applications and smart contracts. This article will introduce how to use SpringBoot to build applications and smart contracts based on blockchain technology. 1. SpringBoot and blockchain First, we need to understand some basic concepts related to blockchain. Blockchain
 Achieve multi-language support and international applications through Spring Boot
Jun 23, 2023 am 09:09 AM
With the development of globalization, more and more websites and applications need to provide multi-language support and internationalization functions. For developers, implementing these functions is not an easy task because it requires consideration of many aspects, such as language translation, date, time and currency formats, etc. However, using the SpringBoot framework, we can easily implement multi-language support and international applications. First, let us understand the LocaleResolver interface provided by SpringBoot. Loc
 How to use Spring Boot to build big data processing applications
Jun 23, 2023 am 09:07 AM
With the advent of the big data era, more and more companies are beginning to understand and recognize the value of big data and apply it to business. The problem that comes with it is how to handle this large flow of data. In this case, big data processing applications have become something that every enterprise must consider. For developers, how to use SpringBoot to build an efficient big data processing application is also a very important issue. SpringBoot is a very popular Java framework that allows
 Implement ORM mapping based on Spring Boot and MyBatis Plus
Jun 22, 2023 pm 09:27 PM
In the development process of Java web applications, ORM (Object-RelationalMapping) mapping technology is used to map relational data in the database to Java objects, making it convenient for developers to access and operate data. SpringBoot, as one of the most popular Java web development frameworks, has provided a way to integrate MyBatis, and MyBatisPlus is an ORM framework extended on the basis of MyBatis.
 Integration and use of Spring Boot and NoSQL database
Jun 22, 2023 pm 10:34 PM
With the development of the Internet, big data analysis and real-time information processing have become an important need for enterprises. In order to meet such needs, traditional relational databases no longer meet the needs of business and technology development. Instead, using NoSQL databases has become an important option. In this article, we will discuss the use of SpringBoot integrated with NoSQL databases to enable the development and deployment of modern applications. What is a NoSQL database? NoSQL is notonlySQL
 Distributed data caching and storage system based on Spring Boot
Jun 22, 2023 am 09:48 AM
With the continuous development and popularization of the Internet, the demand for data processing and storage is also increasing. How to process and store data efficiently and reliably has become a hot topic among industry and researchers. The distributed data caching and storage system based on SpringBoot is a solution that has attracted much attention in recent years. What is a distributed data caching and storage system? Distributed data caching and storage system refers to the distributed storage of data through multiple nodes (servers), which improves the security and reliability of data, and can also improve data processing.
 Building an ESB system using Spring Boot and Apache ServiceMix
Jun 22, 2023 pm 12:30 PM
As modern businesses rely more and more on a variety of disparate applications and systems, enterprise integration becomes even more important. Enterprise Service Bus (ESB) is an integration architecture model that connects different systems and applications together to provide common data exchange and message routing services to achieve enterprise-level application integration. Using SpringBoot and ApacheServiceMix, we can easily build an ESB system. This article will introduce how to implement it. SpringBoot and A


