New Kali Linux System Installation Guide
Kali Linux system is arguably the best out-of-the-box Linux distribution when it comes to security testing. Many tools and software under Kali can be installed on most Linux distributions. The Offensive Security team has invested a lot of time and energy in the development process of the Kali system to improve this Linux distribution for penetration testing and security auditing.
Kali Linux is a security-oriented distribution based on Debian. The system is famous for having hundreds of well-known security tools pre-installed.
Kali even has a highly valuable certification in the field of information security called "Kali Penetration Testing (Penttesting with Kali)" certification. Applicants for this certification must successfully compromise multiple computers within a grueling 24 hours, then complete a penetration test report and send it to Offensive Security's security staff for review within an additional 24 hours. Those who successfully pass the exam will receive an OSCP certification.
This installation guide and subsequent articles are mainly to help individuals become familiar with the Kali Linux system and the use of some of its tool software.
Please use the tools under Kali with caution, as some of them will cause damage to the computer system if used improperly. Please use the information contained in all Kali series articles in legal ways.
System Requirements
The Kali system has some basic requirements and suggestions for hardware. Depending on the user's purpose, you can enable higher configurations. This article assumes that the reader wants to install kali as the only operating system on the computer.
At least 10GB of disk space; allocating more storage space is highly recommended.
At least 512MB of RAM; would love more, especially with a graphical interface.
Supports USB or CD/DVD boot method.
Kali Linux system ISO image
Use the dd command to create a USB boot tool
This article assumes that a USB device can be used to boot the installation system. Note that if possible, use a 4GB or 8GB USB device, and all data on it will be deleted.
The author of this article encountered problems during the installation process when using a larger-capacity USB device, but others should still be able to do it. Anyway, the following installation steps will clear the data from the USB device.
Be sure to back up all your data before starting. The USB boot device used to install the Kali Linux system will be created on another machine.
The first step is to obtain the Kali Linux system ISO image file. This guide will install using the latest version of Kali Linux system that includes the Enlightenment desktop environment.
Enter the following command in the terminal to obtain this version of the ISO image file.
$ cd ~/Downloads
$ wget -c http://cdimage.kali.org/kali-2016.2/kali-linux-e17-2016.2-amd64.iso
The above two commands will download the ISO image file of Kali Linux to the Downloads directory of the current user.
The next step is to write the ISO image to a USB device to start the installation program. We can do this using the dd command in Linux systems. First, the USB device must be found under the lsblk command.
$ lsblk
Confirm the USB device name in the Linux system
Make sure the name of the USB device is /dev/sdc. You can use the dd tool to write the Kali system image to the USB device.
$ sudo dd if=~/Downloads/kali-linux-e17-2016.2-amd64.iso of=/dev/sdc
Note: The above command requires root privileges, so use the sudo command or log in with the root account to execute the command. This command will delete all data from the USB device. Make sure you have backed up the required data.
Once the ISO image file is completely copied to the USB device, the next step is to install the Kali Linux system.
Install the Kali Linux system
1. First, insert the USB device into the computer where the Kali operating system is to be installed, and then boot the system from the USB device. As soon as the system is successfully booted from the USB device, you will see the following graphical interface, select the "Install" or "Graphical Install" option.
This guide will use the "Graphical Install" method to install.
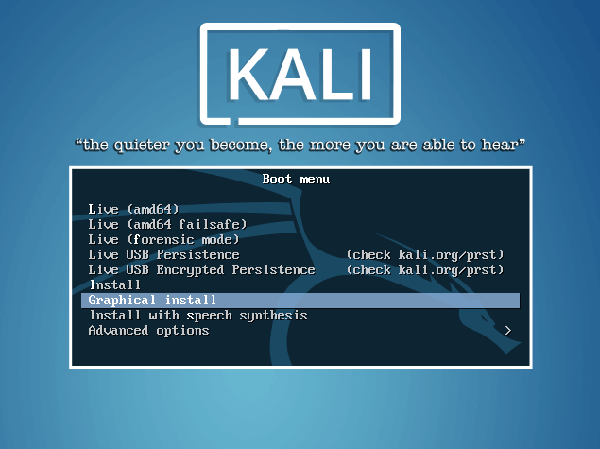
Kali Linux startup menu
2. The following interfaces will ask the user to select regional setting information, such as language, country, and keyboard layout.
After the selection is completed, the system will prompt the user to enter the host name and domain name information. After entering the appropriate environment information, click Continue with installation.

Set the host name of the Kali Linux system

Set the domain name of the Kali Linux system
3. After the host name and domain name are set, you need to set the password of the root user. Don't forget this password.
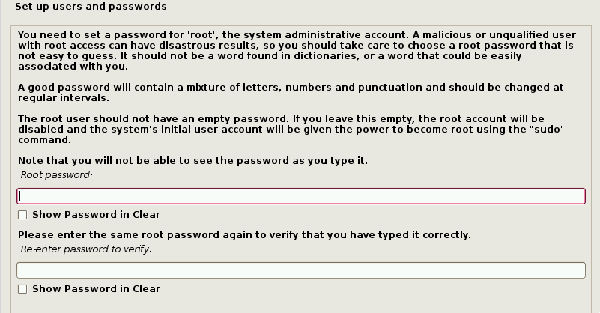
Set Kali Linux system user password
4. After the password is set, the installation step will prompt the user to select a time zone and then stay at the hard disk partition interface.
If Kali Linux is the only operating system on this computer, the easiest option is to use “Guided – Use Entire Disk” and select the storage device on which you need to install Kali.
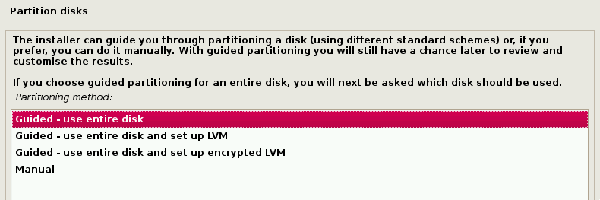
选择 Kali Linux 系统安装类型

选择 Kali Linux 安装磁盘
5、 下一步将提示用户在存储设备上进行分区。大多数情况下,我们可以把整个系统安装在一个分区内。

在分区上安装 Kali Linux 系统
6、 最后一步是提示用户确认将所有的更改写入到主机硬盘。注意,点确认后将会清空整个磁盘上的所有数据。
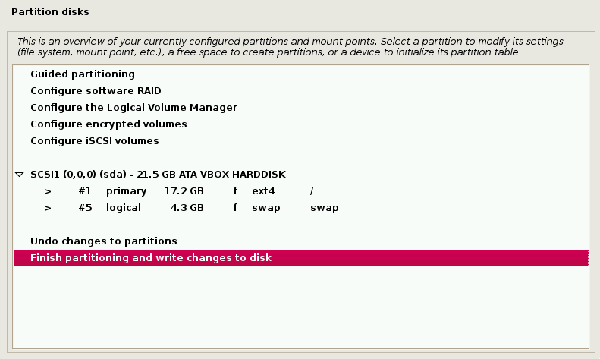
确认磁盘分区更改
7、 一旦确认分区更改,安装包将会进行复制文件的安装过程。安装完成后,你需要设置一个网络镜像源来获取软件包和系统更新。如果你希望使用 Kali 的软件库,确保开启此功能。

配置 Kali Linux 包管理器
8、 选择网络镜像源后,系统将会询问你安装 Grub 引导程序。再次说明,本文假设你的电脑上仅安装唯一的 Kali Linux 操作系统。
在该屏幕上选择“Yes”,用户需要选择要写入引导程序信息的硬盘引导设备。

安装 Grub 引导程序

选择安装 Grub 引导程序的分区
9、 当 Grub 安装完成后,系统将会提醒用户重启机器以进入新安装的 Kali Linux 系统。

Kali Linux 系统安装完成
10、 因为本指南使用 Enlightenment 作为 Kali Linux 系统的桌面环境,因此默认情况下是启动进入到 shell 环境。
使用 root 账号及之前安装过程中设置的密码登录系统,以便运行 Enlightenment 桌面环境。
登录成功后输入命令startx进入 Enlightenment 桌面环境。
# startx
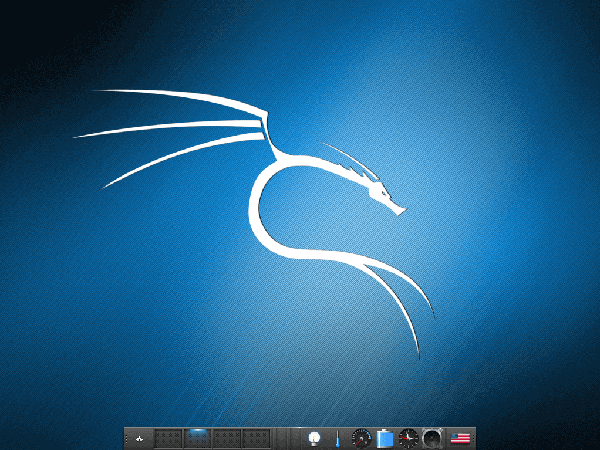
Kali Linux 下进入 Enlightenment 桌面环境
初次进入 Enlightenment 桌面环境时,它将会询问用户进行一些首选项配置,然后再运行桌面环境。

Kali Linux Enlightenment 桌面
此时,你已经成功地安装了 Kali Linux 系统,并可以使用了。后续的文章我们将探讨 Kali 系统中一些有用的工具以及如何使用这些工具来探测主机及网络方面的安全状况。

Hot AI Tools

Undresser.AI Undress
AI-powered app for creating realistic nude photos

AI Clothes Remover
Online AI tool for removing clothes from photos.

Undress AI Tool
Undress images for free

Clothoff.io
AI clothes remover

Video Face Swap
Swap faces in any video effortlessly with our completely free AI face swap tool!

Hot Article

Hot Tools

Notepad++7.3.1
Easy-to-use and free code editor

SublimeText3 Chinese version
Chinese version, very easy to use

Zend Studio 13.0.1
Powerful PHP integrated development environment

Dreamweaver CS6
Visual web development tools

SublimeText3 Mac version
God-level code editing software (SublimeText3)

Hot Topics
 1386
1386
 52
52
 PHP 8.4 Installation and Upgrade guide for Ubuntu and Debian
Dec 24, 2024 pm 04:42 PM
PHP 8.4 brings several new features, security improvements, and performance improvements with healthy amounts of feature deprecations and removals. This guide explains how to install PHP 8.4 or upgrade to PHP 8.4 on Ubuntu, Debian, or their derivati
 How To Set Up Visual Studio Code (VS Code) for PHP Development
Dec 20, 2024 am 11:31 AM
Visual Studio Code, also known as VS Code, is a free source code editor — or integrated development environment (IDE) — available for all major operating systems. With a large collection of extensions for many programming languages, VS Code can be c
 7 PHP Functions I Regret I Didn't Know Before
Nov 13, 2024 am 09:42 AM
If you are an experienced PHP developer, you might have the feeling that you’ve been there and done that already.You have developed a significant number of applications, debugged millions of lines of code, and tweaked a bunch of scripts to achieve op
 Explain JSON Web Tokens (JWT) and their use case in PHP APIs.
Apr 05, 2025 am 12:04 AM
JWT is an open standard based on JSON, used to securely transmit information between parties, mainly for identity authentication and information exchange. 1. JWT consists of three parts: Header, Payload and Signature. 2. The working principle of JWT includes three steps: generating JWT, verifying JWT and parsing Payload. 3. When using JWT for authentication in PHP, JWT can be generated and verified, and user role and permission information can be included in advanced usage. 4. Common errors include signature verification failure, token expiration, and payload oversized. Debugging skills include using debugging tools and logging. 5. Performance optimization and best practices include using appropriate signature algorithms, setting validity periods reasonably,
 How do you parse and process HTML/XML in PHP?
Feb 07, 2025 am 11:57 AM
This tutorial demonstrates how to efficiently process XML documents using PHP. XML (eXtensible Markup Language) is a versatile text-based markup language designed for both human readability and machine parsing. It's commonly used for data storage an
 PHP Program to Count Vowels in a String
Feb 07, 2025 pm 12:12 PM
A string is a sequence of characters, including letters, numbers, and symbols. This tutorial will learn how to calculate the number of vowels in a given string in PHP using different methods. The vowels in English are a, e, i, o, u, and they can be uppercase or lowercase. What is a vowel? Vowels are alphabetic characters that represent a specific pronunciation. There are five vowels in English, including uppercase and lowercase: a, e, i, o, u Example 1 Input: String = "Tutorialspoint" Output: 6 explain The vowels in the string "Tutorialspoint" are u, o, i, a, o, i. There are 6 yuan in total
 Explain late static binding in PHP (static::).
Apr 03, 2025 am 12:04 AM
Static binding (static::) implements late static binding (LSB) in PHP, allowing calling classes to be referenced in static contexts rather than defining classes. 1) The parsing process is performed at runtime, 2) Look up the call class in the inheritance relationship, 3) It may bring performance overhead.
 What are PHP magic methods (__construct, __destruct, __call, __get, __set, etc.) and provide use cases?
Apr 03, 2025 am 12:03 AM
What are the magic methods of PHP? PHP's magic methods include: 1.\_\_construct, used to initialize objects; 2.\_\_destruct, used to clean up resources; 3.\_\_call, handle non-existent method calls; 4.\_\_get, implement dynamic attribute access; 5.\_\_set, implement dynamic attribute settings. These methods are automatically called in certain situations, improving code flexibility and efficiency.


