In my daily work, I have some needs. To put it simply, I need to generate some content into pictures. Simple content can be processed through PhotoShop, but for content with tables, etc., it is a waste of time to process it through PhotoShop every time. There are many generation tools on the Internet similar to long Weibo. Generating simple pictures is okay, but if you want to use rich text to generate pictures, you will need a lot of money, so I studied the implementation based on PHP.
Requirements and principles
Based on PHP, generate images (PNG, JPEG, etc.) from html content
Implementation method
1. Generate directly through graphics functions
You can directly use the GD library or imagick that comes with PHP to Text content is converted into images. This is very powerful when dealing with pure text content, but it is very difficult for rich text content and is difficult to handle well. Currently open source ones include painty, etc., which can support several simple html tags such as p and img.
2. html->pdf->png
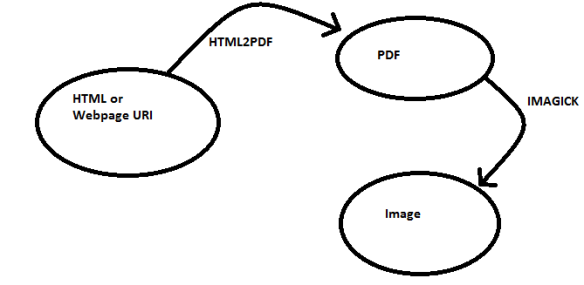
This method first generates a pdf document from the html content, and then converts the pdf document into a picture.
html to pdf: Currently more mature solutions include tcpdf, HTML2PDF, etc. In fact, HTML2PDF also uses the core of tcpdf;
pdf to png: can be extended through imagick php.
The current open source code based on this method includes html to image, and its principle is shown in the figure below.

The core code is (extracted from: http://buffernow.com/html-to-image-php-script/):
//获取某个URL地址的内容
    echo file_get_contents('http://php.cn/');
    //将内容转换成pdf文档
    $html2pdf = new HTML2PDF('P', 'A4');
    $html2pdf->writeHTML($html_content);
    $file = $html2pdf->Output('temp.pdf','F');
    //将pdf文档转换成图片
    $im = new imagick('temp.pdf');
    $im->setImageFormat( "jpg" );
    $img_name = time().'.jpg';
    $im->setSize(800,600);
    $im->writeImage($img_name);
    $im->clear();
$im->destroy();The code of HTML2PDF is used here. In fact, I personally recommend using tcpdf, after all, tcpdf The version is updated with more powerful functions. After actual testing, tcpdf has better support for Chinese, html formats, etc. Relatively speaking, HTML2PDF is a bit miserable, and long Chinese will have basic errors such as the inability to automatically wrap lines.
But at the same time, this method has a major flaw. When pictures and other media are inserted, there will often be a problem that they cannot be placed on one page and need to be retyped on another page. As a result, the generated pictures will have A large blank area; at the same time, if the content of each page is not completely filled, the generated image will also have a large blank area, which is very unsightly.
Therefore, this method is not recommended.
3. By taking a screenshot
This method is similar to using the screenshot function of the browser to directly screenshot the content of a URL address. Compared with the previous two methods: first, it is more convenient and simple to render rich text HTML content, just generate HTML code directly; second, the content layout is more reasonable, and there will be no blank areas that exist in PDF documents. and other issues; third, the support for Chinese is more friendly.
The current main open source projects include:
khtml2png: Based on the Linux platform, it can convert html into image format. It has the following requirements:
g++
KDE 3.x
kdelibs for KDE 3.x (kdelibs4-dev)
zlib (zlib1g-dev)
cmake
For servers, especially VPS with tight resources, install a KED A little too expensive.
CutyCapt and its brother version IECapt: CutyCapt is based on Linux and Windows platforms, IECapt is based on Windows platform and supports svg, ps, pdf, itext, html, rtree, png, jpeg, mng, tiff, gif, bmp, ppm, Various formats such as xbm and xpm are relatively simple to use. Just use the following commands directly.
Note: The capitalization of CutyCapt’s executable commands is not consistent between the Windows platform and the Linux platform.
./CutyCapt --url=http://www.php.cn --out=example.png
IECapt --url=http://www.php.cn/ --out=localfile.png
Its deployment requirements are:
CutyCapt depends on Qt 4.4.0+.
But one thing it is better than khtml2png is that it does not need to install X server, you can use lightweight things like Xvfb, and then you can use it like this:
xvfb-run --server-args="-screen 0, 1024x768x24" ./CutyCapt --url=... --out=...
By handling various For actual comparison of implementation methods, I tend to use CutyCapt.
Through actual comparison of various implementation methods, I tend to use CutyCapt.
具体实现过程
1、通过嵌入富文本编辑器,提供富文本编辑功能,同时可以提供对作者信息、版权标记、图片大小格式等的定制。
2、将提交的内容进行过滤,并生成htm/html文档,通过CSS对生成的文档内容进行格式渲染。
3、通过PHP执行CutyCapt命令,对生成的网页文件进行截图。
到这一步已经完全可以实现html内容生成图片的功能了,但CutyCapt生成的图片相对而言会比较大,因此还可以进一步进行优化。
4、通过imagick对生成的图片进行优化
imagick具有强大的图片处理功能,可以优化CutyCapt生成的图片的质量及大小,同时还可以方便地进行加水印等操作。
开发经验分享
在实际开发过程中碰到了各种问题,进行一些分享。
1、操作系统选择
CutyCapt及imagick都有Linux和Windows的版本,在Windows下面的开发、运行不存在较大的问题,按照正常步骤进行安装配置即可。
在Linux平台下,CutyCapt的安装教程可参考http://www.cszhi.com/20130305/cutycapt.html:
centos下安装cutycapt:
(1)安装qt47
增加qt47的源
vim /etc/yum.repos.d/atrpms.repo
//加入如下内容
[atrpms]
name=CentOS $releasever – $basearch – ATrpms
baseurl=http://dl.atrpms.net/el$releasever-$basearch/atrpms/stable
gpgkey=http://ATrpms.net/RPM-GPG-KEY.atrpms
gpgcheck=1
enabled=1
[atrpms-testing]
name=CentOS $releasever – $basearch - ATrpms testing
baseurl=http://dl.atrpms.net/el$releasever-$basearch/atrpms/testing
gpgkey=http://ATrpms.net/RPM-GPG-KEY.atrpms
gpgcheck=1
enabled=1
//进行安装
yum update
yum install qt47
yum install qt47-devel
yum install qt47-webkit
yum install qt47-webkit-devel
2、安装cutycapt
yum install svn
svn co https://cutycapt.svn.sourceforge.net/svnroot/cutycapt
mv cutycapt/CutyCapt /usr/local/cutycapt
cd /usr/local/cutycapt
qmake
qmake-qt47
3、安装xvfb
yum install Xvfb
4、测试cutycapt截图
xvfb-run --server-args="-screen 0, 1024x768x24" CutyCapt --url=http://www.php.cn --out=php.png
5、将xvfb置入后台运行
Xvfb -fp /usr/share/fonts :0 -screen 0 1024x768x24 &
DISPLAY=:0 ./CutyCapt --url=http://www.php.cn --out=php.png
ubuntu下安装cutycapt
1、两条命令搞定
apt-get install cutycapt
apt-get install xvfb
2、测试截图
xvfb-run --server-args="-screen 0, 1024x768x24" CutyCapt --url=http://www.php.cn --out=php.png
中文乱码问题:
将windows下的中文字体上传至/usr/share/fonts目录,执行下命令fc-cache即可。
在这里,作者想说的是,尽量选择Ubuntu吧,安装方便;更重要的是,CentOS下面会出现各种问题,如CutyCapt: cannot connect to X server :99等,会让你非常郁闷,我甚至安装了新的包含Gnome、KDE桌面环境的操作系统仍无法解决,而在Ubuntu下面几乎不存在任何问题。
2、Web服务器的选择
因为截图功能涉及到PHP需要执行操作系统的CutyCapt命令,可以通过system()或者exec()函数。
作者分别使用了apache和Nginx两种Web服务器,在Nginx下会出现执行调用CutyCapt的PHP脚本无法运行的情况,会遇到比较麻烦的权限问题,http://alfred-long.iteye.com/blog/1578904中提供了一种解决方案,但作者没有测试成功。使用apache服务器则是一路畅通,不存在这个问题。
因此,作者建议选择Ubuntu+apache的组合,千万不要选择CentOS+Nginx,需要解决的麻烦问题太多,从而也容易造成一些不安全的因素。
安装代码如下:
apt-get install apache2
apt-get install php5 libapache2-mod-php5
3、Ubuntu中安装imagick
apt-get install php5-dev php5-cli php-pear   //安装支持环境
apt-get install imagemagick   //有可能不是最新版本,需要通过源代码安装最新版本
//源代码方式安装http://www.imagemagick.org/script/download.php
cd /usr/local/src
wget ftp://ftp.kddlabs.co.jp/graphics/ImageMagick/ImageMagick-6.8.7-0.tar.gz
tar xzvf ImageMagick-6.8.7-0.tar.gz
cd ImageMagick-6.8.7-0/
./configure && make && make install
apt-get install graphicsmagick-libmagick-dev-compat
pecl install imagick
echo extension=imagick.so >>/etc/php5/conf.d/imagick.ini
service apache2 restart
常见错误:
在运行pecl install imagick 时有以下出错提示:
checking if ImageMagick version is at least 6.2.4... configure: error: no. You need at least Imagemagick version 6.2.4 to use Imagick. ERROR: `/tmp/pear/temp/imagick/configure --with-imagick=hjw' failed
根据提示是没有安装Imagemagick或者Imagemagick版本不够,可以通过源代码的方式安装最新版本的Imagemagick。
4、Linux平台下的字体渲染
可以将Windows平台下的雅黑、宋体、楷体、黑体等常用中文字体安装到Ubuntu系统中,避免出现截图中的字体不好看的情况,同时也满足对富文本编辑中支持的字体进行渲染。


