 Web Front-end
 JS Tutorial
 Detailed explanation and examples of building a simple web server with Nodejs
Detailed explanation and examples of building a simple web server with Nodejs
使用 Nodejs 搭建简单的Web服务器
使用Nodejs搭建Web服务器是学习Node.js比较全面的入门教程,因为要完成一个简单的Web服务器,你需要学习Nodejs中几个比较重要的模块,比如:http协议模块、文件系统、url解析模块、路径解析模块、以及301重定向问题,下面我们就简单讲一下如何来搭建一个简单的Web服务器。
作为一个Web服务器应具备以下几个功能:
1、能显示以.html/.htm结尾的Web页面
2、能直接打开以.js/.css/.json/.text结尾的文件内容
3、显示图片资源
4、自动下载以.apk/.docx/.zip结尾的文件
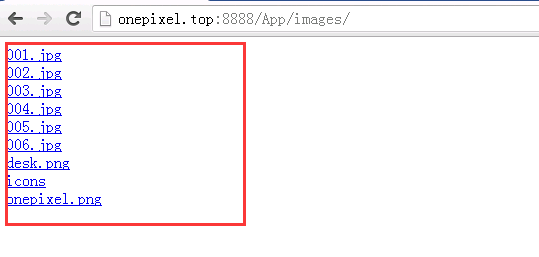
5、形如http://xxx.com/a/b/ , 则查找b目录下是否有index.html,如果有就显示,如果没有就列出该目录下的所有文件及文件夹,并可以进一步访问。
6、形如http://xxx.com/a/b, 则作301重定向到http://xxx.com/a/b/ , 这样可以解决内部资源引用错位的问题。
引入需要用到的几个模块:
//http协议模块
var http = require('http');
//url解析模块
var url = require('url');
//文件系统模块
var fs = require("fs");
//路径解析模块
var path = require("path");
创建服务并在指定的端口监听:
//创建一个服务
var httpServer = http.createServer(this.processRequest.bind(this));

//在指定的端口监听服务
httpServer.listen(port,function(){
  console.log("[HttpServer][Start]","runing at http://"+ip+":"+port+"/");
  console.timeEnd("[HttpServer][Start]");
});
在创建服务的时候需要传递一个匿名函数processRequest 对请求进行处理,processRequest接收2个参数,分别是request和response, request对象中包含了请求的所有内容,response是用来设置响应头以及对客户端做出响应操作。
processRequest:function(request,response){
var hasExt = true;
var requestUrl = request.url;
var pathName = url.parse(requestUrl).pathname;
//对请求的路径进行解码,防止中文乱码
pathName = decodeURI(pathName);
//如果路径中没有扩展名
if(path.extname(pathName) === ''){
//如果不是以/结尾的,加/并作301重定向
if (pathName.charAt(pathName.length-1) != "/"){
pathName += "/";
var redirect = "http://"+request.headers.host + pathName;
response.writeHead(301, {
location:redirect
});
response.end();
}
//添加默认的访问页面,但这个页面不一定存在,后面会处理
pathName += "index.html";
hasExt = false; //标记默认页面是程序自动添加的
}
//获取资源文件的相对路径
var filePath = path.join("http/webroot",pathName);
//获取对应文件的文档类型
var contentType = this.getContentType(filePath);
//如果文件名存在
fs.exists(filePath,function(exists){
if(exists){
response.writeHead(200, {"content-type":contentType});
var stream = fs.createReadStream(filePath,{flags:"r",encoding:null});
stream.on("error", function() {
response.writeHead(500,{"content-type": "text/html"});
response.end("<h1 id="nbsp-Server-nbsp-Error">500 Server Error</h1>");
});
//返回文件内容
stream.pipe(response);
}else { //文件名不存在的情况
if(hasExt){
//如果这个文件不是程序自动添加的,直接返回404
response.writeHead(404, {"content-type": "text/html"});
response.end("<h1 id="nbsp-Not-nbsp-Found">404 Not Found</h1>");
}else {
//如果文件是程序自动添加的且不存在,则表示用户希望访问的是该目录下的文件列表
var html = "<head><meta charset='utf-8'></head>";
try{
//用户访问目录
var filedir = filePath.substring(0,filePath.lastIndexOf('\\'));
//获取用户访问路径下的文件列表
var files = fs.readdirSync(filedir);
//将访问路径下的所以文件一一列举出来,并添加超链接,以便用户进一步访问
for(var i in files){
var filename = files[i];
html += "<div><a href='"+filename+"'>"+filename+"</a></div>";
}
}catch (e){
html += "<h1 id="您访问的目录不存在">您访问的目录不存在</h1>"
}
response.writeHead(200, {"content-type": "text/html"});
response.end(html);
}
}
});
},
请求处理函数中有几个重点需要说一下:
对于路径中有中文的,浏览器会自动进行编码(英文不变,中文会变),因此在接收到地址后,需要对地址进行解码,否则最后得到的路径和真实路径不相符,
当访问路径不是以具体的文件结尾,并且不是以/结尾,则需要通过重定向加上/,表示当前目录,否则当前路径下的静态资源会找不到
如果访问路径是目录,则列出该目录下所有文件及文件夹,并可以点击访问,为了让中文目录能正常显示,则还要在header中设置charset=utf-8

如果要运行demo,打开cmd切换到根目录,运行node start即可。

Hot AI Tools

Undresser.AI Undress
AI-powered app for creating realistic nude photos

AI Clothes Remover
Online AI tool for removing clothes from photos.

Undress AI Tool
Undress images for free

Clothoff.io
AI clothes remover

Video Face Swap
Swap faces in any video effortlessly with our completely free AI face swap tool!

Hot Article

Hot Tools

Notepad++7.3.1
Easy-to-use and free code editor

SublimeText3 Chinese version
Chinese version, very easy to use

Zend Studio 13.0.1
Powerful PHP integrated development environment

Dreamweaver CS6
Visual web development tools

SublimeText3 Mac version
God-level code editing software (SublimeText3)

Hot Topics
 1387
1387
 52
52
 The difference between nodejs and vuejs
Apr 21, 2024 am 04:17 AM
Node.js is a server-side JavaScript runtime, while Vue.js is a client-side JavaScript framework for creating interactive user interfaces. Node.js is used for server-side development, such as back-end service API development and data processing, while Vue.js is used for client-side development, such as single-page applications and responsive user interfaces.
 Is nodejs a backend framework?
Apr 21, 2024 am 05:09 AM
Node.js can be used as a backend framework as it offers features such as high performance, scalability, cross-platform support, rich ecosystem, and ease of development.
 How to connect nodejs to mysql database
Apr 21, 2024 am 06:13 AM
To connect to a MySQL database, you need to follow these steps: Install the mysql2 driver. Use mysql2.createConnection() to create a connection object that contains the host address, port, username, password, and database name. Use connection.query() to perform queries. Finally use connection.end() to end the connection.
 What is the difference between npm and npm.cmd files in the nodejs installation directory?
Apr 21, 2024 am 05:18 AM
There are two npm-related files in the Node.js installation directory: npm and npm.cmd. The differences are as follows: different extensions: npm is an executable file, and npm.cmd is a command window shortcut. Windows users: npm.cmd can be used from the command prompt, npm can only be run from the command line. Compatibility: npm.cmd is specific to Windows systems, npm is available cross-platform. Usage recommendations: Windows users use npm.cmd, other operating systems use npm.
 What are the global variables in nodejs
Apr 21, 2024 am 04:54 AM
The following global variables exist in Node.js: Global object: global Core module: process, console, require Runtime environment variables: __dirname, __filename, __line, __column Constants: undefined, null, NaN, Infinity, -Infinity
 Is there a big difference between nodejs and java?
Apr 21, 2024 am 06:12 AM
The main differences between Node.js and Java are design and features: Event-driven vs. thread-driven: Node.js is event-driven and Java is thread-driven. Single-threaded vs. multi-threaded: Node.js uses a single-threaded event loop, and Java uses a multi-threaded architecture. Runtime environment: Node.js runs on the V8 JavaScript engine, while Java runs on the JVM. Syntax: Node.js uses JavaScript syntax, while Java uses Java syntax. Purpose: Node.js is suitable for I/O-intensive tasks, while Java is suitable for large enterprise applications.
 Is nodejs a back-end development language?
Apr 21, 2024 am 05:09 AM
Yes, Node.js is a backend development language. It is used for back-end development, including handling server-side business logic, managing database connections, and providing APIs.
 How to deploy nodejs project to server
Apr 21, 2024 am 04:40 AM
Server deployment steps for a Node.js project: Prepare the deployment environment: obtain server access, install Node.js, set up a Git repository. Build the application: Use npm run build to generate deployable code and dependencies. Upload code to the server: via Git or File Transfer Protocol. Install dependencies: SSH into the server and use npm install to install application dependencies. Start the application: Use a command such as node index.js to start the application, or use a process manager such as pm2. Configure a reverse proxy (optional): Use a reverse proxy such as Nginx or Apache to route traffic to your application


