 php教程
php教程
 PHP开发
PHP开发
 HTML5 implements WebSocket connection and simple real-time chat based on Tomcat 7.0
HTML5 implements WebSocket connection and simple real-time chat based on Tomcat 7.0
1. What is WebSocket?
WebSocket is a natural full-duplex, two-way, single-socket connection. With WebSocket, your HTTP request becomes a single request to open a WebSocket connection (WebSocket or WebSocket over TLS (Transport Layer Security, formerly known as "SSL")) and reuse the connection from client to server and server to client. same connection. WebSocket reduces latency because once a WebSocket connection is established, the server can send messages as they become available. For example, unlike polling, WebSocket only makes a single request. The server does not need to wait for requests from clients. Similarly, the client can send messages to the server at any time. Compared to polling and sending a request every once in a while regardless of whether there is any available message, a single request greatly reduces latency.
2. WebSocket API
WebSocket API allows you to establish full-duplex two-way communication between client applications and server-side processes through the Web. The WebSocket interface specifies the methods available to the client and how the client interacts with the network.
3. WebSocket constructor
In order to establish a WebSocket connection to the server, use the WebSocket interface to instantiate a WebSocket object by pointing to a URL representing the endpoint to be connected. The WebSocket protocol defines two URL schemes - ws and wss, which are used for unencrypted and encrypted traffic between the client and the server respectively.
Example: var ws = new WebSocket("ws://www.websocket.org");
4. WebSocket events
WebSocket API is purely event-driven. Application code listens for events on the WebSocket object in order to handle incoming data and changes in connection state. The WebSocket protocol is also event-driven.
The WebSocket object dispatches 4 different events:
A. open event:
Once the server responds to the WebSocket connection request, the open event triggers and establishes a connection. The callback function corresponding to the open event is called onopen
Example:
ws.onopen = function(e) {
console.log("Connection open...");
};
B. messagess event:
message event is triggered when a message is received, and the callback function corresponding to this event is onmessage.
Instance:
ws.onmessage = function(e) {
if(typeof e.data === "string"){
console.log("String message received", e, e.data);
} else {
console.log("Other message received", e, e.data);
}
};
C. Error event:
error event is triggered in response to an unexpected failure. The callback function corresponding to this event is onerror.
Example:
ws.onerror = function(e){
console.log('websocked error');
handerError();
}
D. close event:
The close event is triggered when the WebSocket connection is closed. The callback function corresponding to the close event is onclose.
Example:
ws.onclose = function(e) {
console.log("Connection closed", e);
};
5. WebSocket method
WebSocket object has two methods: send() and close().
A. send() method:
After using WebSocket to establish a full-duplex two-way connection between the client and the server, you can call the send() method when the connection is opened. Use the send() method to send messages from the client to the server. After sending one or more messages, you can keep the connection open, or call the close() method to terminate the connection.
Example:
ws.send("Hello WebSocket!");
B. close () method:
Use the close() method to close the WebSocket connection or terminate the connection attempt. If the connection has been closed, this method does nothing. After calling close(), no data can be sent on a closed WebSocket. Two optional parameters can be passed to the close() method: code (a numeric status code) and reason (a text string). Passing these parameters can convey information to the server about why the client closed the connection.
Note: The above is a brief introduction to WebSocket. The following will use a simple web page real-time chat case to introduce how to use WebSocket
A: First create a new project, I call it chatroom here, build a package and then create a new class to use To realize the server-side connection, my class is called ChatWebSocketServlet.Java;
The specific project structure is as follows:
B: Write the server-side implementation class ChatWebSocketServlet.java, the specific code is as follows:
package com.yc.chat.Servlet;
import java.io.IOException;
import java.nio.ByteBuffer;
import java.nio.CharBuffer;
import java.text.SimpleDateFormat;
import java.util.Date;
import java.util.HashMap;
import java.util.Map;
import java.util.Set;
import javax.servlet.annotation.WebServlet;
import javax.servlet.http.HttpServletRequest;
import org.apache.catalina.websocket.MessageInbound;
import org.apache.catalina.websocket.StreamInbound;
import org.apache.catalina.websocket.WebSocketServlet;
import org.apache.catalina.websocket.WsOutbound;
@WebServlet("/chat")
public class ChatWebSocketServlet extends WebSocketServlet {
private final Map<Integer, WsOutbound> map = new HashMap<Integer, WsOutbound>();
private static final long serialVersionUID = -1058445282919079067L;
@Override
protected StreamInbound createWebSocketInbound(String arg0, HttpServletRequest request) {
// StreamInbound:基于流的WebSocket实现类(带内流),应用程序应当扩展这个类并实现其抽象方法onBinaryData和onTextData。
return new ChatMessageInbound();
}
class ChatMessageInbound extends MessageInbound {
// MessageInbound:基于消息的WebSocket实现类(带内消息),应用程序应当扩展这个类并实现其抽象方法onBinaryMessage和onTextMessage。
@Override
protected void onOpen(WsOutbound outbound) {
map.put(outbound.hashCode(), outbound);
super.onOpen(outbound);
}
@Override
protected void onClose(int status) {
map.remove(getWsOutbound().hashCode());
super.onClose(status);
}
@Override
protected void onBinaryMessage(ByteBuffer buffer) throws IOException {
}
@Override
protected void onTextMessage(CharBuffer buffer) throws IOException {
String msg = buffer.toString();
Date date = new Date();
SimpleDateFormat sdf = new SimpleDateFormat("HH:mm:ss");
msg = " <font color=green>匿名用戶 " + sdf.format(date) + "</font><br/> " + msg;
broadcast(msg);
}
private void broadcast(String msg) {
Set<Integer> set = map.keySet();
for (Integer integer : set) {
WsOutbound outbound = map.get(integer);
CharBuffer buffer = CharBuffer.wrap(msg);
try {
outbound.writeTextMessage(buffer);
outbound.flush();
} catch (IOException e) {
e.printStackTrace();
}
}
}
}
}
C : Implement the front-end page index.jsp (it is not beautified in order to display the function, it is relatively simple). The specific code is as follows:
<%@ page language="java" contentType="text/html; charset=UTF-8"
pageEncoding="UTF-8"%>
<!DOCTYPE html>
<html>
<head>
<meta charset="UTF-8">
<title>websocket聊天室</title>
<style type="text/css">
#chat {
text-align: left;
width: 600px;
height: 500px;
width: 600px;
}
#up {
text-align: left;
width: 100%;
height: 400px;
border: 1px solid green;
OVERFLOW-Y: auto;
}
#down {
text-align: left;
height: 100px;
width: 100%;
}
</style>
</head>
<body>
<h2 id="基于HTML-的聊天室">基于HTML5的聊天室</h2>
<div align="center" style="width: 100%; height: 700px;">
<div id="chat">
<div id="up"></div>
<div id="down">
<textarea type="text" style="width: 602px; height: 100%;" id="send"></textarea>
</div>
</div>
<input type="button" value="连接" onclick="chat(this);"> <input
type="button" value="发送" onclick="send(this);" disabled="disabled"
id="send_btn" title="Ctrl+Enter发送">
</div>
</body>
<script type="text/javascript">
var socket;
var receive_text = document.getElementById("up");
var send_text = document.getElementById("send");
function addText(msg) {
receive_text.innerHTML += "<br/>" + msg;
receive_text.scrollTop = receive_text.scrollHeight;
}
var chat = function(obj) {
obj.disabled = "disabled";
socket = new WebSocket('ws://localhost:8080/chatroom/chat');
receive_text.innerHTML += "<font color=green>正在连接服务器……</font>";
//打开Socket
socket.onopen = function(event) {
addText("<font color=green>连接成功!</font>");
document.getElementById("send_btn").disabled = false;
send_text.focus();
document.onkeydown = function(event) {
if (event.keyCode == 13 && event.ctrlKey) {
send();
}
}
};
socket.onmessage = function(event) {
addText(event.data);
};
socket.onclose = function(event) {
addText("<font color=red>连接断开!</font>");
obj.disabled = "";
};
if (socket == null) {
addText("<font color=red>连接失败!</font>");
}
};
var send = function(obj) {
if (send_text.value == "") {
return;
}
socket.send(send_text.value);
send_text.value = "";
send_text.focus();
}
</script>
</html>
Such a simple real-time chat page is ready. Next, deploy the project to the Tomcat 7.0 server , and open the server to achieve chat
Result display:
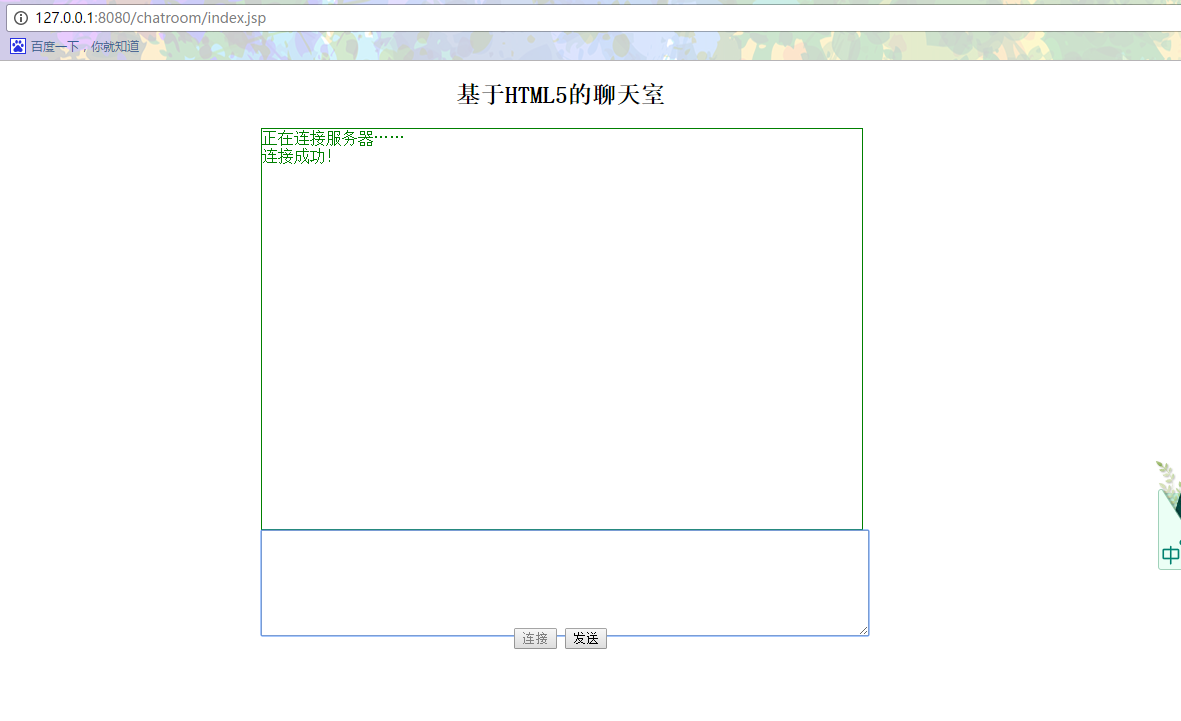
1. Enter the server address in the address bar:
http://127.0.0.1:8080/chatroom/index.jsp
Click to connect to the server and the result is as follows:

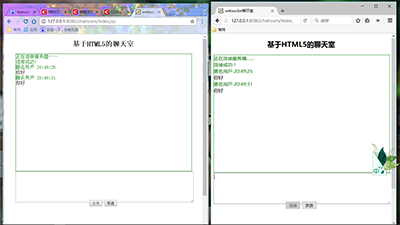
2. Open two different browsers and send messages to each other (I use Google and Firefox here). The results are as follows:


Hot AI Tools

Undresser.AI Undress
AI-powered app for creating realistic nude photos

AI Clothes Remover
Online AI tool for removing clothes from photos.

Undress AI Tool
Undress images for free

Clothoff.io
AI clothes remover

AI Hentai Generator
Generate AI Hentai for free.

Hot Article

Hot Tools

Notepad++7.3.1
Easy-to-use and free code editor

SublimeText3 Chinese version
Chinese version, very easy to use

Zend Studio 13.0.1
Powerful PHP integrated development environment

Dreamweaver CS6
Visual web development tools

SublimeText3 Mac version
God-level code editing software (SublimeText3)

Hot Topics
 1386
1386
 52
52
 Table Border in HTML
Sep 04, 2024 pm 04:49 PM
Guide to Table Border in HTML. Here we discuss multiple ways for defining table-border with examples of the Table Border in HTML.
 HTML margin-left
Sep 04, 2024 pm 04:48 PM
Guide to HTML margin-left. Here we discuss a brief overview on HTML margin-left and its Examples along with its Code Implementation.
 Nested Table in HTML
Sep 04, 2024 pm 04:49 PM
This is a guide to Nested Table in HTML. Here we discuss how to create a table within the table along with the respective examples.
 HTML Table Layout
Sep 04, 2024 pm 04:54 PM
Guide to HTML Table Layout. Here we discuss the Values of HTML Table Layout along with the examples and outputs n detail.
 HTML Input Placeholder
Sep 04, 2024 pm 04:54 PM
Guide to HTML Input Placeholder. Here we discuss the Examples of HTML Input Placeholder along with the codes and outputs.
 HTML Ordered List
Sep 04, 2024 pm 04:43 PM
Guide to the HTML Ordered List. Here we also discuss introduction of HTML Ordered list and types along with their example respectively
 Moving Text in HTML
Sep 04, 2024 pm 04:45 PM
Guide to Moving Text in HTML. Here we discuss an introduction, how marquee tag work with syntax and examples to implement.
 HTML onclick Button
Sep 04, 2024 pm 04:49 PM
Guide to HTML onclick Button. Here we discuss their introduction, working, examples and onclick Event in various events respectively.


