
 Web Front-end
JS Tutorial
Comparison of three ways to implement waterfall flow in js_javascript skills
Web Front-end
JS Tutorial
Comparison of three ways to implement waterfall flow in js_javascript skills
Comparison of three ways to implement waterfall flow in js_javascript skills

Waterfall flow is a website page layout that is visually represented by a jagged multi-column layout. As the page scroll bar scrolls down, this layout will continuously load data blocks and append them to the current tail. The first website to adopt this layout was Pinterest, which gradually became popular in the country. Most domestic fresh websites are basically of this style.
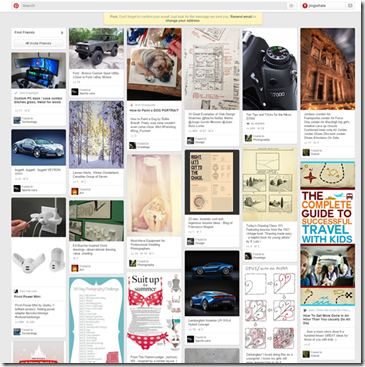
Waterfall Features:
1. Dazzling array: The whole page is mainly pictures, and pictures of different sizes are arranged according to certain rules.
2. Aesthetic: The style of pictures is mainly aesthetic pictures.
3. Simple operation: When browsing the website, you only need to gently slide the mouse wheel, and all the wonderful pictures will be presented in front of you.
How to implement waterfall flow layout:
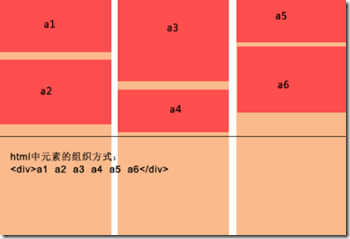
1. Traditional multi-column floating
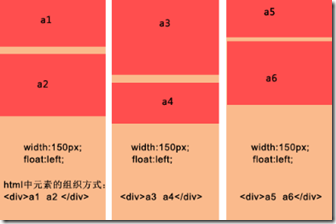
- · Each column has a fixed width and floats left;
- · The data blocks in a column are a group, and each block in the column is arranged in sequence;
- · When loading more data, it needs to be inserted into different columns;
Advantages:
The layout is simple, it should be said that there is no particular difficulty;
There is no need to explicitly know the height of the data block. When there is a picture in the data block, there is no need to specify the picture height.
Disadvantages:
The number of columns is fixed and it is not easy to expand. When the browser window size changes, only x columns can be fixed. If you want to add a column, it is difficult to adjust the arrangement of the data blocks;
When scrolling to load more data, it is still inconvenient to specify which column to insert into.
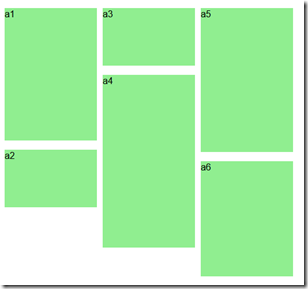
Example:
<!DOCTYPE html>
<html lang="en">
<head>
  <meta charset="UTF-8">
  <title>传统多列浮动</title>
  <style>
    div{
       float:left;
       margin: 5px 5px 5px 5px;
    }
    p{
      background: #90EE90;
      width:160px;
      text-align:center;
    }
  </style>
</head>
<body>
  <div>
    <p style="height:230px;">a1</p>
    <p style="height:100px;">a2</p>
  </div>

  <div>
    <p style="height:100px;">a3</p>
    <p style="height:300px;">a4</p>
  </div>

  <div>
    <p style="height:250px;">a5</p>
    <p style="height:200px;">a6</p>
  </div>
</body>
</html>
Effect:
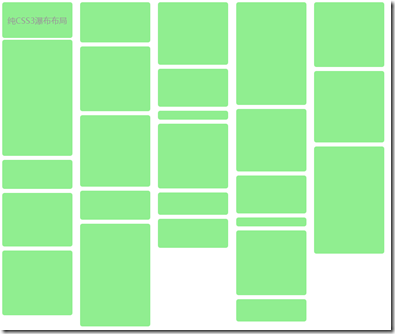
2. CSS3 style definition
Advantages:
Direct CSS definition is the most convenient;
It is easy to expand, just add content directly to the container.
Disadvantages:
Only available in advanced browsers;
There is another shortcoming. His data blocks are arranged from top to bottom to a certain height, and then the remaining elements are added to the next column in turn. This is essentially different;
In view of these two main shortcomings, this method is destined to be limited to high-end browsers, and it is more suitable for text arrangement in multiple columns.
Example
<!DOCTYPE HTML>
<html>
<head>
<meta http-equiv="Content-Type" content="text/html; charset=utf-8">
<title>CSS3瀑布布局</title>
<style>
    .container{
        -webkit-column-width:160px;
        -moz-column-width:160px;
        -o-colum-width:160px;
        -webkit-column-gap:1px;
        -moz-column-gap:1px;
        -o-column-gap:1px;
    }
    div:not(.container){
        -webkit-border-radius:5px;
        -moz-border-radius:5px;
        border-radius:5px;
        background:#90EE90;
        border::#CCC 1px solid;
        display:inline-block;
        width:157px;
        position:relative;
        margin:2px;
    }
    .title{
         line-height:80px; font-size:18px; color:#999;
         text-align:center;
         font-family:"Microsoft YaHei";
    }
</style>
</head>

<body>
<section>
    <div class="container">
    <div style="height:80px" class="title">纯CSS3瀑布布局</div>
    <div style="height:260px"></div>
    <div style="height:65px"></div>
    <div style="height:120px"></div>
    <div style="height:145px"></div>
    <div style="height:90px"></div>
    <div style="height:145px"></div>
    <div style="height:160px"></div>
    <div style="height:65px"></div>
    <div style="height:230px"></div>
    <div style="height:140px"></div>
    <div style="height:85px"></div>
    <div style="height:20px"></div>
    <div style="height:145px"></div>
    <div style="height:50px"></div>
    <div style="height:65px"></div>
    <div style="height:230px"></div>
    <div style="height:140px"></div>
    <div style="height:85px"></div>
    <div style="height:20px"></div>
    <div style="height:145px"></div>
    <div style="height:50px"></div>
    <div style="height:145px"></div>
    <div style="height:160px"></div>
    <div style="height:240px"></div>
  </div>
</section>
</body>
</html>
効果:
3. 絶対位置決め
最良の解決策は、データコンテンツを追加するのに便利です。ウィンドウが変更され、列/データブロックの数が自動的に調整されます。
利点:
データコンテンツを追加するとウィンドウが変わり、列/データブロックの数が自動的に調整されるので便利です。
データ ブロックに画像が含まれている場合は、その高さを知る必要があります。
JS はデータ ブロックの位置を動的に計算します。ウィンドウが頻繁にズームされると、パフォーマンスが消費される可能性があります。
もの:
1) データ ブロックの配置 (コンテナー内の既存の要素を配置)、アルゴリズムの手順を以下に簡単に説明します。
設定(ブロック要素の幅を同じにする)
· 初期化中に、コンテナ内の既存のデータ ブロック要素に対して最初の計算が実行されます。これには、ユーザーが次の情報を提供する必要があります。 a、コンテナ要素 - ウィンドウの合計幅を取得します。 b、列幅 (ブロック要素の幅)。 c、列の最小数 ;
・表示列数の計算:ウィンドウの幅をブロックボックスの幅で割って切り捨て、ウォーターフォール表示の中心を設定します
・各列の高さを保存
· 列の数を取得した後、各データ ブロックを追加するときに開始高さがわかるように、各列の現在の高さを保存する必要があります。
· コンテナ内のすべてのデータ ブロックを順番に取得し、最初に現在の高さが最も小さい列を見つけます。次に、左は列のシリアル番号に基づいてデータ ブロックの左と上の値を決定します。列に列の幅を乗じた値、top は列の現在の値、最後に更新された列の高さにデータ ブロック要素の高さを加えたものです。この時点で要素の挿入は終了します。
・全ての要素を挿入したら、コンテナの高さを各列の最大高さ値に調整し、順次調整を終了します。
2) データの非同期ロード (2 つのステップを含む):
· ロードデータ、関数パラメータが渡され、より便利な制御のためにデータロード機能とロード停止(ロード時に停止)機能を提供できます。
以上がこの記事の全内容です。皆様の学習のお役に立てれば幸いです。

Hot AI Tools

Undresser.AI Undress
AI-powered app for creating realistic nude photos

AI Clothes Remover
Online AI tool for removing clothes from photos.

Undress AI Tool
Undress images for free

Clothoff.io
AI clothes remover

AI Hentai Generator
Generate AI Hentai for free.

Hot Article
Hot Tools

Notepad++7.3.1
Easy-to-use and free code editor

SublimeText3 Chinese version
Chinese version, very easy to use

Zend Studio 13.0.1
Powerful PHP integrated development environment

Dreamweaver CS6
Visual web development tools

SublimeText3 Mac version
God-level code editing software (SublimeText3)
Hot Topics
 1376
1376
 52
52

 How to use JS and Baidu Maps to implement map pan function
Nov 21, 2023 am 10:00 AM
How to use JS and Baidu Maps to implement map pan function
Nov 21, 2023 am 10:00 AM
How to use JS and Baidu Map to implement map pan function Baidu Map is a widely used map service platform, which is often used in web development to display geographical information, positioning and other functions. This article will introduce how to use JS and Baidu Map API to implement the map pan function, and provide specific code examples. 1. Preparation Before using Baidu Map API, you first need to apply for a developer account on Baidu Map Open Platform (http://lbsyun.baidu.com/) and create an application. Creation completed
 Essential tools for stock analysis: Learn the steps to draw candle charts with PHP and JS
Dec 17, 2023 pm 06:55 PM
Essential tools for stock analysis: Learn the steps to draw candle charts with PHP and JS
Dec 17, 2023 pm 06:55 PM
Essential tools for stock analysis: Learn the steps to draw candle charts in PHP and JS. Specific code examples are required. With the rapid development of the Internet and technology, stock trading has become one of the important ways for many investors. Stock analysis is an important part of investor decision-making, and candle charts are widely used in technical analysis. Learning how to draw candle charts using PHP and JS will provide investors with more intuitive information to help them make better decisions. A candlestick chart is a technical chart that displays stock prices in the form of candlesticks. It shows the stock price
 Recommended: Excellent JS open source face detection and recognition project
Apr 03, 2024 am 11:55 AM
Recommended: Excellent JS open source face detection and recognition project
Apr 03, 2024 am 11:55 AM
Face detection and recognition technology is already a relatively mature and widely used technology. Currently, the most widely used Internet application language is JS. Implementing face detection and recognition on the Web front-end has advantages and disadvantages compared to back-end face recognition. Advantages include reducing network interaction and real-time recognition, which greatly shortens user waiting time and improves user experience; disadvantages include: being limited by model size, the accuracy is also limited. How to use js to implement face detection on the web? In order to implement face recognition on the Web, you need to be familiar with related programming languages and technologies, such as JavaScript, HTML, CSS, WebRTC, etc. At the same time, you also need to master relevant computer vision and artificial intelligence technologies. It is worth noting that due to the design of the Web side
 How to create a stock candlestick chart using PHP and JS
Dec 17, 2023 am 08:08 AM
How to create a stock candlestick chart using PHP and JS
Dec 17, 2023 am 08:08 AM
How to use PHP and JS to create a stock candle chart. A stock candle chart is a common technical analysis graphic in the stock market. It helps investors understand stocks more intuitively by drawing data such as the opening price, closing price, highest price and lowest price of the stock. price fluctuations. This article will teach you how to create stock candle charts using PHP and JS, with specific code examples. 1. Preparation Before starting, we need to prepare the following environment: 1. A server running PHP 2. A browser that supports HTML5 and Canvas 3
 How to use JS and Baidu Maps to implement map heat map function
Nov 21, 2023 am 09:33 AM
How to use JS and Baidu Maps to implement map heat map function
Nov 21, 2023 am 09:33 AM
How to use JS and Baidu Maps to implement the map heat map function Introduction: With the rapid development of the Internet and mobile devices, maps have become a common application scenario. As a visual display method, heat maps can help us understand the distribution of data more intuitively. This article will introduce how to use JS and Baidu Map API to implement the map heat map function, and provide specific code examples. Preparation work: Before starting, you need to prepare the following items: a Baidu developer account, create an application, and obtain the corresponding AP
 How to use JS and Baidu Map to implement map click event processing function
Nov 21, 2023 am 11:11 AM
How to use JS and Baidu Map to implement map click event processing function
Nov 21, 2023 am 11:11 AM
Overview of how to use JS and Baidu Maps to implement map click event processing: In web development, it is often necessary to use map functions to display geographical location and geographical information. Click event processing on the map is a commonly used and important part of the map function. This article will introduce how to use JS and Baidu Map API to implement the click event processing function of the map, and give specific code examples. Steps: Import the API file of Baidu Map. First, import the file of Baidu Map API in the HTML file. This can be achieved through the following code:
 PHP and JS Development Tips: Master the Method of Drawing Stock Candle Charts
Dec 18, 2023 pm 03:39 PM
PHP and JS Development Tips: Master the Method of Drawing Stock Candle Charts
Dec 18, 2023 pm 03:39 PM
With the rapid development of Internet finance, stock investment has become the choice of more and more people. In stock trading, candle charts are a commonly used technical analysis method. It can show the changing trend of stock prices and help investors make more accurate decisions. This article will introduce the development skills of PHP and JS, lead readers to understand how to draw stock candle charts, and provide specific code examples. 1. Understanding Stock Candle Charts Before introducing how to draw stock candle charts, we first need to understand what a candle chart is. Candlestick charts were developed by the Japanese
 How to use JS and Baidu Maps to implement map polygon drawing function
Nov 21, 2023 am 10:53 AM
How to use JS and Baidu Maps to implement map polygon drawing function
Nov 21, 2023 am 10:53 AM
How to use JS and Baidu Maps to implement map polygon drawing function. In modern web development, map applications have become one of the common functions. Drawing polygons on the map can help us mark specific areas for users to view and analyze. This article will introduce how to use JS and Baidu Map API to implement map polygon drawing function, and provide specific code examples. First, we need to introduce Baidu Map API. You can use the following code to import the JavaScript of Baidu Map API in an HTML file
