Add events to the buttons above each Item in the ListView
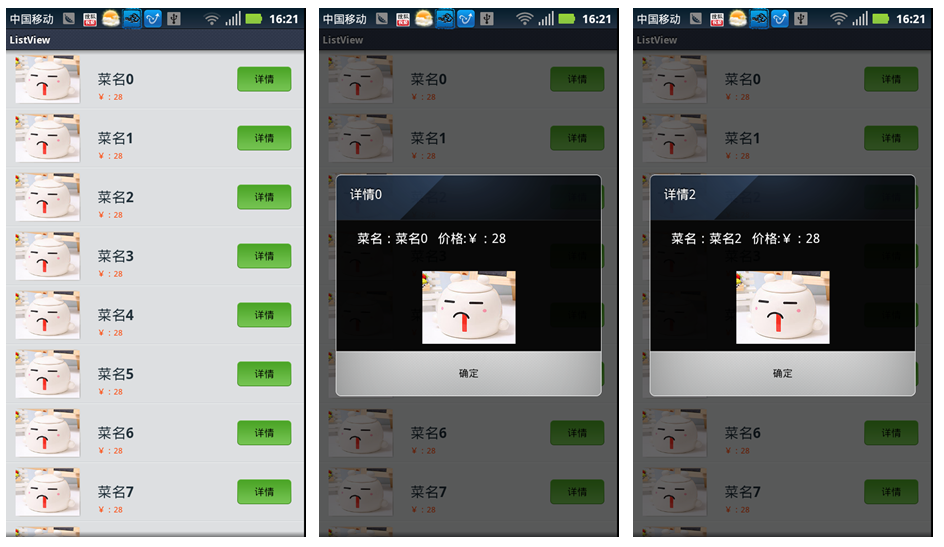
Let’s take a look at the renderings first:

This is just for testing. I have written all the data to death. You can modify it yourself as needed. In addition, there are two events to implement the Button on each Item in the ListView. Method:
1. Use final variables to extend the life cycle scope of local variables. Main code (all codes are attached at the end of this article):
//注意原本getView方法中的int position变量是非final的,现在改为final
        @Override
        public View getView(final int position, View convertView, ViewGroup parent) {
             ViewHolder holder = null;
            if (convertView == null) {

                holder=new ViewHolder();

                //可以理解为从vlist获取view  之后把view返回给ListView
                convertView = mInflater.inflate(R.layout.vlist, null);
                holder.title = (TextView)convertView.findViewById(R.id.title);
                holder.info = (TextView)convertView.findViewById(R.id.info);
                holder.viewBtn = (Button)convertView.findViewById(R.id.view_btn);
                convertView.setTag(holder);
            }else {
                holder = (ViewHolder)convertView.getTag();
            }

            holder.title.setText((String)mData.get(position).get("title"));
            holder.info.setText((String)mData.get(position).get("info"));
            holder.viewBtn.setTag(position);
            //给Button添加单击事件  添加Button之后ListView将失去焦点  需要的直接把Button的焦点去掉
            holder.viewBtn.setOnClickListener(new View.OnClickListener() {

                @Override
                public void onClick(View v) {
                    showInfo(position);
                }
            });

            //holder.viewBtn.setOnClickListener(MyListener(position));

            return convertView;
        }
    }

    //提取出来方便点
    public final class ViewHolder {
        public TextView title;
        public TextView info;
        public Button viewBtn;
    }
    public void showInfo(int position){

        ImageView img=new ImageView(ListViewActivity.this);
        img.setImageResource(R.drawable.b);
        new AlertDialog.Builder(this).setView(img)
        .setTitle("详情"+position)
        .setMessage("菜名:"+title[position]+"   价格:"+info[position])
        .setPositiveButton("确定", new DialogInterface.OnClickListener() {
            @Override
            public void onClick(DialogInterface dialog, int which) {
            }
        })
        .show();
}2. Use a class to record the position of each Button so that each BUTTON has its own Listener. Main code:
//****************************************第二种方法,高手一般都用此种方法,具体原因,我还不清楚,有待研究

        public View getView(int position, View convertView, ViewGroup parent) {
             ViewHolder holder = null;
             MyListener myListener=null;
            if (convertView == null) {

                holder=new ViewHolder();

                //可以理解为从vlist获取view  之后把view返回给ListView
                 myListener=new MyListener(position);

                convertView = mInflater.inflate(R.layout.vlist, null);
                holder.title = (TextView)convertView.findViewById(R.id.title);
                holder.info = (TextView)convertView.findViewById(R.id.info);
                holder.viewBtn = (Button)convertView.findViewById(R.id.view_btn);
                convertView.setTag(holder);
            }else {
                holder = (ViewHolder)convertView.getTag();
            }

            holder.title.setText((String)mData.get(position).get("title"));
            holder.info.setText((String)mData.get(position).get("info"));
            holder.viewBtn.setTag(position);
            //给Button添加单击事件  添加Button之后ListView将失去焦点  需要的直接把Button的焦点去掉
            holder.viewBtn.setOnClickListener( myListener);

            //holder.viewBtn.setOnClickListener(MyListener(position));

            return convertView;
        }
    }

     private class MyListener implements OnClickListener{
            int mPosition;
            public MyListener(int inPosition){
                mPosition= inPosition;
            }
            @Override
            public void onClick(View v) {
                // TODO Auto-generated method stub
                Toast.makeText(ListViewActivity.this, title[mPosition], Toast.LENGTH_SHORT).show();
            }

        }


    //提取出来方便点
    public final class ViewHolder {
        public TextView title;
        public TextView info;
        public Button viewBtn;
}3. All codes
1.ListViewActivity.Java All codes:
package ms.ListView;

import java.util.ArrayList;
import java.util.HashMap;
import java.util.List;
import java.util.Map;

import android.app.Activity;
import android.app.AlertDialog;
import android.content.Context;
import android.content.DialogInterface;
import android.os.Bundle;
import android.view.LayoutInflater;
import android.view.View;
import android.view.View.OnClickListener;
import android.view.ViewGroup;
import android.widget.AdapterView;
import android.widget.AdapterView.OnItemSelectedListener;
import android.widget.BaseAdapter;
import android.widget.Button;
import android.widget.ImageView;
import android.widget.ListView;
import android.widget.TextView;
import android.widget.Toast;

public class ListViewActivity extends Activity {
    /** Called when the activity is first created. */
    private List<Map<String, Object>> mData;
    private int flag;
    public static String title[]=new String[]{"菜名0","菜名1","菜名2","菜名3","菜名4","菜名5","菜名6","菜名7","菜名8","菜名9"};
    public static String info[]=new String[]{ "¥:28","¥:28","¥:28","¥:28","¥:28","¥:28","¥:28","¥:28","¥:28","¥:28",};


    @Override
    public void onCreate(Bundle savedInstanceState) {
        super.onCreate(savedInstanceState);
        setContentView(R.layout.main);
        mData = getData();
        ListView listView = (ListView) findViewById(R.id.listView);
        MyAdapter adapter = new MyAdapter(this);
        listView.setAdapter(adapter);


    }


    //获取动态数组数据  可以由其他地方传来(json等)
    private List<Map<String, Object>> getData() {
        List<Map<String, Object>> list = new ArrayList<Map<String, Object>>();
for(int i=0;i<title.length;i++){
        Map<String, Object> map = new HashMap<String, Object>();
        map.put("title", title[i]);
        map.put("info", info[i]);
        list.add(map);
}

        return list;
    }

    public class MyAdapter extends BaseAdapter {

        private LayoutInflater mInflater;

        public MyAdapter(Context context) {
            this.mInflater = LayoutInflater.from(context);
        }

        @Override
        public int getCount() {
            // TODO Auto-generated method stub
            return mData.size();
        }

        @Override
        public Object getItem(int position) {
            // TODO Auto-generated method stub
            return null;
        }

        @Override
        public long getItemId(int position) {
            // TODO Auto-generated method stub
            return 0;
        }
        //****************************************final方法
//注意原本getView方法中的int position变量是非final的,现在改为final
        @Override
        public View getView(final int position, View convertView, ViewGroup parent) {
             ViewHolder holder = null;
            if (convertView == null) {

                holder=new ViewHolder();

                //可以理解为从vlist获取view  之后把view返回给ListView

                convertView = mInflater.inflate(R.layout.vlist, null);
                holder.title = (TextView)convertView.findViewById(R.id.title);
                holder.info = (TextView)convertView.findViewById(R.id.info);
                holder.viewBtn = (Button)convertView.findViewById(R.id.view_btn);
                convertView.setTag(holder);
            }else {
                holder = (ViewHolder)convertView.getTag();
            }

            holder.title.setText((String)mData.get(position).get("title"));
            holder.info.setText((String)mData.get(position).get("info"));
            holder.viewBtn.setTag(position);
            //给Button添加单击事件  添加Button之后ListView将失去焦点  需要的直接把Button的焦点去掉
            holder.viewBtn.setOnClickListener(new View.OnClickListener() {

                @Override
                public void onClick(View v) {
                    showInfo(position);
                }
            });

            //holder.viewBtn.setOnClickListener(MyListener(position));

            return convertView;
        }
    }
        //****************************************第二种方法,高手一般都用此种方法,具体原因,我还不清楚,有待研究

//      public View getView(int position, View convertView, ViewGroup parent) {
//           ViewHolder holder = null;
//           MyListener myListener=null;
//          if (convertView == null) {
//
//              holder=new ViewHolder();
//
//              //可以理解为从vlist获取view  之后把view返回给ListView
//               myListener=new MyListener(position);
//
//              convertView = mInflater.inflate(R.layout.vlist, null);
//              holder.title = (TextView)convertView.findViewById(R.id.title);
//              holder.info = (TextView)convertView.findViewById(R.id.info);
//              holder.viewBtn = (Button)convertView.findViewById(R.id.view_btn);
//              convertView.setTag(holder);
//          }else {
//              holder = (ViewHolder)convertView.getTag();
//          }
//
//          holder.title.setText((String)mData.get(position).get("title"));
//          holder.info.setText((String)mData.get(position).get("info"));
//          holder.viewBtn.setTag(position);
//          //给Button添加单击事件  添加Button之后ListView将失去焦点  需要的直接把Button的焦点去掉
//          holder.viewBtn.setOnClickListener( myListener);
//
//          //holder.viewBtn.setOnClickListener(MyListener(position));
//
//          return convertView;
//      }
//  }
//
//   private class MyListener implements OnClickListener{
//          int mPosition;
//          public MyListener(int inPosition){
//              mPosition= inPosition;
//          }
//          @Override
//          public void onClick(View v) {
//              // TODO Auto-generated method stub
//              Toast.makeText(ListViewActivity.this, title[mPosition], Toast.LENGTH_SHORT).show();
//          }
//
//      }
//
//


    //提取出来方便点
    public final class ViewHolder {
        public TextView title;
        public TextView info;
        public Button viewBtn;
    }
    public void showInfo(int position){

        ImageView img=new ImageView(ListViewActivity.this);
        img.setImageResource(R.drawable.b);
        new AlertDialog.Builder(this).setView(img)
        .setTitle("详情"+position)
        .setMessage("菜名:"+title[position]+"   价格:"+info[position])
        .setPositiveButton("确定", new DialogInterface.OnClickListener() {
            @Override
            public void onClick(DialogInterface dialog, int which) {
            }
        })
        .show();
    }


}2.main.xml
<?xml version="1.0" encoding="utf-8"?>
<LinearLayout xmlns:android="http://schemas.android.com/apk/res/android"
    android:layout_width="fill_parent"
    android:layout_height="fill_parent"
    android:orientation="vertical" >

    <ListView
        android:id="@+id/listView"
        android:layout_width="fill_parent"
        android:layout_height="fill_parent"
        android:divider="@drawable/list_line"
        android:dividerHeight="1dip" />

</LinearLayout>3.vlist.xml
<?xml version="1.0" encoding="utf-8"?>
<LinearLayout xmlns:android="http://schemas.android.com/apk/res/android"
    android:layout_width="fill_parent"
    android:layout_height="fill_parent"
    android:orientation="vertical" >

    <ListView
        android:id="@+id/listView"
        android:layout_width="fill_parent"
        android:layout_height="fill_parent"
        android:divider="@drawable/list_line"
        android:dividerHeight="1dip" />

</LinearLayout>4.btn_detail_selecter.xml
<?xml version="1.0" encoding="utf-8"?>
<selector xmlns:android="http://schemas.android.com/apk/res/android">

    <item android:drawable="@drawable/btn_detail_normal" android:state_enabled="true" android:state_focused="false" android:state_pressed="false"/>
    <item android:drawable="@drawable/btn_detail_pressed" android:state_enabled="true" android:state_pressed="true"/>
    <item android:drawable="@drawable/btn_detail_pressed" android:state_enabled="true" android:state_focused="true"/>

</selector>5.item .xml
<?xml version="1.0" encoding="UTF-8"?>
<selector xmlns:android="http://schemas.android.com/apk/res/android">

    <item android:drawable="@drawable/item_higlight" android:state_focused="true" android:state_pressed="false"/>
    <item android:drawable="@drawable/item_higlight" android:state_focused="false" android:state_pressed="true"/>
    <item android:drawable="@drawable/item_higlight" android:state_selected="true"/>
    <item android:drawable="@drawable/item_higlight" android:state_focused="true"/>
    <item android:drawable="@drawable/item_higlight"/>

</selector>6.colors.xml
<?xml version="1.0" encoding="UTF-8"?>
<resources>
    <color name="region">#8000ff00</color>
    <color name="listTitle">#ff23323b</color>
    <color name="text">#ff848f9b</color>
    <color name="write">#ffffffff</color>
</resources>7.values.xml
<?xml version="1.0" encoding="utf-8"?>
<resources>

    <string name="hello">Hello World, ListViewActivity!</string>
    <string name="app_name">ListView</string>

</resources>8.drawables.xml
<?xml version="1.0" encoding="UTF-8"?>
<resources>
    <item type="drawable" name="bg">#80000000</item>
    <item type="drawable" name="transparent">#00000000</item>
    <item type="drawable" name="lightblue">#ffcfe1ed</item>
    <item type="drawable" name="readmenu_btn_bg_f">#30ffffff</item>
    <item type="drawable" name="readmenu_btn_bg_p">#50ffffff</item>
    <item type="drawable" name="blackMask">#30000000</item>
</resources>
Hot AI Tools

Undresser.AI Undress
AI-powered app for creating realistic nude photos

AI Clothes Remover
Online AI tool for removing clothes from photos.

Undress AI Tool
Undress images for free

Clothoff.io
AI clothes remover

AI Hentai Generator
Generate AI Hentai for free.

Hot Article

Hot Tools

Notepad++7.3.1
Easy-to-use and free code editor

SublimeText3 Chinese version
Chinese version, very easy to use

Zend Studio 13.0.1
Powerful PHP integrated development environment

Dreamweaver CS6
Visual web development tools

SublimeText3 Mac version
God-level code editing software (SublimeText3)


