

Detailed explanation of HTML tags

-- Detailed explanation of HTML tags
Detailed explanation of HTML instructions
Structure
<html>
<head>
<title>Title<title>
</head>
<body>......File content. .........
</body>
</html>
1. File title
<title>.....</title>
2. File update--< meta>
【1】Automatically update once after 10 seconds
<meta http-equiv="refresh" content=10>
【2】Automatically link to another file after 10 seconds
<meta http-equiv="refresh" content ="10; URL=URL of the file to be linked">
3. Query form--<isindex>
If you want to set the prompt text before the query field:
<isindex PRompt="Prompt text">
4. Default base path--<base>
<base href="URL of the host where the file is placed">
Layout
1. Title text <h#>............</h#> #=1~6; h1 is the largest font, h6 is the smallest font
2. Font changes <font>......................</font>
【1】Font size <font size=#>. .........</font> #=1~7; The larger the number, the larger the font
【2】Specify the font <font face="font name">..... ..</font>
【3】Text color <font color=#rrggbb>............</font> rr: stands for red (red) color code gg: stands for green (green) color Code bb: blue color code
3. Display small fonts <small>.....</small>
4. Display large fonts <big>..... ...</big>
5. Bold font <b>.....</b>
6. Italic font <i>..........</ i>
7. Typewriter font <tt>............</tt>
8. Bottom line <u>.....</u>
9. Strikethrough <strike>..........</strike>
10. Subscript <sub>..........</sub>
11. Superscript <sup>. .......</sup>
12. Text blinking effect <blink>..........</blink>
13. Line break <br>
14. Segmentation <p >
15. The alignment direction of text <p align="#"> Number # can be left: table aligned to the left (default value) center: table aligned to the center right: table aligned to the right P.S.<p align="# The text after "" will be displayed in the set alignment until another
appears to change its alignment direction, or when the
ⅱ
16. Divider line <hr>
【1】Thickness of the divider line <hr size=points>
【2】Width of the divider line <hr size=points or percentage>
【3】Alignment direction of the divider line <hr align= "#"> The # sign can be left: the table is aligned to the left (default value) center: the table is aligned to the center right: the table is aligned to the right
【4】The color of the dividing line <hr color=#rrggbb>
【5】 Solid dividing line <hr noshade>
17. Align to the center <center>......................</center>
18. Display in original style <pre>.......... </pre>
19. Properties of the command
【1】Background color -- bgcolor <body bgcolor=#rrggbb>
【2】Background pattern -- background <body background="graphic file name">
【 3】Set the background pattern so that it does not scroll -- bgproperties <body bgproperties=fixed>
【4】The color of the document content text -- text <body text=#rrggbb>
【5】The color of the hyperlink text -- link < body link=#rrggbb>
【6】The text color of the hyperlink being selected -- vlink <body vlink=#rrggbb>
【7】The text color of the hyperlink that has been linked -- alink <body alink=#rrggbb>
20. Annotation <!--..........-->21. Special character representation
Symbol logue in &quスt
Blank &nススpp
Pictures
1. Insert picture <img src="graphic file name">
2. Set frame -- border <img src="graphic file name" border=points >
3. Set graphic size -- widthⅱheight <img src="Graphic file name" width=width points height=height points>
4. Set the top, bottom, left and right spaces of the graphic - vspaceⅱhspace Number of empty points>
5. Graphic notes <img src="Graphic file name" alt="Explanation text">
6. Preload pictures
<img src="High-resolution graphic file name" lowsrc="Low-resolution graphic File name"> P.S. It is best to have the same size of the two pictures
7. Image Map <area shape=shape coords=area coordinate list href="URL of connection point">
<area shape=shape coords=area coordinate list href="URL of connection point">
<area shape=shape coords =area coordinate list href="URL of connection point">
<area shape=shape coords=area coordinate list href="URL of connection point"> </map>
【1】Define shape -- shape
shape =rect: rectangle shape=circle: circle shape=poly: polygon
[2] Define the area -- coords
a. Rectangle: Four numbers must be used, the first two numbers are the coordinates of the upper left corner, and the last two numbers are Coordinates of the lower right corner
Example: <area shape=rect coords=100,50,200,75 href="URL">
b. Circle: Three numbers must be used, the first two numbers are the coordinates of the center of the circle, and the last number is the radius length
Example: <area shape=circle coords=85,155,30 href="URL">
c. Any shape (polygon): fill in the coordinates of each turning point of the shape in order
Example: <area shape= poly coords=232,70,285,70,300,90,250,90,200,78 href="URL">
Table
1. Define table <table>..........</table>
【1】Settings The thickness of the border -- border
<table border=points>
【2】Set the width of the grid -- cellspacing
<table cellspacing=points>
【3】Set the distance between the data and the grid -- cellpadding
< table cellpadding=points>
【4】Adjust table width -- width
<table width=points or percentage>
【5】Adjust table height -- height
<table height=points or percentage>
【6】Set table Background color -- bgcolor
<table bgcolor=#rrggbb>
【7】Set table border color -- bordercolor
<table bordercolor=#rrggbb>
2. Display grid lines <table border>
3. Table title
< caption>........................</caption>
Table title position -- align
<caption align="#"> Number # can be top: the table title is placed above the table (default value)
bottom: The table title is placed below the table
4. Define columns <tr>
5. Define fields «1» <td>: Align to the left
«2» <th>: Align to the center ⅱ Bold
【1】 Horizontal position -- align <th align="#">
# number can be left: align to the left
center: align to the center right: align to the right
【2】Vertical position -- align <th align="#" > The # number can be
top: align upwards middle: align to the middle
bottom: align downwards
【3】Field width -- width
<th width=points or percentages >
【4】Fields are merged vertically -- rowspan
<th rowspan=Number of columns to be merged>
【5】Horizontal merging of columns -- colspan
<th colspan=Number of columns to be merged>
List
1. Directory list
<dir><li>Item 1 <li>Item 2 <li>Item 3 </dir> P.S. Each item in the directory list cannot exceed 20 characters (i.e. 10 Chinese characters)
2. Option list <menu> <li>Item 1 < li>Item 2 <li>Item 3 </menu>
3. List with serial numbers <ol> <li>Item 1 <li>Item 2 <li>Item 3 </ol>
【1】Serial number format -- type <ol type=#> or <li type=#> The # number can be A: The uppercase English letters AⅱBⅱCⅱD... are used as the project number. a: The lowercase English letters aⅱbⅱcⅱd... are used. .As the project number I: The table uses uppercase Roman numerals as the project number i: The table uses lowercase Roman numerals as the project number 1: The table uses Arabic numerals as the project number (default value)
[2] Starting number - - start <ol start=The ordinal number to start counting>
【3】Specify the number -- value <li value=The ordinal number to be specified>
4. List without serial number <ul> <li>Item 1 <li>Item 2 <li>Item 3 </ul>
【1】Bullet mark form -- type <ul type=#>or <li type=#> The # number can be disc: solid dot (default value) circle: hollow circle Point square: solid square
【2】Original list -- plain <ul plain>
【3】List arrangement -- warp «1»The list is arranged vertically <ul warp = vert> «2»The list is arranged horizontally <ul warp = horiz>
5. Definition List <dl> <dt>Item 1 <dd>Item 1 Description <dt>Item 2 <dd>Item 2 Description <dt>Item 3 <dd>Item 3 Description </dl>
Close Arrangement -- compact
- P.S. In this way, the content of
- and the content of
- can be placed on the same line, separated by only a few blank spaces without line breaks. However, if the text of
- exceeds a certain length, , the effect of compact disappears!
Form
1. Basic structure <form action="URL of the CGI program used to process data" or "mailto: URL of the e-mail" method="get or post">.......... ........ ..... </form>
2. Input file form <form action="URL" method="post"> <input> <input> .. ........ ..... </form>
【1】Field type -- type <input type=#> Number # can be text: text input passWord: password checkbox : Multi-select button radio: Radio button submit: Accept button reset: Reset button image: Graphic button hidden: Hidden field
【2】Field name -- name P.S. If type For submitⅱreset, the name does not need to be set.
【3】Default value on the document -- value <input value="Default string">
【4】Set the width of the field -- size <input size=word Number of characters>
【5】Limit the maximum input string length -- maxlength <input maxlength=number of characters>
【6】Default the initial value of checkbox or radio -- checked <input type=checkbox checked> <input type =radio checked>
【7】Specify the URL of the graphic -- src <input type=image src="image file name">
【8】Align image and text -- align <input type=image align="#"> # The number can be top: text aligned to the top of the image middle: text aligned to the middle of the image buttom: text aligned to the bottom of the image
3. Selective form <form action="URL" method="post"> <select> <option> < option> .......... ........... </select> </form>
A, <select>'s attributes
【1】Field name -- name <select name="data field name">
【2】Set the number of displayed options -- size <select size=number>
【3】Multiple options -- multiple <select multiple>
B, <option> attributes
【1】Define the return value of the option -- value <option value="return value">
【2】Pre-selected option -- selected <option selected>
4. Multi-column input text area form <form action ="URL" method="post"> <textarea> ........... </textarea> </form>
【1】Variable name of text area -- name <textarea name=variable name>
【2】Set the width of the text input area -- cols <textarea cols=number of characters>
【3】Set the height of the text input area -- rows <textarea rows=number of columns >
【4】Set the default string in the input area <textarea> Default text </textarea>
【5】Wrap automatically or not --wrap

Hot AI Tools

Undresser.AI Undress
AI-powered app for creating realistic nude photos

AI Clothes Remover
Online AI tool for removing clothes from photos.

Undress AI Tool
Undress images for free

Clothoff.io
AI clothes remover

Video Face Swap
Swap faces in any video effortlessly with our completely free AI face swap tool!

Hot Article
Hot Tools

Notepad++7.3.1
Easy-to-use and free code editor

SublimeText3 Chinese version
Chinese version, very easy to use

Zend Studio 13.0.1
Powerful PHP integrated development environment

Dreamweaver CS6
Visual web development tools

SublimeText3 Mac version
God-level code editing software (SublimeText3)
Hot Topics
 1386
1386
 52
52

 How to remove HTML tags using Python regular expressions
Jun 22, 2023 am 08:44 AM
How to remove HTML tags using Python regular expressions
Jun 22, 2023 am 08:44 AM
HTML (HyperTextMarkupLanguage) is a standard language for creating Web pages. It uses tags and attributes to describe various elements on the page, such as text, images, tables, links, etc. However, when processing HTML text, it is difficult to quickly extract the text content for subsequent processing. At this time, we can use regular expressions in Python to remove HTML tags to quickly extract plain text. In Python, regular tables
 How to extract HTML tag content using regular expressions in Go language
Jul 14, 2023 pm 01:18 PM
How to extract HTML tag content using regular expressions in Go language
Jul 14, 2023 pm 01:18 PM
How to use regular expressions to extract HTML tag content in Go language Introduction: Regular expression is a powerful text matching tool, and it is also widely used in Go language. In the scenario of processing HTML tags, regular expressions can help us quickly extract the required content. This article will introduce how to use regular expressions to extract the content of HTML tags in Go language, and give relevant code examples. 1. Introduce related packages First, we need to import related packages: regexp and fmt. regexp package provides
 How to remove HTML tags from string in PHP?
Mar 23, 2024 pm 09:03 PM
How to remove HTML tags from string in PHP?
Mar 23, 2024 pm 09:03 PM
PHP is a commonly used server-side scripting language that is widely used in website development and back-end application development. When developing a website or application, you often encounter situations where you need to process HTML tags in strings. This article will introduce how to use PHP to remove HTML tags from strings and provide specific code examples. Why do you need to remove HTML tags? HTML tags are often included when processing user input or text obtained from a database. Sometimes we want to remove these HTML tags when displaying text
 How to escape html tags in php
Feb 24, 2021 pm 06:00 PM
How to escape html tags in php
Feb 24, 2021 pm 06:00 PM
In PHP, you can use the htmlentities() function to escape html, which can convert characters into HTML entities. The syntax is "htmlentities(string,flags,character-set,double_encode)". You can also use the html_entity_decode() function in PHP to de-escape html and convert HTML entities into characters.
 How to remove HTML tags from given string in Java?
Aug 29, 2023 pm 06:05 PM
How to remove HTML tags from given string in Java?
Aug 29, 2023 pm 06:05 PM
String is a final class in Java, it is immutable, which means we cannot change the object itself, but we can change the reference of the object. HTML tags can be removed from a given string using the replaceAll() method of String class. We can remove HTML tags from a given string using regular expressions. After removing the HTML tags from the string, it returns a string as normal text. Syntax publicStringreplaceAll(Stringregex,Stringreplacement) example publicclassRemoveHTMLTagsTest{&nbs
 What is an example of a starting tag in HTML?
Apr 06, 2025 am 12:04 AM
What is an example of a starting tag in HTML?
Apr 06, 2025 am 12:04 AM
AnexampleofastartingtaginHTMLis,whichbeginsaparagraph.StartingtagsareessentialinHTMLastheyinitiateelements,definetheirtypes,andarecrucialforstructuringwebpagesandconstructingtheDOM.
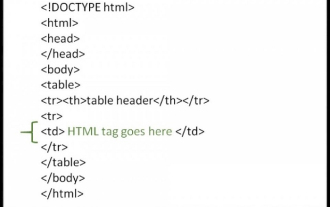 How to use HTML tags in HTML tables?
Sep 08, 2023 pm 06:13 PM
How to use HTML tags in HTML tables?
Sep 08, 2023 pm 06:13 PM
We can easily add HTML tags in the table. HTML tags should be placed inside <td> tags. For example, add paragraph <p>…</p> tags or other available tags inside the <td> tag. Syntax The following is the syntax for using HTMl tags in HTML tables. <td><p>Paragraphofthecontext</p><td>Example 1 An example of using HTML tags in an HTML table is given below. <!DOCTYPEhtml><html><head&g
 PHP regular expression method to verify basic HTML tags
Jun 24, 2023 am 08:07 AM
PHP regular expression method to verify basic HTML tags
Jun 24, 2023 am 08:07 AM
PHP is an efficient web development language that supports regular expression functions and can quickly verify the validity of input data. In web development, HTML is a common markup language, and validating HTML tags is a very important method for web form validation. This article will introduce basic HTML tag verification methods and how to use PHP regular expressions for verification. 1. Basic structure of HTML tags HTML tags consist of element names and attributes surrounded by angle brackets. Common tags include p, a, div
