

Simulate spring functions
1. Create User.java with the following content:
package net.model;
/**
 * @项目名:spring2.5
 * @包名:net.model
 * @文件名:User.java
 * @日期:Jun 22, 2011 4:31:22 PM
 * @备注:
 * @作者:apple
 */
public class User {
private String username;
private String password;
public String getUsername() {return username;}
public void setUsername(String username) {this.username = username;}
public String getPassword() {return password;}
public void setPassword(String password) {
this.password = password;
}
}2. Create UserDao.java with the following content:
package net.dao;
import net.model.User;
/**
 * @项目名:spring2.5
 * @包名:net.dao
 * @文件名:UserDao.java
 * @日期:Jun 22, 2011 4:12:42 PM
 * @备注:
 * @作者:apple
 */
public interface UserDao {
public void save(User u);
}3. Create UserDaoImpl.java with the following content:
package net.dao.impl;
import net.dao.UserDao;
import net.model.User;
/**
 * @项目名:spring2.5
 * @包名:net.dao.impl
 * @文件名:UserDaoImpl.java
 * @日期:Jun 22, 2011 4:13:45 PM
 * @备注:
 * @作者:apple
 */
public class UserDaoImpl implements UserDao {
public void save(User u) {
// TODO Auto-generated method stub
System.out.println("user save...");
}
}4. Create UserService.java with the following content:
package net.service;
import net.dao.UserDao;
import net.dao.impl.UserDaoImpl;
import net.model.User;
/**
 * @项目名:spring2.5
 * @包名:net.service
 * @文件名:UserService.java
 * @日期:Jun 22, 2011 4:15:47 PM
 * @备注:
 * @作者:apple
 */
public class UserService {
private UserDao userDao ;
public UserDao getUserDao() {
return userDao;
}
public void setUserDao(UserDao userDao) {
this.userDao = userDao;
}
public void add(User u){
userDao.save(u);
}//这里可以调用任务实现了UserDao接口的save方法了。
}
5. Create BeanFactory.java with the following content:
package net.factory;
/**
 * @项目名:spring2.5
 * @包名:net.factory
 * @文件名:BeanFactory.java
 * @日期:Jun 22, 2011 4:37:08 PM
 * @备注:
 * @作者:apple
 */
public interface BeanFactory {
public Object getBean(String name);
}6. Create ClassPathXmlApplicationContext.java with the following content:
package net.util;
import java.lang.reflect.Method;
import java.util.HashMap;
import java.util.List;
import java.util.Map;
import net.dao.UserDao;
import net.factory.BeanFactory;
import net.model.User;
import net.service.UserService;
import org.jdom.Document;
import org.jdom.Element;
import org.jdom.input.SAXBuilder;
/**
 * @项目名:spring2.5
 * @包名:net.util
 * @文件名:ClassPathXmlApplicationContext.java
 * @日期:Jun 22, 2011 4:19:35 PM
 * @备注:
 * @作者:apple
 */
public class ClassPathXmlApplicationContext implements BeanFactory{
private Map<String,Object> beans = new HashMap<String, Object>();
    public ClassPathXmlApplicationContext() throws Exception{
    SAXBuilder sb=new SAXBuilder();//创建一个SAXBuilder对象
    Document doc=sb.build(ClassPathXmlApplicationContext.class.getClassLoader().getResourceAsStream("beans.xml")); //构造文档对象
    Element root=doc.getRootElement(); //获取根元素
    List list=root.getChildren("bean");//取名字为bean的所有元素
    for(int i=0;i<list.size();i++){
          Element element=(Element)list.get(i);
          String id = element.getAttributeValue("id");
          String clazz = element.getAttributeValue("class");
          System.out.println(id + ":" + clazz);
          Object o = Class.forName(clazz).newInstance();
          beans.put(id, o);
          //* 以下for循环是实现模拟spring自动装配(注入)功能
      //一开始列出此bean的所有property子元素
      for (Element propertyElement : (List<Element>)element.getChildren("property")){
      //获取property子元素中 属性为name的值(也就是需要注入的参数名称)
      String name = propertyElement.getAttributeValue("name");
      //获取property子元素中 属性为bean的值 (需要注入参数的类型),此处的bean值是已经在上面初始化好了的bean的ID了。
      String bean = propertyElement.getAttributeValue("bean");
      //因此此处获取指定ID的bean
      Object beanObject = beans.get(bean);

      //组成set方法名称:set + 第一个字母大写 + 其它的字母
      String methodName = "set" + name.substring(0,1).toUpperCase() + name.substring(1);
      System.out.println("methodName = " + methodName);
      //获取bean的set方法,参数(方法名,参数:此参数的类型)
      Method m = o.getClass().getMethod(methodName, beanObject.getClass().getInterfaces()[0]);
      //使用反映机制,执行method方法,从而实现注入功能
      m.invoke(o, beanObject);
      }
       }
    }
    public Object getBean(String name){
return beans.get(name);
}

    public static void main(String[] args){
    BeanFactory factory=null;
try {
factory = new ClassPathXmlApplicationContext();
} catch (Exception e) {
// TODO Auto-generated catch block
e.printStackTrace();
}
UserService service = (UserService)factory.getBean("userService");
User u = new User();
service.add(u);
    }
}7. Create beans.xml with the following content:
<?xml version="1.0" encoding="UTF-8"?>
<beans>
<bean id="u" class="net.dao.impl.UserDaoImpl">
</bean>
<bean id="userService" class="net.service.UserService">
<property name="userDao" bean="u"/>
</bean>
</beans>

Hot AI Tools

Undresser.AI Undress
AI-powered app for creating realistic nude photos

AI Clothes Remover
Online AI tool for removing clothes from photos.

Undress AI Tool
Undress images for free

Clothoff.io
AI clothes remover

Video Face Swap
Swap faces in any video effortlessly with our completely free AI face swap tool!

Hot Article
Hot Tools

Notepad++7.3.1
Easy-to-use and free code editor

SublimeText3 Chinese version
Chinese version, very easy to use

Zend Studio 13.0.1
Powerful PHP integrated development environment

Dreamweaver CS6
Visual web development tools

SublimeText3 Mac version
God-level code editing software (SublimeText3)
Hot Topics
 1386
1386
 52
52

 A new programming paradigm, when Spring Boot meets OpenAI
Feb 01, 2024 pm 09:18 PM
A new programming paradigm, when Spring Boot meets OpenAI
Feb 01, 2024 pm 09:18 PM
In 2023, AI technology has become a hot topic and has a huge impact on various industries, especially in the programming field. People are increasingly aware of the importance of AI technology, and the Spring community is no exception. With the continuous advancement of GenAI (General Artificial Intelligence) technology, it has become crucial and urgent to simplify the creation of applications with AI functions. Against this background, "SpringAI" emerged, aiming to simplify the process of developing AI functional applications, making it simple and intuitive and avoiding unnecessary complexity. Through "SpringAI", developers can more easily build applications with AI functions, making them easier to use and operate.
 Use Spring Boot and Spring AI to build generative artificial intelligence applications
Apr 28, 2024 am 11:46 AM
Use Spring Boot and Spring AI to build generative artificial intelligence applications
Apr 28, 2024 am 11:46 AM
As an industry leader, Spring+AI provides leading solutions for various industries through its powerful, flexible API and advanced functions. In this topic, we will delve into the application examples of Spring+AI in various fields. Each case will show how Spring+AI meets specific needs, achieves goals, and extends these LESSONSLEARNED to a wider range of applications. I hope this topic can inspire you to understand and utilize the infinite possibilities of Spring+AI more deeply. The Spring framework has a history of more than 20 years in the field of software development, and it has been 10 years since the Spring Boot 1.0 version was released. Now, no one can dispute that Spring
 What are the implementation methods of spring programmatic transactions?
Jan 08, 2024 am 10:23 AM
What are the implementation methods of spring programmatic transactions?
Jan 08, 2024 am 10:23 AM
How to implement spring programmatic transactions: 1. Use TransactionTemplate; 2. Use TransactionCallback and TransactionCallbackWithoutResult; 3. Use Transactional annotations; 4. Use TransactionTemplate in combination with @Transactional; 5. Customize the transaction manager.
 How to implement scheduled tasks in Java Spring
May 24, 2023 pm 01:28 PM
How to implement scheduled tasks in Java Spring
May 24, 2023 pm 01:28 PM
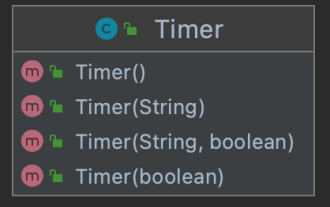
Java implements scheduled tasks In the library that comes with Jdk, there are two ways to implement scheduled tasks, one is Timer, and the other is ScheduledThreadPoolExecutor. When Timer+TimerTask creates a Timer, it creates a thread, which can be used to schedule TimerTask tasks. Timer has four construction methods, and you can specify the name of the Timer thread and whether to set it as a daemon thread. The default name is Timer-number, and the default is not a daemon thread. There are three main methods: cancel(): terminate task scheduling, cancel all currently scheduled tasks, running tasks will not be affected purge(): remove tasks from the task queue
 The differences and connections between Spring Boot and Spring Cloud
Jun 22, 2023 pm 06:25 PM
The differences and connections between Spring Boot and Spring Cloud
Jun 22, 2023 pm 06:25 PM
SpringBoot and SpringCloud are both extensions of Spring Framework that help developers build and deploy microservice applications faster, but they each have different purposes and functions. SpringBoot is a framework for quickly building Java applications, allowing developers to create and deploy Spring-based applications faster. It provides a simple, easy-to-understand way to build stand-alone, executable Spring applications
 The 7 most commonly used annotations in Spring, the most powerful organization in history!
Jul 26, 2023 pm 04:38 PM
The 7 most commonly used annotations in Spring, the most powerful organization in history!
Jul 26, 2023 pm 04:38 PM
With the update and iteration of technology, Java5.0 began to support annotations. As the leading framework in Java, spring has slowly begun to abandon xml configuration since it was updated to version 2.5, and more annotations are used to control the spring framework.
 How to set transaction isolation level in Spring
Jan 26, 2024 pm 05:38 PM
How to set transaction isolation level in Spring
Jan 26, 2024 pm 05:38 PM
How to set the transaction isolation level in Spring: 1. Use the @Transactional annotation; 2. Set it in the Spring configuration file; 3. Use PlatformTransactionManager; 4. Set it in the Java configuration class. Detailed introduction: 1. Use the @Transactional annotation, add the @Transactional annotation to the class or method that requires transaction management, and set the isolation level in the attribute; 2. In the Spring configuration file, etc.
 Learn Spring Cloud from scratch
Jun 22, 2023 am 08:11 AM
Learn Spring Cloud from scratch
Jun 22, 2023 am 08:11 AM
As a Java developer, learning and using the Spring framework is an essential skill. With the popularity of cloud computing and microservices, learning and using Spring Cloud has become another skill that must be mastered. SpringCloud is a development toolset based on SpringBoot for quickly building distributed systems. It provides developers with a series of components, including service registration and discovery, configuration center, load balancing and circuit breakers, etc., allowing developers to build micro
