Selection, establishment and use of PHP development environment (1)
The following is a tutorial introducing various configurations of various PHP development environments. If you still don’t know how, please move on: phpmystudy2016 version installation package download-Let there be no difficult php environment in the world
PHP scares away many beginners The reason is the relatively complex establishment of a PHP debugging environment. The PHP test environment is the primary problem to solve when learning PHP. Therefore, this article begins by addressing this overarching question. The PHP environment configuration is very flexible. Here I will explain it according to the installation method that is more suitable for learning. What I want to say at the beginning is that installing a PHP environment is not as difficult as you think. In fact, after you install it a few times, you will find that it is really easy to install PHP.
What I will talk about below will cover mainstream Windows operating systems, that is to say, I will only explain the establishment process of the PHP development environment in the Windows environment. This article will describe this process in the most detailed and popular language.
The purpose of writing this tutorial is for friends who like PHP but don’t know much about PHP. I went through many detours when getting started with PHP, so my biggest wish is that this tutorial can give beginners a correct guide, so that I will be satisfied. If you think you are an expert and already have this knowledge, please give your valuable advice, thank you.
This article inevitably contains errors and deficiencies, please correct me.
Demonstration operating system: Windows Server 2003
Required software: PHP, MySQL, Apache, PHPMyAdmin, Zend Studio
System requirements for Zend Studio: 233MHz or above CPU (in my opinion, at least 733M or above CPU), 128M The above memory (I recommend 512M), and more than 100M disk space. Windows NT, Windows 2000 or Windows XP, Windows Server 2003 operating system. The only thing worth noting is that the software does not support the Windows 98 operating system. I strongly recommend developing PHP not only on Windows 98 operating system, but also on Windows 2000/XP or Windows Server 2003 operating system. This can ensure the stability of the entire debugging system. Another thing I want to say is that Zend Studio consumes more memory and requires relatively high CPU frequency and relatively large memory support, otherwise it will be extremely difficult to run. Depending on your system, you can choose whether to install it.
First of all, I will briefly explain the purpose of the above required software, and then I will explain the basic use of these software in detailed text:
[PHP]: Obviously this is used to parse the PHP file we edited. Configuring PHP also revolves around it. It comes in two versions, and this article will not cover the installation of its CGI version. If you want to install it using CGI, check out the PHP manual.
[MySQL]: The legendary best partner of PHP, what is it used for? It’s DBMS (DataBase Management System: Database Management System)! Even if we don't necessarily need it sometimes, it is still indispensable if you want to really apply PHP to web services - of course, if you need to replace MySQL with another DBMS. Please skip the relevant content of this article. This article will not introduce the installation of other DBMS.
[Apache]: The most widely used server on the Internet today, even Microsoft's IIS is far less than the market share owned by Apache. Compact and safe. It comes in two versions, version 1.x and the latest version 2.x. Perhaps version 1.x has more complete support for PHP, but this article will only introduce the installation of version 2.x. If you want to install version 1.x, please skip the relevant parts of this article. Of course, because I use Windows as the demonstration platform, IIS will not be missing. This article will also introduce in detail the configuration of PHP under IIS, including the configuration of the latest Windows Server 2003 operating system IIS6.0.
[PHPMyAdmin]: A very excellent MySQL management software running in PHP environment. If you want to use other software instead, please skip the corresponding chapter.
[Zend Studio]: After I have used it for a while, I have to admit that it is a very good PHP IDE. However, if you want to use it, you must have a powerful CPU and large enough memory, otherwise it will be slow Might make you very unhappy. Of course, you can also use other editors such as EditPlus2 to develop PHP.
Part 1 Obtaining the software
How to obtain the above software?
[PHP]:
First we should know where PHP is released. http://qa.php.net/ This is the official page of the PHP quality assurance team. The homepage contains the latest version of PHP. You can download the latest version including RC test version. However, I do not recommend using the RC test version because there may be unknown bugs, which will affect PHP learning.
It is easy for us to find the latest official version of PHP. Enter: http://www.php.net/downloads.php in the browser address bar. You can download the latest official version of PHP and other old versions we need from here.
I know it’s easy for beginners to have questions. After opening the page above, there are so many versions inside, which one should I download? Because my demonstration operating system is Windows, I describe the installation process under the Widnwos platform. So we only download the Windows version of PHP. Below I will give a detailed introduction through pictures:
Here we have seen two versions of PHP, PHP5 and PHP4. We will only talk about PHP4 here. For the installation of PHP5, please refer to my article (http://www.openphp. cn/index.php?module=article&id=12). Pull the browser scroll bar down slightly and you can see the following part:
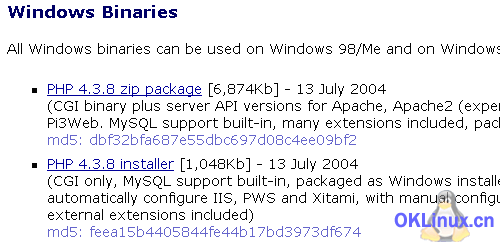
There are two different versions officially provided, one is the Zip Package and the other is the Installer version. In terms of security and performance, both are The Zip Package version is better. This article only discusses the installation of the Zip Package version. Generally, servers also install this version. What else are you thinking about? Click it and enter the selection page of the mirror download site. It will automatically rank the server with the closest speed at the top for us to download. Of course, we can choose the domestic server to download. Please see the picture below:
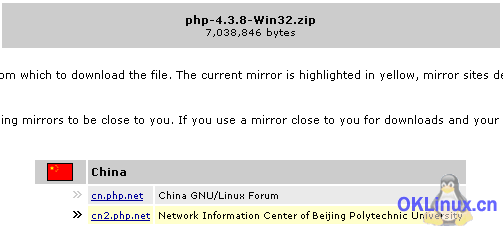
PHP The reason why many beginners are deterred is the relatively complicated establishment of a PHP debugging environment. The PHP testing environment is the first problem to solve when learning PHP. Therefore, this article begins by addressing this overarching question. The PHP environment configuration is very flexible. Here I will explain it according to the installation method that is more suitable for learning. What I want to say at the beginning is that installing a PHP environment is not as difficult as you think. In fact, after you install it a few times, you will find that it is really easy to install PHP.
What I will talk about below will cover the mainstream Windows operating system, that is to say, I will only explain the establishment process of the PHP development environment in the Windows environment. This article will describe this process in the most detailed and popular language.
The purpose of writing this tutorial is for friends who like PHP but don’t know much about PHP. I went through many detours when getting started with PHP, so my biggest wish is that this tutorial can give beginners a correct guide, so that I will be satisfied. If you think you are an expert and already have this knowledge, please give your valuable advice, thank you.
This article inevitably contains errors and deficiencies, please correct me.
Demonstration operating system: Windows Server 2003
Required software: PHP, MySQL, Apache, PHPMyAdmin, Zend Studio
System requirements for Zend Studio: 233MHz or above CPU (in my opinion, at least 733M or above CPU), 128M The above memory (I recommend 512M), and more than 100M disk space. Windows NT, Windows 2000 or Windows XP, Windows Server 2003 operating system. The only thing worth noting is that the software does not support the Windows 98 operating system. I strongly recommend developing PHP not only on Windows 98 operating system, but also on Windows 2000/XP or Windows Server 2003 operating system. This can ensure the stability of the entire debugging system. Another thing I want to say is that Zend Studio consumes more memory and requires relatively high CPU frequency and relatively large memory support, otherwise it will be extremely difficult to run. Depending on your system, you can choose whether to install it.
First of all, I will briefly explain the purpose of the above required software, and then I will explain the basic use of these software in detailed text:
[PHP]: Obviously this is used to parse the PHP file we edited. Configuring PHP also revolves around it. It comes in two versions, and this article will not cover the installation of its CGI version. If you want to install it using CGI, check out the PHP manual.
[MySQL]: The legendary best partner of PHP, what is it used for? It’s DBMS (DataBase Management System: Database Management System)! Even if we don't necessarily need it sometimes, it is still indispensable if you want to really apply PHP to web services - of course, if you need to replace MySQL with another DBMS. Please skip the relevant content of this article. This article will not introduce the installation of other DBMS.
[Apache]: The most widely used server on the Internet today, even Microsoft's IIS is far less than the market share owned by Apache. Compact and safe. It comes in two versions, version 1.x and the latest version 2.x. Perhaps version 1.x has more complete support for PHP, but this article will only introduce the installation of version 2.x. If you want to install version 1.x, please skip the relevant parts of this article. Of course, because I use Windows as the demonstration platform, IIS will not be missing. This article will also introduce in detail the configuration of PHP under IIS, including the configuration of the latest Windows Server 2003 operating system IIS6.0.
[PHPMyAdmin]: A very excellent MySQL management software running in PHP environment. If you want to use other software instead, please skip the corresponding chapter.
[Zend Studio]: After using it for a while, I have to admit that it is a very good PHP IDE. However, if you want to use it, you must have a powerful CPU and enough memory, otherwise its speed may be It will make you very unhappy. Of course, you can also use other editors such as EditPlus2 to develop PHP.
Part 1 Obtaining the software
How to obtain the above software?
[PHP]:
First we should know where PHP is released. http://qa.php.net/ This is the official page of the PHP quality assurance team. The homepage contains the latest version of PHP. You can download the latest version including RC test version. However, I do not recommend using the RC test version because there may be unknown bugs, which will affect PHP learning.
It is easy for us to find the latest official version of PHP. Enter: http://www.php.net/downloads.php in the browser address bar. You can download the latest official version of PHP and other old versions we need from here.
I know it’s easy for beginners to have questions. After opening the page above, there are so many versions inside, which one should I download? Because my demonstration operating system is Windows, I describe the installation process under the Widnwos platform. So we only download the Windows version of PHP. Below I will give a detailed introduction through pictures:
Here we have seen two versions of PHP, PHP5 and PHP4. We will only talk about PHP4 here. For the installation of PHP5, please refer to my article (http://www.openphp. cn/index.php?module=article&id=12). Pull the browser scroll bar down slightly and you can see the following part:
There are two officially provided versions, one is the Zip Package and the other is the Installer version, from the perspective of security and performance It is said that the Zip Package version is the best. This article only discusses the installation of the Zip Package version. Generally, servers also install this version. What else are you thinking about? Click it and enter the selection page of the mirror download site. It will automatically rank the server with the closest speed at the top for us to download. Of course, we can choose the domestic server to download. Please see the picture below:
After downloading, it is a php-x.x.x-win32.zip compressed package. where x.x.x is the version number. Store in C drive for later use.
[MySQL]:
The official website of MySQL company is http://www.mysql.com/, where we can download the latest version of MySQL and database operation software.
Enter the MySQL download directory: http://www.mysql.com/downloads/. We can see a series of MySQL-related software resources on this page. Including client interface software. For example, the famous MySQL Control Center can be downloaded and used if interested. Here we choose PHPMyAdmin as the database operation software. Let’s go a step further and see which one we really need.
Pull down the browser scroll bar, we can see this title: MySQL database server & standard clients:, the following is a list of various versions of MySQL, including the latest stable version, development version and past versions, we only Select the latest stable version to download, which is currently version 4.0, as shown below:

Click the link above to enter the download page of the corresponding MySQL version. Here we can see the MySQL versions under various operating systems, such as Linux, Windows , FreeBSD, MAC, etc. We scroll down the browser scroll bar and find Windows downloads. Below are two versions of MySQL for Windows. Both versions support Windows 95/98/NT/2000/XP/2003 ( x86), the only difference is that one is the installation version and the other is the decompressed version. The decompressed version must be decompressed under the C drive. I personally recommend using the decompressed version of MySQL. This version is easy to install and easy to operate. This article will only explain the settings of this version. In fact, the installation versions are similar, but the path and initialization are more troublesome. You can try to install it yourself.
Click Pick a mirror to enter the mirror download station, as shown below:

is the same as PHP download, it will automatically rank the server with the fastest speed at the top for us to download. Of course, we choose the domestic server to download, as above There is a form that can be filled in or skipped (many netizens asked me whether I need to fill in that form before downloading, so I mentioned it here). We skip it directly and pull down the browser scroll bar. You can see two There are Chinese mirror server download links. You can choose one to download at will. Please see the picture below:
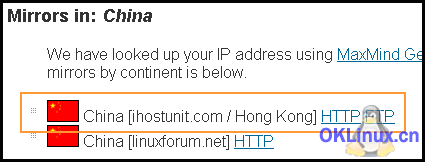
After downloading, there is a compressed package named mysql-x.x.x-win-noinstall.zip, where x.x.x is the version number. Store in C drive for later use.
[Apache]:
The official website of Apache is http://www.apache.org/, you can get Apache related information from here. Let’s go straight to the topic and enter the software download page: http://httpd.apache.org/download.cgi. This time, you don’t even need to choose a mirror server. It seems that Apache is more user-friendly. This page lists the latest The download link for the stable version includes the installation package and source code package. We downloaded the 2.x version of the MSI Installer installation package, as shown below:

The reason why PHP discourages many beginners It is a relatively complicated PHP debugging environment to establish. The PHP test environment is the first problem to solve when learning PHP. Therefore, this article begins by addressing this overarching question. The PHP environment configuration is very flexible. Here I will explain it according to the installation method that is more suitable for learning. What I want to say at the beginning is that installing a PHP environment is not as difficult as you think. In fact, after you install it a few times, you will find that it is really easy to install PHP.
What I will talk about below will cover the mainstream Windows operating system, that is to say, I will only explain the establishment process of the PHP development environment in the Windows environment. This article will describe this process in the most detailed and popular language.
The purpose of writing this tutorial is for friends who like PHP but don’t know much about PHP. I went through many detours when getting started with PHP, so my biggest wish is that this tutorial can give beginners a correct guide, so that I will be satisfied. If you think you are an expert and already have this knowledge, please give your valuable advice, thank you.
This article inevitably contains errors and deficiencies, please correct me.
Demonstration operating system: Windows Server 2003
Required software: PHP, MySQL, Apache, PHPMyAdmin, Zend Studio
System requirements for Zend Studio: 233MHz or above CPU (in my opinion, at least 733M or above CPU), 128M The above memory (I recommend 512M), and more than 100M disk space. Windows NT, Windows 2000 or Windows XP, Windows Server 2003 operating system. The only thing worth noting is that the software does not support the Windows 98 operating system. I strongly recommend developing PHP not only on Windows 98 operating system, but also on Windows 2000/XP or Windows Server 2003 operating system. This can ensure the stability of the entire debugging system. Another thing I want to say is that Zend Studio consumes more memory and requires relatively high CPU frequency and relatively large memory support, otherwise it will be extremely difficult to run. Depending on your system, you can choose whether to install it.
First of all, I will briefly explain the purpose of the above required software, and then I will explain the basic use of these software in detailed text:
[PHP]: Obviously this is used to parse the PHP file we edited. Configuring PHP also revolves around it. It comes in two versions, and this article will not cover the installation of its CGI version. If you want to install it using CGI, check out the PHP manual.
[MySQL]: The legendary best partner of PHP, what is it used for? It’s DBMS (DataBase Management System: Database Management System)! Even if we don't necessarily need it sometimes, it is still indispensable if you want to really apply PHP to web services - of course, if you need to replace MySQL with another DBMS. Please skip the relevant content of this article. This article will not introduce the installation of other DBMS.
[Apache]: The most widely used server on the Internet today, even Microsoft's IIS is far less than the market share owned by Apache. Compact and safe. It comes in two versions, version 1.x and the latest version 2.x. Perhaps version 1.x has more complete support for PHP, but this article will only introduce the installation of version 2.x. If you want to install version 1.x, please skip the relevant parts of this article. Of course, because I use Windows as the demonstration platform, IIS will not be missing. This article will also introduce in detail the configuration of PHP under IIS, including the configuration of the latest Windows Server 2003 operating system IIS6.0.
[PHPMyAdmin]: A very excellent MySQL management software running in PHP environment. If you want to use other software instead, please skip the corresponding chapter.
[Zend Studio]: After I have used it for a while, I have to admit that it is a very good PHP IDE. However, if you want to use it, you must have a powerful CPU and large enough memory, otherwise it will be slow Might make you very unhappy. Of course, you can also use other editors such as EditPlus2 to develop PHP.
Part 1 Obtaining the software
How to obtain the above software?
[PHP]:
First we should know where PHP is released. http://qa.php.net/ This is the official page of the PHP quality assurance team. The homepage contains the latest version of PHP. You can download the latest version including RC test version. However, I do not recommend using the RC test version because there may be unknown bugs, which will affect PHP learning.
It is easy for us to find the latest official version of PHP. Enter: http://www.php.net/downloads.php in the browser address bar. You can download the latest official version of PHP and other old versions we need from here.
I know it’s easy for beginners to have questions. After opening the page above, there are so many versions inside, which one should I download? Because my demonstration operating system is Windows, I describe the installation process under the Widnwos platform. So we only download the Windows version of PHP. Below I will give a detailed introduction through pictures:
Here we have seen two versions of PHP, PHP5 and PHP4. We will only talk about PHP4 here. For the installation of PHP5, please refer to my article (http://www.openphp. cn/index.php?module=article&id=12). Pull the browser scroll bar down slightly and you can see the following part:
There are two officially provided versions, one is the Zip Package and the other is the Installer version, from the perspective of security and performance It is said that the Zip Package version is better. This article only discusses the installation of the Zip Package version. Generally, servers also install this version. What else are you thinking about? Click it and enter the selection page of the mirror download site. It will automatically rank the server with the closest speed at the top for us to download. Of course, we can choose the domestic server to download. Please see the picture below:
After downloading, it is a php-x.x.x-win32.zip compressed package. where x.x.x is the version number. Store in C drive for later use.
[MySQL]:
The official website of MySQL company is http://www.mysql.com/, where we can download the latest version of MySQL and database operation software.
Enter the MySQL download directory: http://www.mysql.com/downloads/. We can see a series of MySQL-related software resources on this page. Including client interface software. For example, the famous MySQL Control Center can be downloaded and used if interested. Here we choose PHPMyAdmin as the database operation software. Let’s go a step further and see which one we really need.
Pull down the browser scroll bar, we can see this title: MySQL database server & standard clients:, the following is a list of various versions of MySQL, including the latest stable version, development version and past versions, we only Select the latest stable version to download, which is currently version 4.0, as shown below:
Click the link above to enter the download page of the corresponding MySQL version. We can see the MySQL versions under various operating systems here. Such as Linux, Windows, FreeBSD, MAC, etc. We scroll down the browser scroll bar and find Windows downloads. Below are two versions of MySQL under Windows. Both versions support Windows 95/98/NT/2000/ XP/2003 (x86), the only difference is that one is the installed version and the other is the decompressed version. The decompressed version must be decompressed under the C drive. I personally recommend using the decompressed version of MySQL. This version is easy to install and easy to operate. This article will only explain the settings of this version. In fact, the installation versions are similar, but the path and initialization are more troublesome. You can try to install it yourself.
Click Pick a mirror to enter the mirror download station, as shown below:
Same as PHP download, it will automatically rank the server with the fastest speed at the top for us to download, of course choose the domestic server After downloading, there is a form on it that can be filled in or skipped (many netizens asked me whether I need to fill in that form before downloading, so I mentioned it here), we skip it directly and pull down the browser scroll bar. You can see two Chinese mirror server download links, choose one to download at will, please see the picture below:
After downloading, there is a compressed package named mysql-x.x.x-win-noinstall.zip , where x.x.x is the version number. Store in C drive for later use.
[Apache]:
The official website of Apache is http://www.apache.org/, you can get Apache related information from here. Let’s go straight to the topic and enter the software download page: http://httpd.apache.org/download.cgi. This time, you don’t even need to choose a mirror server. It seems that Apache is more user-friendly. This page lists the latest The download link for the stable version includes the installation package and source code package. We downloaded the 2.x version of the MSI Installer installation package, as shown below:
After downloading, there is a file named apache_2.x.x -The compressed package of win32-x86-no_ssl.msi, where 2.x.x is the version number. Store in C drive for later use.
[PHPMyAdmin]:
PHPMyAdmin is a very excellent MySQL management software. The entire software is written in PHP, supports multiple languages, and supports three login methods: Config, http, and Cookie (I will introduce the differences between these three methods in detail later). It is very convenient to create databases, create data tables, modify data tables, optimize data tables, move and copy databases (tables)... and fully integrate PHP and MySQL. Its source code is completely open, and there are many excellent features worth learning from. This is why I chose it as my preferred MySQL management software.
The official website of PHPMyAdmin is http://www.phpmyadmin.net/, but it seems that it is currently inaccessible. It is an open source project in Sourceforge. We use the Sourceforge site to download this software: http://sourceforge.net/projects/phpmyadmin/. This page lists the various versions of PHPMyAdmin. Download the latest version. Click Download to enter the download page, as shown below:

As a Windows user, we choose the Zip compressed package to download, click on it:

This will jump to the mirror server selection page, click the icon to the right of the mirror site list, and select a mirror site Download, please wait a few seconds, it will automatically download the software without you need to do other operations. If there is no response for a long time, you can try to download from the link given on the page, or try to choose other mirror sites, see the picture below for details:
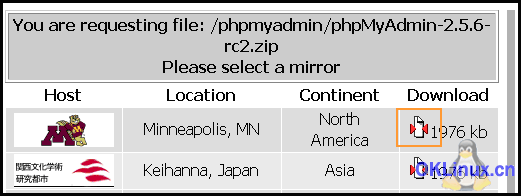
Save the downloaded file in C drive for later use.
[Zend Studio]
Next we have to invite a very important role - Zend Studio, which is the flagship product of Zend company, including Zend Studio Client and Zend Studio Server. The former is the client and includes Zend Development Environment (hereinafter referred to as ZDE) - code editing and debugging tool, literally means development environment in English. The latter is the server side, mainly capable of automatically installing server software and configuring the server from the web interface. Contains Zend Server Center (hereinafter referred to as ZSC) - here lists the server configuration information, you can use this to set up PHP, and also contains Zend Debug Server Engine, which is very useful when debugging code. Okay, let’s briefly introduce these first. We must first download the installation program and install it before explaining its purpose. Otherwise, talking on paper is useless. This is why I spend so much space talking about downloading each software package.
We should get familiar with Zend - a name closely related to PHP. Zend Engine is the core engine of PHP. The engine was written by Zeev Suraski and Andi Gutmans, and the engine is named after them. The two of them have made great contributions to the development of PHP, developing PHP IDE (integrated environment): Zend Studio, code encryption tool: Zend SafeGuard (including Zend Encoder), accelerator: Zend Optimizer (free release), etc. A series of tools that pave the way for PHP developers in the development environment. As PHP enthusiasts, we should remember both of their names. And of course, there's Rasmus Lerdorf, the creator of PHP.
The latest version of Zend Studio is currently 3.5.1, which provides full support for PHP5, including syntax highlighting, debugging, acceleration, encryption, etc.
Back to business, let’s take a look at Zend’s official website: http://www.zend.com/. There are very rich PHP resources here, including many famous articles, PHP online manuals, and the latest PHP information. Wait, of course, all PHP versions can also be downloaded here. E. My good friends read it directly, so I don’t need any introduction. Okay, let’s take a look at how to get the Zend Studio we need. Open http://www.zend.com/store/ and you can see a series of products, including Zend Studio (commercial version), Zend Studio Personal Edition (personal non-commercial version), Zend SafeGuard Suite (including a Zend Encoder and a Zend License Manager), Zend Encoder (commercial version). Except for Zend Studio Personal Edition, all others are commercial versions, which can only be used for ten to twenty days. If you have the money, of course you can buy it, but it is not cheap. One Zend Studio is 195 US dollars. For ordinary people, It is said to be too expensive, so we will use Zend Studio Personal Edition directly, and we will try out the other ones and they are very useful. If it feels useful to you then buy it.
Click on Zend Studio Personal Edition, as shown below:
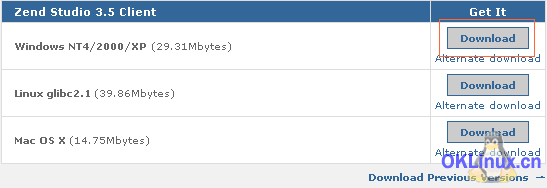
Then enter the description page of the software. Here are some differences between the personal version and the commercial version. You can take a general look, then look at FREE DOWNLOAD on the upper right, click it to enter Download page, relatively speaking, the download process is more complicated, but there is no way:)

We only need to download the client and select the For Windows version. If you have registered and logged in before, it will automatically download the software, otherwise it will jump to the registration page.
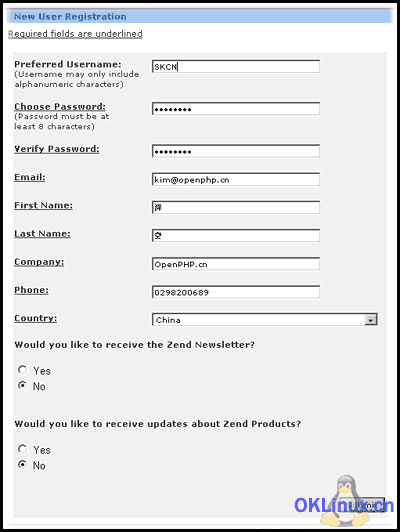
Fill out the registration form and submit it. Remember that the email address must be correct, otherwise you will not receive the serial number. After successful registration, you will automatically jump to the download page to start downloading the software. The registration page is as shown below:
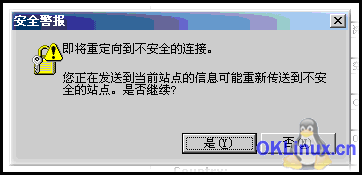
There may be the following prompts, choose to continue:
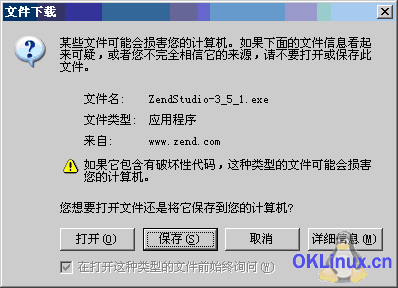
Then the prompt "License Key has been sent to your registered mailbox" will pop up. Click OK and the browser will automatically start downloading Software:

Save in C drive for backup:
OK, the five required softwares have been downloaded. Is it time to get to the point? Haha, I have written so much in the download part alone. It is mainly for beginners. Not everyone knows the official addresses and download methods of these software. Not everyone is able to choose the correct version to download. After all, it takes a while to learn how to download these software correctly. I have also been thinking about it for a while, and now I will help you save this time so that you can spend more time learning the language. In addition, these software update versions relatively quickly, so readers need to know how to download official software.
[Summary] The above part mainly describes how to download each software. The difficulty is to choose the correct version of the software. Beginners may have a headache when seeing a wide variety of software, but after reading these, they should not feel this way. If you have downloaded each software correctly, then the C drive should now contain php-x.x.x-win32.zip, mysql-x.x.x-win-noinstall.zip, apache_2.x.x-win32-x86-no_ssl.msi, phpmyadmin-x-x.zip , ZendStudio-x.exe these software.
The above is the content of the selection, establishment and use of PHP development environment (1). For more related content, please pay attention to the PHP Chinese website (www.php.cn)!

Hot AI Tools

Undresser.AI Undress
AI-powered app for creating realistic nude photos

AI Clothes Remover
Online AI tool for removing clothes from photos.

Undress AI Tool
Undress images for free

Clothoff.io
AI clothes remover

Video Face Swap
Swap faces in any video effortlessly with our completely free AI face swap tool!

Hot Article

Hot Tools

Notepad++7.3.1
Easy-to-use and free code editor

SublimeText3 Chinese version
Chinese version, very easy to use

Zend Studio 13.0.1
Powerful PHP integrated development environment

Dreamweaver CS6
Visual web development tools

SublimeText3 Mac version
God-level code editing software (SublimeText3)

Hot Topics
 1387
1387
 52
52
 PHP 8.4 Installation and Upgrade guide for Ubuntu and Debian
Dec 24, 2024 pm 04:42 PM
PHP 8.4 brings several new features, security improvements, and performance improvements with healthy amounts of feature deprecations and removals. This guide explains how to install PHP 8.4 or upgrade to PHP 8.4 on Ubuntu, Debian, or their derivati
 7 PHP Functions I Regret I Didn't Know Before
Nov 13, 2024 am 09:42 AM
If you are an experienced PHP developer, you might have the feeling that you’ve been there and done that already.You have developed a significant number of applications, debugged millions of lines of code, and tweaked a bunch of scripts to achieve op
 How To Set Up Visual Studio Code (VS Code) for PHP Development
Dec 20, 2024 am 11:31 AM
Visual Studio Code, also known as VS Code, is a free source code editor — or integrated development environment (IDE) — available for all major operating systems. With a large collection of extensions for many programming languages, VS Code can be c
 Explain JSON Web Tokens (JWT) and their use case in PHP APIs.
Apr 05, 2025 am 12:04 AM
JWT is an open standard based on JSON, used to securely transmit information between parties, mainly for identity authentication and information exchange. 1. JWT consists of three parts: Header, Payload and Signature. 2. The working principle of JWT includes three steps: generating JWT, verifying JWT and parsing Payload. 3. When using JWT for authentication in PHP, JWT can be generated and verified, and user role and permission information can be included in advanced usage. 4. Common errors include signature verification failure, token expiration, and payload oversized. Debugging skills include using debugging tools and logging. 5. Performance optimization and best practices include using appropriate signature algorithms, setting validity periods reasonably,
 How do you parse and process HTML/XML in PHP?
Feb 07, 2025 am 11:57 AM
This tutorial demonstrates how to efficiently process XML documents using PHP. XML (eXtensible Markup Language) is a versatile text-based markup language designed for both human readability and machine parsing. It's commonly used for data storage an
 PHP Program to Count Vowels in a String
Feb 07, 2025 pm 12:12 PM
A string is a sequence of characters, including letters, numbers, and symbols. This tutorial will learn how to calculate the number of vowels in a given string in PHP using different methods. The vowels in English are a, e, i, o, u, and they can be uppercase or lowercase. What is a vowel? Vowels are alphabetic characters that represent a specific pronunciation. There are five vowels in English, including uppercase and lowercase: a, e, i, o, u Example 1 Input: String = "Tutorialspoint" Output: 6 explain The vowels in the string "Tutorialspoint" are u, o, i, a, o, i. There are 6 yuan in total
 Explain late static binding in PHP (static::).
Apr 03, 2025 am 12:04 AM
Static binding (static::) implements late static binding (LSB) in PHP, allowing calling classes to be referenced in static contexts rather than defining classes. 1) The parsing process is performed at runtime, 2) Look up the call class in the inheritance relationship, 3) It may bring performance overhead.
 What are PHP magic methods (__construct, __destruct, __call, __get, __set, etc.) and provide use cases?
Apr 03, 2025 am 12:03 AM
What are the magic methods of PHP? PHP's magic methods include: 1.\_\_construct, used to initialize objects; 2.\_\_destruct, used to clean up resources; 3.\_\_call, handle non-existent method calls; 4.\_\_get, implement dynamic attribute access; 5.\_\_set, implement dynamic attribute settings. These methods are automatically called in certain situations, improving code flexibility and efficiency.


