Selection, establishment and use of PHP development environment (2)
Okay. There are several installation methods to choose from here, because Zend has done a good job in this regard. If you are going to install Apache as a server, then just install the Zend Studio we downloaded, but its Apache is 1.x Version. And there is no need to manually install PHP, which is very convenient. In fact, for novices, just installing Zend is OK, but why do I need to download so many software. Because not everyone wants to use Zend Studio alone, or Zend Studio does not need to be installed on every machine, or you want to configure a PHP environment that is more suitable for you. So what I want to talk about next is: first configure the PHP running environment, and then install Zend Studio. Everyone, please follow my lead.
Configure PHP
Three of the five software downloaded have zip as the extension. You need a zip decompression software to decompress. You can go to http://www.winzip.com to get the decompression. Compression software, because there are many decompression software and can be obtained in many ways, so I will not explain them in detail here.
In addition, the configuration of PHP4 is slightly different from the configuration of PHP5. For detailed information, please refer to my PHP5 configuration article: http://www.openphp.cn/index.php?module=article&id=12
Change php-x.x.x -Win32.zip Unzip to the root directory of drive C. After decompression is complete, we should be able to find a folder named php-x.x.x-win32 in the root directory of the C drive and rename it to php4. Entering this folder, we can clearly see the directory structure of PHP as shown below:
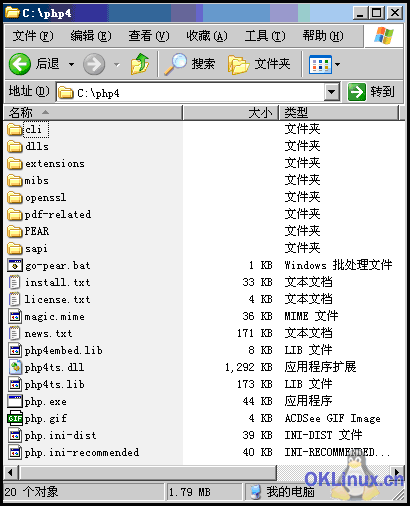
Let me explain a few directories that are useful during configuration:
[dlls] stores the corresponding PHP extension library the required dlls. So what is PHP's DLL extension library? It is an extension of PHP's basic functionality. For example, if you need to use PHP to generate images, then you have to use the GD library extension, which contains a series of image generation functions. In this way, you can easily expand the application scope of PHP. So when you configure PHP, you need to tell PHP that you need support for this extension library.
[extensions] dll of PHP extension library. This is where PHP searches for and stores extension libraries.
[PEAR]PEAR is the storage path of PHP Extension and Application Repository. For more information, please visit http://pear.php.net.
[sapi] Stores the dll file of SAPI.
[go-pear.bat] Files required to install PEAR.
[install.txt]Installation instruction file.
[php4ts.dll] main dll file.
[php.exe]CGI executable program.
[php.ini-dist] PHP configuration file
After explaining these main directories and files, some novices may be afraid, haha, don’t be afraid, put aside these weird names and proper nouns. We install PHP directly, but make a statement first. You can’t make a mistake in the following steps. Be careful, that’s right. Once again, the paths mentioned below, unless otherwise specified, are suitable for all versions of operating systems after Windows 98. I use Windows Server 2003 as a demonstration operating system.
Step one: Copy the php4ts.dll file to the C:Windows directory (if it is a Windows 2000/NT operating system, it is the C:winnt directory, the same below. Please pay attention to the folder corresponding to your Windows version).
Step 2: Copy all .dll files in the [dlls] folder to the C:Windowssystem32 directory (if it is a Windows 2000/NT operating system, it is the C:winntsystem32 directory; if it is Windows 98, it is C :windowssystem directory. The same below. Please note the folder corresponding to your Windows version).
Step 3: Copy the php.ini-dist file to the C:Windows folder and rename it to php.ini. A word of caution here: Do not store the php.ini file in the php directory. In other words, there should be no php.ini file in the C:PHP4 directory (this will not happen if you follow my steps to completely install PHP). Now we already have the php.ini file in the C:windows directory. This file is the PHP configuration file, so the configuration of PHP is also centered around it. Open it with notepad. You can see a lot of English. Friends who are not good at English, don’t be afraid, haha. I'll detail some important configuration options.
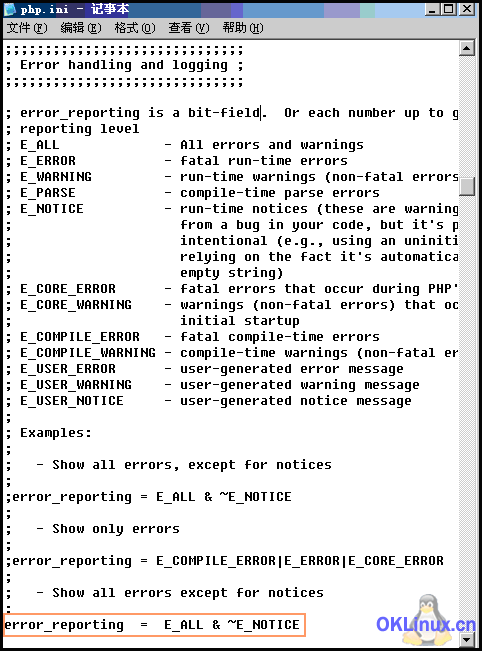
I will explain the configuration of each part in order from top to bottom. First, find the Error handling and logging section, where you set the PHP warning level, that is, whether to allow PHP to give corresponding warnings or prompts when an error occurs. Of course, we are learning and debugging PHP, this is necessary. Many lines begin with a semicolon, followed by comments in the *.ini file. We can use these comments to understand the meaning of each warning level. Here we set the alert level to: E_ALL & ~E_NOTICE:
error_reporting = E_ALL & ~E_NOTICE
as shown below:
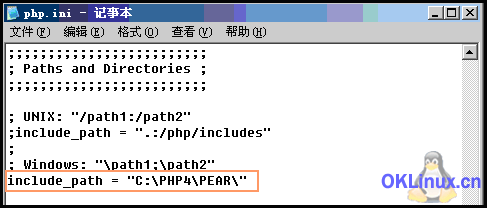
Find the Paths and Directories settings section, where you set the PHP file search path. Use semicolons ";" to separate multiple paths. We set a search path to point to the C:PHP4PEAR directory, remove the semicolon in front of include_path, and change the address in quotation marks to C:PHP4PEAR:
; UNIX: "/ path1:/path2"
;include_path = ".:/php/includes"
;
; Windows: "path1;path2"
include_path = "C:PHP4PEAR
As shown below:
Go down a little and find extension_dir. This is the location where PHP searches for extension libraries. Point its path to the C:PHP4extensions folder:
extension_dir = "C:PHP4extensions"
Set as shown below:

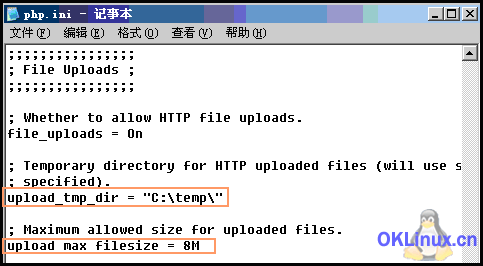
Find the File Uploads configuration section, where we can set the size of the files that PHP allows to upload (the default is 2M) and the temporary folder where the uploaded files are stored (if the temporary folder is not set, it will be stored in the system by default Temporary folder), we can set it according to our own needs, such as setting the allowed upload size to 8M and setting the temporary file folder to C:TEMP, then we must create a file named temp in the root directory of the C drive folder, remember to remove the semicolon in front of upload_tmp_dir:
; Whether to allow HTTP file uploads.
file_uploads = On
; Temporary directory for HTTP uploaded files (will use system default if not
; specified) .
upload_tmp_dir = "C:temp"
; Dynamic Extensions, a little further down is the configuration section of Windows Extensions. You can see:
;extension=php_bz2.dll
;extension=php_cpdf.dll
...
extension=php_gettext.dllextension=php_hyperwave.dllextension=php_iconv.dll;extension=php_ifx.dllextension=php_iisfunc.dllextension=php_imap.dllextension=php_inter base.dll
extension=php_java.dllextension=php_ldap.dllextension=php_mbstring.dll;extension=php_mcrypt.dllextension=php_mhash.dllextension=php_mime_magic.dllextension=php_ ming.dll
extension=php_mssql.dllextension=php_msql.dll;extension=php_oci8.dll tension=php_pgsql. dllextension=php_printer.dllextension=php_shmop.dllextension=php_snmp.dllextension=php_sockets.dll
;extension=php_sybase_ct.dll
extension=php_w32api.dll
extension=php_xmlrpc.dll
extension=php_xslt.dll
extension=php_yaz.dll
extension=php_zip.dll
Find [Session] Part, we only modify one parameter session.save_path here, the default is /tmp, we point it to the C:/TEMP/ directory (use slashes or backslashes to indicate that the path is consistent in PHP), remember to set it on the C drive Create a folder named temp in the root directory:
session.save_path = “C:/temp/”
This is to set the storage path of the session. OK, the configuration of the php.ini file comes to an end. Ctrl+s save the file and close Notepad.
PEAR Installation
PEAR is a good "code warehouse" that provides your code with strong scalability and plays a huge role in improving project efficiency. The new PHP version compressed package already comes with PEAR (not complete), all we have to do is install it. Of course, you must now have a broadband internet connection. If it is a 56k Modem, the installation speed will be very slow.
Click Start -> Run, enter cmd and confirm (if it is Windows 98 operating system, please open the MS-DOS window), open the Windows command prompt window. Follow the following steps:
Enter the PHP directory and enter the commands in the following order:
Enter cd and press Enter to enter the root directory of the C drive:
C:Documents and SettingsAdministrator>cd
C:
Enter cd php4 and press Enter to enter the PHP directory:
C:>cd php4
C:php4>
Enter go-pear.bat and press Enter to start installing PEAR.
C:php4>go-pear.bat
The following welcome message will appear in the command prompt window. The welcome message also mentions the PEAR package that needs to be downloaded, as shown below:
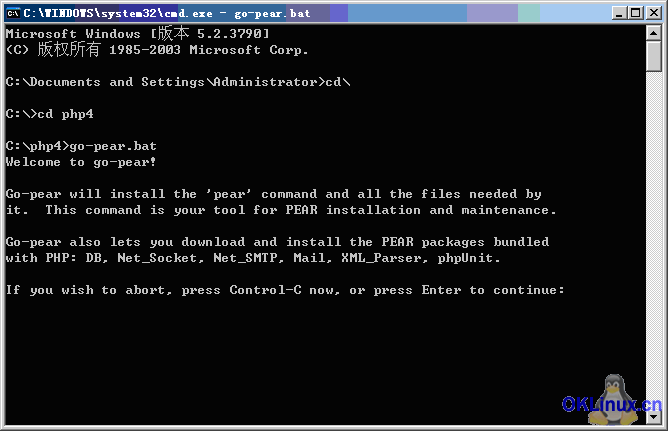
Press Enter to continue the installation. Prompt whether to use a proxy to download these PEAR packages. If you want to use a proxy, enter it in the format of http://user:password@proxy.myhost.com:port, otherwise just press Enter. I don’t use a proxy here and just press Enter, as shown below:
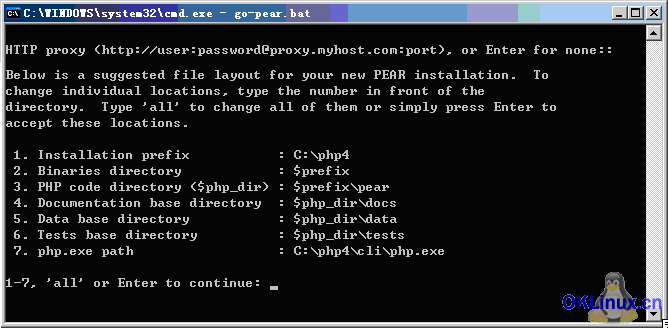
Check your PEAR package here, and then list the system information. Generally, just press Enter to continue according to the default, as shown below:

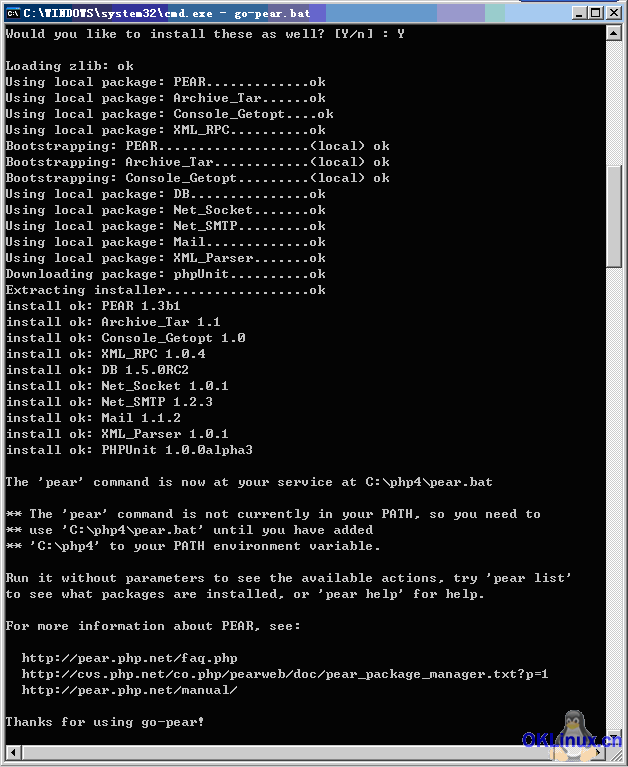
The PEAR packages that need to be downloaded are listed here, and you will be asked whether to install them. Enter Y and press Enter to start downloading the software packages and complete the installation, as shown below:
Installation of MySQL
Place mysql-x.x.x-win The -noinstall.zip folder is compressed to the root directory of drive C (note: when using this version of MySQL, the decompressed folder must be placed in the root directory of drive C). After decompression, you can find a file named mysql in the root directory of drive C. -x.x.x folder. Rename it to mysql . Entering this folder, you can see the directory structure as shown below:
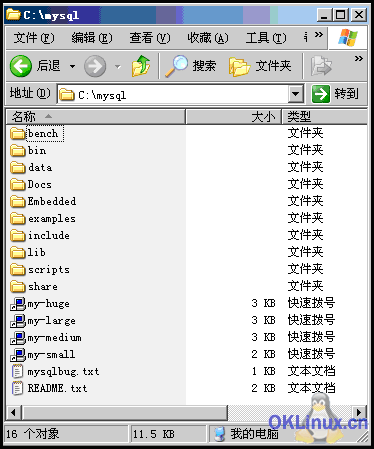
Only two directories are introduced here:
[bin] This directory stores the mysql running program, including the terminal and a Mysql management software winmysqladmin.
[data] This directory is the storage directory of the database.
OK, enter the bin directory, find the winmysqladmin.exe file, and open it. The first time you run it you will be prompted to enter a new username and password. Here you can freely select the username and password you need to enter as the default username and password for my.ini. As shown below:
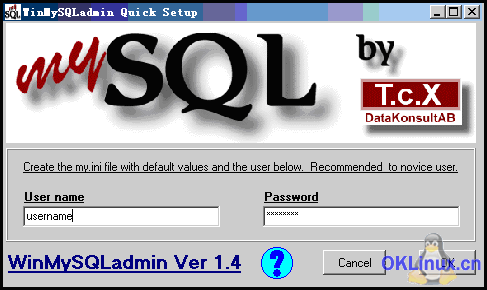
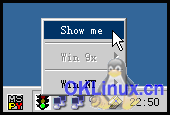
Click OK. After confirmation, WinMySQLadmin will shrink to the taskbar in the lower right corner:

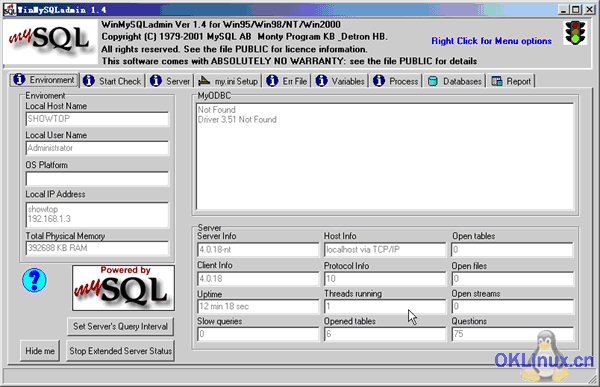
Right-click on the icon and select Show me to open the main interface of WinMySQLadmin. As shown below:
This software displays the basic information of MySQL and can make some simple settings for MySQL, which will not be introduced here. The main interface is as shown below:
Let’s see if the MySQL service is started. Open the "Control Panel", then open "Administrative Tools" and then "Services". If everything goes well, we will see the message that MySQL has been started, as shown below:

The installation of MySQL comes to an end here, it is very simple.
The above is the content of the selection, establishment and use of PHP development environment (2). For more related content, please pay attention to the PHP Chinese website (www.php.cn)!

Hot AI Tools

Undresser.AI Undress
AI-powered app for creating realistic nude photos

AI Clothes Remover
Online AI tool for removing clothes from photos.

Undress AI Tool
Undress images for free

Clothoff.io
AI clothes remover

AI Hentai Generator
Generate AI Hentai for free.

Hot Article

Hot Tools

Notepad++7.3.1
Easy-to-use and free code editor

SublimeText3 Chinese version
Chinese version, very easy to use

Zend Studio 13.0.1
Powerful PHP integrated development environment

Dreamweaver CS6
Visual web development tools

SublimeText3 Mac version
God-level code editing software (SublimeText3)

Hot Topics
 1385
1385
 52
52
 PHP 8.4 Installation and Upgrade guide for Ubuntu and Debian
Dec 24, 2024 pm 04:42 PM
PHP 8.4 brings several new features, security improvements, and performance improvements with healthy amounts of feature deprecations and removals. This guide explains how to install PHP 8.4 or upgrade to PHP 8.4 on Ubuntu, Debian, or their derivati
 How To Set Up Visual Studio Code (VS Code) for PHP Development
Dec 20, 2024 am 11:31 AM
Visual Studio Code, also known as VS Code, is a free source code editor — or integrated development environment (IDE) — available for all major operating systems. With a large collection of extensions for many programming languages, VS Code can be c
 7 PHP Functions I Regret I Didn't Know Before
Nov 13, 2024 am 09:42 AM
If you are an experienced PHP developer, you might have the feeling that you’ve been there and done that already.You have developed a significant number of applications, debugged millions of lines of code, and tweaked a bunch of scripts to achieve op
 How do you parse and process HTML/XML in PHP?
Feb 07, 2025 am 11:57 AM
This tutorial demonstrates how to efficiently process XML documents using PHP. XML (eXtensible Markup Language) is a versatile text-based markup language designed for both human readability and machine parsing. It's commonly used for data storage an
 Explain JSON Web Tokens (JWT) and their use case in PHP APIs.
Apr 05, 2025 am 12:04 AM
JWT is an open standard based on JSON, used to securely transmit information between parties, mainly for identity authentication and information exchange. 1. JWT consists of three parts: Header, Payload and Signature. 2. The working principle of JWT includes three steps: generating JWT, verifying JWT and parsing Payload. 3. When using JWT for authentication in PHP, JWT can be generated and verified, and user role and permission information can be included in advanced usage. 4. Common errors include signature verification failure, token expiration, and payload oversized. Debugging skills include using debugging tools and logging. 5. Performance optimization and best practices include using appropriate signature algorithms, setting validity periods reasonably,
 PHP Program to Count Vowels in a String
Feb 07, 2025 pm 12:12 PM
A string is a sequence of characters, including letters, numbers, and symbols. This tutorial will learn how to calculate the number of vowels in a given string in PHP using different methods. The vowels in English are a, e, i, o, u, and they can be uppercase or lowercase. What is a vowel? Vowels are alphabetic characters that represent a specific pronunciation. There are five vowels in English, including uppercase and lowercase: a, e, i, o, u Example 1 Input: String = "Tutorialspoint" Output: 6 explain The vowels in the string "Tutorialspoint" are u, o, i, a, o, i. There are 6 yuan in total
 Explain late static binding in PHP (static::).
Apr 03, 2025 am 12:04 AM
Static binding (static::) implements late static binding (LSB) in PHP, allowing calling classes to be referenced in static contexts rather than defining classes. 1) The parsing process is performed at runtime, 2) Look up the call class in the inheritance relationship, 3) It may bring performance overhead.
 What are PHP magic methods (__construct, __destruct, __call, __get, __set, etc.) and provide use cases?
Apr 03, 2025 am 12:03 AM
What are the magic methods of PHP? PHP's magic methods include: 1.\_\_construct, used to initialize objects; 2.\_\_destruct, used to clean up resources; 3.\_\_call, handle non-existent method calls; 4.\_\_get, implement dynamic attribute access; 5.\_\_set, implement dynamic attribute settings. These methods are automatically called in certain situations, improving code flexibility and efficiency.


