Asp.net SignalR creates real-time chat application
1. Overview
Create a real-time chat application using ASP.NET and SignalR 2. Add SignalR to your MVC 5 application and create a chat view to send and display messages.
In the Demo, you will learn SignalR development tasks including:
Add the SignalR library to an MVC 5 application.
Create hub and startup classes to push content to clients.
Use the SignalR jQuery library from your web page to send emails and display updates from the hub.
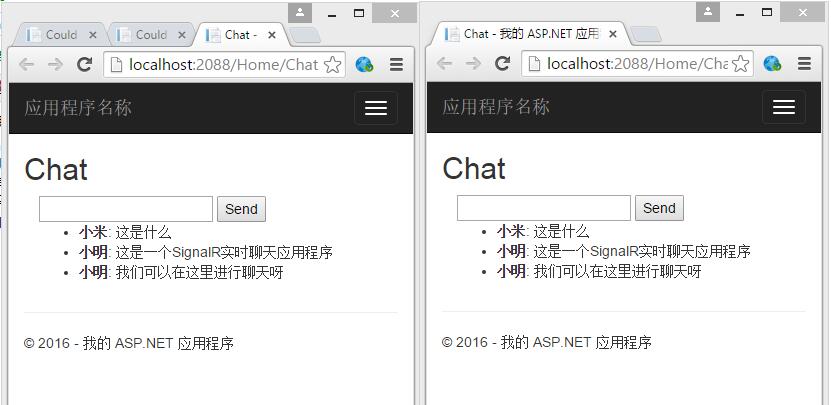
The screenshot below shows the completed chat application running in the browser.
2. Implement
Create an ASP.NET MVC 5 application, install the SignalR library, add and create a chat application.
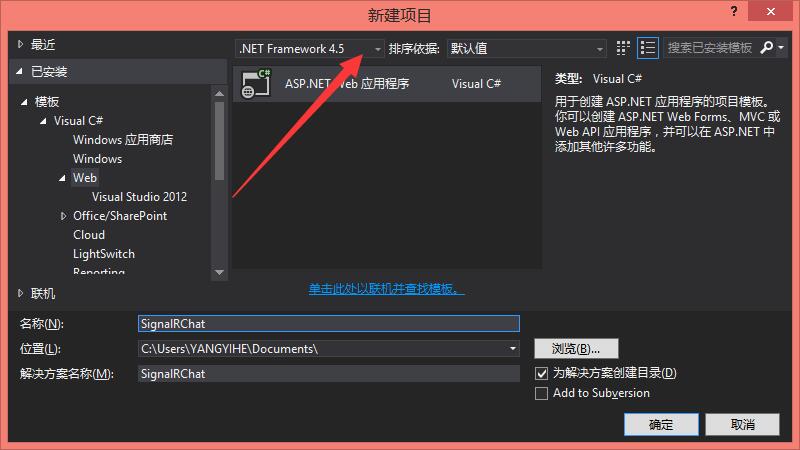
1). In Visual Studio, create a C# ASP.NET application targeting .NET Framework 4.5, name it SignalRChat, and click OK.
2). In the New ASP.NET Project dialog box , select MVC and click Change Authentication
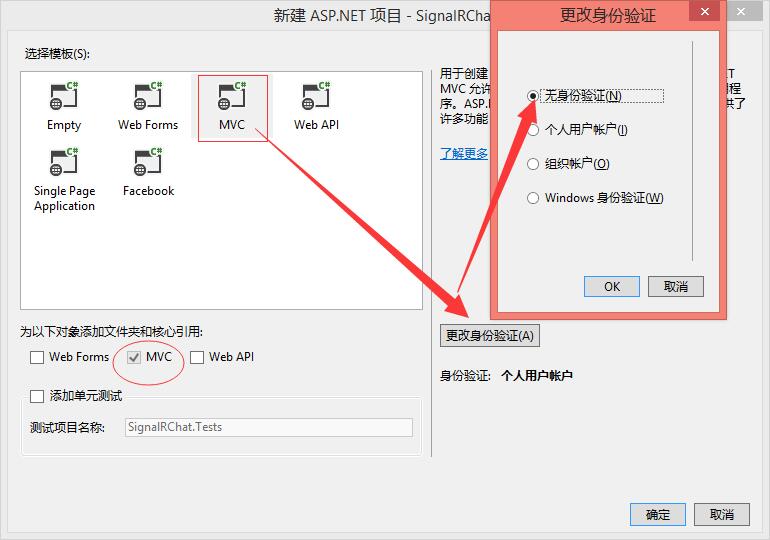
Note: If the application selects a different authentication provider, the Startup.cs class will be created, here select No Authentication so we create a Startup class ourselves.
3).Install SignalR
Open Tools | Library Package Manager | Package Manager Console and run the following command. This step adds a set of script files and assembly references to the project that enable the SignalR functionality.
Input: install-package Microsoft.AspNet.SignalR
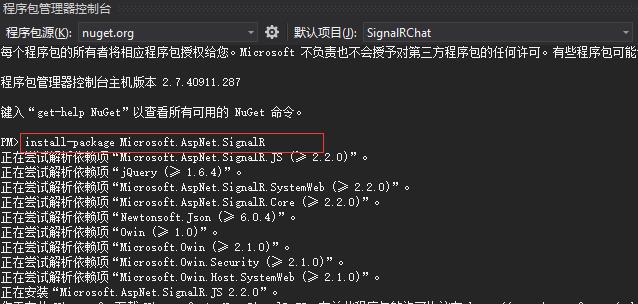
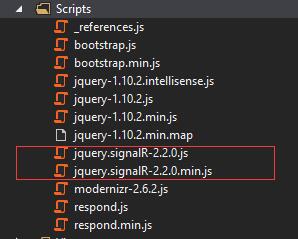
The installation is complete, and a file like this appears in the Scripts folder:
4). Create the Startup class:
Create the class in the root directory , named Startup:
using Owin;
using Microsoft.Owin;
[assembly: OwinStartup(typeof(SignalRChat.Startup))]
namespace SignalRChat
{
 public class Startup
 {
  public void Configuration(IAppBuilder app)
  {
   // Any connection or hub wire up and configuration should go here
   app.MapSignalR();
  }
 }
}5). Add Hubs folder in the project, add existing items:
Right-click the Hubs folder, click Add | New Project, select Visual C# | Web | Then SignalR node In the Installed pane, from the center pane, select the SignalR Hub class (v2) and create a file called ChatHub.cs.
Modify the code:
using System;
using System.Web;
using Microsoft.AspNet.SignalR;
namespace SignalRChat
{
 public class ChatHub : Hub
 {
  public void Send(string name, string message)
  {
   // Call the addNewMessageToPage method to update clients.
   Clients.All.addNewMessageToPage(name, message);
  }
 }
}
6). Edit the HomeController class and find it in Controllers/HomeController.cs. Add the following method to the class. This method returns the view of the chat, which you will create in a later step.
public ActionResult Chat()

{

 return View();

}
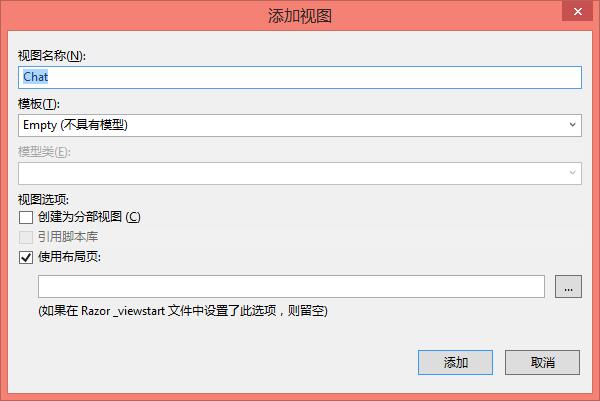
7). Right-click on the Chat() method >Add View Page
Modify the code to:
@{
ViewBag.Title = "Chat";
}
<h2>Chat</h2>
<div class="container">
<input type="text" id="message" />
<input type="button" id="sendmessage" value="Send" />
<input type="hidden" id="displayname" />
<ul id="discussion"></ul>
</div>
@section scripts {
<!--Script references. -->
<!--The jQuery library is required and is referenced by default in _Layout.cshtml. -->
<!--Reference the SignalR library. -->
<script src="~/Scripts/jquery.signalR-2.0.3.min.js"></script>
<!--Reference the autogenerated SignalR hub script. -->
<script src="~/signalr/hubs"></script>
<!--SignalR script to update the chat page and send messages.-->
<script>
$(function () {
// 建立对应server端Hub class的对象,请注意ChatHub(Hubs文件夹下的类名)的第一个字母要改成小写
var chat = $.connection.chatHub;
// 定义client端的javascript function,供server端hub,通过dynamic的方式,调用所有Clients的javascript function
chat.client.addNewMessageToPage = function (name, message) { //这里的fuction(name,message)=>ChatHub.cs 中的Send(string name, string message)
//当server端调用sendMessage时,将server push的message数据,呈现在wholeMessage中
$('#discussion').append('<li><strong>' + htmlEncode(name)
+ '</strong>: ' + htmlEncode(message) + '</li>');
};
// Get the user name and store it to prepend to messages.
$('#displayname').val(prompt('Enter your name:', ''));
// Set initial focus to message input box.
$('#message').focus();
//把connection打开
$.connection.hub.start().done(function () {
$('#sendmessage').click(function () {
//调用叫server端的Hub对象,将#message数据传给server
chat.server.send($('#displayname').val(), $('#message').val());
$('#message').val('').focus();
});
});
});
// This optional function html-encodes messages for display in the page.
function htmlEncode(value) {
var encodedValue = $('<div />').text(value).html();
return encodedValue;
}
</script>
}
Run the project with F5 to achieve the above effect, you can have Users join live synchronous chats in real time.
The above is the entire content of this article. I hope it will be helpful to everyone’s learning. I also hope that everyone will support the PHP Chinese website.
For more articles related to creating real-time chat applications with Asp.net SignalR, please pay attention to the PHP Chinese website!

Hot AI Tools

Undresser.AI Undress
AI-powered app for creating realistic nude photos

AI Clothes Remover
Online AI tool for removing clothes from photos.

Undress AI Tool
Undress images for free

Clothoff.io
AI clothes remover

Video Face Swap
Swap faces in any video effortlessly with our completely free AI face swap tool!

Hot Article

Hot Tools

Notepad++7.3.1
Easy-to-use and free code editor

SublimeText3 Chinese version
Chinese version, very easy to use

Zend Studio 13.0.1
Powerful PHP integrated development environment

Dreamweaver CS6
Visual web development tools

SublimeText3 Mac version
God-level code editing software (SublimeText3)

Hot Topics
 1386
1386
 52
52
 How to use various symbols in C language
Apr 03, 2025 pm 04:48 PM
The usage methods of symbols in C language cover arithmetic, assignment, conditions, logic, bit operators, etc. Arithmetic operators are used for basic mathematical operations, assignment operators are used for assignment and addition, subtraction, multiplication and division assignment, condition operators are used for different operations according to conditions, logical operators are used for logical operations, bit operators are used for bit-level operations, and special constants are used to represent null pointers, end-of-file markers, and non-numeric values.
 What is the role of char in C strings
Apr 03, 2025 pm 03:15 PM
In C, the char type is used in strings: 1. Store a single character; 2. Use an array to represent a string and end with a null terminator; 3. Operate through a string operation function; 4. Read or output a string from the keyboard.
 How to handle special characters in C language
Apr 03, 2025 pm 03:18 PM
In C language, special characters are processed through escape sequences, such as: \n represents line breaks. \t means tab character. Use escape sequences or character constants to represent special characters, such as char c = '\n'. Note that the backslash needs to be escaped twice. Different platforms and compilers may have different escape sequences, please consult the documentation.
 The difference between char and wchar_t in C language
Apr 03, 2025 pm 03:09 PM
In C language, the main difference between char and wchar_t is character encoding: char uses ASCII or extends ASCII, wchar_t uses Unicode; char takes up 1-2 bytes, wchar_t takes up 2-4 bytes; char is suitable for English text, wchar_t is suitable for multilingual text; char is widely supported, wchar_t depends on whether the compiler and operating system support Unicode; char is limited in character range, wchar_t has a larger character range, and special functions are used for arithmetic operations.
 The difference between multithreading and asynchronous c#
Apr 03, 2025 pm 02:57 PM
The difference between multithreading and asynchronous is that multithreading executes multiple threads at the same time, while asynchronously performs operations without blocking the current thread. Multithreading is used for compute-intensive tasks, while asynchronously is used for user interaction. The advantage of multi-threading is to improve computing performance, while the advantage of asynchronous is to not block UI threads. Choosing multithreading or asynchronous depends on the nature of the task: Computation-intensive tasks use multithreading, tasks that interact with external resources and need to keep UI responsiveness use asynchronous.
 How to convert char in C language
Apr 03, 2025 pm 03:21 PM
In C language, char type conversion can be directly converted to another type by: casting: using casting characters. Automatic type conversion: When one type of data can accommodate another type of value, the compiler automatically converts it.
 What is the function of C language sum?
Apr 03, 2025 pm 02:21 PM
There is no built-in sum function in C language, so it needs to be written by yourself. Sum can be achieved by traversing the array and accumulating elements: Loop version: Sum is calculated using for loop and array length. Pointer version: Use pointers to point to array elements, and efficient summing is achieved through self-increment pointers. Dynamically allocate array version: Dynamically allocate arrays and manage memory yourself, ensuring that allocated memory is freed to prevent memory leaks.
 How to use char array in C language
Apr 03, 2025 pm 03:24 PM
The char array stores character sequences in C language and is declared as char array_name[size]. The access element is passed through the subscript operator, and the element ends with the null terminator '\0', which represents the end point of the string. The C language provides a variety of string manipulation functions, such as strlen(), strcpy(), strcat() and strcmp().


