CodeIgniter study notes Item2--MVC in CI
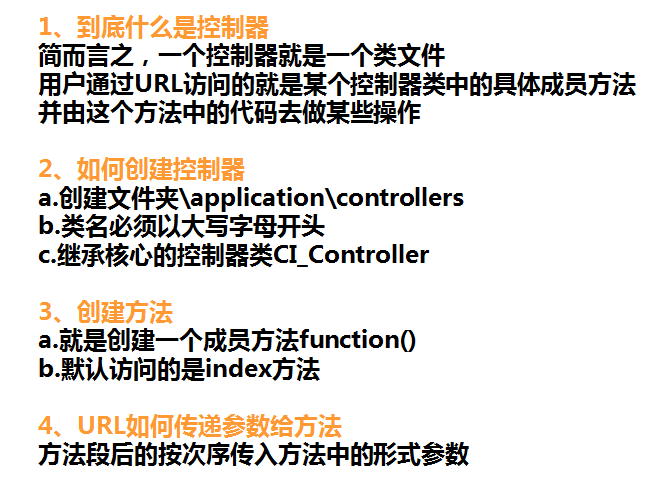
1.Controller in CI
To create your own project through CI, you only need to copy the application directory, system directory and index.php file in the CI compressed package to your own project directory. . Edit your own code entirely in the application directory, and do not modify the system directory. When a new version of CI is released in the future, you only need to replace the contents of the system file. If you modify it yourself, you will encounter trouble in the upgrade.

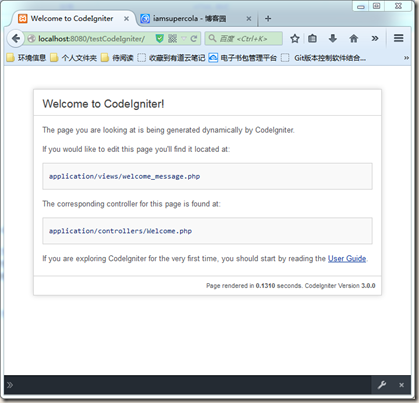
After the copy is completed, open the homepage of the new project through the URL: http://localhost:8080/testCodeIgniter/

Through this page, CI prompts us that the view currently displayed is defined in the welcome_message.php file, and the controller currently used is Welcome.php
Open
1 |
|
File, this file has only one index method, and the view is loaded in the method
1 |
|
1 2 3 4 5 6 7 8 9 10 11 12 13 14 15 16 17 18 19 20 21 22 |
|
View file
1 |
|
In the
1 |
|
directory
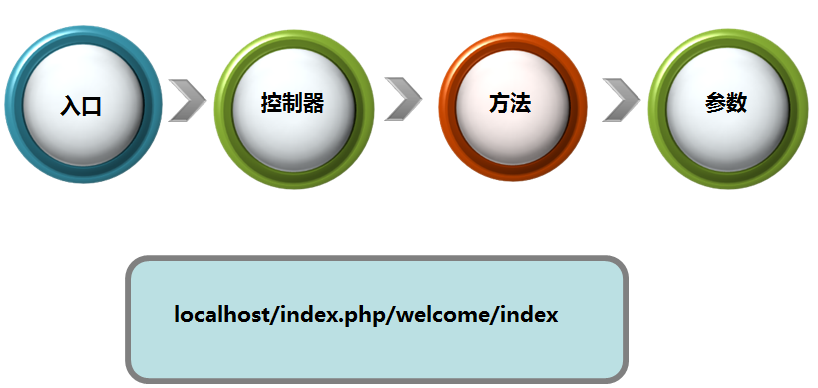
use pathinfo to access the controller through URL, the format is: protocol://domain name/entry file/controller/method name , For private methods, protected methods or methods starting with an underscore, they cannot be accessed through pathinfo
Add a new test method in the above control file Welcome.php:
1 2 3 4 |
|
Through
1 |
|
You can call the test method of the Welcome controller
Create a new user controller, including an index method
1 2 3 4 5 6 7 8 9 |
|
The controller needs to inherit from the CI_Controller class
Pass pathinfo can access the index method of the user controller: http://localhost:8080/testCodeIgniter/index.php/user/index

Note: pathinfo is case-sensitive. After testing with the CI3.0 version, it is case-insensitive
2. Views in CI
Controller loads the view
When CI loads the view through the controller, By calling
1 |
|
The view file name is index.php. At this time, there is no need to add a file suffix. The file path is a relative path based on the application/views directory.
The view file can be PHP native code. , no HTML code is required
Multiple views can be loaded in the controller, and the views can be loaded sequentially from top to bottom according to the structure of the document
1 2 3 |
|
Controller allocation variables
Two methods:
1. Single variable
1 |
|
##2. Allocate a batch of variables
1 2 3 |
|
For both allocation methods, you can use
1 |
|
1 |
|
1 |
|
的model方法中,会将传入的模型名称转成小写再去寻找对应的文件,但是类名必须是首字母大写并且拼装“
1 |
|
”,拼装后的结果应与模型文件的文件名一致,只是首字母大写,例如:文件名是
1 |
|
,类名应该是
1 |
|
。
– user_model.php文件
1 2 3 4 5 6 7 8 9 10 11 12 13 14 15 16 17 |
|
在控制器中这样调用
1 2 3 4 5 6 |
|
原则上,除了关系表,每张实体表都应该对应一个模型
以上就是CodeIgniter学习笔记 Item2--CI中的MVC的内容,更多相关内容请关注PHP中文网(www.php.cn)!

Hot AI Tools

Undresser.AI Undress
AI-powered app for creating realistic nude photos

AI Clothes Remover
Online AI tool for removing clothes from photos.

Undress AI Tool
Undress images for free

Clothoff.io
AI clothes remover

AI Hentai Generator
Generate AI Hentai for free.

Hot Article

Hot Tools

Notepad++7.3.1
Easy-to-use and free code editor

SublimeText3 Chinese version
Chinese version, very easy to use

Zend Studio 13.0.1
Powerful PHP integrated development environment

Dreamweaver CS6
Visual web development tools

SublimeText3 Mac version
God-level code editing software (SublimeText3)

Hot Topics
 1376
1376
 52
52
 How to implement custom middleware in CodeIgniter
Jul 29, 2023 am 10:53 AM
How to implement custom middleware in CodeIgniter Introduction: In modern web development, middleware plays a vital role in applications. They can be used to perform some shared processing logic before or after the request reaches the controller. CodeIgniter, as a popular PHP framework, also supports the use of middleware. This article will introduce how to implement custom middleware in CodeIgniter and provide a simple code example. Middleware overview: Middleware is a kind of request
 CodeIgniter middleware: Accelerate application responsiveness and page rendering
Jul 28, 2023 pm 06:51 PM
CodeIgniter Middleware: Accelerating Application Responsiveness and Page Rendering Overview: As web applications continue to grow in complexity and interactivity, developers need to use more efficient and scalable solutions to improve application performance and responsiveness. . CodeIgniter (CI) is a lightweight PHP-based framework that provides many useful features, one of which is middleware. Middleware is a series of tasks that are performed before or after the request reaches the controller. This article will introduce how to use
 PHP MVC Architecture: Building Web Applications for the Future
Mar 03, 2024 am 09:01 AM
Introduction In today's rapidly evolving digital world, it is crucial to build robust, flexible and maintainable WEB applications. The PHPmvc architecture provides an ideal solution to achieve this goal. MVC (Model-View-Controller) is a widely used design pattern that separates various aspects of an application into independent components. The foundation of MVC architecture The core principle of MVC architecture is separation of concerns: Model: encapsulates the data and business logic of the application. View: Responsible for presenting data and handling user interaction. Controller: Coordinates the interaction between models and views, manages user requests and business logic. PHPMVC Architecture The phpMVC architecture follows the traditional MVC pattern, but also introduces language-specific features. The following is PHPMVC
 How to use the database query builder (Query Builder) in the CodeIgniter framework
Jul 28, 2023 pm 11:13 PM
Introduction to the method of using the database query builder (QueryBuilder) in the CodeIgniter framework: CodeIgniter is a lightweight PHP framework that provides many powerful tools and libraries to facilitate developers in web application development. One of the most impressive features is the database query builder (QueryBuilder), which provides a concise and powerful way to build and execute database query statements. This article will introduce how to use Co
 How to use CodeIgniter5 framework in php?
Jun 01, 2023 am 11:21 AM
CodeIgniter is a lightweight PHP framework that uses MVC architecture to support rapid development and simplify common tasks. CodeIgniter5 is the latest version of the framework and offers many new features and improvements. This article will introduce how to use the CodeIgniter5 framework to build a simple web application. Step 1: Install CodeIgniter5 Downloading and installing CodeIgniter5 is very simple, just follow these steps: Download the latest version
 PHP development: Using CodeIgniter to implement MVC pattern and RESTful API
Jun 16, 2023 am 08:09 AM
As web applications continue to evolve, it is important to develop applications more quickly and efficiently. And, as RESTful API is widely used in web applications, it is necessary for developers to understand how to create and implement RESTful API. In this article, we will discuss how to implement MVC pattern and RESTful API using CodeIgniter framework. Introduction to MVC pattern MVC (Model-Vie
 CodeIgniter middleware: Provides secure file upload and download functions
Aug 01, 2023 pm 03:01 PM
CodeIgniter middleware: Provides secure file upload and download functions Introduction: In the process of web application development, file upload and download are very common functions. However, for security reasons, handling file uploads and downloads often requires additional security measures. CodeIgniter is a popular PHP framework that provides a wealth of tools and libraries to support developers in building secure and reliable web applications. This article will introduce how to use CodeIgniter middleware to implement secure files
 Use PHP framework CodeIgniter to develop a real-time chat application to provide convenient communication services
Jun 27, 2023 pm 02:49 PM
With the development of mobile Internet, instant messaging has become more and more important and popular. For many companies, live chat is more like a communication service, providing a convenient communication method that can quickly and effectively solve business problems. Based on this, this article will introduce how to use the PHP framework CodeIgniter to develop a real-time chat application. Understand the CodeIgniter framework CodeIgniter is a lightweight PHP framework that provides a series of simple tools and libraries to help developers quickly


