Be a front-end developer who can use PS
Do I need PS for front-end development? became a project manager. After more than ten minutes, the project manager came over and told me: The UI designers of the product department (our UI designers were all transferred to the product department at that time) need to report this task to their product managers. Please briefly describe your work in the email. The icon requirements are then sent to the product manager and CCed to me and the UI designer. I heard that eggs were all over the floor, and a few icons were designed in less than half an hour, but it took a whole day to complete! After this experience, I think it is necessary for a developer who makes interfaces to know some PS technology. On the one hand, it can improve development efficiency, and on the other hand, the interface made will be better-looking (of course, some PS technology , sometimes you can also help beautiful women with PP pictures). The picture below was achieved using PS's "History Brush Tool" and the Gaussian blur function under "Filter"->"Blur".
 The PS skill required for front-end development is cutting pictures
I originally planned to share common tools and cutting pictures together in one article, but in order to intuitively display the operation, This article has added a lot of pictures, so it can no longer accommodate the introduction of the picture cutting function. Let’s introduce the image cutting function in a separate article. This article mainly introduces the common configuration of PS and several commonly used tools in the toolbar. Finally, it also introduces several tips in using PS.
Preparations before PS
1. Close unnecessary windows. Open PhotoShop. Before starting to P or cut pictures, we usually need to close unnecessary windows and only keep the windows used in the picture cutting process. The opening or closing of the window can be controlled through the "Window" menu. The several windows needed for general web design are: information, characters, layers, and history.
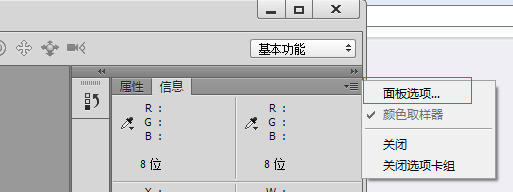
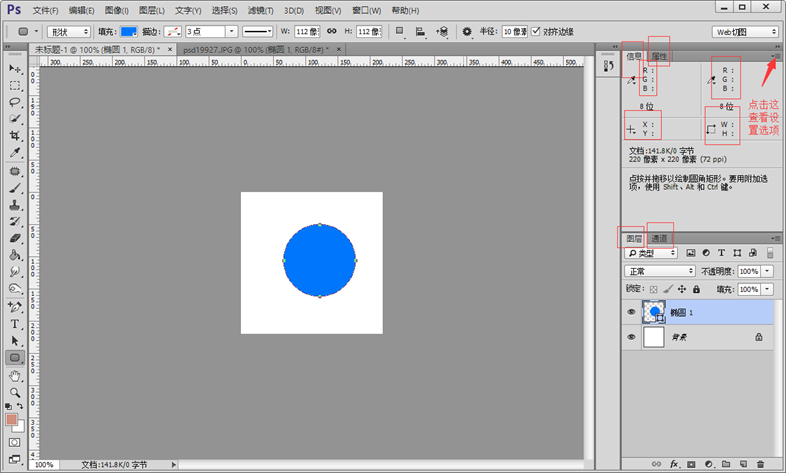 2. Set panel information. Sometimes when we move the mouse or select an area, we want to know the mouse position or the size of the selected area. Select the "Information" window and open "Panel Options...".
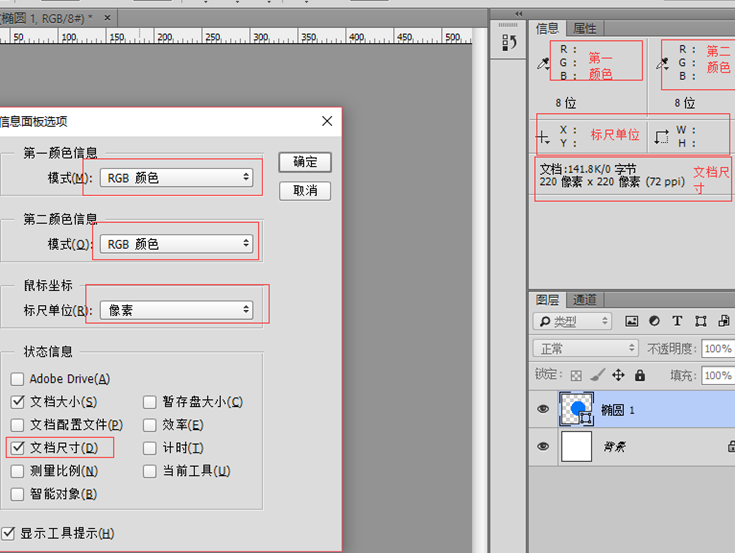
 Set the mode of the first color information and the second color information of the panel to "RGB" color, set the ruler unit of the mouse coordinates to "pixels", and check "Document" Size", these settings will be used later. After the setting is completed, we use the "Selection Tool" to select an area in the workspace, and the information window displays the coordinates of the mouse, the length and width of the area, and the RGB color.
 3. Set the unit and ruler. Select the menu "Edit"->"Preferences"->"Units and Rulers" and change the ruler and text units to pixels.
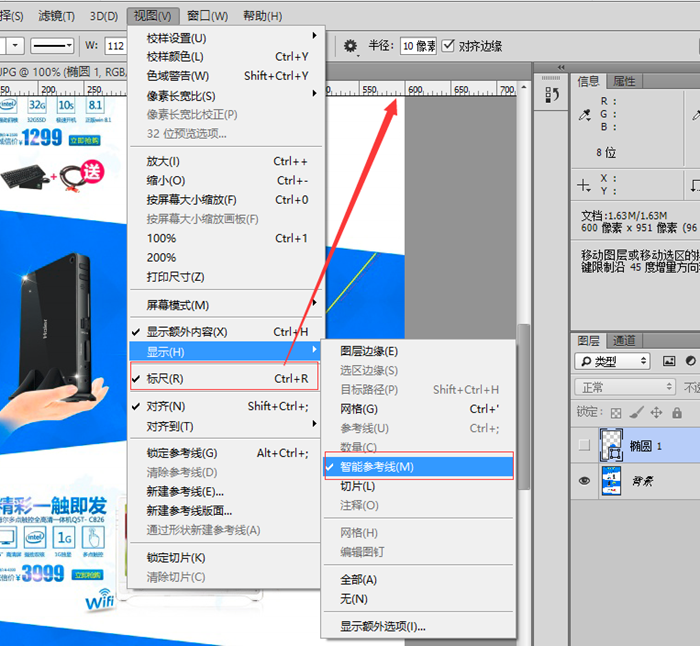
4. Smart guides and rulers. Open the "View"->"Display" menu and check "Smart Guides". Select the "View" menu and check "Ruler" (ctr+R).
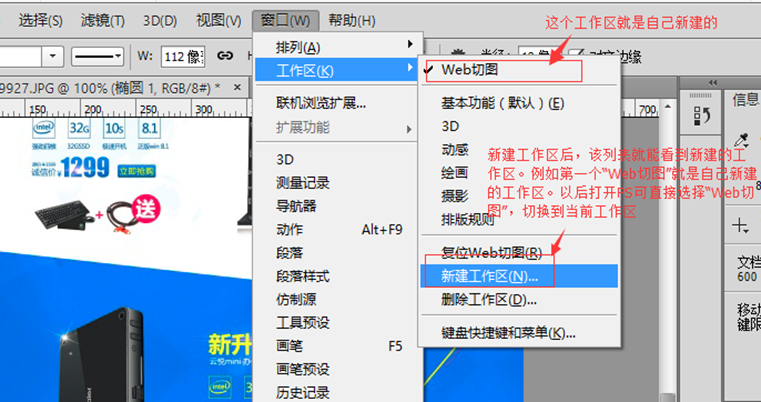
5. Save the workspace. After setting up the interface menu, we definitely don’t want to have to reset it the second time we open it. Open the menu "Window"->"Workspace"->"New Workspace" to create a new workspace. You can use the newly created workspace directly the next time you design a cutout.
Commonly used tools
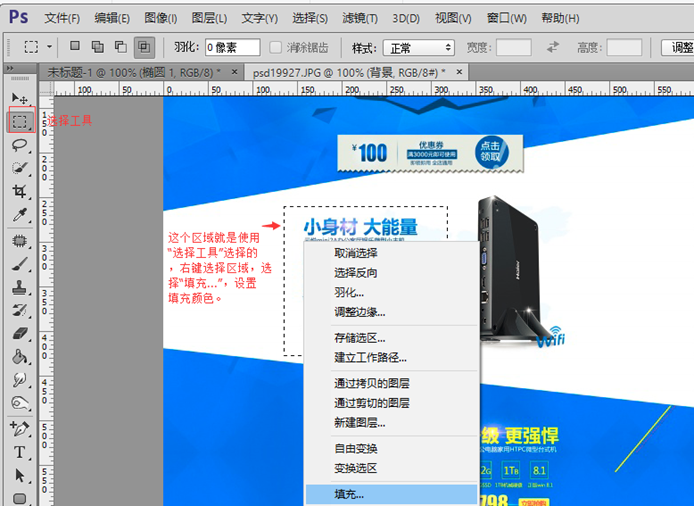
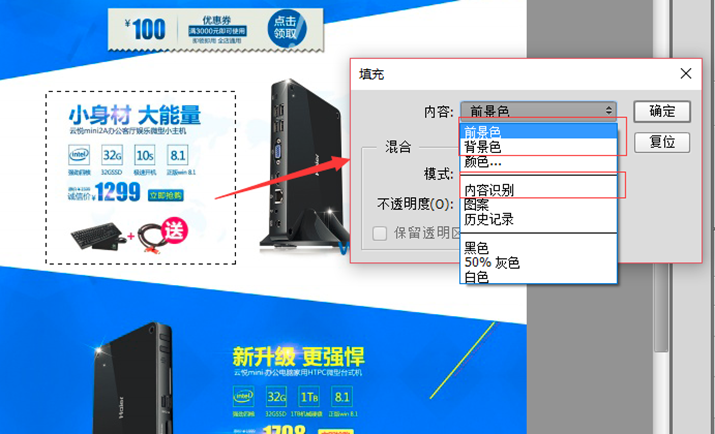
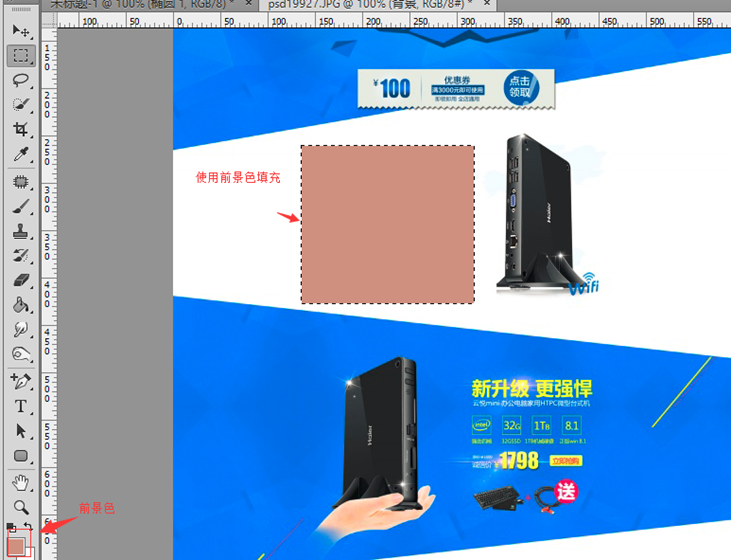
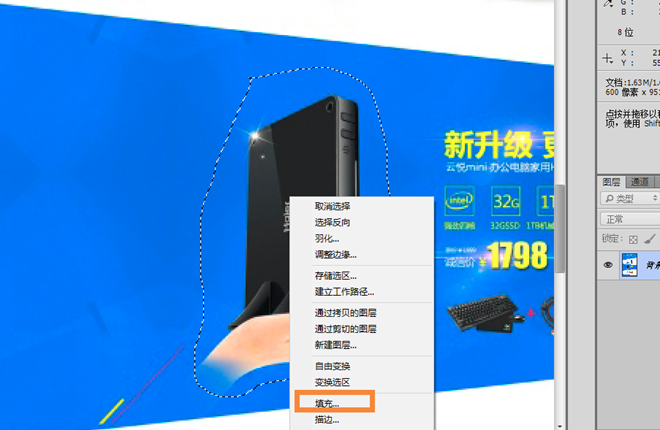
1. Select the tool (shortcut key M). Select the "Selection Tool" in the toolbar, select an area on the layer, then right-click the selected area and select "Fill..." to pop up the fill window. We can fill the selected area with the foreground color, background color or other colors.
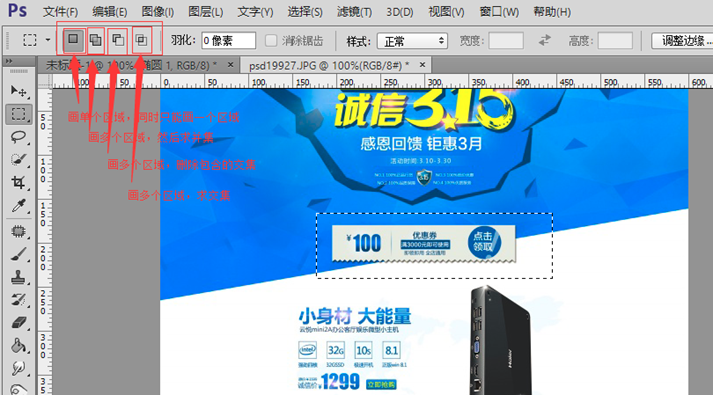
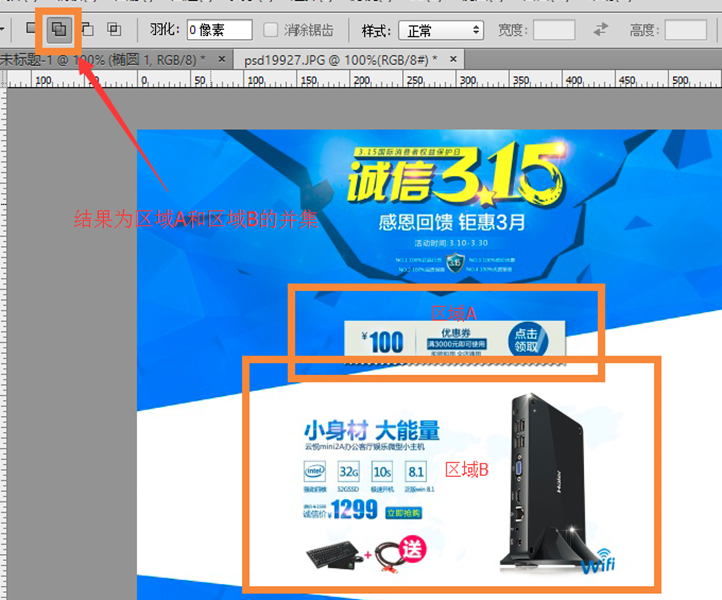
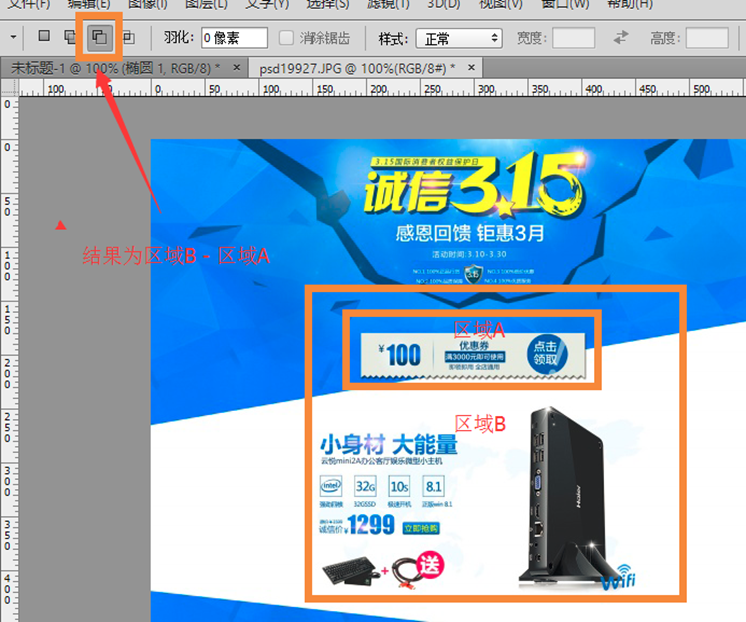
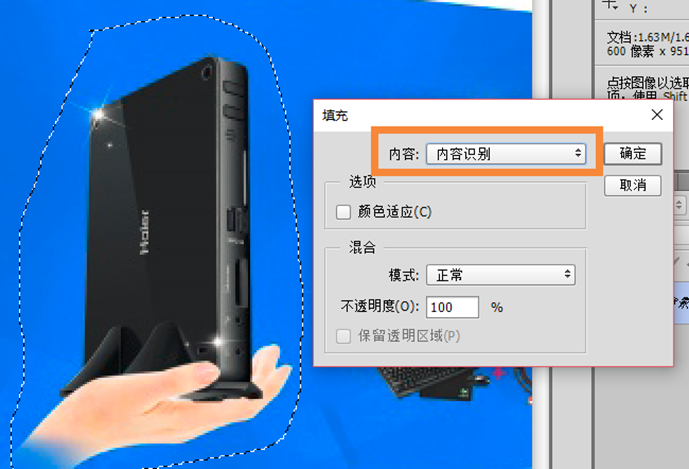
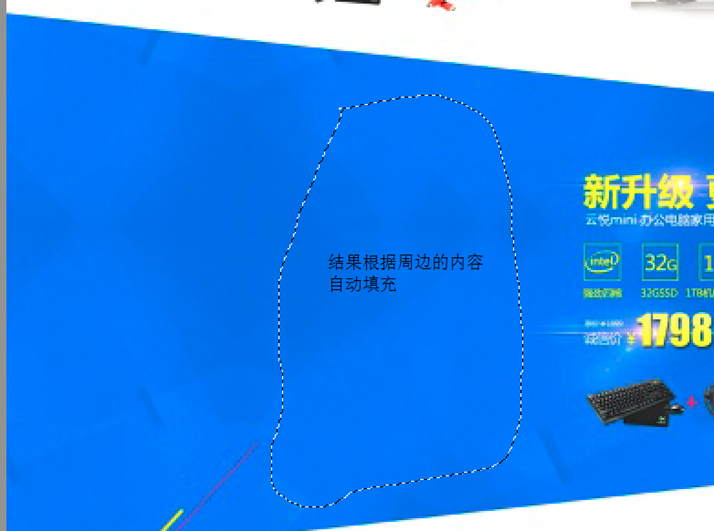
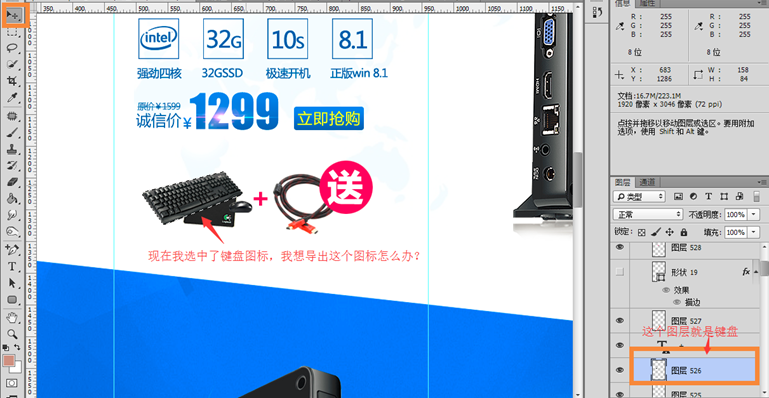
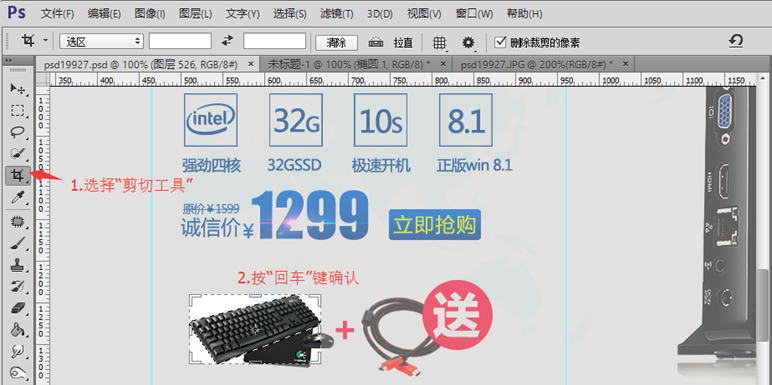
5. Cropping tool. The crop tool is used to cut out only what we need. After using other area selection tools, switch the menu to the crop tool to directly crop the previously selected area.
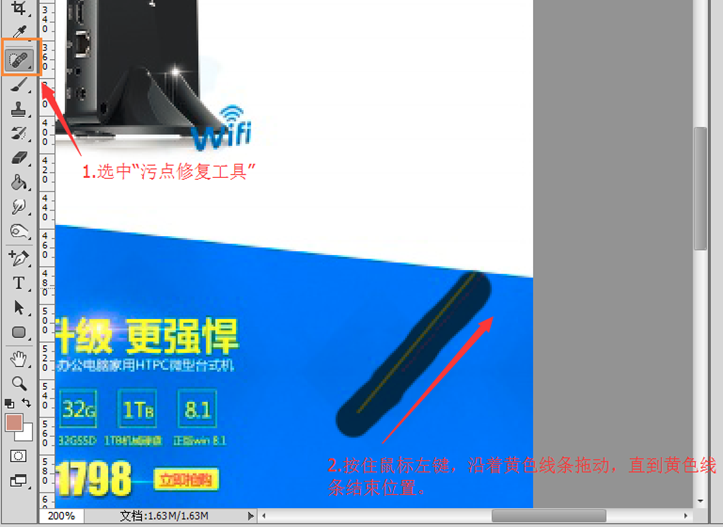
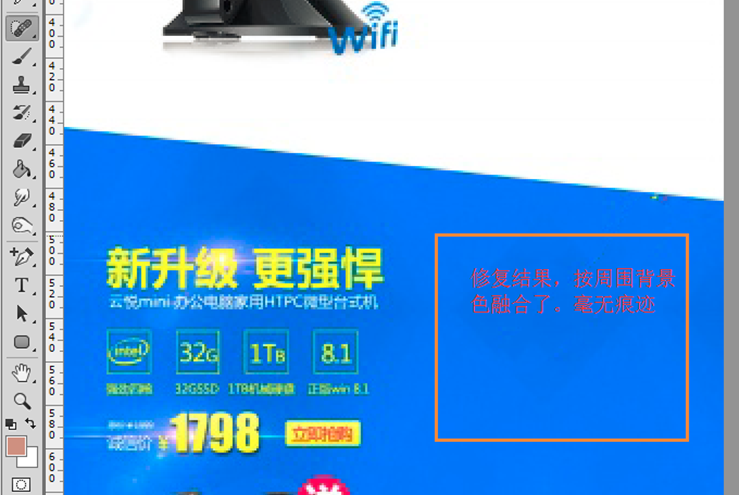
6. Spot repair tool. It includes a spot repair tool and a repair tool. The spot repair tool automatically blends the colors around the brush. For example, in the picture below, there is a yellow horizontal line that you want to remove. You can use the spot repair tool to remove it. Click and hold the mouse and drag from beginning to end. Patch tool, selects an area and fills it with content from elsewhere.
Some tips
1. Automatic layer positioning. When using the "Move Tool", the menu bar has two additional menus: "Auto Selection" and "Layer (or Group)". The functions of these two menus are similar to the linkage between selected files and solution directory files in Visual Studio. For the options on the right, we usually choose "Layer", while for the option on the left, it is recommended not to check "Custom Selection". When you need to position, hold down the Ctrl key and left-click the picture in the image window to open the "Layer" window. The layers are automatically positioned.

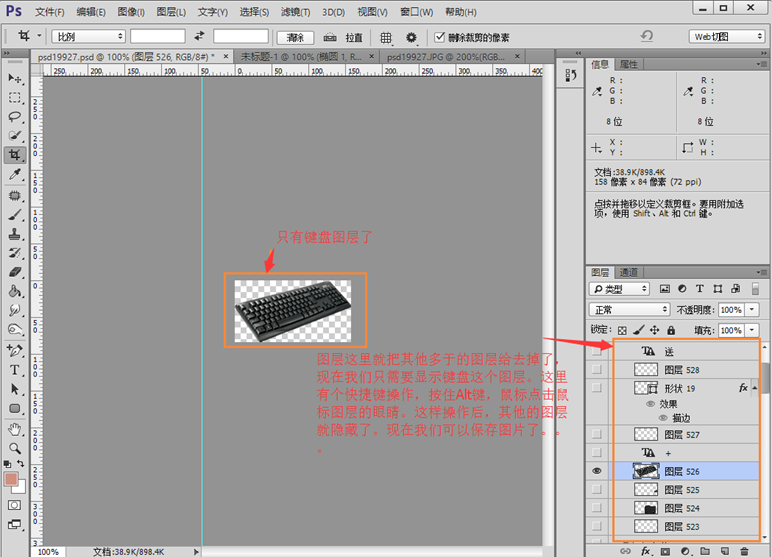
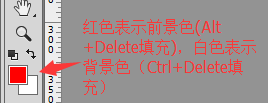
2. Fill the foreground color and background color. With the selection tools introduced earlier, sometimes we select an area and want to fill it with the foreground color or background color. What should we do? Photoshop provides us with fill shortcut keys. Use Alt+Delete to fill the foreground color, and use Ctrl+Delete to advance the background color.
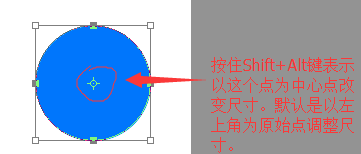
3. Adjust the graphic size. If you want to adjust the size of a circle, we know that you can use Ctrl+T to freely change the size. But some students don’t know how to adjust with the center of the circle as the center point. It’s actually very simple. Just hold down the Shift+Alt keys and drag the circle. In this way, the adjustment of the graphic is based on the center of the circle. In addition, if we want to draw a square or circle, hold down Shift before drawing to draw the square or circle.
For more articles related to making a front-end development using PS, please pay attention to the PHP Chinese website!

Hot AI Tools

Undresser.AI Undress
AI-powered app for creating realistic nude photos

AI Clothes Remover
Online AI tool for removing clothes from photos.

Undress AI Tool
Undress images for free

Clothoff.io
AI clothes remover

Video Face Swap
Swap faces in any video effortlessly with our completely free AI face swap tool!

Hot Article

Hot Tools

Notepad++7.3.1
Easy-to-use and free code editor

SublimeText3 Chinese version
Chinese version, very easy to use

Zend Studio 13.0.1
Powerful PHP integrated development environment

Dreamweaver CS6
Visual web development tools

SublimeText3 Mac version
God-level code editing software (SublimeText3)

Hot Topics
 1386
1386
 52
52
 What is the reason why PS keeps showing loading?
Apr 06, 2025 pm 06:39 PM
PS "Loading" problems are caused by resource access or processing problems: hard disk reading speed is slow or bad: Use CrystalDiskInfo to check the hard disk health and replace the problematic hard disk. Insufficient memory: Upgrade memory to meet PS's needs for high-resolution images and complex layer processing. Graphics card drivers are outdated or corrupted: Update the drivers to optimize communication between the PS and the graphics card. File paths are too long or file names have special characters: use short paths and avoid special characters. PS's own problem: Reinstall or repair the PS installer.
 How to solve the problem of loading when PS is always showing that it is loading?
Apr 06, 2025 pm 06:30 PM
PS card is "Loading"? Solutions include: checking the computer configuration (memory, hard disk, processor), cleaning hard disk fragmentation, updating the graphics card driver, adjusting PS settings, reinstalling PS, and developing good programming habits.
 What are the common questions about exporting PDF on PS
Apr 06, 2025 pm 04:51 PM
Frequently Asked Questions and Solutions when Exporting PS as PDF: Font Embedding Problems: Check the "Font" option, select "Embed" or convert the font into a curve (path). Color deviation problem: convert the file into CMYK mode and adjust the color; directly exporting it with RGB requires psychological preparation for preview and color deviation. Resolution and file size issues: Choose resolution according to actual conditions, or use the compression option to optimize file size. Special effects issue: Merge (flatten) layers before exporting, or weigh the pros and cons.
 How to set password protection for export PDF on PS
Apr 06, 2025 pm 04:45 PM
Export password-protected PDF in Photoshop: Open the image file. Click "File"> "Export"> "Export as PDF". Set the "Security" option and enter the same password twice. Click "Export" to generate a PDF file.
 How to speed up the loading speed of PS?
Apr 06, 2025 pm 06:27 PM
Solving the problem of slow Photoshop startup requires a multi-pronged approach, including: upgrading hardware (memory, solid-state drive, CPU); uninstalling outdated or incompatible plug-ins; cleaning up system garbage and excessive background programs regularly; closing irrelevant programs with caution; avoiding opening a large number of files during startup.
 How to use PS Pen Tool
Apr 06, 2025 pm 10:15 PM
The Pen Tool is a tool that creates precise paths and shapes, and is used by: Select the Pen Tool (P). Sets Path, Fill, Stroke, and Shape options. Click Create anchor point, drag the curve to release the Create anchor point. Press Ctrl/Cmd Alt/Opt to delete the anchor point, drag and move the anchor point, and click Adjust curve. Click the first anchor to close the path to create a shape, and double-click the last anchor to create an open path.
 How to solve the problem of loading when the PS opens the file?
Apr 06, 2025 pm 06:33 PM
"Loading" stuttering occurs when opening a file on PS. The reasons may include: too large or corrupted file, insufficient memory, slow hard disk speed, graphics card driver problems, PS version or plug-in conflicts. The solutions are: check file size and integrity, increase memory, upgrade hard disk, update graphics card driver, uninstall or disable suspicious plug-ins, and reinstall PS. This problem can be effectively solved by gradually checking and making good use of PS performance settings and developing good file management habits.
 How to pull the vertical reference line of PS
Apr 06, 2025 pm 08:18 PM
Pull vertical guides in Photoshop: Enable ruler view (View > ruler). Hover the mouse over the vertical edge of the ruler, and then the cursor becomes a vertical line with double arrows and hold and drag the mouse to pull out the reference line. Click Delete by dragging the guide, or hovering it into a cross.


