PHP method to implement QQ quick login
Foreword:
PHP implements QQ quick login, listing three methods
Method one: process-oriented, callback address and first trigger login are written on a method page [because of if Make judgment],
Methods 2 and 3: Object-oriented
1. First call the login method and send a request to Tencent,
2. Tencent carries the unique corresponding parameters of this website OPENID, ACCESSTOKEN, return to the corresponding callback page,
3. After the callback page receives Tencent's parameters, it uses these two parameters to issue the corresponding request, such as querying the user's data.
4. Tencent performs corresponding operations, such as returning the user's data to you
Even if you don't understand it, it doesn't matter. Follow my process below to ensure that you can achieve it.
Preliminary preparation:
When using Tencent’s functions, you have to say hello to them!
QQ Internet homepage: http://connect.qq.com/
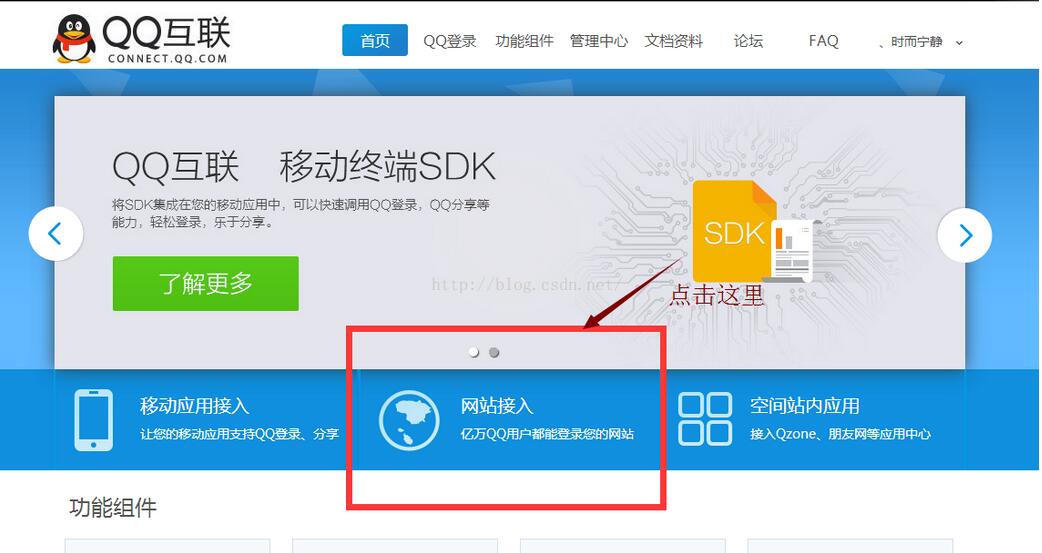
After entering the website, follow the following operations:
1. Enter the official website

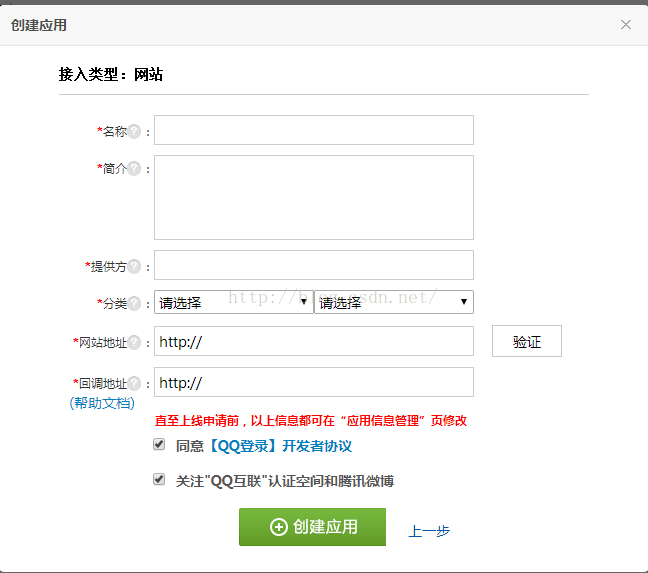
2. Apply to create a [website] application

3. Fill in the information as required
Note the website address: fill in You need to set the URL for quick login, eg: http://www.test.com;
Callback address: After you send QQ quick login, Tencent will give you information, and this information will be accepted on this page. eg: http://www.test.com/accept_info.php
[For detailed application filling, please see the official tips, I will not go into details here]

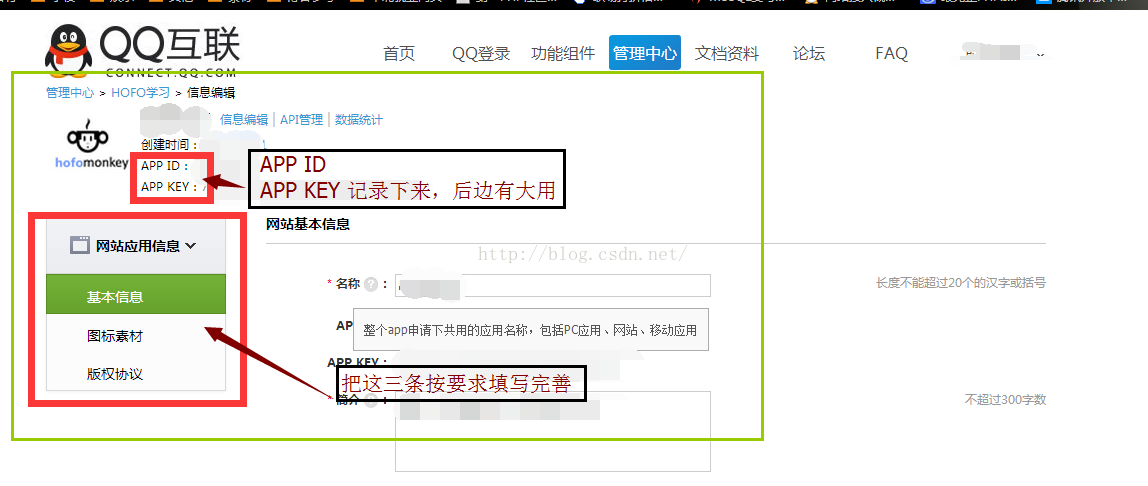
4. After successful application, complete the information

Method 1, process-oriented method
Usage method: After configuring $app_id, $app_secret, $my_url, copy the others as they are, and $user_data is the returned login information
Code:
//应用的APPID
$app_id = "你的APPID";
//应用的APPKEY
$app_secret = "你的APPKEY";
//【成功授权】后的回调地址,即此地址在腾讯的信息中有储存
$my_url = "你的回调网址";
//Step1:获取Authorization Code
session_start();
$code = $_REQUEST["code"];//存放Authorization Code
if(empty($code))
{
//state参数用于防止CSRF攻击,成功授权后回调时会原样带回
$_SESSION['state'] = md5(uniqid(rand(), TRUE));
//拼接URL
$dialog_url = "https://graph.qq.com/oauth2.0/authorize?response_type=code&client_id="
. $app_id . "&redirect_uri=" . urlencode($my_url) . "&state="
. $_SESSION['state'];
echo("<script> top.location.href='" . $dialog_url . "'</script>");
}
//Step2:通过Authorization Code获取Access Token
if($_REQUEST['state'] == $_SESSION['state'] || 1)
{
//拼接URL
$token_url = "https://graph.qq.com/oauth2.0/token?grant_type=authorization_code&"
. "client_id=" . $app_id . "&redirect_uri=" . urlencode($my_url)
. "&client_secret=" . $app_secret . "&code=" . $code;
$response = file_get_contents($token_url);
if (strpos($response, "callback") !== false)//如果登录用户临时改变主意取消了,返回true!==false,否则执行step3
{
$lpos = strpos($response, "(");
$rpos = strrpos($response, ")");
$response = substr($response, $lpos + 1, $rpos - $lpos -1);
$msg = json_decode($response);
if (isset($msg->error))
{
echo "<h3 id="error">error:</h3>" . $msg->error;
echo "<h3 id="msg-nbsp">msg :</h3>" . $msg->error_description;
exit;
}
}
//Step3:使用Access Token来获取用户的OpenID
$params = array();
parse_str($response, $params);//把传回来的数据参数变量化
$graph_url = "https://graph.qq.com/oauth2.0/me?access_token=".$params['access_token'];
$str = file_get_contents($graph_url);
if (strpos($str, "callback") !== false)
{
$lpos = strpos($str, "(");
$rpos = strrpos($str, ")");
$str = substr($str, $lpos + 1, $rpos - $lpos -1);
}
$user = json_decode($str);//存放返回的数据 client_id ,openid
if (isset($user->error))
{
echo "<h3 id="error">error:</h3>" . $user->error;
echo "<h3 id="msg-nbsp">msg :</h3>" . $user->error_description;
exit;
}
//echo("Hello " . $user->openid);
//echo("Hello " . $params['access_token']);
//Step4:使用<span style="font-family: Arial, Helvetica, sans-serif;">openid,</span><span style="font-family: Arial, Helvetica, sans-serif;">access_token来获取所接受的用户信息。</span>
$user_data_url = "https://graph.qq.com/user/get_user_info?access_token={$params['access_token']}&oauth_consumer_key={$app_id}&openid={$user->openid}&format=json";
$user_data = file_get_contents($user_data_url);//此为获取到的user信息
}
else
{
echo("The state does not match. You may be a victim of CSRF.");
}Usage method:
1. Correctly configure APPID, APPKEY CALLBACK (callback URL) in QQ_LoginAction.class
2. In the calling method, the code is:
$qq_login = new \Component\QQ_LoginAction();    //引入此类文件即可
$qq_login->qq_login();          //调用登录方法,向腾讯发出快速登录请求
$qc = new \Component\QQ_LoginAction();
$acs = $qc->qq_callback();<span style="white-space:pre">    //access_token
$oid=$qc->get_openid();<span style="white-space:pre">     //openid
$user_data = $qc->get_user_info();<span style="white-space:pre">  //get_user_info()为获得该用户的信息,其他操作方法见API文档
5.QQ_LoginAction.class.php File code: [ThinkPHP3.2 used]
<?php
namespace Component;
session_start();
define('APPID','XXXX'); //appid
define('APPKEY','XXXX'); //appkey
define('CALLBACK','XXXX'); //回调地址
define('SCOPE','get_user_info,list_album,add_album,upload_pic,add_topic,add_weibo'); //授权接口列表
class QQ_LoginAction {
const GET_AUTH_CODE_URL = "https://graph.qq.com/oauth2.0/authorize";
const GET_ACCESS_TOKEN_URL = "https://graph.qq.com/oauth2.0/token";
const GET_OPENID_URL = "https://graph.qq.com/oauth2.0/me";
private $APIMap = array(
"get_user_info" => array( //获取用户资料
"https://graph.qq.com/user/get_user_info",
array("format" => "json"),
),
"add_t" => array( //发布一条普通微博
"https://graph.qq.com/t/add_t",
array("format" => "json", "content","#clientip","#longitude","#latitude","#compatibleflag"),
"POST"
),
"add_pic_t" => array( //发布一条图片微博
"https://graph.qq.com/t/add_pic_t",
array("content", "pic", "format" => "json", "#clientip", "#longitude", "#latitude", "#syncflag", "#compatiblefalg"),
"POST"
),
"del_t" => array( //删除一条微博
"https://graph.qq.com/t/del_t",
array("id", "format" => "json"),
"POST"
),
"get_repost_list" => array( //获取单条微博的转发或点评列表
"https://graph.qq.com/t/get_repost_list",
array("flag", "rootid", "pageflag", "pagetime", "reqnum", "twitterid", "format" => "json")
),
"get_info" => array( //获取当前用户资料
"https://graph.qq.com/user/get_info",
array("format" => "json")
),
"get_other_info" => array( //获取其他用户资料
"https://graph.qq.com/user/get_other_info",
array("format" => "json", "#name-1", "#fopenid-1")
),
"get_fanslist" => array(
"https://graph.qq.com/relation/get_fanslist", //我的微博粉丝列表
array("format" => "json", "reqnum", "startindex", "#mode", "#install", "#sex")
),
"get_idollist" => array(
"https://graph.qq.com/relation/get_idollist", //我的微博收听列表
array("format" => "json", "reqnum", "startindex", "#mode", "#install")
),
"add_idol" => array(
"https://graph.qq.com/relation/add_idol", //微博收听某用户
array("format" => "json", "#name-1", "#fopenids-1"),
"POST"
),
"del_idol" => array( //微博取消收听某用户
"https://graph.qq.com/relation/del_idol",
array("format" => "json", "#name-1", "#fopenid-1"),
"POST"
)
);
private $keysArr;
function __construct(){
if($_SESSION["openid"]){
$this->keysArr = array(
"oauth_consumer_key" => APPID,
"access_token" => $_SESSION['access_token'],
"openid" => $_SESSION["openid"]
);
}else{
$this->keysArr = array(
"oauth_consumer_key" => APPID
);
}
}
public function qq_login(){
//-------生成唯一随机串防CSRF攻击
$_SESSION['state'] = md5(uniqid(rand(), TRUE));
$keysArr = array(
"response_type" => "code",
"client_id" => APPID,
"redirect_uri" => CALLBACK,
"state" => $_SESSION['state'],
"scope" => SCOPE
);
$login_url = self::GET_AUTH_CODE_URL.'?'.http_build_query($keysArr);
header("Location:$login_url");
}
public function qq_callback(){
//--------验证state防止CSRF攻击
if($_GET['state'] != $_SESSION['state']){
return false;
}
//-------请求参数列表
$keysArr = array(
"grant_type" => "authorization_code",
"client_id" => APPID,
"redirect_uri" => CALLBACK,
"client_secret" => APPKEY,
"code" => $_GET['code']
);
//------构造请求access_token的url
$token_url = self::GET_ACCESS_TOKEN_URL.'?'.http_build_query($keysArr);
$response = $this->get_contents($token_url);
if(strpos($response, "callback") !== false){
$lpos = strpos($response, "(");
$rpos = strrpos($response, ")");
$response = substr($response, $lpos + 1, $rpos - $lpos -1);
$msg = json_decode($response);
if(isset($msg->error)){
$this->showError($msg->error, $msg->error_description);
}
}
$params = array();
parse_str($response, $params);
$_SESSION["access_token"]=$params["access_token"];
$this->keysArr['access_token']=$params['access_token'];
return $params["access_token"];
}
public function get_contents($url){
if (ini_get("allow_url_fopen") == "1") {
$response = file_get_contents($url);
}else{
$ch = curl_init();
curl_setopt($ch, CURLOPT_SSL_VERIFYPEER, FALSE);
curl_setopt($ch, CURLOPT_RETURNTRANSFER, TRUE);
curl_setopt($ch, CURLOPT_URL, $url);
$response = curl_exec($ch);
curl_close($ch);
}
if(empty($response)){
return false;
}
return $response;
}
public function get_openid(){
//-------请求参数列表
$keysArr = array(
"access_token" => $_SESSION["access_token"]
);
$graph_url = self::GET_OPENID_URL.'?'.http_build_query($keysArr);
$response = $this->get_contents($graph_url);
//--------检测错误是否发生
if(strpos($response, "callback") !== false){
$lpos = strpos($response, "(");
$rpos = strrpos($response, ")");
$response = substr($response, $lpos + 1, $rpos - $lpos -1);
}
$user = json_decode($response);
if(isset($user->error)){
$this->showError($user->error, $user->error_description);
}
//------记录openid
$_SESSION['openid']=$user->openid;
$this->keysArr['openid']=$user->openid;
return $user->openid;
}
/**
* showError
* 显示错误信息
* @param int $code 错误代码
* @param string $description 描述信息(可选)
*/
public function showError($code, $description = '$'){
echo "<meta charset=\"UTF-8\">";
echo "<h3 id="error">error:</h3>$code";
echo "<h3 id="msg-nbsp">msg :</h3>$description";
exit();
}
/**
* _call
* 魔术方法,做api调用转发
* @param string $name 调用的方法名称
* @param array $arg 参数列表数组
* @since 5.0
* @return array 返加调用结果数组
*/
public function __call($name,$arg){
//如果APIMap不存在相应的api
if(empty($this->APIMap[$name])){
$this->showError("api调用名称错误","不存在的API: <span style='color:red;'>$name</span>");
}
//从APIMap获取api相应参数
$baseUrl = $this->APIMap[$name][0];
$argsList = $this->APIMap[$name][1];
$method = isset($this->APIMap[$name][2]) ? $this->APIMap[$name][2] : "GET";
if(empty($arg)){
$arg[0] = null;
}
$responseArr = json_decode($this->_applyAPI($arg[0], $argsList, $baseUrl, $method),true);
//检查返回ret判断api是否成功调用
if($responseArr['ret'] == 0){
return $responseArr;
}else{
$this->showError($responseArr['ret'], $responseArr['msg']);
}
}
//调用相应api
private function _applyAPI($arr, $argsList, $baseUrl, $method){
$pre = "#";
$keysArr = $this->keysArr;
$optionArgList = array();//一些多项选填参数必选一的情形
foreach($argsList as $key => $val){
$tmpKey = $key;
$tmpVal = $val;
if(!is_string($key)){
$tmpKey = $val;
if(strpos($val,$pre) === 0){
$tmpVal = $pre;
$tmpKey = substr($tmpKey,1);
if(preg_match("/-(\d$)/", $tmpKey, $res)){
$tmpKey = str_replace($res[0], "", $tmpKey);
$optionArgList[]= $tmpKey;
}
}else{
$tmpVal = null;
}
}
//-----如果没有设置相应的参数
if(!isset($arr[$tmpKey]) || $arr[$tmpKey] === ""){
if($tmpVal == $pre){
continue;
}else if($tmpVal){//则使用默认的值
$arr[$tmpKey] = $tmpVal;
}else{
$this->showError("api调用参数错误","未传入参数$tmpKey");
}
}
$keysArr[$tmpKey] = $arr[$tmpKey];
}
//检查选填参数必填一的情形
if(count($optionArgList)!=0){
$n = 0;
foreach($optionArgList as $val){
if(in_array($val, array_keys($keysArr))){
$n++;
}
}
if(!$n){
$str = implode(",",$optionArgList);
$this->showError("api调用参数错误",$str."必填一个");
}
}
if($method == "POST"){
$response = $this->post($baseUrl, $keysArr, 0);
}else if($method == "GET"){
$baseUrl=$baseUrl.'?'.http_build_query($keysArr);
$response = $this->get_contents($baseUrl);
}
return $response;
}
public function post($url, $keysArr, $flag = 0){
$ch = curl_init();
if(! $flag) curl_setopt($ch, CURLOPT_SSL_VERIFYPEER, FALSE);
curl_setopt($ch, CURLOPT_RETURNTRANSFER, TRUE);
curl_setopt($ch, CURLOPT_POST, TRUE);
curl_setopt($ch, CURLOPT_POSTFIELDS, $keysArr);
curl_setopt($ch, CURLOPT_URL, $url);
$ret = curl_exec($ch);
curl_close($ch);
return $ret;
}
}Usage method: Tencent SDK, the API is very well written Detailed, no details
Address: http://wiki.connect.qq.com/%E7%BD%91%E7%AB%99%E6%8E%A5%E5%85%A5%E6%A6 %82%E8%BF%B0
If you are still unclear, you can read the official introduction for more details.
Method: Modify the HOST configuration file
1. Open C :\Windows\System32\drivers\etc\host
2. Add 127.0.0.1 www.test.com
and then operate.

Hot AI Tools

Undresser.AI Undress
AI-powered app for creating realistic nude photos

AI Clothes Remover
Online AI tool for removing clothes from photos.

Undress AI Tool
Undress images for free

Clothoff.io
AI clothes remover

Video Face Swap
Swap faces in any video effortlessly with our completely free AI face swap tool!

Hot Article

Hot Tools

Notepad++7.3.1
Easy-to-use and free code editor

SublimeText3 Chinese version
Chinese version, very easy to use

Zend Studio 13.0.1
Powerful PHP integrated development environment

Dreamweaver CS6
Visual web development tools

SublimeText3 Mac version
God-level code editing software (SublimeText3)

Hot Topics
 1386
1386
 52
52
 Alipay PHP SDK transfer error: How to solve the problem of 'Cannot declare class SignData'?
Apr 01, 2025 am 07:21 AM
Alipay PHP...
 Explain JSON Web Tokens (JWT) and their use case in PHP APIs.
Apr 05, 2025 am 12:04 AM
JWT is an open standard based on JSON, used to securely transmit information between parties, mainly for identity authentication and information exchange. 1. JWT consists of three parts: Header, Payload and Signature. 2. The working principle of JWT includes three steps: generating JWT, verifying JWT and parsing Payload. 3. When using JWT for authentication in PHP, JWT can be generated and verified, and user role and permission information can be included in advanced usage. 4. Common errors include signature verification failure, token expiration, and payload oversized. Debugging skills include using debugging tools and logging. 5. Performance optimization and best practices include using appropriate signature algorithms, setting validity periods reasonably,
 Explain the concept of late static binding in PHP.
Mar 21, 2025 pm 01:33 PM
Article discusses late static binding (LSB) in PHP, introduced in PHP 5.3, allowing runtime resolution of static method calls for more flexible inheritance.Main issue: LSB vs. traditional polymorphism; LSB's practical applications and potential perfo
 Describe the SOLID principles and how they apply to PHP development.
Apr 03, 2025 am 12:04 AM
The application of SOLID principle in PHP development includes: 1. Single responsibility principle (SRP): Each class is responsible for only one function. 2. Open and close principle (OCP): Changes are achieved through extension rather than modification. 3. Lisch's Substitution Principle (LSP): Subclasses can replace base classes without affecting program accuracy. 4. Interface isolation principle (ISP): Use fine-grained interfaces to avoid dependencies and unused methods. 5. Dependency inversion principle (DIP): High and low-level modules rely on abstraction and are implemented through dependency injection.
 How to automatically set permissions of unixsocket after system restart?
Mar 31, 2025 pm 11:54 PM
How to automatically set the permissions of unixsocket after the system restarts. Every time the system restarts, we need to execute the following command to modify the permissions of unixsocket: sudo...
 How does session hijacking work and how can you mitigate it in PHP?
Apr 06, 2025 am 12:02 AM
Session hijacking can be achieved through the following steps: 1. Obtain the session ID, 2. Use the session ID, 3. Keep the session active. The methods to prevent session hijacking in PHP include: 1. Use the session_regenerate_id() function to regenerate the session ID, 2. Store session data through the database, 3. Ensure that all session data is transmitted through HTTPS.
 Explain late static binding in PHP (static::).
Apr 03, 2025 am 12:04 AM
Static binding (static::) implements late static binding (LSB) in PHP, allowing calling classes to be referenced in static contexts rather than defining classes. 1) The parsing process is performed at runtime, 2) Look up the call class in the inheritance relationship, 3) It may bring performance overhead.
 How to debug CLI mode in PHPStorm?
Apr 01, 2025 pm 02:57 PM
How to debug CLI mode in PHPStorm? When developing with PHPStorm, sometimes we need to debug PHP in command line interface (CLI) mode...


