A brief analysis of the simple use of BootStrap Treeview
bootstrap-treeview.js1 is a powerful tree menu plug-in. This article will introduce you to the simple use of bootstrap treeview.
No more nonsense, let’s get straight to the practical stuff.
1. bootstrap-treeview Github URL:
https://github.com/jonmiles/bootstrap-treeview
2. Usage requirements:
<!-- 样式表 -->
<link href="~/Content/bootstrap.css" rel="stylesheet" />
<link href="~/bootstrap-treeview.css" rel="stylesheet" />
<!-- JS文件 -->
<script src="jquery.js"></script>
<script src="bootstrap-treeview.js"></script>
3. Data format: (Note that during use, the data format of the tree can be Json format or hard-coded. Of course, hard-coded code is definitely not flexible. Json format The field names must follow the field requirements of the tree, that is, text format text, sub-node name nodes, etc.)
var tree = [
{
text: "Parent 1",
nodes: [
{
text: "Child 1",
nodes: [
{
text: "Grandchild 1"
},
{
text: "Grandchild 2"
}
]
},
{
text: "Child 2"
}
]
},
{
text: "Parent 2"
},
{
text: "Parent 3"
},
{
text: "Parent 4"
},
{
text: "Parent 5"
}
];4. Simple use:
4.1 Add container:
<div id="tree"></div>
4.2 Define the tree structure: (data is in Json format, ajax is used here, obtained from the background, the code is as follows)
<script>
$(function () {
$.ajax({
type: "Post",
url: "/Home/GetTreeJson",
dataType: "json",
success: function (result) {
$('#tree').treeview({
data: result, // 数据源
showCheckbox: true, //是否显示复选框
highlightSelected: true, //是否高亮选中
//nodeIcon: 'glyphicon glyphicon-user', //节点上的图标
nodeIcon: 'glyphicon glyphicon-globe',
emptyIcon: '', //没有子节点的节点图标
multiSelect: false, //多选
onNodeChecked: function (event,data) {
alert(data.nodeId);
},
onNodeSelected: function (event, data) {
alert(data.nodeId);
}
});
},
error: function () {
alert("树形结构加载失败!")
}
});
})
</script>
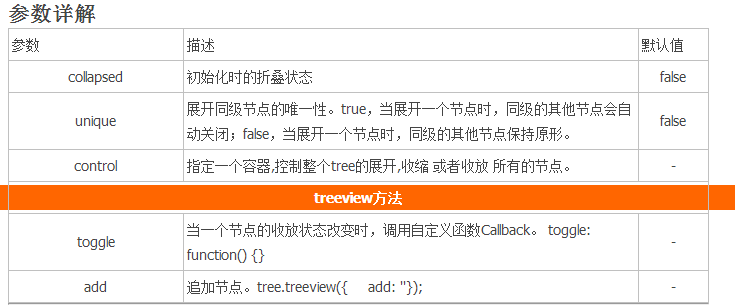
Note: The onNodeChecked and onNodeSelected methods are the default methods in the documentation. There are other methods. Check the documentation yourself, or check the bootstrap-treeview.js file. The content of the uncompressed js file is very detailed and easy to use. Understand.
4.3 Json format data source: (using .net MVC framework, listing simple Control codes)
/// <summary>
/// 返回Json格式数据
/// </summary>
/// <returns></returns>
[HttpPost]
public JsonResult GetTreeJson()
{
var nodeA = new List<Node>();
nodeA.Add(new Node(4, "A01", null));
nodeA.Add(new Node(5, "A02", null));
nodeA.Add(new Node(6, "A03", null));

var nodeB = new List<Node>();
nodeB.Add(new Node(7, "B07", null));
nodeB.Add(new Node(8, "B08", null));
nodeB.Add(new Node(9, "B09", null));

var nodes = new List<Node>();
nodes.Add(new Node(1, "A01", nodeA));
nodes.Add(new Node(2, "B02", nodeB));
nodes.Add(new Node(3, "A03", null));
return Json(nodes, JsonRequestBehavior.AllowGet);
}
/// <summary>
/// Tree类
/// </summary>
public class Node
{
public Node() { }
public Node(int id, string str, List<Node> node)
{
nodeId = id;
text = str;
nodes = node;
}
public int nodeId; //树的节点Id,区别于数据库中保存的数据Id。若要存储数据库数据的Id,添加新的Id属性;若想为节点设置路径,类中添加Path属性
public string text; //节点名称
public List<Node> nodes; //子节点,可以用递归的方法读取,方法在下一章会总结
}
5. Summary:
The tree is simply created. Complex functions and logical judgments need further design. Reading bootstrap-treeview.js yourself is still very inspiring and discoverable 0-0,.
Supplement:

The above is the simple use of bootstrap treeview introduced by the editor. I hope it will be helpful to everyone. If you have any questions If you have any questions, please leave me a message and I will reply to you in time. I would also like to thank you all for your support of the PHP Chinese website!
For more articles on the simple use of BootStrap Treeview, please pay attention to the PHP Chinese website!

Hot AI Tools

Undresser.AI Undress
AI-powered app for creating realistic nude photos

AI Clothes Remover
Online AI tool for removing clothes from photos.

Undress AI Tool
Undress images for free

Clothoff.io
AI clothes remover

AI Hentai Generator
Generate AI Hentai for free.

Hot Article

Hot Tools

Notepad++7.3.1
Easy-to-use and free code editor

SublimeText3 Chinese version
Chinese version, very easy to use

Zend Studio 13.0.1
Powerful PHP integrated development environment

Dreamweaver CS6
Visual web development tools

SublimeText3 Mac version
God-level code editing software (SublimeText3)

Hot Topics
 1382
1382
 52
52


