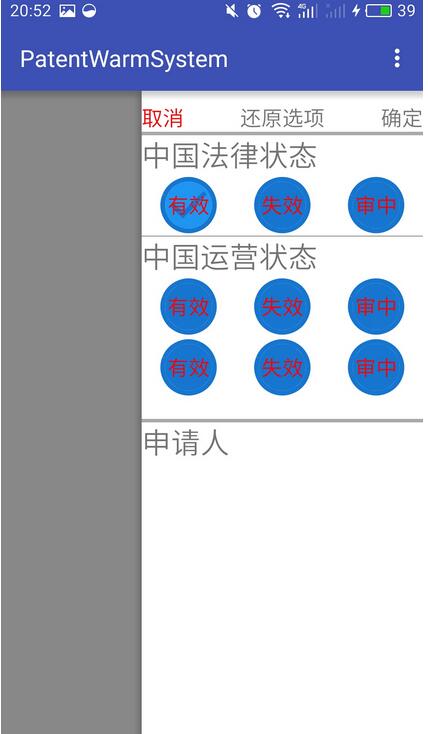
The sidebar is a very common interface effect (drawer effect) in Android applications. It is relatively simple to use DrawerLayout to implement the right column. And this control has its own sliding effect, which is very convenient.
DrawerLayout belongs to the content of the android-support-v4.jar package. If the sdk is new, there is no need to update it. If the sdk is new, you need to import this package.
Let’s take a look at the effect first

The drawer effect is implemented here and for the convenience of users, they can open this drawer at will anywhere. I define it here. Click on the menu to bring up the drawer.
Code Description
1.Activity layout file
<android.support.v4.widget.DrawerLayout xmlns:android="http://schemas.android.com/apk/res/android"
 android:id="@+id/drawer_layout"
 android:layout_width="match_parent"
 android:layout_height="match_parent" >
<!-- 注意drawrlayout的命名,因为一会要使用-->
 <FrameLayout
  android:id="@+id/content_frame"
  android:layout_width="match_parent"
  android:layout_height="match_parent">
  <fragment
   android:id="@+id/fragment_hello"
    android:name="com.patent.patentwarmsystem.CorrelationFragment"
    android:layout_width="wrap_content"
   android:layout_height="wrap_content" />
 </FrameLayout>


 <include
  layout="@layout/activity_main_right"
  android:id="@+id/right_drawer"
  android:layout_width="240dp"
  android:layout_height="match_parent"
  android:layout_gravity="end"
  android:background="#FFFFFF"
  android:gravity="center_horizontal" >

 </include>

</android.support.v4.widget.DrawerLayout>You can see that drawlayout can be used as a control, and then define the layout of the sidebar and include a The layout can be defined by yourself (optional). But pay attention to the layout attribute android:layout_gravity="end" on the right side. This is how it is placed on the right.
Placed on the left is: android:layout_gravity="start"
2.Activity code usage
First pay attention to importing this: import android.support.v4.widget.DrawerLayout;
public class MainActivity extends AppCompatActivity {

 private DrawerLayout drawerLayout;
 private ActionBarDrawerToggle toggle;

 @Override
 protected void onCreate(Bundle savedInstanceState) {
  super.onCreate(savedInstanceState);
  setContentView(R.layout.activity_main);
  initDrawerLayout();
  drawerLayout.setScrimColor(Color.GRAY); //这个可以设置抽屉拉出后,主界面的颜色,我这里使用了系统自带的灰色


 }

 private void initDrawerLayout() {
 //注意:初始化的是drawerlayout整个大布局,不是初始化抽屉的那个id
  drawerLayout = (DrawerLayout) super.findViewById(R.id.drawer_layout);
  drawerLayout.setScrimColor(Color.TRANSPARENT);
  //v4控件 actionbar上的抽屉开关,可以实现一些开关的动态效果
  toggle = new ActionBarDrawerToggle(this, drawerLayout,
    R.drawable.star_change, R.string.drawer_open
    , R.string.drawer_close) {
   public void onDrawerClosed(View drawerView) {
    super.onDrawerClosed(drawerView);//抽屉关闭后
   }

   public void onDrawerOpened(View drawerView) {
    super.onDrawerOpened(drawerView);//抽屉打开后
   }
  };
  drawerLayout.setDrawerListener(toggle);
 }

 /**
  * 加载菜单
  */
 @Override
 public boolean onCreateOptionsMenu(Menu menu) {
  // Inflate the menu; this adds items to the action bar if it is present.
  getMenuInflater().inflate(R.menu.menu, menu);
  return true;
 }

//上面说到方便使用者随处调用就是这个方法,只需调用这个方法绑定id即可随处控制抽屉的拉出
 private void toggleRightSliding(){//该方法控制右侧边栏的显示和隐藏
  if(drawerLayout.isDrawerOpen(GravityCompat.END)){
   drawerLayout.closeDrawer(GravityCompat.END);//关闭抽屉
  }else{
   drawerLayout.openDrawer(GravityCompat.END);//打开抽屉
  }
 }

 @Override
 public boolean onOptionsItemSelected(MenuItem item) {
  switch (item.getItemId()) {
   case R.id.action_personal:
    toggleRightSliding();
    break;
  }
  return super.onOptionsItemSelected(item);
 }
}In addition, here are a few more methods to facilitate changes to readers' needs:
// 通过代码:根据重力方向打开指定抽屉
drawerLayout.openDrawer(Gravity.LEFT);
// 设置抽屉阴影
drawerLayout.setDrawerShadow(R.drawable.ic_launcher, Gravity.LEFT);
// 设置抽屉空余处颜色
drawerLayout.setScrimColor(Color.BLUE);
Okay, these are the codes to implement the function of a drawer. It can be seen that there is still a lot of room for customization.
For more articles related to Android implementing the Drawerlayout effect of the right drawer, please pay attention to the PHP Chinese website!


