
Original text: http://www.raywenderlich.com/5138/beginning-storyboards-in-ios-5-part-1
Storyboards are an exciting new feature in iOS5 that will greatly Save you time writing user interfaces. To understand what a storyboard is, look at the image below. This is also the storyboard we will create for this tutorial:
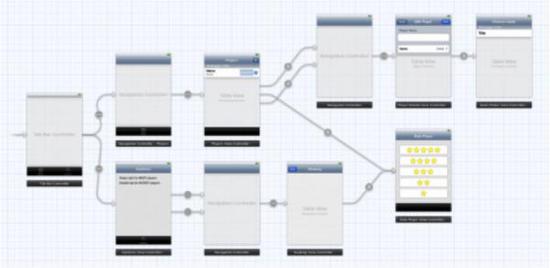
You may not know what this program does, but its main screen interface and the windows between each screen The relationship is clear from this picture. This is the benefit of using storyboards.
If your app has a large number of windows, storyboards can help you reduce a lot of navigation code to go from one window to another. Instead of having a separate nib file for each viewcontroller, your app only needs one storyboard file (which can contain all viewcontrollers and the relationships between them).
Different from traditional nib files, storyboard files have the following advantages:
Through a storyboard file, you can see all windows and the relationships between them at a glance. Because all windows are designed in one storyboard file, it will be easier for you to grasp the changes each change brings to each window.
The transitions between various windows can be described in the storyboard. This transformation is called a segue. To create a segue, simply ctrl+drag from one viewcontroller to another. This will reduce the code for form navigation.
Storyboard is still useful even on tableview, such as customizing tableviewcell. You can design your own tableview in the storyboard editor, which also saves a lot of code.
Of course, there are pros and cons. There are still some limitations to the use of storyboards. The storyboard editor is not more powerful than IB, there are things that can only be done in IB that cannot be done using storyboard. Additionally you may need a larger screen, especially for iPad programs.
If you hate IB and prefer to create user interfaces using a pure code approach, then storyboarding is not for you. By the way, I just want to write as little code as possible - especially UI code! - So storyboarding is totally to my liking.
nib files can still be used in iOS4 and Xcode4.2. IB will not stop you from using nib files just because you have a storyboard. If you still want to use nibs, you can use both storyboards and nib files. They do not contradict each other.
Through this tutorial, you will understand what you can do with storyboards. The program itself is boring, but it demonstrates how to use storyboards for the most common needs.
Start
Open Xcode and create a Single View Application. Please fill in the following options:
Product Name : Ratings
Company Identifier : Company prefix, use anti-domain name rules.
Class Prefix : Empty
Device Family : iPhone
Use Storyboard : Check this Item
Use Automatic Reference Counting: Check this item
Include Unit Tests: Do not check this item
Contains two classes in the new project: AppDelegate and ViewCotnroller. And the heart of this tutorial: the MainStoryboard.storyboard file. Note that there is no xib file, not even MainWindow.xib.
Click on the MainStoryboard.storyboard file to open the storyboard editor:
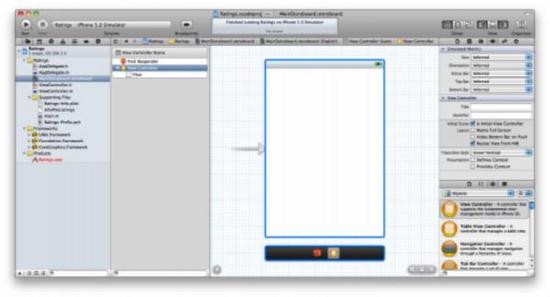
The storyboard editor looks a lot like IB in appearance. You can drag controls from the Object Library (lower right corner) into the viewcontroller and modify its layout. The difference is that the storyboard does not only contain one viewcontroller, but all viewcontrollers in the app.
Storyboard has a special term "scene", and a "scene" is used to represent a viewcontroller. You used to have a separate nib file for each scene/viewcontroller, but now everything is rolled into one storyboard.
For iPhone apps, you can view one scene at a time, but iPad apps can display multiple scenes at a time, such as using the "main-detail" window of splitview, or using popovercontroller to pop up content.
Let’s first experience how to use the storyboard editor. Drag a few controls into the blank viewcontroller.
The left sidebar displays the Document Outline (document tree):
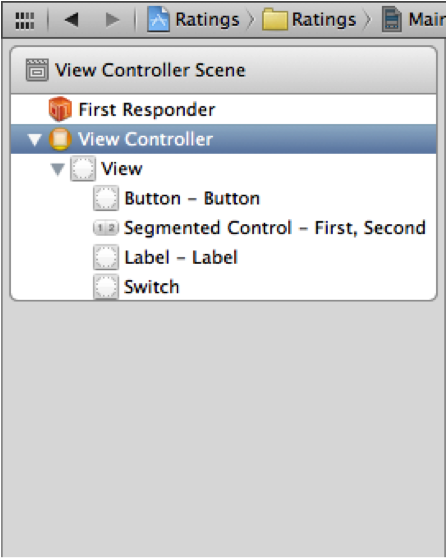
In IB, this area is often used to list components in nib files. . But in the storyboard editor, it shows the content of all your viewcontrollers. Of course, currently we only have one viewcontroller in our storyboard, but we will add more viewcontrollers later.
The document tree has a "shrunken" version, which is shown as the "Dock" in the figure below:
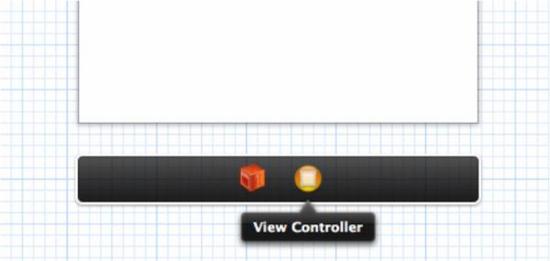
On the Dock, the top-level objects of the scene are displayed. For each scene, there is at least a First Responder and a viewcontroller, and there may also be other top-level objects. This will be explained in detail later. The Dock is especially useful for creating connections. If you want to connect something to the viewcontroller, you can easily drag them onto the Dock.
Note: You may not use FirstResponder very often. This is a proxy object that points to the object that holds first responder status at a certain time. This object also exists in IB, but you may never use it. For example, you could connect the button's TouchUpInside event to the First Responder's cut: method. If a textfield has focus at a certain moment and you press the button at this time, this textfield (that is, the first responder at the current moment) will call the cut: method to cut its text to the clipboard.
Run the program.
If you have created a nib-based app before (Translator's Note: Xcode 3.x), you may know the MainWindow.xib file. This nib file contains a top-level UIWindow object connected to the App Delegate, and one or more viewcontrollers. However, when you use storyboards, all UI is put into a storyboard and MainWindow.xib is no longer used.
So, how is the storyboard loaded into the app without the MainWindow.xib file?
Open AppDelegate.h, you will see these sentences:
#import
@interface AppDelegate : UIResponder
@property (strong, nonatomic) UIWindow * window;
@end
When using storyboards, the application delegate must inherit from UIResponder (originally directly from NSObject Inherited), there is also a UIWindow property (the difference is that it is not an IBOutlet).
In AppDelegate.m, it actually does nothing, all methods are empty. Even application:didFinishLaunchingWithOptions: simply returns Yes. If it was in the past, you would either add the view of the main viewcontroller to the window here, or set the rootViewController property of the window. But now there is nothing.
The secrets are located in the Info.plist file. Open Ratings-Info.plist (in the Supporting Files file group),
In a nib-based project, there is a key named NSMainNibFile or Main nib file base name in the Info.plist file, which will cause UIApplication loads MainWindow.xib and connects it to the app. This setting is no longer available in Info.plist.
Correspondingly, storyboard applications use the UIMainStoryboardFile or "Main storyboard file base name" key. It requires the name of the storyboard file that the application needs to load when it starts. When this key is missing, UIApplication will load the MainStoryboard.storyboard file by default and automatically initialize the first viewcontroller in the storyboard and place it in a newly created UIWindow object. This eliminates the need for manual coding.
You can view Target's Summary window:
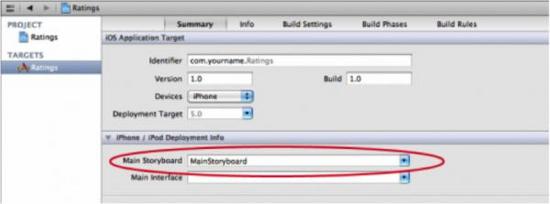
Under the new iPhone/iPodDeployment Info section, you can choose whether to start from the storyboard file or Start from nib file.
To be clearer, you can open main.m to view:
#import <UIKit/UIKit.h>
#import "AppDelegate.h"
int main ( int argc, char * argv []) {
        @autoreleasepool {
               return UIApplicationMain ( argc, argv, nil ,
               NSStringFromClass ([ AppDelegate class ])) ;
     }
}
The last parameter of the original UIApplicationMain() is nil, but Now it's NSStringFromClass([AppDelegate class]).
Unlike when using MainWindow.xib, the application delegate will not be included in the storyboard. Since the application delegate cannot be loaded from a nib, nor from a storyboard file, we must tell UIApplicationMain the name of the application delegate class, otherwise it cannot find the application delegate class at all.
Using TabBar
Ratings The program has a Tabbar, which contains two viewcontrollers. Creating a tabbar using storyboard is a piece of cake.
Switch to MainStoryboard.storyboard and drag a TabBarController to the canvas. You may have to maximize the Xcode window because the TabBarController is tied to two viewcontrollers and you may need more space to operate flexibly.
The new TabBarController has been configured with two ViewControllers, one for each Tab button. UITabBarController is a container of ViewController that contains multiple viewcontrollers. Other similar containers include NavigationController and SplitViewController (both introduced later). One of the cooler features of iOS5 is that you can write your own ViewController container - introduced in a later tutorial in this book.
The containment relationship between TabBarController and the contained ViewController is represented by an arrow (with a small circle icon in the middle).
Note: If you want to move the TabBarController and its contained ViewController, use Cmd+left click to select them all and then move them (the selected scene will be surrounded by a light blue box).
Put a Label in the first ViewController and enter the text "FirstTab". Put a Label in the 2nd ViewController and enter the text "Second Tab". This way we can distinguish between two ViewControllers when switching Tabs.
Note: You cannot drag and drop things into the scene in the editor's zoom mode, you must first return to normal mode.
Select TabBarController and open the properties panel. Tick the "IsInitial View Controller" option.
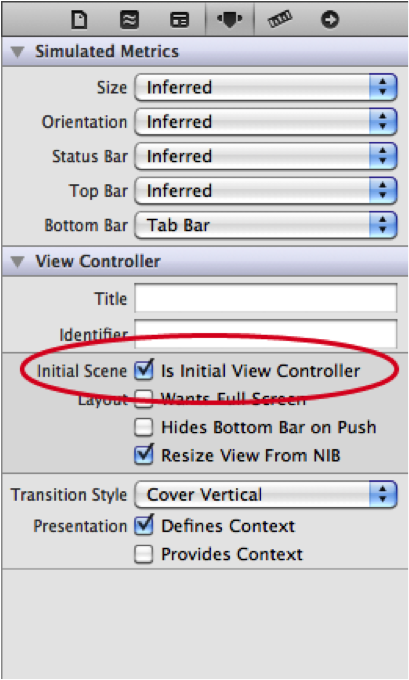
In the canvas, the arrow that originally pointed to the original ViewController now points to the TabBarController.
In other words, when the program is running, UIAppliation will use TabBarController as the first ViewController of the application.
The storyboard always uses a ViewController as the "initialview controller", which is the entrance to the storyboard.
Run the program. The current program can switch between two ViewControllers through TabBarController.
Xcode actually has a template specifically for Tabbar applications (called the Tabbed Application template). Of course, we can also use this template. But at some point we have to create the TabbarController manually, so we have to know how to do it without using templates.
Now you can delete the viewcontroller originally created by the project template, we no longer need it. In this way, there will only be one TabbarController and its two viewcontrollers in the storyboard.
In this way, you can create more than 5 ViewControllers to TabBarController and it will automatically display the More... button on the Tabbar.
Add Table View Controller
The two scenes connected to TabBarController are just regular UIViewControllers. Now we want to replace the first of these with a UITableViewController.
Select the first ViewController and delete it. Drag a TablViewController into the canvas.
Select TablViewController and select the menu "Editor\EmbedIn\Navigation".
This will result in adding a ViewController to the canvas:
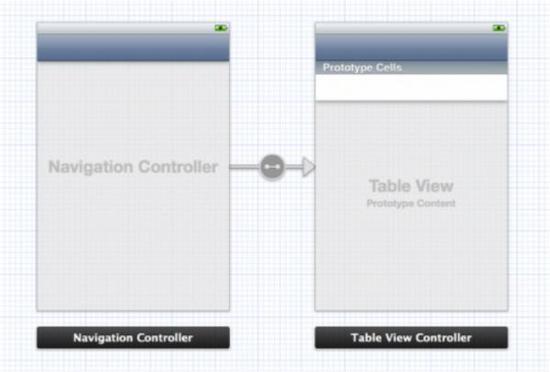
Of course you can also drag a NavigationController directly from the Object Library, but the Embed In command is simpler Some.
Since NavigationController is also a ViewController container, there is also an arrow between it and TableViewController to indicate the relationship between the two. These relationships are displayed in the document tree as shown in the figure:
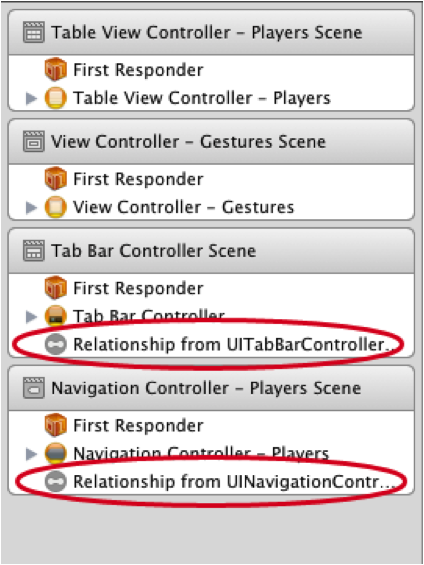
Note that a navigationBar has been added to the TableViewController. This is put in automatically by the storyboard editor, as the scene will now be displayed within the NavigationController's frame. Of course, this is not a real UINavigationBar object, but just a simulated "fake" navigation bar.
Open the properties panel of the TableViewcontroller, and we can see that there is a Simulated metrics section at the top.
The storyboard uses the "Inferred" (relying on inference) setting by default, which means that if the scene is in the NavigationController If displayed, the navigation bar will be displayed, if displayed in a TabBarController, the TabBar will be displayed, and so on. You can change these settings if you need to, but please understand that these settings are only to help you design your screen. Simulated Metrics are not used at runtime, they are only to help you with visual design.
Now connect the new scene to the TabBarController. ctrl+left click, drag a line from TabBarController to NavigationController.
After dragging, a pop-up menu will be displayed, please select Relationship-viewControllers. This will create a new relationship between the two:
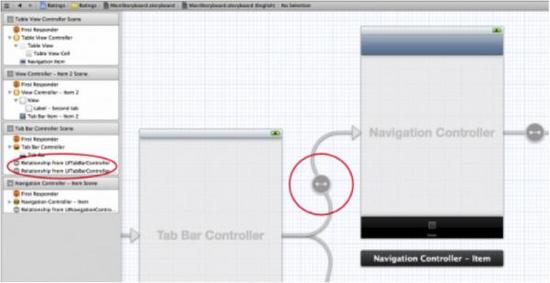
TabBarController now has two relationships, one for Tab. NavigationController itself has a relationship and is connected to TableViewController. There is also another type of arrow, "segue", which we will talk about later.
When a new connection is created, a new Tab is also added to the TabBarController, named "Item". I want to place the new scene on the first Tab, and I can change their order by dragging the Tabs.
Run the program, and now the first Tab has become a NavigationController.
Before we add the actual functionality to the app, let’s organize our storyboard. I want to name the first tab Players and the second tab Gestures. You don't need to change the TabBarController, but the ViewController corresponding to the tab.
When you connect a ViewController to a TabBarController, a TabBarItem object is created on the ViewController. Through the TabBarItem object, you can set the Tab's Title and picture.
Select the TabBarItem object on the NavigationController, in the properties panel, set its Title to Players.
Rename the TabBarItem of the second ViewController to Gestures.
We can also put pictures on the Tab. In the source code of this tutorial there is a folder Images. Add this folder to the project. In the properties panel of the TabBarItem "Guestures", set Players.png as its image. Set the image of TabBarItem "Players" to Players.png.
Similarly, on the ViewController contained by NavigationController, there is a NavigationItem object that can be used to set the navigation bar. Select the NavigationItem on the TableViewController and change the title to Players in the properties panel.
Of course, you can also modify the title by simply double-clicking the NavigationBar (note: you should double-click the "fake" navigation bar on the TableViewController instead of double-clicking the real navigation bar on the NavigationController.
Running the program does not require you to write a line of code, and our customized Tab bar will be displayed.
The above is the content of iOS 5 Storyboard Introduction (1). For more related content, please pay attention to the PHP Chinese website (www). .php.cn)!
##


