Preface
The main content of this article: Write the simplest crawler in the shortest time, which can crawl the forum post title and post content.
Audience of this article: Newbies who have never written about reptiles.
Getting Started
0.Preparation
Things you need to prepare: Python, scrapy, an IDE or any text editing tool.
1. The technical department has studied and decided that you will write the crawler.
Create a working directory at will, and then use the command line to create a project. The project name is miao, which can be replaced with the name you like.
scrapy startproject miao
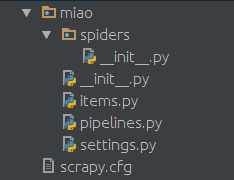
You will then get the following directory structure created by scrapy

Created in the spiders folder A python file, such as miao.py, serves as the crawler script. The content is as follows:
import scrapy
class NgaSpider(scrapy.Spider):
    name = "NgaSpider"
    host = "http://bbs.ngacn.cc/"
    # start_urls是我们准备爬的初始页
    start_urls = [
        "http://bbs.ngacn.cc/thread.php?fid=406",
    ]
    # 这个是解析函数,如果不特别指明的话,scrapy抓回来的页面会由这个函数进行解析。
    # 对页面的处理和分析工作都在此进行,这个示例里我们只是简单地把页面内容打印出来。
    def parse(self, response):
print response.body2. Give it a try?
If you use the command line, this is it:
cd miao
scrapy crawl NgaSpider
You can see that Reptile Jun has printed out the first page of your interstellar area. Of course, since there is no processing, so A mixture of html tags and js scripts are printed together.
Analysis
Next we have to analyze the page we just captured, from this html and js Duili extracted the title of the post on this page. In fact, parsing a page is a laborious task, and there are many methods. Here we only introduce xpath.
0. Why not try the magic xpath?
Take a look at the thing you just grabbed, or open the page manually with the chrome browser and press F12 You can see the page structure. Each title is actually wrapped by such an html tag. For example:
<a href='/read.php?tid=10803874' id='t_tt1_33' class='topic'>[合作模式] 合作模式修改设想</a>
You can see that href is the address of this post (of course the forum address must be spelled in front), and the content wrapped in this tag is the title of the post.
So we use the absolute positioning method of xpath to extract the part of class='topic'.
1. Look at the effect of xpath
Add a reference at the top:
from scrapy import Selector
Change the parse function to:
 def parse(self, response):
        selector = Selector(response)
        # 在此,xpath会将所有class=topic的标签提取出来,当然这是个list
        # 这个list里的每一个元素都是我们要找的html标签
        content_list = selector.xpath("//*[@class='topic']")
        # 遍历这个list,处理每一个标签
        for content in content_list:
            # 此处解析标签,提取出我们需要的帖子标题。
            topic = content.xpath('string(.)').extract_first()
            print topic
            # 此处提取出帖子的url地址。
            url = self.host + content.xpath('@href').extract_first()
print urlRun it again and you can see the titles and URLs of all the posts on the first page of your forum's interstellar area.
Recursion
Next we need to capture the content of each post. You need to use python's yield here.
yield Request(url=url, callback=self.parse_topic)
Here you will tell scrapy to crawl this URL, and then parse the crawled page using the specified parse_topic function.
At this point we need to define a new function to analyze the content of a post.
The complete code is as follows:
import scrapy
from scrapy import Selector
from scrapy import Request
class NgaSpider(scrapy.Spider):
    name = "NgaSpider"
    host = "http://bbs.ngacn.cc/"
    # 这个例子中只指定了一个页面作为爬取的起始url
    # 当然从数据库或者文件或者什么其他地方读取起始url也是可以的
    start_urls = [
        "http://bbs.ngacn.cc/thread.php?fid=406",
    ]

    # 爬虫的入口,可以在此进行一些初始化工作,比如从某个文件或者数据库读入起始url
    def start_requests(self):
        for url in self.start_urls:
            # 此处将起始url加入scrapy的待爬取队列,并指定解析函数
            # scrapy会自行调度,并访问该url然后把内容拿回来
            yield Request(url=url, callback=self.parse_page)

    # 版面解析函数,解析一个版面上的帖子的标题和地址
    def parse_page(self, response):
        selector = Selector(response)
        content_list = selector.xpath("//*[@class='topic']")
        for content in content_list:
            topic = content.xpath('string(.)').extract_first()
            print topic
            url = self.host + content.xpath('@href').extract_first()
            print url
            # 此处,将解析出的帖子地址加入待爬取队列,并指定解析函数
            yield Request(url=url, callback=self.parse_topic)
         # 可以在此处解析翻页信息,从而实现爬取版区的多个页面

    # 帖子的解析函数,解析一个帖子的每一楼的内容
    def parse_topic(self, response):
        selector = Selector(response)
        content_list = selector.xpath("//*[@class='postcontent ubbcode']")
        for content in content_list:
            content = content.xpath('string(.)').extract_first()
            print content
# 可以在此处解析翻页信息,从而实现爬取帖子的多个页面So far, this crawler can crawl the titles of all posts on the first page of your forum, and crawl every title on the first page of each post. One floor of content. The principle of crawling multiple pages is the same. Just pay attention to parsing the URL address of the page, setting the termination condition, and specifying the corresponding page parsing function.
Pipelines——Pipelines
#Here is the processing of the captured and parsed content. You can Write to local files and databases through pipes.
0. Define an Item
Create an items.py file in the miao folder.
from scrapy import Item, Field
class TopicItem(Item):
    url = Field()
    title = Field()
    author = Field()

class ContentItem(Item):
    url = Field()
    content = Field()
author = Field()Here we define two simple classes to describe the results of our crawling.
1. Write a processing method
Find the pipelines.py file under the miao folder. Scrapy should have been automatically generated before.
We can build a processing method here.
class FilePipeline(object):

    ## 爬虫的分析结果都会由scrapy交给此函数处理
    def process_item(self, item, spider):
        if isinstance(item, TopicItem):            ## 在此可进行文件写入、数据库写入等操作
            pass
        if isinstance(item, ContentItem):            ## 在此可进行文件写入、数据库写入等操作
            pass
        ## ...
return item2. Call this processing method in the crawler.
To call this method, we only need to call it in the crawler. For example, the original content processing function can be changed to:
    def parse_topic(self, response):
        selector = Selector(response)
        content_list = selector.xpath("//*[@class='postcontent ubbcode']")        for content in content_list:
            content = content.xpath('string(.)').extract_first()            ## 以上是原内容
            ## 创建个ContentItem对象把我们爬取的东西放进去
            item = ContentItem()
            item["url"] = response.url
            item["content"] = content
            item["author"] = "" ## 略
            ## 这样调用就可以了
            ## scrapy会把这个item交给我们刚刚写的FilePipeline来处理
yield item3. Specify this pipeline# in the configuration file
##Find the settings.py file and addITEM_PIPELINES = { 'miao.pipelines.FilePipeline': 400,
}yield item
You can configure multiple Pipelines here. Scrapy will hand over the items to each item in turn according to the priority. The result of each processing will be passed to the next pipeline for processing.
You can configure multiple pipelines like this:
ITEM_PIPELINES = {
            'miao.pipelines.Pipeline00': 400,
            'miao.pipelines.Pipeline01': 401,
            'miao.pipelines.Pipeline02': 402,
            'miao.pipelines.Pipeline03': 403,
            ## ...
}##Middleware——Middleware
Through Middleware, we can make some modifications to the request information. For example, commonly used settings such as UA, proxy, login information, etc. can be configured through Middleware.
is similar to the pipeline configuration. Add the name of Middleware to setting.py, such as
DOWNLOADER_MIDDLEWARES = {
            "miao.middleware.UserAgentMiddleware": 401,
            "miao.middleware.ProxyMiddleware": 402,
}某些网站不带UA是不让访问的。在miao文件夹下面建立一个middleware.py 这里就是一个简单的随机更换UA的中间件,agents的内容可以自行扩充。 2.破网站封IP,我要用代理 比如本地127.0.0.1开启了一个8123端口的代理,同样可以通过中间件配置让爬虫通过这个代理来对目标网站进行爬取。同样在middleware.py中加入: 很多网站会对访问次数进行限制,如果访问频率过高的话会临时禁封IP。如果需要的话可以从网上购买IP,一般服务商会提供一个API来获取当前可用的IP池,选一个填到这里就好。 一些常用配置 在settings.py中的一些常用配置 如果非要用Pycharm作为开发调试工具的话可以在运行配置里进行如下配置: 然后在Scrpit parameters中填爬虫的名字,本例中即为: 最后是Working diretory,找到你的settings.py文件,填这个文件所在的目录。 按小绿箭头就可以愉快地调试了。import random
agents = [
"Mozilla/5.0 (Windows; U; Windows NT 6.1; en-US) AppleWebKit/532.5 (KHTML, like Gecko) Chrome/4.0.249.0 Safari/532.5",
"Mozilla/5.0 (Windows; U; Windows NT 5.2; en-US) AppleWebKit/532.9 (KHTML, like Gecko) Chrome/5.0.310.0 Safari/532.9",
"Mozilla/5.0 (Windows; U; Windows NT 5.1; en-US) AppleWebKit/534.7 (KHTML, like Gecko) Chrome/7.0.514.0 Safari/534.7",
"Mozilla/5.0 (Windows; U; Windows NT 6.0; en-US) AppleWebKit/534.14 (KHTML, like Gecko) Chrome/9.0.601.0 Safari/534.14",
"Mozilla/5.0 (Windows; U; Windows NT 6.1; en-US) AppleWebKit/534.14 (KHTML, like Gecko) Chrome/10.0.601.0 Safari/534.14",
"Mozilla/5.0 (Windows; U; Windows NT 6.1; en-US) AppleWebKit/534.20 (KHTML, like Gecko) Chrome/11.0.672.2 Safari/534.20",
"Mozilla/5.0 (Windows NT 6.1; WOW64) AppleWebKit/534.27 (KHTML, like Gecko) Chrome/12.0.712.0 Safari/534.27",
"Mozilla/5.0 (Windows NT 6.1; WOW64) AppleWebKit/535.1 (KHTML, like Gecko) Chrome/13.0.782.24 Safari/535.1",
]
class UserAgentMiddleware(object):
def process_request(self, request, spider):
agent = random.choice(agents)
request.headers["User-Agent"] = agentclass ProxyMiddleware(object):
def process_request(self, request, spider):
# 此处填写你自己的代理
# 如果是买的代理的话可以去用API获取代理列表然后随机选择一个
proxy = "http://127.0.0.1:8123"
request.meta["proxy"] = proxy# 间隔时间,单位秒。指明scrapy每两个请求之间的间隔。
DOWNLOAD_DELAY = 5
# 当访问异常时是否进行重试
RETRY_ENABLED = True
# 当遇到以下http状态码时进行重试
RETRY_HTTP_CODES = [500, 502, 503, 504, 400, 403, 404, 408]
# 重试次数
RETRY_TIMES = 5
# Pipeline的并发数。同时最多可以有多少个Pipeline来处理item
CONCURRENT_ITEMS = 200
# 并发请求的最大数
CONCURRENT_REQUESTS = 100
# 对一个网站的最大并发数
CONCURRENT_REQUESTS_PER_DOMAIN = 50
# 对一个IP的最大并发数
CONCURRENT_REQUESTS_PER_IP = 50
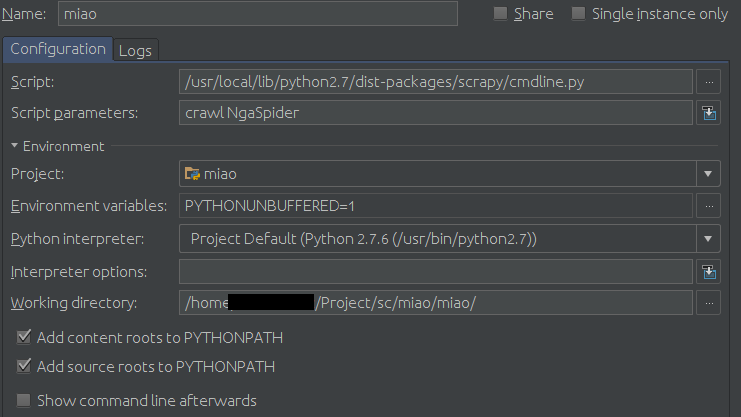
Configuration页面:
Script填你的scrapy的cmdline.py路径,比如我的是/usr/local/lib/python2.7/dist-packages/scrapy/cmdline.py
crawl NgaSpider
示例:


