Vue.js learning example sharing
This article shares with you a summary of learning Vuejs and a small example of calling webapi;
» Vuejs - learning hodgepodge
» WebApi + Vue.js example
Let’s share step by step:
» Vuejs - Learning Hodgepodge
First of all, if we want to learn a js framework, we must introduce the basic library of the framework. Here I create A page and a library that references the official website is:
Let's take a look at a basic usage code of Vue:
var app = new Vue({
 el: "#appVue",
 data: {
 msg: "第一个vue",
 }
});Analyzing the code, the parameter transfer required by Vue is a {} object; el and data inside are parameter names; el The corresponding is the id of a certain block element on our page (such as the id attribute of div, table); data corresponds to the data source; msg is our customized data source name; OK, let's take a look at the correspondence. The html code and renderings:
<h3 id="Vue-nbsp-nbsp-学习大杂烩">Vue - 学习大杂烩</h3>
<hr />
<div class="container" id="appVue">
<input type="text" v-model="msg" class="form-control" />
</div>
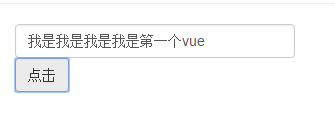
Renderings:

It is obvious that the data we initialized msg("the first vue") is reflected in the input. Take a closer look at the attribute of this input tag. There is a v-model attribute, and its corresponding value is the msg we initialized. It can be seen that v-model plays a role in data binding. Function; Okay, let's make the data value a little more complicated. Add another json format array to the data, such as:
blogs: [
 { title: "webapi" },
 { title: "wcf" },
 { title: "mvc" }
]Then let's add the following html:
<ul>
  <li class="text-left " v-for="(blog,index) in blogs">{{index}} - {{blog.title}}</li>
</ul>Refresh the page directly and see the rendering:

From the results, we can see that the data we defined is directly traversed and displayed in page, and then analyze the specific code. Compared with the ordinary li element, there is an additional v-for attribute, and there is such a syntax rule for the value of a (obj, index) in arr, which is similar to a for loop. There is also a traversal number index. If there is a loop, the value must be displayed. At this time, you can see that the writing method in the child level of the li element is {{index}} - {{blog.title}}, let’s analyze it. Writing rules:
1. {{}} is the format of the output text, which contains the object to be output
2. The parameter index corresponds to the index in v-for, corresponding The value is the traversal sequence number, starting from 0
3. blog.title corresponds to the blog in v-for, and its corresponding custom attribute title
is given by {{}} above The writing method of data binding has to arouse our curiosity about it. This writing method is actually the same in many js data binding frameworks (such as: angularjs). Let's do a small example of addition to remember it more deeply. In this way of writing, first add two attributes x and y to the data attribute just now:
data: {
 msg: "第一个vue",
 blogs: [
 { title: "webapi" },
 { title: "wcf" },
  { title: "mvc" }
 ],
 x: 444,
 y: 2
},Then add the following html code:
* = {{x * y}}
The effect of executing the property page :

It can be seen that {{x * y}} allows expressions, and when the x or y value in my text box is modified, this {{x *y}} will be automatically recalculated, which is somewhat similar to the concept of reassigning the value to the display box after calculation in js written by ourselves; let's see how to define a method in vue. One of her attributes methods is used here. We define The following code:
var app = new Vue({
 el: "#appVue",
 data: {
 msg: "第一个vue",
 blogs: [
 { title: "webapi" },
 { title: "wcf" },
  { title: "mvc" }
 ],
 x: 444,
 y: 2
 },
 methods: {
 showMsg: function () {17  this.msg = "我是" + this.msg;
 }
 }
}Add the following html element,
Okay, let’s take a look at the running effect and click the button multiple times:

The effect we get is that we have been doing it all the time. v-model="msg" adds "I am" to the text box. The conclusion drawn here is that the button triggers the method showMsg we defined in methods in vue. Let's take a look at the attribute v-on:click on the button. To indicate binding click events, v-on:click here can be abbreviated to @click. Since my mvc view template in vs does not support this writing method, this article still uses v-on for binding. Event; let’s use her filter again. Here we add the following filters code to vue and define a case filter:
filters: {
 toUpper: function (val, isUpper) {
 if (!val) { return ""; }
 return isUpper ? val.toUpperCase() : val.toLowerCase();
 }
}In order to facilitate the effect. , we modify the text box code of v-model="msg" above as follows:
<input type="text" v-model="msg" class="form-control" />{{msg|toUpper(true)}}<br />{{msg|toUpper(false)}}We added a {{msg|toUpper(true)}} writing method in the text box , if you are careful, you can post that the toUpper method behind is the filter method we just defined, passing a parameter true, and then take a look at the rendering:

通过使用不同参数的filter的对比,能看出我们过滤器在此实例中的效果,这里注意的是在msg后面直接使用‘|'隔开就可以增加我们定义的过滤器了,如果多个以此类推使用‘|'追加隔开就行了,还有就是我们定义的 toUpper: function (val, isUpper) 方法中有两个参数,第一个参数就是绑定的msg本身,第二个参数才是我们需要手动传递的,这个一定要分开;时间不多了,这里就不再讲解其他的常用的特性和属性了,直接来看下面vue使用webapi的数据体现的一个例子;
» WebApi + Vue.js 示例
首先,这里用到了Vue提供的组件概念component,她和js变量一样有全局和局部(私有)两种,代码方面差距不是很大效果也一样,这里我们用到的是局部方式来定义一个组件,下面先来看整体代码:
var blogApp = new Vue({
el: "#divBlogs",
data: {
blogs: []
},
methods: {
getBlogs: function () {
var that = this;
$.getJSON("http://www.lovexins.com:1001/api/values?task=2", function (result) {
if (!result) { return; }
that.blogs = result;
});
}
},
components: {
"div-blog": {
props: ["item"],
template: '<div class=" bs-callout bs-callout-danger">' +
' <h4>' +
' <a v-bind:href="item.Url" target="_blank">{{item.Title | toUpperOrLower(false)}}</a>' +
' </h4>' +
' <p>' +
' {{item.Des}}' +
' </p>' +
' <hr />' +
' <h5>' +
' 作者:<a v-bind:href="item.BlogUrl" target="_blank">{{item.NickName}}</a> 发布时间:<code>{{item.CreateTime}}</code> 推荐:<code>{{item.ZanNum}}</code> 阅读:<code>{{item.ReadNum}}</code> 评论:<code>{{item.CommiteNum}}</code>' +
' </h5>' +
' </div>',
filters: {
toUpperOrLower: function (val, isUpper) {
if (!val) { return ""; }
return isUpper ? val.toUpperCase() : val.toLowerCase();
}
}
}
}
});这里定义的格式和上面第一小节使用到的差不多,只是多了一个components的定义,这个就是组件的关键字,咋们来逐一分析下代码步骤;
1. blogs: []是我们定义的一个博客信息数组
2. methods属性中getBlogs方法用到了一段 var that = this; 这样的代码,这里的this是上面创建的 var blogApp = new Vue() 对象,她可以直接使用data中定义的博客数据数组blogs,因此有了下面通过jquery的getJSON获取webapi数据后,直接赋值给博客数组bolgs
3. components组件中自定义了一个名为“div-blog”的组件,参数名称是props定义的item;template是对应的模板,里面可以直接使用item来获取对应的参数值;
4. 这里也定义了一个filters,同样是转大小写的,写法可以忽略了,主要注意的地方这里局部的定义的主键里面使用filters的时候也同样是 {{item.Title | toUpperOrLower(false)}} 格式
好了通过上面总结注意点,咋们再来看下怎么在html中使用这个自定义的组件呢,如下整体html代码:
<div class="row" id="divBlogs">
 <div class="col-md-12">
 <button v-on:click="getBlogs" class="btn btn-default">查 询</button>
 <div-blog v-for="blog in blogs" v-bind:item="blog"></div-blog>
 <div style="position:fixed; right:0px; bottom:10px; width:44px; height:40px; background-color:#F8F8F8; font-weight:100; cursor:pointer;" id="toTop" onclick="toTop()">
 <img  src="/static/imghw/default1.png"  data-src="http://121.42.208.152/images/top.png"  class="lazy"  title="返 回"   style="max-width:90%"  alt="Vue.js learning example sharing" >
 </div>
 </div>
</div>
引用自定义组件的代码就一句:
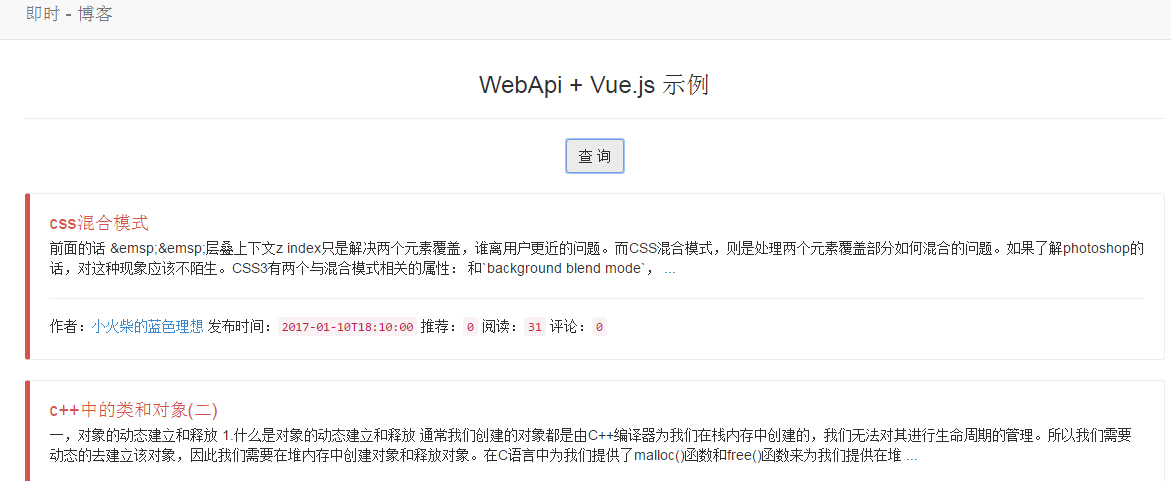
这里的div-blog就是对应上面总结的第3点说的,自定义主键名称,需要注意的是如果自定义组件名称格式如divBlog(驼峰格式),那么我们在html中使用格式就必须是div-Blog,通过‘-'分割开来,这个细节特别要注意不然页面不会有效果,好了说了这么多来看下运行的效果图:

以上就是本文的全部内容,希望本文的内容对大家的学习或者工作能带来一定的帮助,同时也希望多多支持PHP中文网!
更多Vue.js learning example sharing相关文章请关注PHP中文网!

Hot AI Tools

Undresser.AI Undress
AI-powered app for creating realistic nude photos

AI Clothes Remover
Online AI tool for removing clothes from photos.

Undress AI Tool
Undress images for free

Clothoff.io
AI clothes remover

AI Hentai Generator
Generate AI Hentai for free.

Hot Article

Hot Tools

Notepad++7.3.1
Easy-to-use and free code editor

SublimeText3 Chinese version
Chinese version, very easy to use

Zend Studio 13.0.1
Powerful PHP integrated development environment

Dreamweaver CS6
Visual web development tools

SublimeText3 Mac version
God-level code editing software (SublimeText3)

Hot Topics
 Practical combat: Develop a plug-in in vscode that supports vue files to jump to definitions
Nov 16, 2022 pm 08:43 PM
vscode itself supports Vue file components to jump to definitions, but the support is very weak. Under the configuration of vue-cli, we can write many flexible usages, which can improve our production efficiency. But it is these flexible writing methods that prevent the functions provided by vscode itself from supporting jumping to file definitions. In order to be compatible with these flexible writing methods and improve work efficiency, I wrote a vscode plug-in that supports Vue files to jump to definitions.
 Let's talk in depth about reactive() in vue3
Jan 06, 2023 pm 09:21 PM
Foreword: In the development of vue3, reactive provides a method to implement responsive data. This is a frequently used API in daily development. In this article, the author will explore its internal operating mechanism.
 In-depth discussion of how vite parses .env files
Jan 24, 2023 am 05:30 AM
When using the Vue framework to develop front-end projects, we will deploy multiple environments when deploying. Often the interface domain names called by development, testing and online environments are different. How can we make the distinction? That is using environment variables and patterns.
 Detailed graphic explanation of how to integrate the Ace code editor in a Vue project
Apr 24, 2023 am 10:52 AM
Ace is an embeddable code editor written in JavaScript. It matches the functionality and performance of native editors like Sublime, Vim, and TextMate. It can be easily embedded into any web page and JavaScript application. Ace is maintained as the main editor for the Cloud9 IDE and is the successor to the Mozilla Skywriter (Bespin) project.
 What is the difference between componentization and modularization in vue
Dec 15, 2022 pm 12:54 PM
The difference between componentization and modularization: Modularization is divided from the perspective of code logic; it facilitates code layered development and ensures that the functions of each functional module are consistent. Componentization is planning from the perspective of UI interface; componentization of the front end facilitates the reuse of UI components.
 Explore how to write unit tests in Vue3
Apr 25, 2023 pm 07:41 PM
Vue.js has become a very popular framework in front-end development today. As Vue.js continues to evolve, unit testing is becoming more and more important. Today we’ll explore how to write unit tests in Vue.js 3 and provide some best practices and common problems and solutions.
 A brief analysis of how to handle exceptions in Vue3 dynamic components
Dec 02, 2022 pm 09:11 PM
How to handle exceptions in Vue3 dynamic components? The following article will talk about Vue3 dynamic component exception handling methods. I hope it will be helpful to everyone!
 Analyze the principle of Vue2 implementing composition API
Jan 13, 2023 am 08:30 AM
Since the release of Vue3, the word composition API has entered the field of vision of students who write Vue. I believe everyone has always heard how much better the composition API is than the previous options API. Now, due to the release of the @vue/composition-api plug-in, Vue2 Students can also get on the bus. Next, we will mainly use responsive ref and reactive to conduct an in-depth analysis of how this plug-in achieves this.


