Preface
Before you start developing an application account, let’s take a look at the official “Mini Program” tutorial! (The following content comes from the "Mini Program" development guide officially announced by WeChat)
This document will take you step by step to create a WeChat mini program, and you can experience the actual effect of the mini program on your mobile phone. The home page of this mini program will display the welcome message and the current user's WeChat avatar. Click on the avatar to view the startup log of the current mini program in the newly opened page.
1. Get the AppID of the WeChat applet
First of all, we need to have an account. If you can see this document, we should have invited and created an account for you. Note that the AppID of the service account or subscription account cannot be used directly. Use the provided account to log in to https://mp.weixin.qq.com, and you can view the AppID of the WeChat applet in the website's "Settings" - "Developer Settings".
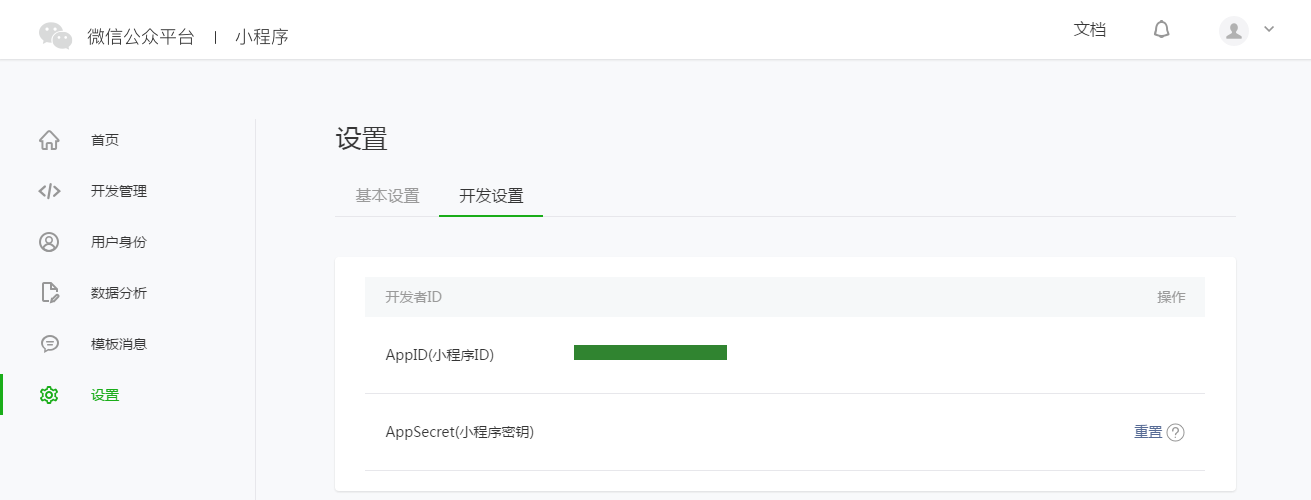
Note: If we do not use the administrator WeChat ID bound during registration, try the mini program on your mobile phone. Then we still need to operate "Bind Developer". That is, in the "User Identity - Developer" module, bind the WeChat ID you need to experience the mini program. By default, this tutorial uses the administrator's WeChat ID to register an account and experience.
2. Create a project
We need to use developer tools to complete mini program creation and code editing.
After the developer tools are installed, open and use WeChat to scan the QR code to log in. Select Create "Project", fill in the AppID obtained above, set a local project name (not a mini program name), such as "My First Project", and select a local folder as the directory where the code is stored , just click "New Project".
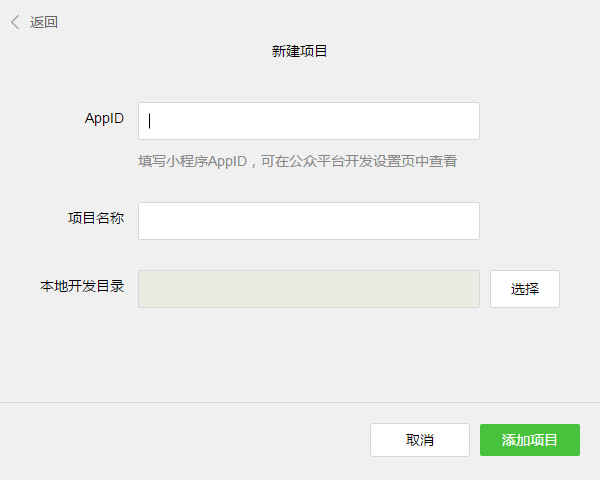
In order to facilitate beginners to understand the basic code structure of the WeChat applet, during the creation process, if the selected local folder is an empty folder, the developer The tool will prompt whether you need to create a quick start project. Select "Yes", the developer tools will help us generate a simple demo in the development directory.
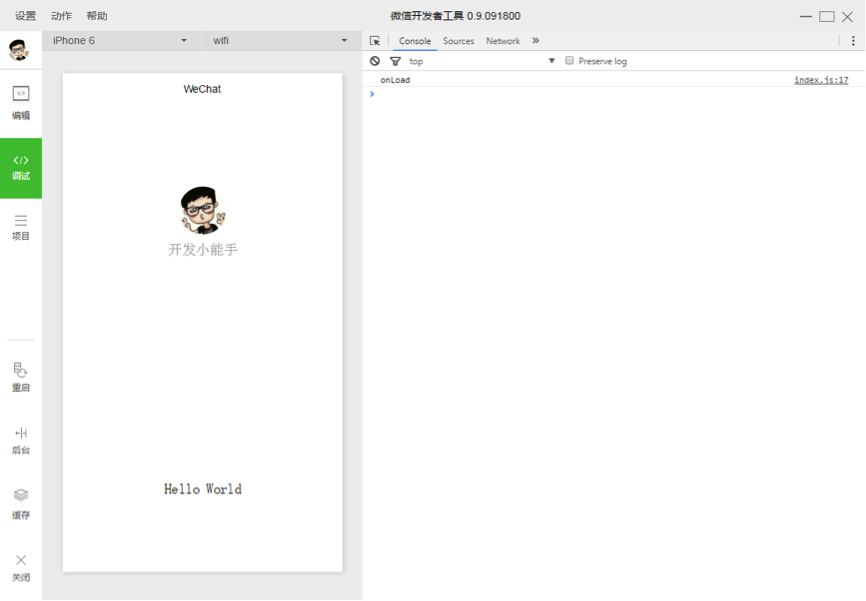
After the project is successfully created, we can click on the project to enter and see the complete developer tool interface. Click on the left navigation to view and edit our code in "Edit" and in "Debug" "You can test the code and simulate the effect of the mini program on the WeChat client. In "Project" you can send it to your mobile phone to preview the actual effect.
3. Write code
Click "Edit" in the left navigation of the developer tools. We can see that this project has been initialized and contains some simple code files. The most critical and essential ones are app.js, app.json, and app.wxss. Among them, the .js suffix is a script file, the .json suffix is a configuration file, and the .wxss suffix is a style sheet file. The WeChat applet will read these files and generate applet instances.
Let’s briefly understand the functions of these three files to facilitate modification and develop your own WeChat applet from scratch.
app.js is the script code of the mini program. We can monitor and process the life cycle functions of the applet and declare global variables in this file. Call the rich API provided by MINA, such as synchronous storage and synchronous reading of local data in this example.
<font size="3" face="微软雅黑" >//app.js
App({
onLaunch: function () {
// 调用 API 从本地缓存中获取数据
var logs = wx.getStorageSync('logs') || []
logs.unshift(Date.now())
wx.setStorageSync('logs', logs)
},
getUserInfo:function(cb){
var that = this;
if(this.globalData.userInfo){
typeof cb == "function" && cb(this.globalData.userInfo)
}else{
// 调用登录接口
wx.login({
success: function () {
wx.getUserInfo({
success: function (res) {
that.globalData.userInfo = res.userInfo;
typeof cb == "function" && cb(that.globalData.userInfo)
}
})
}
});
}
},
globalData:{
userInfo:null
}
})</font>Copy code
app.json is the global configuration for the entire applet. We can configure which pages the mini program consists of, configure the background color of the mini program's window, configure the navigation bar style, and configure the default title in this file. Note that no comments can be added to this file.
<font size="3" face="微软雅黑" >/**app.json*/
{

  "pages":[

    "pages/index/index",

    "pages/logs/logs"

  ],

  "window":{

    "backgroundTextStyle":"light",

    "navigationBarBackgroundColor": "#fff",

    "navigationBarTitleText": "WeChat",

    "navigationBarTextStyle":"black"

  }

}</font>
Copy code
app.wxss is the common style sheet for the entire applet. We can directly use the style rules declared in app.wxss on the class attribute of the page component.
<font size="3" face="微软雅黑" >/**app.wxss**/

.container {

  height: 100%;

  display: flex;

  flex-direction: column;

  align-items: center;

  justify-content: space-between;

  padding: 200rpx 0;

  box-sizing: border-box;

}</font>
Copy code
3. Create page
In this tutorial, we have two pages, the index page and the logs page, namely the welcome page and the applet startup log display pages, they are all in the pages directory. The [path + page name] of each page in the WeChat mini program needs to be written in pages of app.json, and the first page in pages is the homepage of the mini program.
Each mini program page is composed of four different suffix files with the same name in the same path, such as: index.js, index.wxml, index.wxss, index.json. Files with the .js suffix are script files, files with the .json suffix are configuration files, files with the .wxss suffix are style sheet files, and files with the .wxml suffix are page structure files.
index.wxml is the structure file of the page:
<font size="3" face="微软雅黑" ><!--index.wxml-->

<view class="container">

  <view  bindtap="bindViewTap" class="userinfo">

    <image class="userinfo-avatar" src="{{userInfo.avatarUrl}}" background-size="cover"></image>

    <text class="userinfo-nickname">{{userInfo.nickName}}</text>

  </view>

  <view class="usermotto">

    <text class="user-motto">{{motto}}</text>

  </view>

</view></font>
Copy code
In this example, , , are used to build the page structure, bind data and interactive processing functions.
index.js 是页面的脚本文件,在这个文件中我们可以监听并处理页面的生命周期函数、获取小程序实例,声明并处理数据,响应页面交互事件等。
<font size="3" face="微软雅黑" >//index.js
// 获取应用实例
var app = getApp()
Page({
data: {
motto: 'Hello World',
userInfo: {}
},
// 事件处理函数
bindViewTap: function() {
wx.navigateTo({
url: '../logs/logs'
})
},
onLoad: function () {
console.log('onLoad')
var that = this
// 调用应用实例的方法获取全局数据
app.getUserInfo(function(userInfo){
// 更新数据
that.setData({
userInfo:userInfo
})
})
}
})</font>复制代码
index.wxss 是页面的样式表:
<font size="3" face="微软雅黑" >/**index.wxss**/

.userinfo {

  display: flex;

  flex-direction: column;

  align-items: center;

}


.userinfo-avatar {

  width: 128rpx;

  height: 128rpx;

  margin: 20rpx;

  border-radius: 50%;

}


.userinfo-nickname {

  color: #aaa;

}


.usermotto {

  margin-top: 200px;

}</font>复制代码
页面的样式表是非必要的。当有页面样式表时,页面的样式表中的样式规则会层叠覆盖 app.wxss 中的样式规则。如果不指定页面的样式表,也可以在页面的结构文件中直接使用 app.wxss 中指定的样式规则。
index.json 是页面的配置文件:
页面的配置文件是非必要的。当有页面的配置文件时,配置项在该页面会覆盖 app.json 的 window 中相同的配置项。如果没有指定的页面配置文件,则在该页面直接使用 app.json 中的默认配置。
logs 的页面结构
<font size="3" face="微软雅黑" ><!--logs.wxml-->

<view class="container log-list">

  <block wx:for-items="{{logs}}" wx:for-item="log">

    <text class="log-item">{{index + 1}}. {{log}}</text>

  </block>

</view></font>复制代码
logs 页面使用 控制标签来组织代码,在 上使用 wx:for-items 绑定 logs 数据,并将 logs 数据循环展开节点
<font size="3" face="微软雅黑" >//logs.js
var util = require('../../utils/util.js')
Page({
data: {
logs: []
},
onLoad: function () {
this.setData({
logs: (wx.getStorageSync('logs') || []).map(function (log) {
return util.formatTime(new Date(log))
})
})
}
})</font>复制代码
运行结果如下:
4. 手机预览
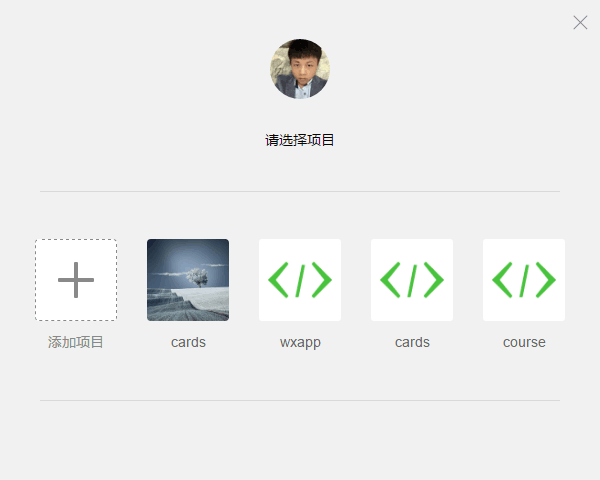
开发者工具左侧菜单栏选择「项目」,点击「预览」,扫码后即可在微信客户端中体验。
目前,预览和上传功能尚无法实现,需要等待微信官方的下一步更新。
如你所见,微信官方给出的开发指南还非常简单,很多细节、代码和功能都没有明确的展示,所以接下来就到博卡君展示实力的时候啦!开发教程正式开始!
第一章:准备工作
做好准备工作很重要。开发一个微信应用号,你需要提前到微信的官方网站(weixin.qq.com)下载开发者工具。
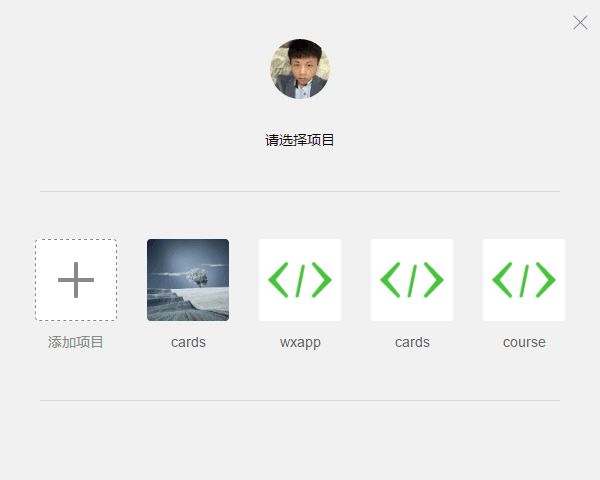
1. 下载最新微信开发者工具,打开后你会看到该界面:
2. 点击「新建 web+」项目,随后出现如下画面:
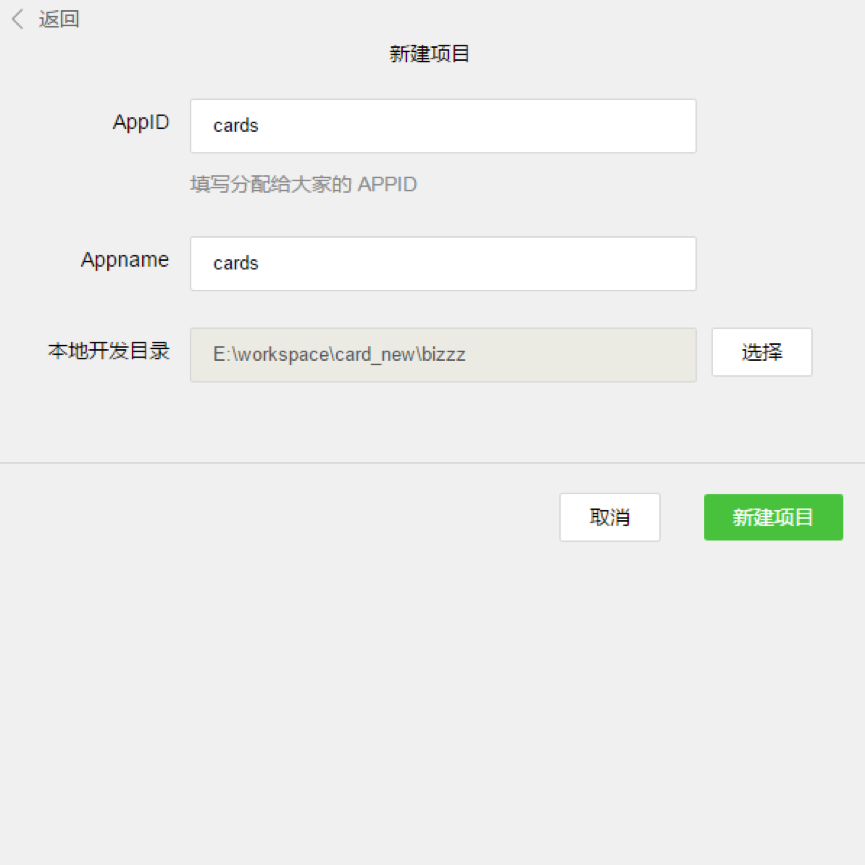
3. 该页面内的各项内容需要注意——
AppID:依照官方解释来填。
Appname: 项目最外层文件夹名称,如你将其命名为「ABC」,则之后的全部项目内容均将保存在「/ABC/…」目录下。
本地开发目录:项目存放在本地的目录。
注:再次强调,如果你和团队成员共同开发该项目,则建议你们使用同样的目录名称及本地目录,以确保协同开发的统一性。如果你之前已有项目,则导入过程与以上内容近似,不再赘述。
4. 准备工作全部完成后,点击「新建项目」按钮,弹出框点「确定」。
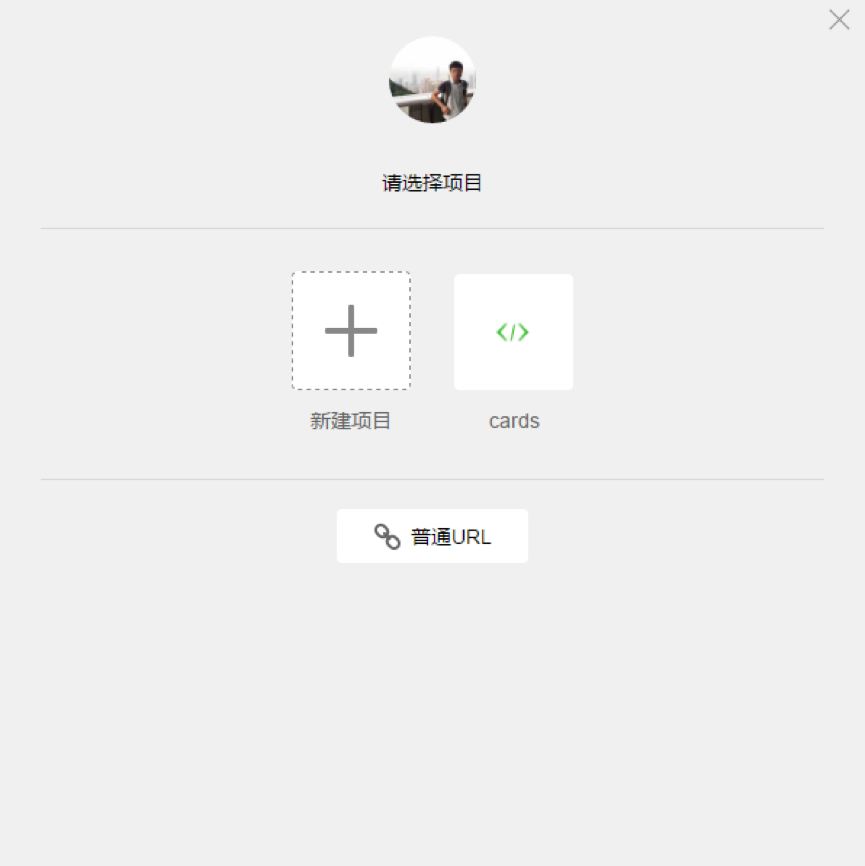
5. 如上图所示,此刻,微信开发者工具已经为你自动构建了一个初始的 demo 项目,该项目内包含了一个微信应用项目所需具备的基本内容和框架结构。点击项目名称(图中即「cards」)进入该项目,就能看到整个项目的基本架构了:
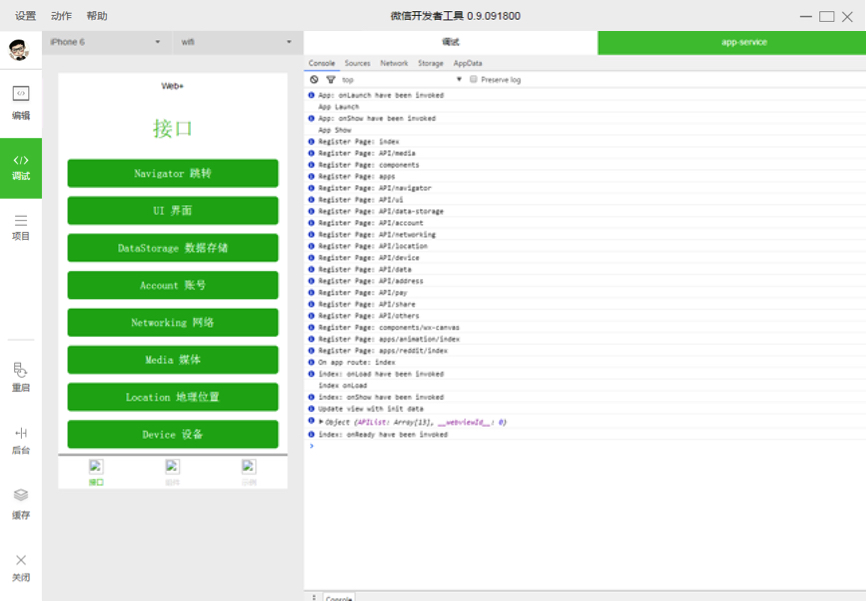
第二章:项目构架
微信目前用户群体非常庞大,微信推出公众号以后,火爆程度大家都看得到,也同样推动着 h5 的高速发展,随着公众号业务的需求越来越复杂,应用号现在的到来也是恰到好处。我们团队具体看了一两次文档后发现,它提供给开发者的方式也在发生全面的改变,从操作 DOM 转为操作数据,基于微信提供的一个过桥工具实现很多 h5 在公众号很难实现的功能,有点类似于 hybrid 开发,不同于 hybrid 开发的方式是:微信开放的接口更为严谨,结构必须采用他提供给我们的组件,外部的框架和插件都不能在这里使用上,让开发者完全脱离操作 DOM,开发思想转变很大。
If a worker wants to do his job well, he must first sharpen his tools. It is very important to understand its core functions and first understand its entire operation process.
Life cycle:
In index.js:
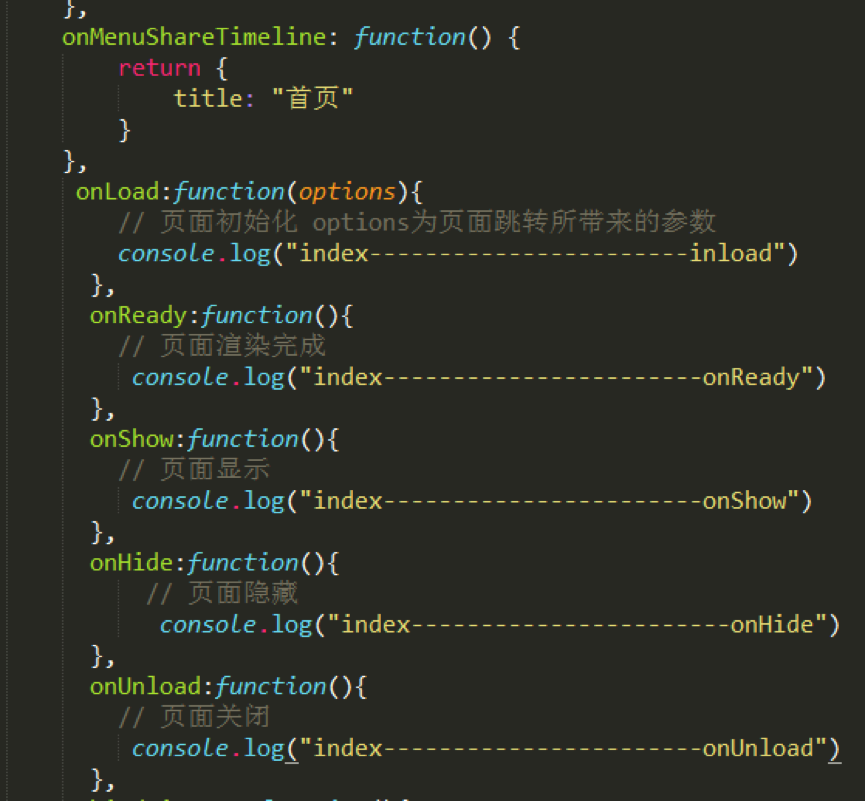
' You can see in the Console of the developer tools:
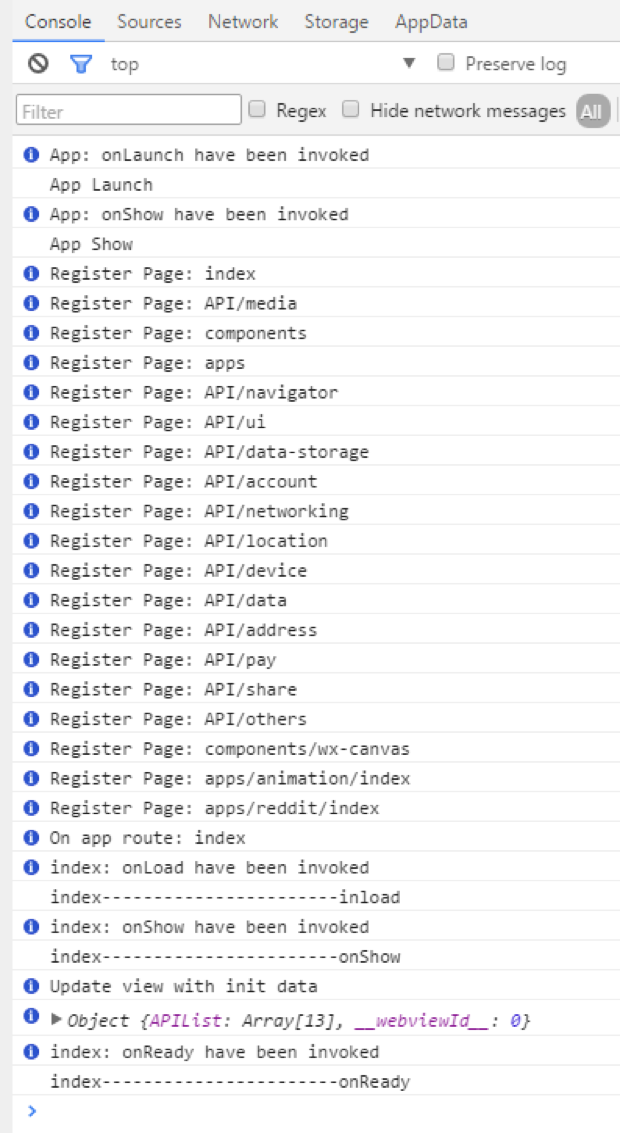
In the homepage console, you can see that the order is App Launch-->App Show-->onload-->onShow-->onReady.
The first is the startup and display of the entire app. The startup of the app can be configured in app.js, and then it goes to the loading and display of each page, etc.
As you can imagine, a lot of things can be processed here, such as loading boxes and so on.
Routing:
Routing has always been a core point in project development. In fact, WeChat has very little introduction to routing here. It can be seen that WeChat is well encapsulated in routing and also provides three Jump method.
wx.navigateTo(OBJECT): Keep the current page and jump to a page in the application. Use wx.navigateBack to return to the original page.
wx.redirectTo(OBJECT): Close the current page and jump to a page within the application.
wx.navigateBack(): Close the current page and go back to the previous page.
These three are basically enough. In terms of routing, WeChat is well packaged. Developers do not need to configure routing at all. Many frameworks often have very cumbersome routing configuration.
Components:
This time WeChat is also very comprehensive in terms of component provision, which basically meets the project needs, so the development speed is very fast. You can browse it carefully several times before development, and the development efficiency will be very good. .
Others:
Any external frameworks and plug-ins are basically unusable. Even native js plug-ins are difficult to use, because in the past, our js plug-ins were basically all in the form of operating dom. exists, and the architecture of the WeChat application account this time does not allow the operation of any DOM, even the dynamically set rem.js we were used to using is not supported.
This time WeChat also provides WebSocket, which can be used directly for chatting. There is a lot of room for development.
Compared with public accounts, we found that developing application accounts is component-based, structured, and diversified. The New World is always full of surprises, and more Easter eggs are waiting for everyone to discover.
Let’s start with some simple code!
1. Find the project folder and import it into your editor. Here, I used the Sublime Text editor. You can choose your favorite editor based on your development habits.
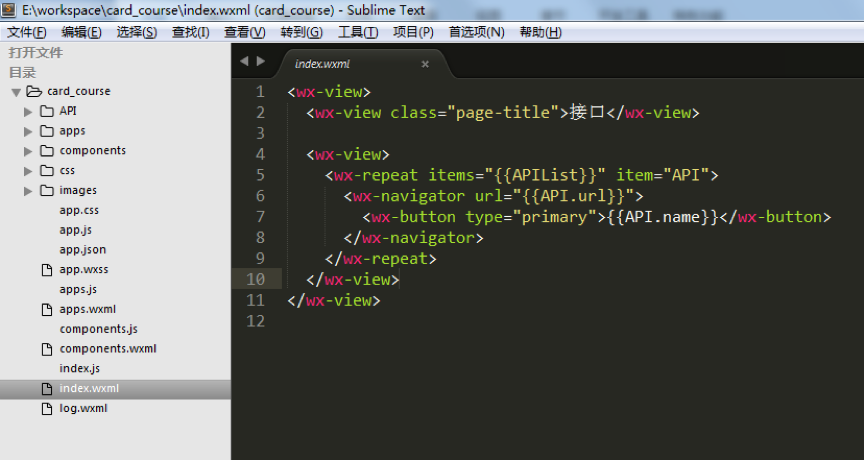
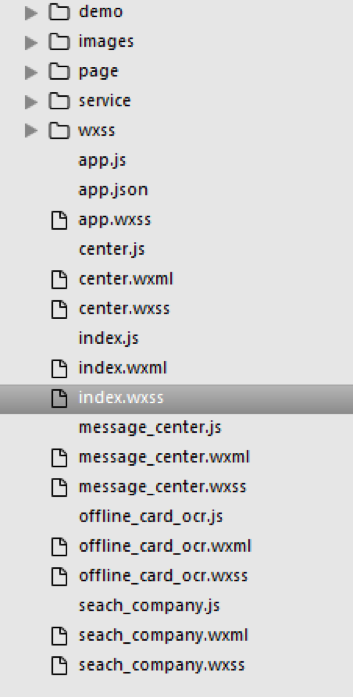
#2. Next, you need to adjust the project structure according to your project content. In the sample project, the "card_course" directory mainly contains the "tabBar" page and some configuration files of the application.
3. The "tabBar" of the example project is five menu buttons:

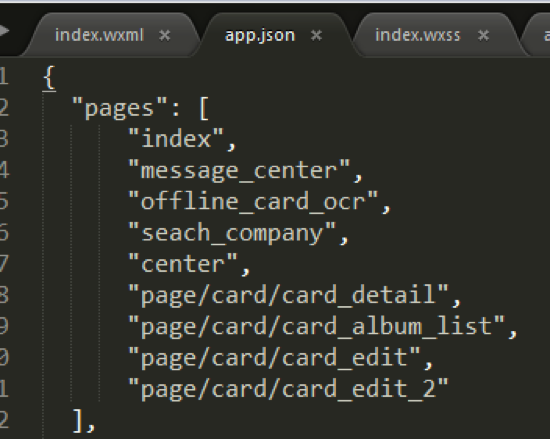
4. Find the "app.json" file to configure these five menu. Find ""tabBar"" in the code line:
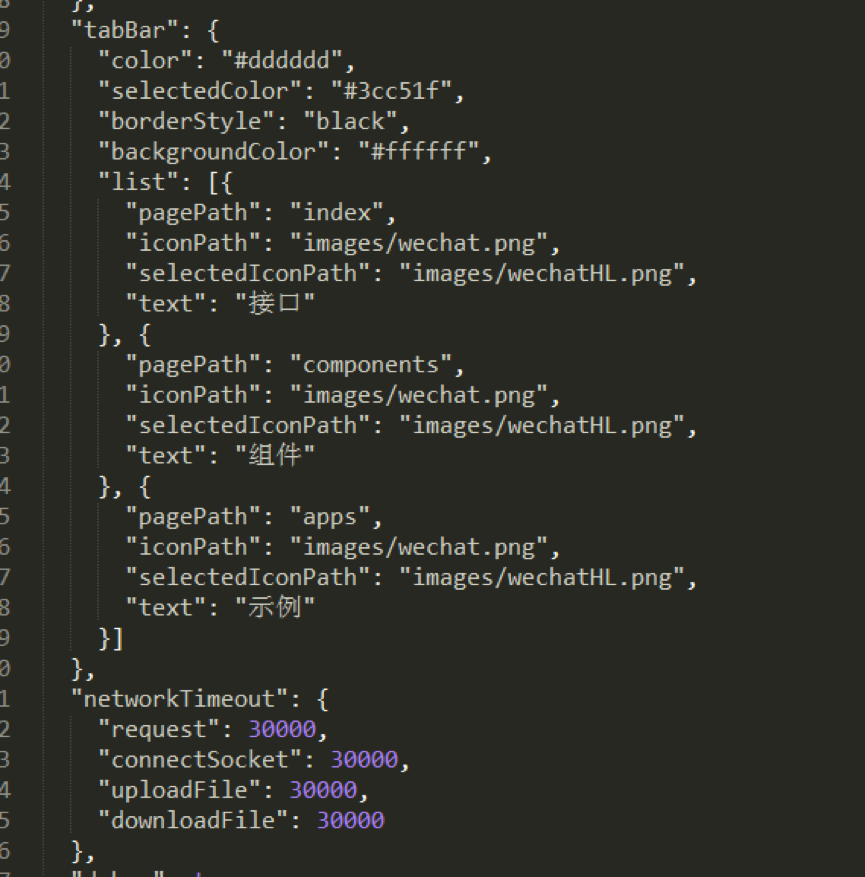
#You can change it according to actual project needs, where:
"Color" is the bottom font color, "selectedColor" is the highlight color for switching to the page, "borderStyle" is the color of the line above the switching menu, and "backgroundColor" is the background color of the bottom menu bar. The text description is relatively abstract. It is recommended that you debug it one by one and check its effects to deepen your impression.
The order of codes under ""list"" must be placed in order and cannot be changed casually.
In the file name after ""pagePath"", the ".wxml" suffix is hidden. This is a humane aspect of WeChat development code - it helps you save time in writing code without frequent declarations. File extension.
""iconPath"" is the icon path of the page that has not been displayed. These two paths can be directly network icons.
""selectedIconPath"" is the path of the highlighted icon on the currently displayed page. It can be removed. After removal, the icon will be displayed as ""iconPath"" by default.
""Text"" is the page title, which can also be removed. After removing it, the icon will be displayed. If only one of them is removed, the position will be occupied.
Note: WeChat’s bottom menu supports up to five columns (five icons), so when you design the UI and basic structure of your WeChat application, you must consider the layout of the menu bar in advance. .
5. According to the above code rules, I have prepared the basic structure of the sample project for your reference:
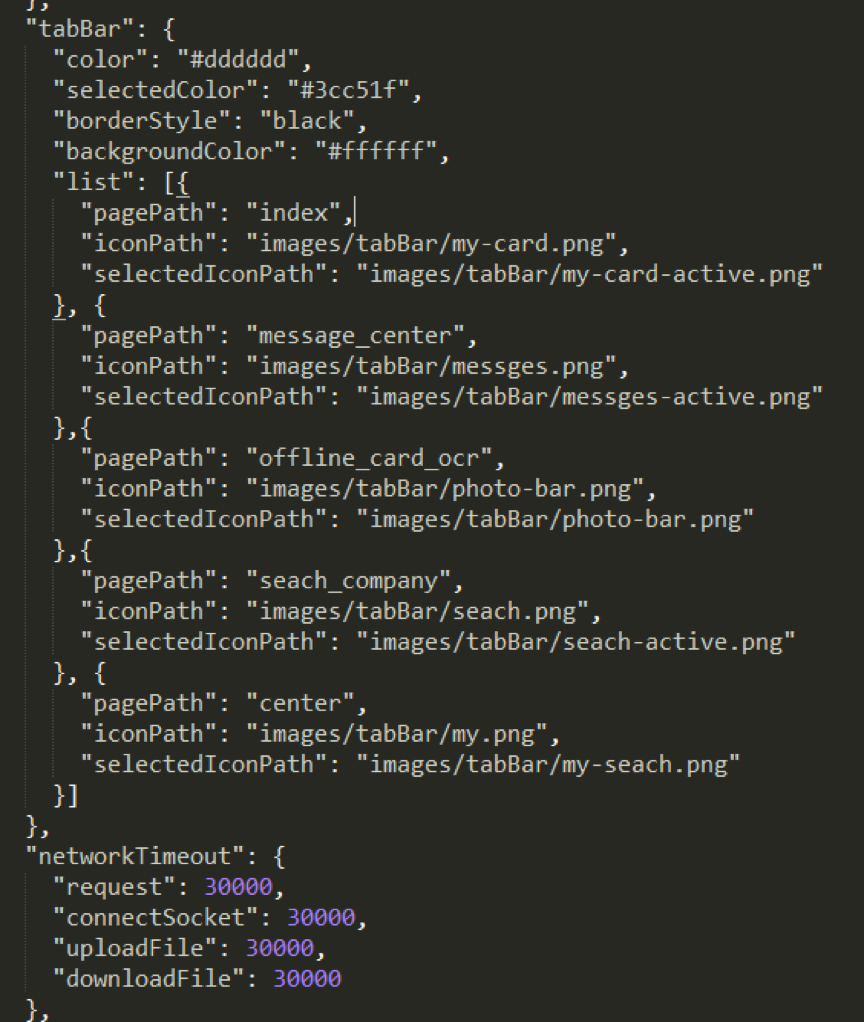
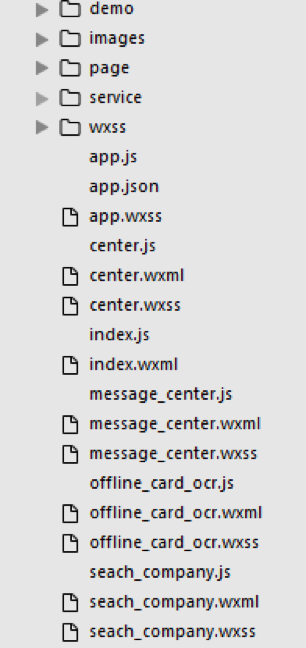
#6. After the "Json" file is configured, the basic structure of "card_course" is as shown in the figure above. Any unnecessary subsets can be Temporarily delete the missing subsets and you will need to actively create them. When deleting a subset, remember to check whether the relevant content in "app.json" has been deleted as well.
Note: I personally recommend that when you create a new "wxml" file, you also create the corresponding "js" and "wxss" files together, because the configuration feature of the WeChat application account is to parse to a "wxml" When the file is opened, "js" and "wxss" files with the same file name will be found in the same directory at the same time, so the "js" file must be pre-configured in "app.json" in time.
When writing "wxml", just code according to the interface provided by the WeChat application account. Most of them are the previous "p", but we now use "view". When you need to use other subsets, you can choose according to the interface provided by WeChat.
Use the "class" name to set the style. The "id" name is basically useless here. Mainly operates data, not "dom".
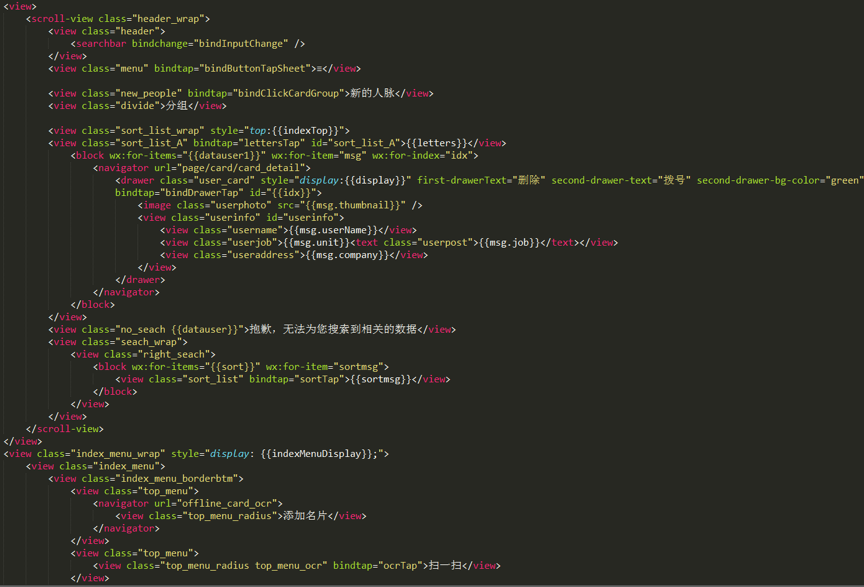
#7. The above is the "wxml" encoding of the sample project homepage. As can be seen from the picture, the amount of code to implement a page is very small.
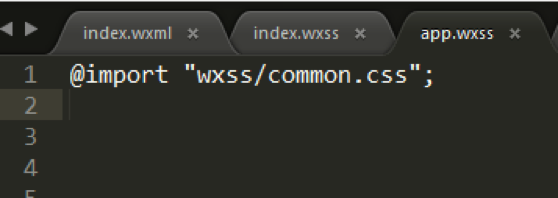
8. The "Wxss" file is an imported style file. You can also write styles directly in it. The example uses the import method:
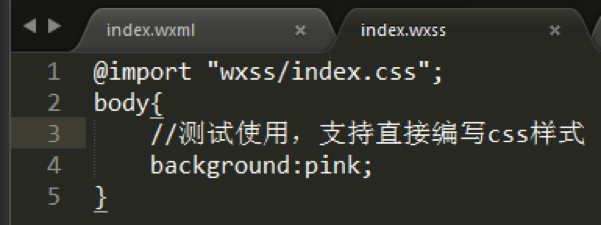
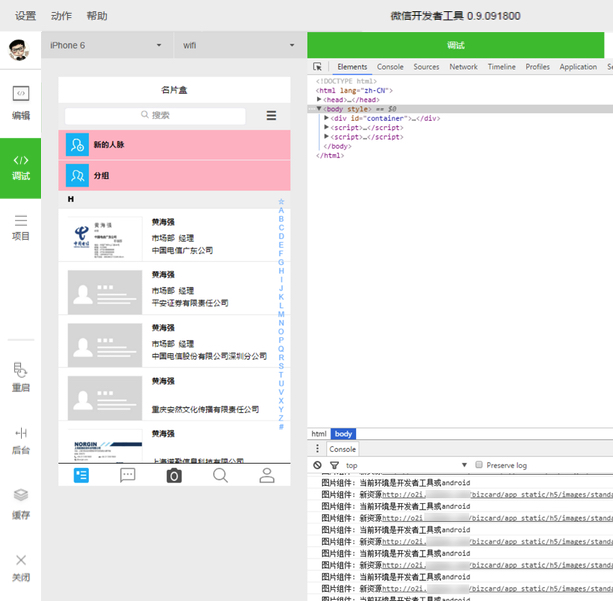
9. After modifying the code and refreshing it, you can see that the "view" label without a background directly turns pink.
Note: After modifying the content under "wxml" and "wxss", you can directly refresh with F5 to see the effect. If you modify "js", you need to click the restart button to see the effect.
10. In addition, public styles can be directly referenced in "app.wxss".
