
As a coder, my art foundation is weak. We can refer to some mature web PS tutorials to improve our design capabilities. To paraphrase a sentence, "If you are familiar with three hundred Tang poems, you can recite them even if you don't know how to compose them."
The tutorials in this series come from online PS tutorials, all from abroad, and all in English. I try to translate these excellent tutorials. Due to limited translation capabilities, the details of the translation still need to be worked out. I hope that the majority of netizens will give me some advice.
Agreement:
1. The software used in this article is the Photoshop CS5 version
2. The screenshots of the original tutorial are in English. I re-screened them based on the re-production. Chinese version of Figure
3. Some operations in the original text do not give parameters. I measured some parameters through repeated testing, which are displayed in red text. For some wrong parameters, the correct parameters are displayed directly in red text
For example: (90, 22, 231, 77) , indicating that the coordinates of the upper left corner of the rectangle are (90, 22) , width 231, height 77
For example: (90,22), indicating that the coordinates of the upper left corner of the rectangle are (90,22), the other two parameters of the rectangle have been specified in the tutorial
4. My own experience will be attached at the end of the tutorial. Some are optimizations of some steps in the tutorial, etc.
Let's start the tutorial:
Let's start the tutorial
Step 1
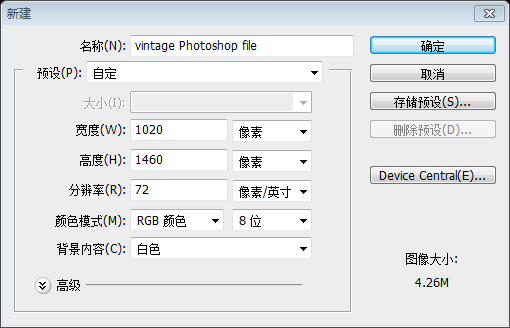
Open Photoshop, create a new document (Ctrl +N) and use the following dimensions 1020 by 1460.
Step 1
Open Photoshop, create a new document (Ctrl+N ), according to the following settings, size: 1020px*1460px
Paint bucket tool, Click once on your document to change the color, then click: Filter > Texture > Grain . Here are the settings I used

Select Rectangle Tool and create this shape on top . As a color I have used #61544a
Step 2Use the
Rectangle ToolCreate a new rectangle at the top(75,7 , 870, 61) , color: #61544a

With Pen Tool create this black shape:
用
Pen ToolCreate a new black triangle:
If you are not familiar withPen Tool, you can also use Rectangle Tool to create a new black rectangle, Then use the direct selection tool, select the lower left corner of the rectangle, and then press the delete key to delete it, turning it into a black triangle

Filter>Blur>Gaussian Blur
, add a Gaussian blur with a radius of 6.5px. Do the same on the right side. As shown in the figure below:

Step 3
Select Rectangle Tool and create this shape. For my shape I have used this color: #e5d2ac
Step 3
Select the Rectangle Tool
Create a new rectangle(70, 68, 880 , 54) , the color I chose for this rectangle: #e5d2ac

Next with Pen Tool I will create this shapes:
Next with Pen Tool create the following on the left side Shape:
Since the author is not used to Pen Tool, this step is changed to
Use to customize the shape first Tool, select the Shift key, select several control points on the right side of the
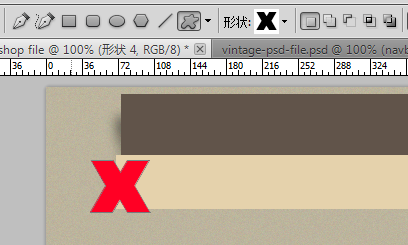
Use Direct Selection Tool, hold down the Shift key to select the two controls on the right Click, hold down the Shift key and drag a few pixels to the right, and change the color to #dfc9a0


Step 4
I will select Rectangle Tool and I will create this shape and I will apply this layer styles:
Use the
Rectangle Tool to create a new rectangle (286,74,625,42)

##Because this is a shape (a vector object) to apply the next step I will have to rasterize this shape first. To do that, locate the shape on your layer palette, right click on it and choose Rasterize Layer
Once the layer is rasterized, select Eraser Tool, with a brush of 7px and start erasing each corner of the shape.Because this is a shape (vector object), the layer must be rasterized before doing the next step. To do this, select the shape layer in your Layers panel, right-click on it and select Rasterize Layer
When the layer is rasterized, selectEraser Tool, select a round brush with a radius of 7px (actually, I feel 12px is better, the picture below is the rendering of 12px), and then erase the four corners of the rectangle

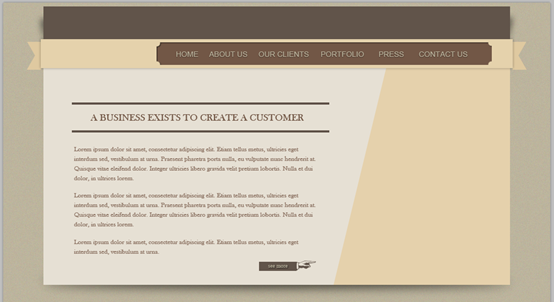
We are doing this because we need to create a vintage style for our navigation. After you finish this, with type tool add the links for the navigation bar. Here is my result:
We do this because we need to create a retro style navigation bar. After you're done, add links to the navigation bar using the Type Tool (Font: Arial, Size: 14px, Color: #bcb49d, and add the following layer style) . Here are my results:


Step 5
On this step we will create featured area. With Rectangle Tool I will create this shape. Color used #e6e0d4:
Step 5
In this step, we will create a featured area. Use the Rectangle Tool to create a rectangle (75, 122, 870, 404) , color: #e6e0d4

I will select Ellipse Tool and I will create this black shape
Use Ellipse ToolCreate a black ellipse

And I will apply a Gaussian Blur (Filter>Blur>Gaussian Blur) of about 4px. My result:
And I will apply a Gaussian Blur (click: Filter> Blur> ; Gaussian Blur) with a radius of 4px

With Type Tool I will add some text:
用Text toolAdd some text:
This step is also skipped in one sentence, so the detailed process will be completed here
UseRectangle Tool DrawTwo rectangles (128, 186, 480, 4) and (128, 238, 480, 4), color: #61544a. (You can also use the Straight Line Tool to draw two straight lines with a thickness of 4px)

Add some text between the lines. Font: Baskerville Old Face, font size: 18px, color: #725746

Add some paragraph text below, font: Baskerville Old Face, font size: 12px, color: #8d7464

Use the Rectangle Tool to create a rectangle (477, 483, 70, 17) below the paragraph text, color: #61544a

Add text to the rectangle. Font: Times New Roman, font size: 10px, color: #bcb49d. Add a layer style to the text:


Use to customize the shape ToolAdds a hand shape to the right side of the button. Color: #61544a

Pen Tool on the right to create the following shape, color: #e5d1ac
##I am not good atPen Tool , use Rectangle ToolCreate a new rectangle (617, 122, 328, 404), then press Ctrl+T Free Transform Tool, right-click to select Bevel, drag the upper left corner point to move to the right, the degree of H: - 13.64.
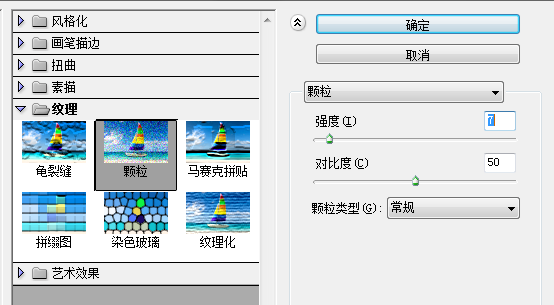
I will go to Filter>Texture>Grain and I will use this settings:
Click:
Filter> Texture> Grain, set as shown below:

Add a color overlay: #725746
. This is my result:

This area is complete. Let’s start creating the LOGO
Step 6
First I will select Ellipse Tool and I will create this circle. As a color I have used #8d7d5d
Step 6
First use the Ellipse Tool
to create a circle(106, 25, 144, 144) . Color set to: #8d7d5d

Next I will use again Ellipse Tool but this time I will create a orange circle, smaller then the first one:
Next again Use the Ellipse Tool to create another circle (117, 36, 122, 122), color: #ff7420, a little smaller than the previous one:

Having Ellipse Tool still selected I will create a white ellipse on the top of the 2 circles.
Continue to keep the selectionEllipse Tool , create a white ellipse above the 2 circles

Once you have created this one, apply a Gaussian Blur for it ( Filter>Blur>Gaussian Blur) with a radius of 20px. Set the blending mode to Overlay.
My result:
After you create the ellipse, add Gaussian Blur (Filter> ; Blur> Gaussian Blur), radius: 20px (You still need to consider the parameters, the size of the parameter setting is related to the size of your ellipse). Set the blend mode to Overlay

Next on the top of all this circles I would like to make a circle with dashes. You can easily do this on Illustrator, but Photoshop does not have a special tool to create it, that's why we will have to improvise. First select Brush Tool (B), then open the brush palette. You can do that by pressing F5 on your keyboard or from Window> ;Brush. Once you have done this, apply the following settings to your brush palette:
Next inside the top circle, I like to create a circle with a stroke. It's easy to do this in Illustrator, but there isn't a normal tool to create it in Photoshop, which is why we need to improvise a bit. First select the Brush Tool, and then open the Brush Panel. You can press F5 or click: Window > Brushes to open the brush panel, and set your brush panel as shown below.

Now select Ellipse Tool, but this time make sure that you select paths, instead of shape layers (please see the screenshots)
Now select the Ellipse Tool , but this time make sure the selection is the path, instead of the shape layer (see screenshot)

Once you have done this, Pres Ctrl+Shift +Alt+N to create a new layer the you can create another circle. As you can see this one is not filled. Right Click on it and choose Stroke Path. A window will pop-up, select Brush, hit OK,
When you are done with everything, press Ctrl+Shift +Alt+N to create a new layer where you can create another circle. When you see this circle is not filled. Right click and select Stroke Path. A window will pop up, select the brush and press OK.

then push Delete on your keyboard. You should have something like this now:
Then push Delete. Add the following layer style to this layer, Your work should look like the picture below:


Next with Type Tool I will write: Pfolio (font used Bauhaus 93) and I will apply this layer styles:
Next use the Text tool to add: Pfolio (Font: Bauhaus 93, Font size: 36px), and add the following layer style:


Color overlay color: #e86f1e


The logo is finished, let's move to the content area now...
The logo is finished, let's start making the content area part
Step 7
I will select Line Tool and I will create this 2 lines, then with Type Tool I will write “Latest News From Blog” using Neues Bauen font. I have applied the following layer styles for the phrase “Latest News from the blog”:
Step 7
Select the Line ToolCreate 2 straight lines ((75 , 583, 230, 2) and (720, 583, 230, 2), color: #61544a), and then use text tool to write Latest News From Blog, font: Neues Bauen, Font size: 22px. Add the following layer style to the text layer:


Color overlay color: #a18778


Next, on the line from the left side of the text, I will add a Layer Mask (directly from Layer Panel), I will select Gradient Tool, I will make sure that the default palette is selected (black & white) and I will draw a line from left to the right.
Next, on the left side of the text For the straight line, I want to add a layer mask (operate directly in the layers panel), I want to select the Gradient Tool, select the default panel (black and white), and then drag from left to right
I will proceed in the same way for the line on the right.
Here is my result:
Same operation for the line on the right
This is My results:

Next with Pen Tool I will create this 2 triangles
Next, use Pen Tool to create two triangles
Suggestion: You can use the Rectangle Tool to draw a rectangle, and then use the Direct Selection Tool to drag a point to the appropriate position, and then use Direct selection toolSelect another point, press Delete to delete, and get the triangle

Filter> Blur> Gaussian Blur) and set the radius to 10px. This is my result:
Rectangle ToolCreate a rectangle(77,650,277,179), and then add it as shown below Layer style:

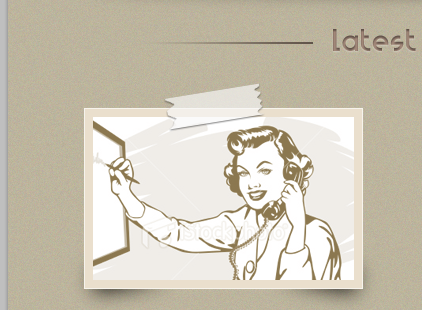
Changed the background color to #c5bba7 and the image's layer's blending mode to Overlay:

Rectangle ToolCreate a new rectangle. Right-click on the layer panel and select the rasterized layer, then select the Lasso Tool, and create a selection (jagged) on the left side of the rectangle. Then press the delete key on the keyboard, use the same method on the right side of the rectangle, then lower the opacity (66%) , and add a layer style as shown below:


## In the same way I will create 5 new thumbnails
In the same way I will create 5 new thumbnails

With Rectangle Tool I will create this shape:
Step 8
Use the Rectangle Tool to create a rectangle (0, 1113, 1020, 347), color: #62544b:

pen toolCreate the following shape:
Recommendation: Use the Custom shape tool, select the X shape, use the direct selection tool to move the upper and lower control points to the horizontal position, and then drag Move the two control points on the right to the appropriate position. Fill color: #e9e3d7. Add style as shown below:
Projection color: #b49d91


And copy the two to the appropriate location:

Use the Rectangle Tool to add some rectangles and add the following styles:


Add some text:

 At this point, this tutorial is complete
 Postscript:
This tutorial is in retro style, a bit like the western style of the early last century. Using the overlay effect of the blending mode, the black image can be synthesized into a wood grain color. The entire page is simple and simple, with a fresh style that makes people feel relaxed and happy.
For more PS web design tutorials XIV - How to create a retro-style PS layout For related articles, please pay attention to the PHP Chinese website!
 How to solve Java stack overflow exception
 es6 new features
 Laptop sound card driver
 How many types of usb interfaces are there?
 The installer cannot create a new system partition solution
 A collection of common computer commands
 How to use unlocker
 vs2010 key
 How to solve the problem that scanf return value is ignored


