Advanced front-end basics (1): Detailed illustration of memory space

var a = 20;
var b = 'abc';
var c = true;
var d = { m: 20 }Because JavaScript has an automatic garbage collection mechanism, memory space is not a concept that is often mentioned for front-end development and is easily ignored by everyone. In particular, many friends who are not computer majors have a vague understanding of memory space after entering the front-end, and some even know nothing about it.
Of course including myself. For a long time, I thought that the concept of memory space was not that important in learning JS. But later, when I went back and reorganized the basics of JS, I found that due to my vague understanding of them, I did not understand many things. For example, what are the most basic reference data types and reference passing? For example, what is the difference between shallow copy and deep copy? There are also closures, prototypes, etc.
So later I gradually understood that if I want to have a deeper understanding of JS, I must have a clear understanding of the memory space.
##1. Stack and Heap
Note: The stack can also be called stack
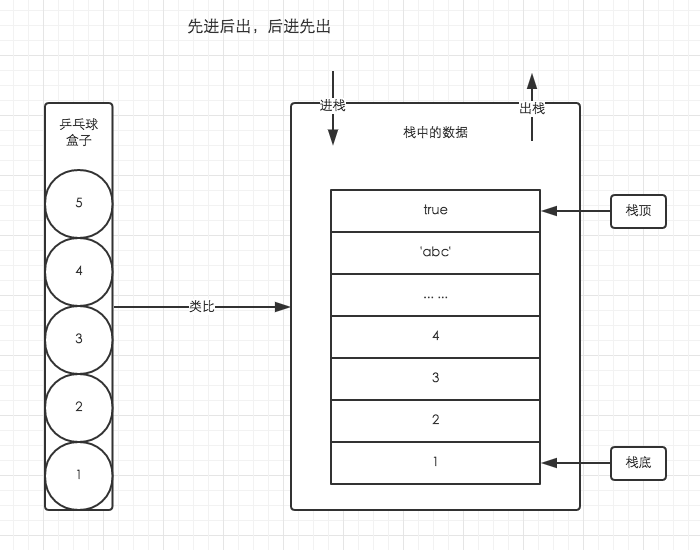
Unlike C/C++, there is no strict distinction between stack memory and heap memory in JavaScript. Therefore, we can roughly understand that all data in JavaScript is stored in heap memory. But in some scenarios, we still need to process based on the stack data structure, such as JavaScript execution context (I will summarize the execution context in the next article). The execution context logically implements the stack. Therefore, it is still important to understand the principles and characteristics of the stack data structure. To simply understand the stack access method, we can analyze it by analogy with a table tennis box. As shown on the left side of the picture below.
##2. Variable objects and basic data types
After the execution context of JavaScript is generated, a special object called a variable object will be created (the details will be summarized together with the execution context in the next article). The basic data types of JavaScript are often stored in variable objects.
Basic data types are simple data segments. There are 5 basic data types in JavaScript, namely Undefined, Null, Boolean, Number, and String. Basic data types are accessed by value, because we can directly manipulate the actual value stored in the variable.
##3. Reference data types and heap memory
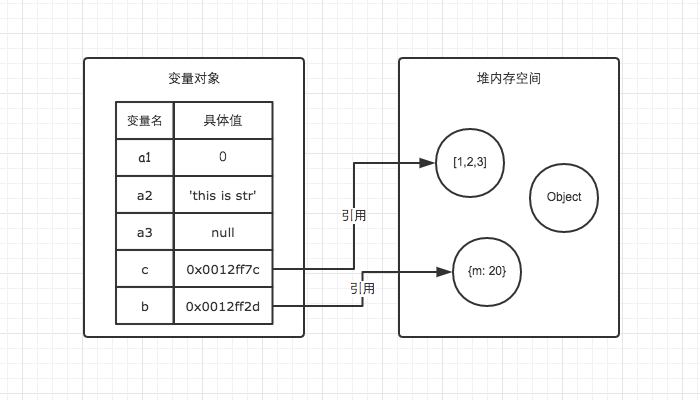
Unlike other languages, the size of JS's reference data types, such as array Array, is not fixed. Values of reference data types are objects stored in heap memory. JavaScript does not allow direct access to locations in heap memory, so we cannot directly manipulate the heap memory space of an object. When you manipulate an object, you are actually manipulating a reference to the object rather than the actual object. Therefore, values of reference types are accessed by reference. The reference here can be roughly understood as an address stored in the variable object, which is associated with the actual value of the heap memory.
var a1 = 0;   // 变量对象
var a2 = 'this is string'; // 变量对象
var a3 = null; // 变量对象

var b = { m: 20 }; // 变量b存在于变量对象中,{m: 20} 作为对象存在于堆内存中
var c = [1, 2, 3]; // 变量c存在于变量对象中,[1, 2, 3] 作为对象存在于堆内存中So when we want to access the reference data type in the heap memory, we actually first obtain the address reference (or address pointer) of the object from the variable object ), and then get the data we need from the heap memory. 
理解了JS的内存空间,我们就可以借助内存空间的特性来验证一下引用类型的一些特点了。
在前端面试中我们常常会遇到这样一个类似的题目
// demo01.js
var a = 20;
var b = a;
b = 30;

// 这时a的值是多少?
// demo02.js
var m = { a: 10, b: 20 }
var n = m;
n.a = 15;

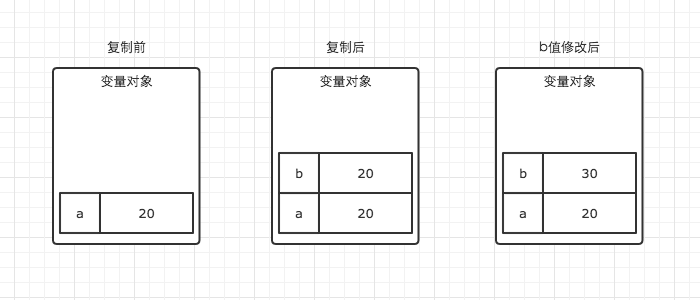
// 这时m.a的值是多少在变量对象中的数据发生复制行为时,系统会自动为新的变量分配一个新值。var b = a执行之后,a与b虽然值都等于20,但是他们其实已经是相互独立互不影响的值了。具体如图。所以我们修改了b的值以后,a的值并不会发生变化。

在demo02中,我们通过var n = m执行一次复制引用类型的操作。引用类型的复制同样也会为新的变量自动分配一个新的值保存在栈内存中,但不同的是,这个新的值,仅仅只是引用类型的一个地址指针。当地址指针相同时,尽管他们相互独立,但是在变量对象中访问到的具体对象实际上是同一个。如图所示。
因此当我改变n时,m也发生了变化。这就是引用类型的特性。
通过内存的角度来理解,是不是感觉要轻松很多。除此之外,我们还可以以此为基础,一步一步的理解JavaScript的执行上下文,作用域链,闭包,原型链等重要概念。其他的我会在以后的文章慢慢总结,敬请期待。
内存空间管理
因为JavaScript具有自动垃圾收集机制,所以我们在开发时好像不用关心内存的使用问题,内存的分配与回收都完全实现了自动管理。但是根据我自己的开发经验,了解内存机制有助于自己清晰的认识到自己写的代码在执行过程中发生过什么,从而写出性能更加优秀的代码。因此关心内存是一件非常重要的事情。
JavaScript的内存生命周期
1. 分配你所需要的内存
2. 使用分配到的内存(读、写)
3. 不需要时将其释放、归还
为了便于理解,我们使用一个简单的例子来解释这个周期。
var a = 20;  // 在内存中给数值变量分配空间
alert(a + 100);  // 使用内存
var a = null; // 使用完毕之后,释放内存空间
第一步和第二步我们都很好理解,JavaScript在定义变量时就完成了内存分配。第三步释放内存空间则是我们需要重点理解的一个点。
JavaScript有自动垃圾收集机制,那么这个自动垃圾收集机制的原理是什么呢?其实很简单,就是找出那些不再继续使用的值,然后释放其占用的内存。垃圾收集器会每隔固定的时间段就执行一次释放操作。
在JavaScript中,最常用的是通过标记清除的算法来找到哪些对象是不再继续使用的,因此a = null其实仅仅只是做了一个释放引用的操作,让 a 原本对应的值失去引用,脱离执行环境,这个值会在下一次垃圾收集器执行操作时被找到并释放。而在适当的时候解除引用,是为页面获得更好性能的一个重要方式。
1.在局部作用域中,当函数执行完毕,局部变量也就没有存在的必要了,因此垃圾收集器很容易做出判断并回收。但是全局变量什么时候需要自动释放内存空间则很难判断,因此在我们的开发中,需要尽量避免使用全局变量,以确保性能问题。
2.要详细了解垃圾收集机制,建议阅读《JavaScript高级编程》中的4.3节

Hot AI Tools

Undresser.AI Undress
AI-powered app for creating realistic nude photos

AI Clothes Remover
Online AI tool for removing clothes from photos.

Undress AI Tool
Undress images for free

Clothoff.io
AI clothes remover

AI Hentai Generator
Generate AI Hentai for free.

Hot Article

Hot Tools

Notepad++7.3.1
Easy-to-use and free code editor

SublimeText3 Chinese version
Chinese version, very easy to use

Zend Studio 13.0.1
Powerful PHP integrated development environment

Dreamweaver CS6
Visual web development tools

SublimeText3 Mac version
God-level code editing software (SublimeText3)

Hot Topics
 How much storage space does a Windows 10 system require?
Dec 30, 2023 pm 12:08 PM
When we are preparing to install an operating system on our computer, I believe that everyone must be interested in knowing how much memory space these versions occupy for the current multiple versions of the win10 operating system, and how much memory space we need to set aside for installation. . So for this issue, I think it still depends on the version and system digits. How much memory space does Windows 10 system occupy? Answer: It will occupy about 20G of memory. 32-bit systems generally occupy 16g of memory. 64-bit systems generally occupy about 20g of memory. The professional and enterprise versions generally take up more. After all, they are powerful and may reach around 30g. Only the lite version is different. The lite version deletes many components, so it only requires less than 10g of space. w
 Win7 Ultimate 64-bit installation tutorial diagram
Jul 10, 2023 pm 04:29 PM
Win7 system is currently the most favorite Microsoft operating system among Chinese users. It has many different versions. Of course, the most popular one is Win7 Ultimate 64-bit system, so most users will choose to install Win7 Ultimate 64-bit system. However, there are still A few new users don't know how to install it. The editor below will teach you the installation steps of win7 ultimate 64-bit version. For those who don’t know yet, take a look at this tutorial. 1. Download the Xiaobai three-step installation software from the Xiaobai one-click system reinstallation official website and open it. The software will automatically help us match the appropriate system, and then click Reinstall Now. 2. Next, the software will help us download the system image directly, we just need to wait patiently. 3. After the download is completed, the software will help us directly reinstall W online.
 Illustration of the official installation tutorial of win7 ultimate version
Jul 14, 2023 pm 07:37 PM
Recently, users always ask what is the one-click method to install win7 ultimate 64-bit system? What should you pay attention to when installing win7 ultimate 64-bit system? In fact, one-click installation of win7 ultimate 64-bit system is very simple. Next, the editor will teach you Let’s follow the detailed instructions for installing the official version of win7 ultimate version. 1. Download a Xiaobai three-step installation version of the software and open it, select the win7 system, and click Reinstall Now. 2. Then start downloading the win7 ultimate system image, and we will wait for a while. 3. After the download is completed, the software will automatically reinstall the Windows system online. 4. After the installation is complete, click Restart now. (At this point the software will automatically help us reinstall the system, we don’t need to do anything) 5. After restarting, select the second option in the menu
 Graphical tutorial for installing win7 system from USB disk
Jul 15, 2023 pm 01:49 PM
The USB flash drive can not only be used to store data, but can also be used as a boot disk to reinstall the system. Some netizens said that their win7 system is broken and they want to install the win7 system through a USB flash drive, but they don't know how to install win7 from a USB flash drive. Today I will teach you a simple tutorial on how to install win7 system via USB flash drive. The specific steps are as follows: 1. First download and install the one-click system reinstallation tool of Kaka Installer on an available computer and open it. Insert a blank USB disk of more than 8g, select the USB disk reinstallation system mode, and click to start production. 2. Select the win7 system that needs to be installed to start production. 3. After the software successfully creates a USB boot disk, preview the startup hotkeys of the corresponding assembly machine motherboard, and then remove the USB disk to exit. 4. Insert the boot disk and need to reinstall.
 Revealing the secrets of Graphviz: a graphical tool that improves understanding
Apr 08, 2024 am 09:54 AM
Graphviz is a chart drawing tool that uses DOT language to visualize complex data. It can be installed on various distributions through the package manager. DOT syntax consists of nodes and edges and can describe different types of graphs. For example, the BFS algorithm can visualize its execution process through Graphviz. Graphviz provides a variety of features, such as support for multiple input formats, graph types, and customizable appearance, to help users deeply understand data and algorithms.
 Illustrated tutorial on one-click computer system reinstallation
Jul 08, 2023 pm 12:57 PM
Nowadays, many people don’t want to go to a computer repair shop to repair their computers. Due to various reasons, computer stores feel that computer software failures occur from time to time in the eyes of many people. Therefore, solving computer software failures cannot be separated from reinstalling the computer system. The following editor will teach you how to reinstall the computer system. Once you learn it, you can You can do it yourself. 1. First, we download a KaKa installation software to the computer. 2. Then we wait patiently for the system to download. 3. After the system is downloaded, the environment is deployed and then restarted. 4. Restart the computer to enter the Windows startup manager interface, select the second one and press Enter to enter the pe system. 5. Continue the installation of win10 professional version in the pe system. 6. Install the new system to the C drive. 7. After the installation is complete, we restart again.
 Illustration showing the detailed updates of win11
Jan 13, 2024 am 10:18 AM
Win11 will be officially launched on October 5th. Many users want to know what is updated in the Win11 system this time and whether it is necessary to upgrade or purchase it. In general, win11 mainly has major changes in the interface design. Let’s take a look at the win11 update diagram. Win11 update diagram: 1. Appearance 1. Win11 has been completely redone in appearance. 2. All windows have become rounded corners, including resource managers, applications, settings, pop-up windows, etc. 3. The settings interface has also been changed. Users can now perform almost all required work in the settings without opening the control panel and other settings. 4. The new taskbar adopts a centered design, and all applications including Start
 Illustrated tutorial on how to use one-click installation of Oniontou
Jul 20, 2023 pm 01:25 PM
In recent times, I often see some users complaining on the Internet, saying that they used a certain software tool to reinstall the system, which resulted in the computer becoming infected. This may be because the installation software contains viruses. Today, The editor will introduce to you a safe and non-toxic software, the one-click installation of Oniontou, as well as the tutorial of using Oniontou one-click installation. Come and see what it's like. 1. Open the downloaded Onion One-click Installer, cancel the setting of the safe Internet homepage, select the system version to be downloaded, and click One-click Quick Installation. 2. Wait for the system to download. 3. After the download is completed, the installation program window will appear. Click Yes to restart the computer to start reinstalling the system. The above is the step-by-step tutorial for one-click installation of Oniontou. I hope it can help everyone.


: Detailed illustration of memory space)


