ps mask cutout
The material picture does not look complicated, but it is difficult to retain all the hair details, colors, etc. using a single cutout method. The author here used to adjust the edges to quickly cut out the subject, used the extraction filter to retain the details of the hair, and then used the channel to restore the color. The final effect was perfect. Final effect

Original image

1. Open the image , ctrl+j to copy a layer to get layer 1, click on the red circle to create a new layer 2, place it between layer 1 and the background layer, fill it with the color you like as a check effect and a new background layer.
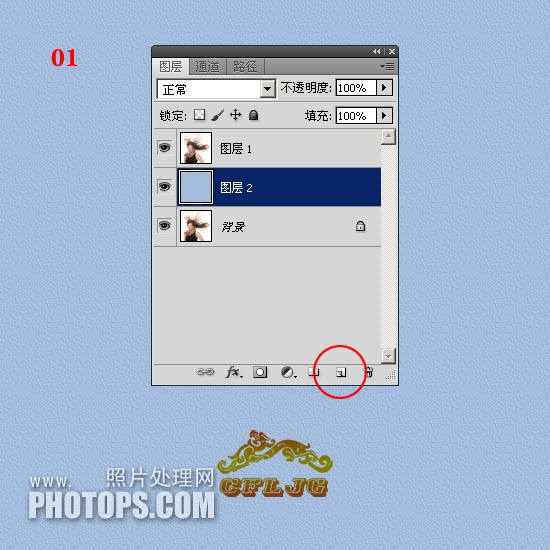
2. Click on layer 1 and use the "Quick Selection Tool" to roughly make a selection. After the selection is made, the "Adjust Edges" option will be activated.
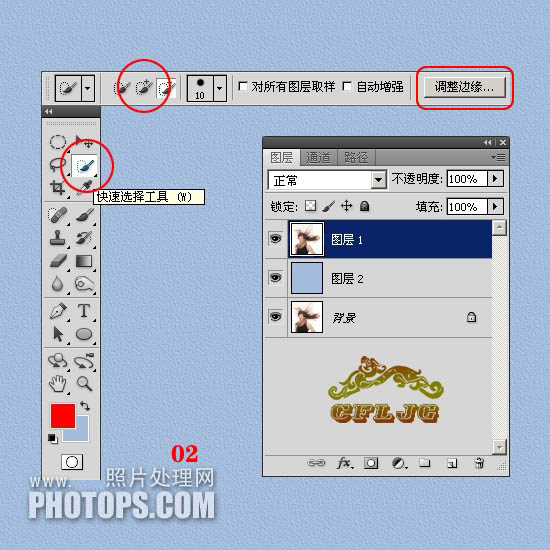
3. An ant line appears in the constituency.
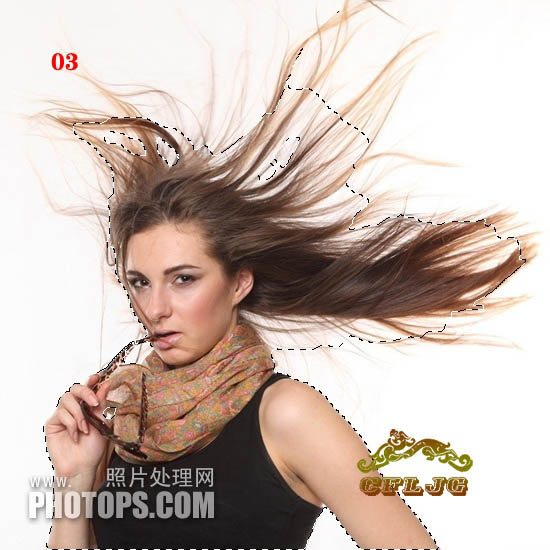
4. Click the Adjust Edge option to bring up the Adjust Edge dialog box. For the time being, refer to the settings of the icons for each parameter. Use the Adjust Radius tool to adjust the character's shape. Paint edges.
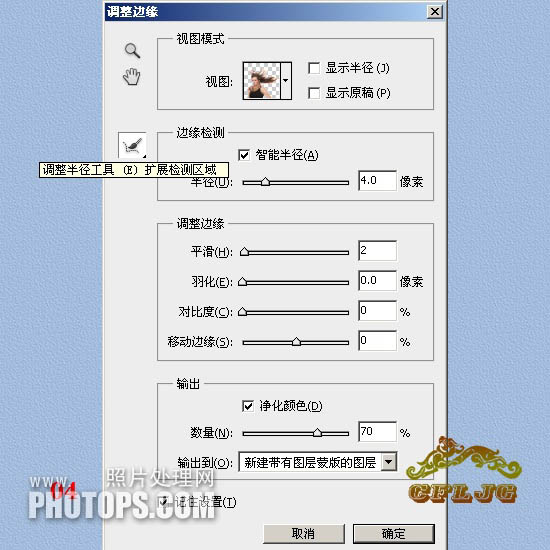
5. When applying, try to coat all the hair. If you find that there is something left that has not been coated, you can re-apply the missed areas. once, until all hair is shown. If you find that the original background color is still left between the hair strands, just apply it where it is and it will be resolved. Click OK when you are satisfied.
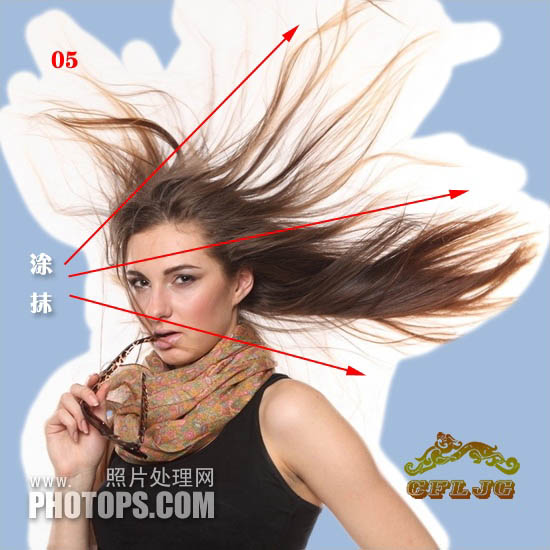
6. After confirmation, create a new copy of layer 1 with a layer mask.
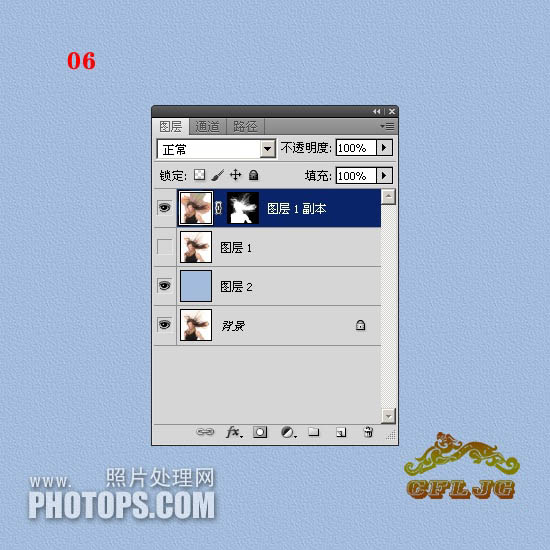
7. At this time, the distribution cutout is basically completed. This is the real "mask cutout", which is a new addition to the photoshop upgrade. Function, it is fast to cut out pictures, and the original color of the edge hair is basically retained. It is an excellent tool. However, we also see that a lot of scattered details are lost, so the edge mask cutout method is not a panacea, so don’t regard it as magical.
 8. What to do with the lost details? This requires an old tool, a tool abandoned by the new version of PS, to extract the filter to retrieve the lost details. Click on layer 1, turn off the small eyes of the copy layer of layer 1, execute filter in layer 1--extract--check the force foreground--take the eyedropper at the darkest red point of the hair in the picture Color - Use the highlighter tool to apply green as shown - OK.
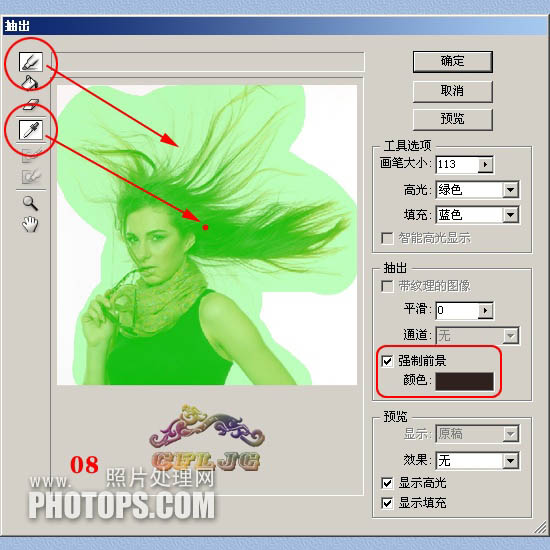
9. Extract the details of the hair. Note that you must enlarge the picture after extracting it, and use an eraser or layer mask to remove the excess. Clean up the edge noise to keep the picture clear.
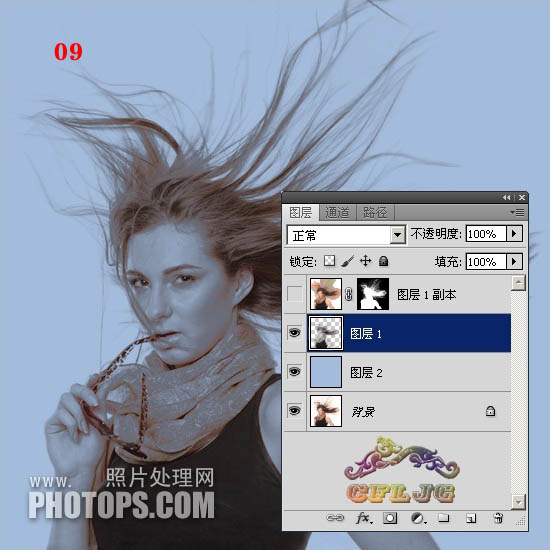
10. Compare and see if there is any obvious loss of details and whether they have been filled in.

11. The details have been recovered. This is the indelible contribution of taking out the filter. However, new problems have appeared again, and the color of the hair has also been lost. Okay, what should I do? Don't worry, we'll figure it out later.

12. Click on the background layer, turn off the small eyes in front of the copy layer of layer 1, layer 2 and layer 1, and enter the channel , copy the blue channel to get a blue copy, because the blue channel has the richest details.
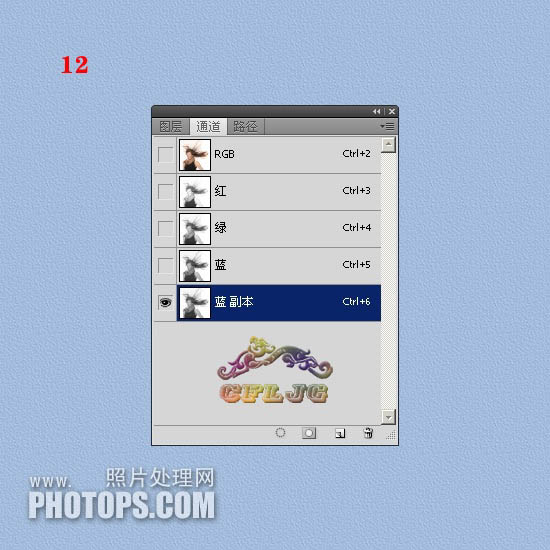
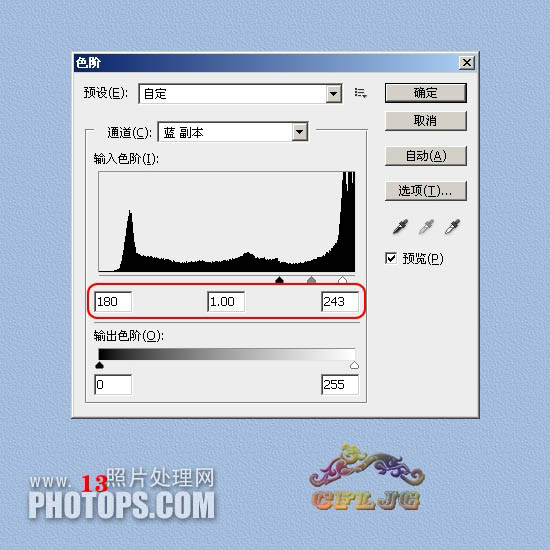
13. Execute Image--Adjustment--Levels in the blue copy, and set the parameters as shown in the figure.
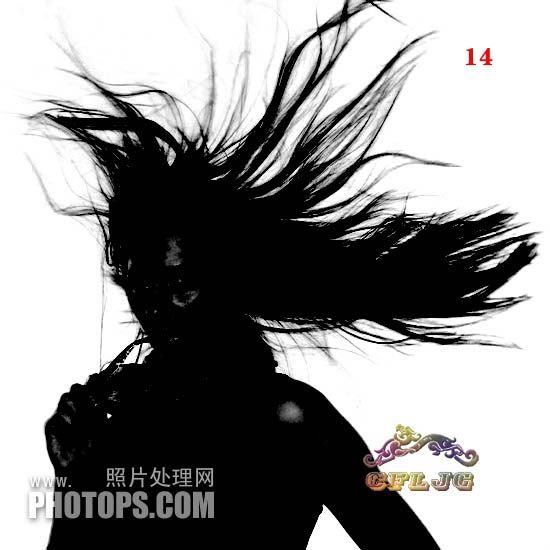
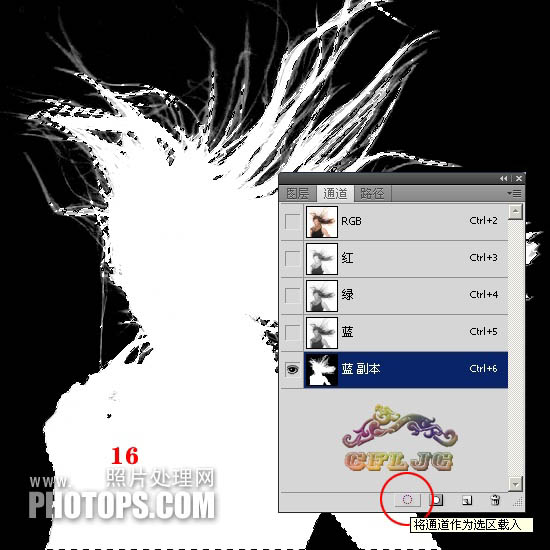
14. We can see that there are still variegated colors on the edge of the hair. Use a white paintbrush to clean it up. There is still white in the main body of the character. Paint solid with black paintbrush.
#15. After being painted and modified with a black and white brush, the result is like this.
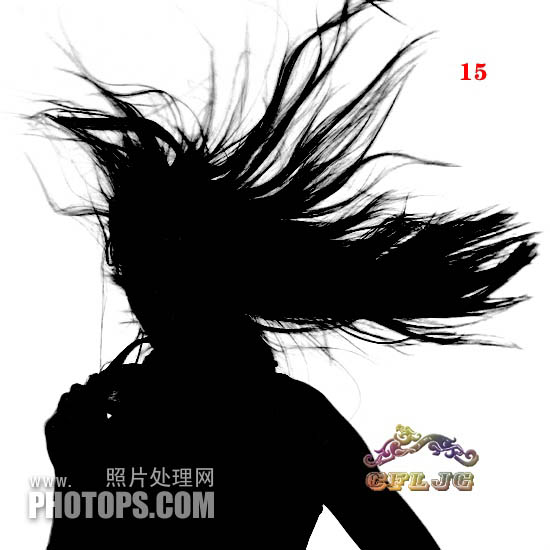
16. We use channels to make selections and extract the parts we want through the channels. The white color in the channels represents what we want to extract. For parts, black represents the part to be discarded, and gray represents the extracted translucent part. In other words, make the part you want white, the unwanted part black, and the translucent part gray. Use ctrl+i to invert, click on the red circle to make a selection, and an ant line will appear.
17. Click on the RGB channel, return to the background layer, ctrl+j to copy, and put layer 3 on the top level.
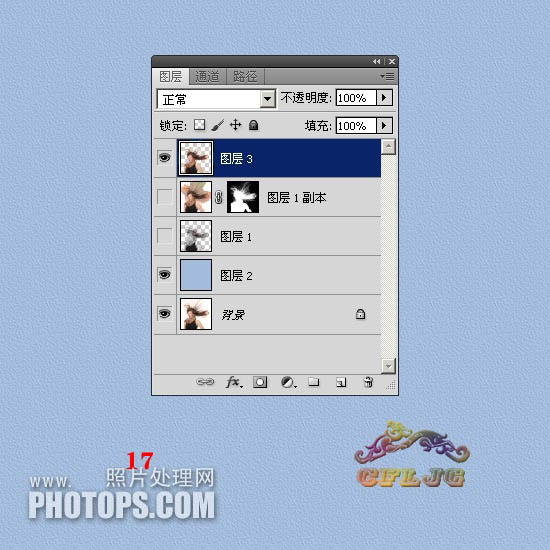
18. This is the channel cutout, and the cutout picture is like this.

19. Set the blending mode of layer 3 to color and turn on the small eyes of all layers.
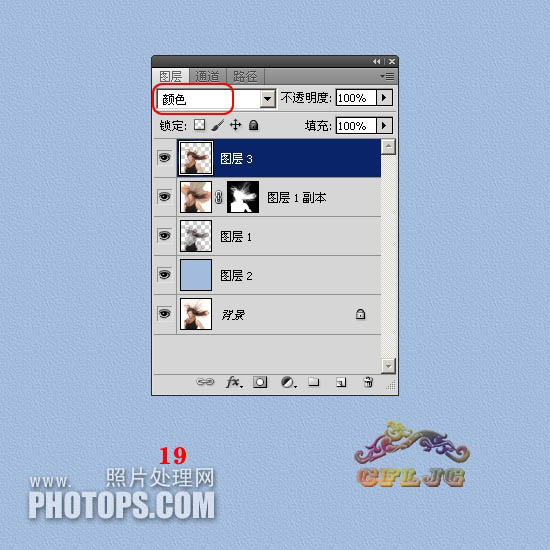
Twenty, wow! The lost color was found.

Twenty-one, ctrl+shift+alt+e stamp the layer to get layer 4, and do appropriate sharpening on layer 4 Add texture.
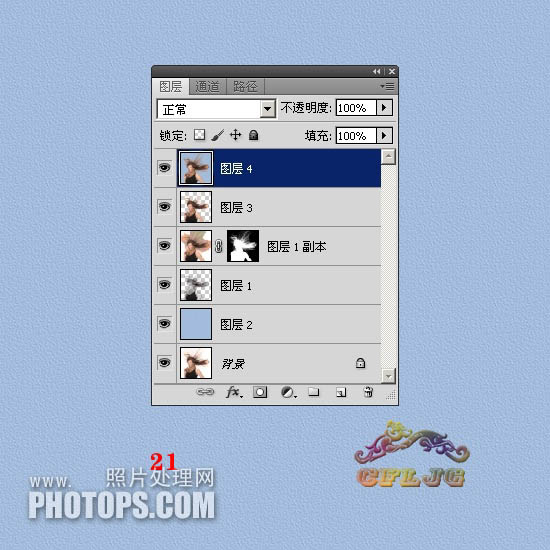
Final effect:

Please pay attention to more articles related to PS mask cutout PHP Chinese website!

Hot AI Tools

Undresser.AI Undress
AI-powered app for creating realistic nude photos

AI Clothes Remover
Online AI tool for removing clothes from photos.

Undress AI Tool
Undress images for free

Clothoff.io
AI clothes remover

AI Hentai Generator
Generate AI Hentai for free.

Hot Article

Hot Tools

Notepad++7.3.1
Easy-to-use and free code editor

SublimeText3 Chinese version
Chinese version, very easy to use

Zend Studio 13.0.1
Powerful PHP integrated development environment

Dreamweaver CS6
Visual web development tools

SublimeText3 Mac version
God-level code editing software (SublimeText3)

Hot Topics
 1385
1385
 52
52
 What is the reason why PS keeps showing loading?
Apr 06, 2025 pm 06:39 PM
PS "Loading" problems are caused by resource access or processing problems: hard disk reading speed is slow or bad: Use CrystalDiskInfo to check the hard disk health and replace the problematic hard disk. Insufficient memory: Upgrade memory to meet PS's needs for high-resolution images and complex layer processing. Graphics card drivers are outdated or corrupted: Update the drivers to optimize communication between the PS and the graphics card. File paths are too long or file names have special characters: use short paths and avoid special characters. PS's own problem: Reinstall or repair the PS installer.
 What are the common questions about exporting PDF on PS
Apr 06, 2025 pm 04:51 PM
Frequently Asked Questions and Solutions when Exporting PS as PDF: Font Embedding Problems: Check the "Font" option, select "Embed" or convert the font into a curve (path). Color deviation problem: convert the file into CMYK mode and adjust the color; directly exporting it with RGB requires psychological preparation for preview and color deviation. Resolution and file size issues: Choose resolution according to actual conditions, or use the compression option to optimize file size. Special effects issue: Merge (flatten) layers before exporting, or weigh the pros and cons.
 How to solve the problem of loading when PS is always showing that it is loading?
Apr 06, 2025 pm 06:30 PM
PS card is "Loading"? Solutions include: checking the computer configuration (memory, hard disk, processor), cleaning hard disk fragmentation, updating the graphics card driver, adjusting PS settings, reinstalling PS, and developing good programming habits.
 How to set password protection for export PDF on PS
Apr 06, 2025 pm 04:45 PM
Export password-protected PDF in Photoshop: Open the image file. Click "File"> "Export"> "Export as PDF". Set the "Security" option and enter the same password twice. Click "Export" to generate a PDF file.
 How to speed up the loading speed of PS?
Apr 06, 2025 pm 06:27 PM
Solving the problem of slow Photoshop startup requires a multi-pronged approach, including: upgrading hardware (memory, solid-state drive, CPU); uninstalling outdated or incompatible plug-ins; cleaning up system garbage and excessive background programs regularly; closing irrelevant programs with caution; avoiding opening a large number of files during startup.
 How to solve the problem of loading when the PS opens the file?
Apr 06, 2025 pm 06:33 PM
"Loading" stuttering occurs when opening a file on PS. The reasons may include: too large or corrupted file, insufficient memory, slow hard disk speed, graphics card driver problems, PS version or plug-in conflicts. The solutions are: check file size and integrity, increase memory, upgrade hard disk, update graphics card driver, uninstall or disable suspicious plug-ins, and reinstall PS. This problem can be effectively solved by gradually checking and making good use of PS performance settings and developing good file management habits.
 How to use PS Pen Tool
Apr 06, 2025 pm 10:15 PM
The Pen Tool is a tool that creates precise paths and shapes, and is used by: Select the Pen Tool (P). Sets Path, Fill, Stroke, and Shape options. Click Create anchor point, drag the curve to release the Create anchor point. Press Ctrl/Cmd Alt/Opt to delete the anchor point, drag and move the anchor point, and click Adjust curve. Click the first anchor to close the path to create a shape, and double-click the last anchor to create an open path.
 How does PS feathering control the softness of the transition?
Apr 06, 2025 pm 07:33 PM
The key to feather control is to understand its gradual nature. PS itself does not provide the option to directly control the gradient curve, but you can flexibly adjust the radius and gradient softness by multiple feathering, matching masks, and fine selections to achieve a natural transition effect.


