 Web Front-end
 PS Tutorial
 Photoshop and WPF work together to create a cool and personalized progress bar control
Photoshop and WPF work together to create a cool and personalized progress bar control
Now if you want to build a professional App, UI design and ease of operation are very important. UI design can use design tools such as Photoshop or AI. I previously learned that the WPF design tool Expression Blend can directly import PSD files or AI design files (of course not all features are supported). I recently researched it and spent a lot of trouble. Fortunately, Finally, the desired effect was achieved. The following is a step by step example to illustrate how to first use PS to build a vector graphic template, then use Expression Blend to import the PSD file, and obtain the Data value of PATH to build a beautiful UI for creating a cool personalized progress bar control.
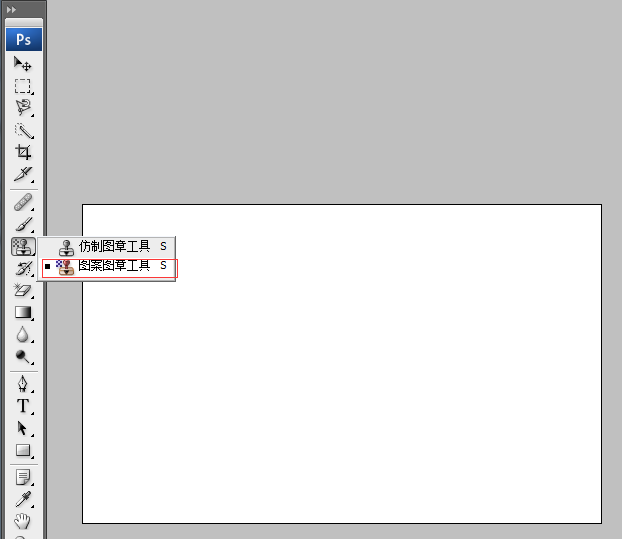
1. Open Photoshop, create a new blank layer, and click on the PS pattern stamp tool:
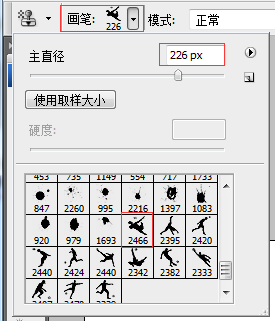
##2. Select the brush you like (you can download free brushes from the website), as shown below:
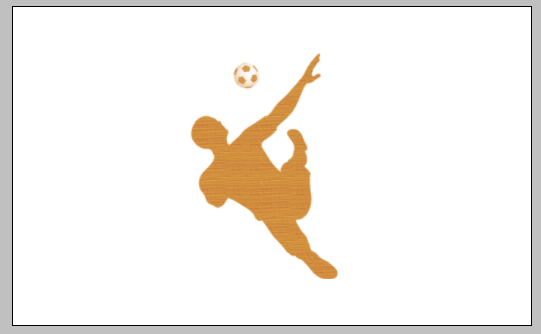
After clicking on the appropriate location, as shown in the figure below.
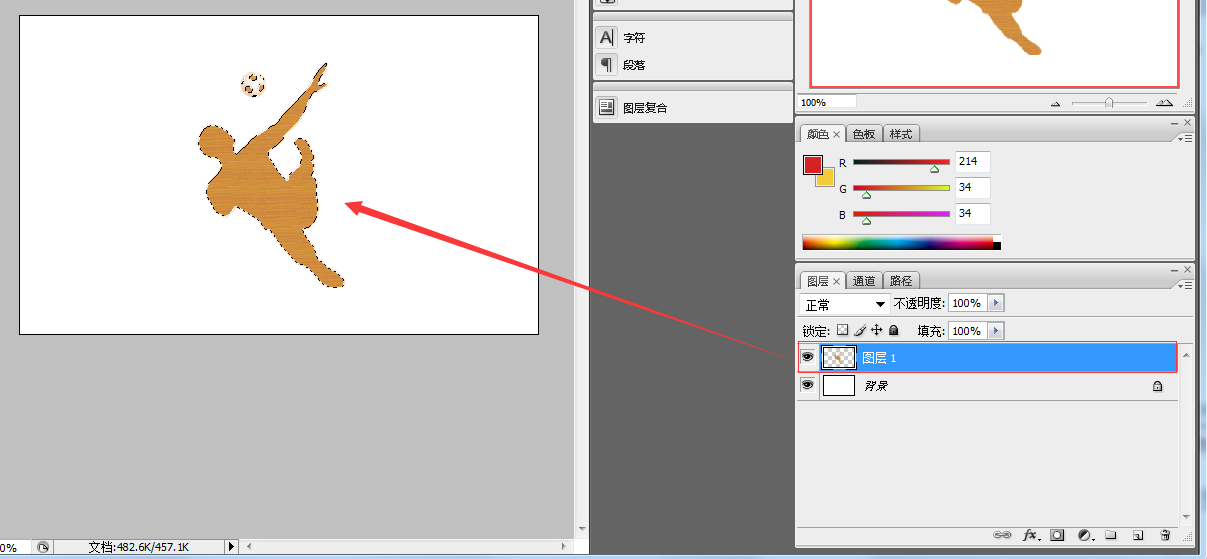
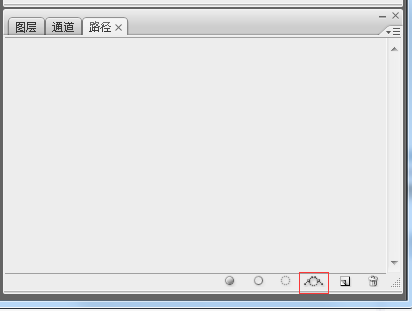
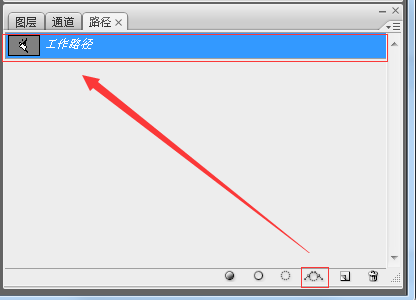
3. Hold down CTRL, select the layer, switch to the Path panel, and click [Create working path from selection] button, as shown below:
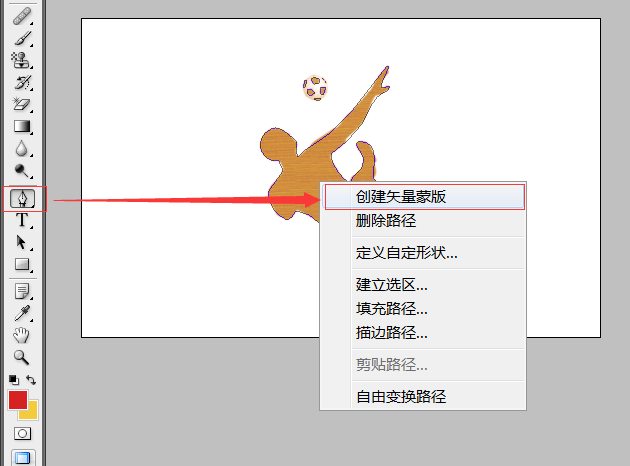
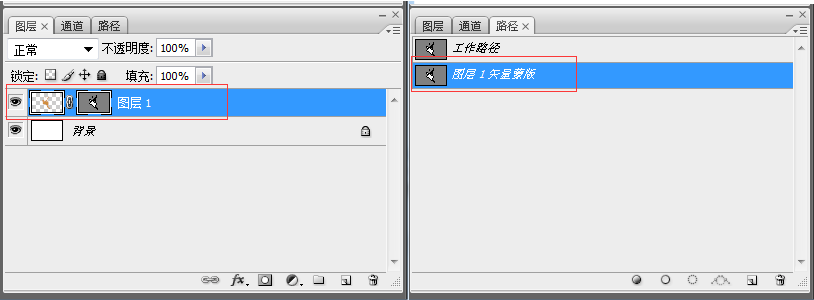
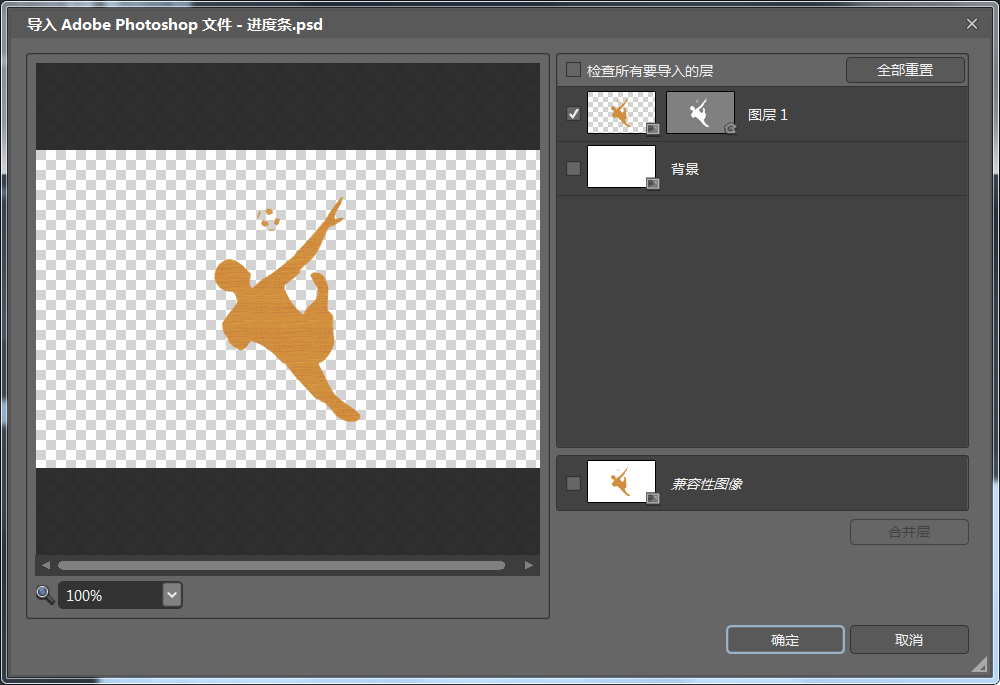
5. Open Expression Blend 4 to create a new WPF project, and then import the PSD file, as shown below:
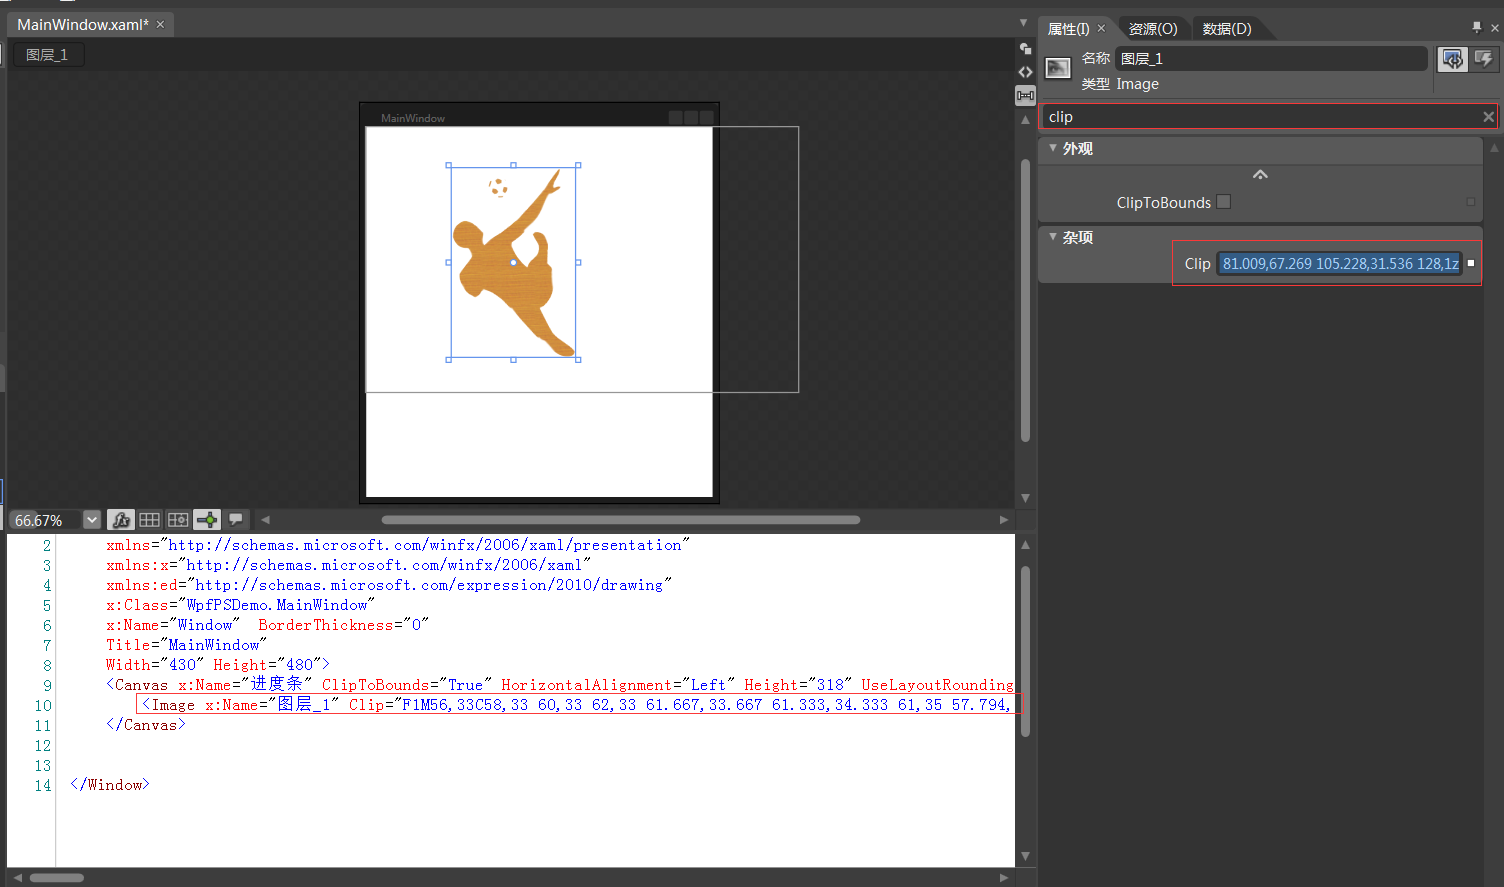
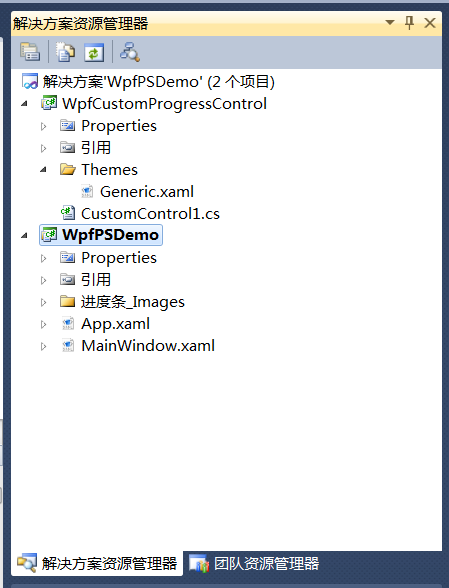
##After the import is successful, you can copy the clip data of the graphic, this is Data value required by PATH in WPF. Let’s create a cool WPF progress bar control. 6. Re-open the project in VS2010 and add a WPF custom control library, as shown below: 17 Write the control UI and background code as follows: 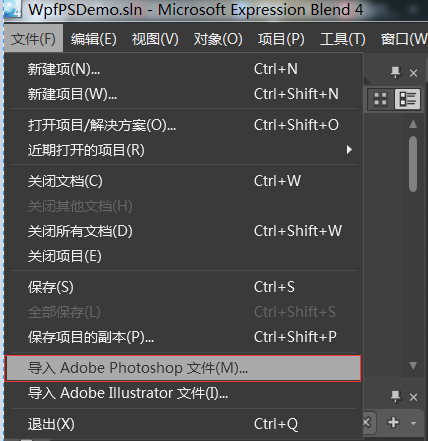
<resourcedictionary>

    <style>
        <Setter Property="Template">
            <Setter.Value>
                <ControlTemplate TargetType="{x:Type local:CustomProgressControl}">
                    <Grid x:Name="PART_container"
                          Background="{TemplateBinding Background}"
                          Width="{TemplateBinding Width}"
                          Height="{TemplateBinding Height}">
                        <Path x:Name="PART_foreground_P"
                              Visibility="Collapsed"
                              Stretch="Fill"
                              Stroke="Transparent"
                              Fill="{TemplateBinding Foreground}"
                              StrokeThickness="2"
                              Data="F1M56,33C58,33 60,33 62,33 61.667,33.667 61.333,34.333 61,35 57.794,34.859 53.856,36.079 56,33z M49,24C54.364,24.735 53.554,24.821 56,28 53.807,30.696 55.287,29.902 51,31 50,30 49,29 48,28 48.333,26.667 48.667,25.333 49,24z M62,22C63.666,22.333 65.333,22.667 67,23 66.333,27.571 65.935,27.376 64,30 63,29.333 62,28.667 61,28 61,27.667 61,27.333 61,27 61.333,25.333 61.667,23.666 62,22z M46,15C46.667,15 47.333,15 48,15 47.333,17.333 46.667,19.667 46,22 45.333,22 44.667,22 44,22 44.667,19.667 45.333,17.333 46,15z M63,13C64.923,14.392 63.599,13.101 65,15 64.333,14.333 63.667,13.667 63,13z M55,12C56.666,12.667 58.333,13.333 60,14 60,15.333 60,16.667 60,18 59.333,18 58.667,18 58,18 54.722,21.928 52.838,16.561 52,14 53,13.333 54,12.667 55,12z M128,1C128.667,1 129.333,1 130,1 128.882,10.058 122.793,12.326 122,23 126.364,22.028 126.876,21.206 131,22 130,23.333 129,24.667 128,26 110.659,32.752 112.704,45.252 103,59 95.769,69.245 82.761,82.131 72,89 72.621,101.092 82.373,112.463 90,118 90.333,118 90.667,118 91,118 93.274,107.421 107.464,106.386 104,92 101.667,87.667 99.333,83.333 97,79 98,78 99,77 100,76 122.812,77.152 112.786,100.488 115,114 116.666,115.666 118.333,117.333 120,119 127.359,142.373 118.776,160.626 106,168 110.337,176.877 114.918,188.188 121,197 127.441,206.332 140.794,210.508 148,220 146.506,223.067 146.885,223.215 144,225 113.08,236.802 62.376,138.34 36,147 34.077,151.751 32.347,152.761 28,155 17.556,150.255 9.333,141.565 9,127 13.999,120.001 19,112.999 24,106 22.667,102.667 21.333,99.333 20,96 7.555,96.019 4.392,90.889 1,82 1.465,74.486 3.768,68.82 9,66 19.848,56.341 31.922,71.946 38,77 37.406,83.299 36.792,87.413 39,92 41.333,89.667 43.667,87.333 46,85 81.009,67.269 105.228,31.536 128,1z" />

                        <Rectangle x:Name="PART_mask"
                                   Fill="{TemplateBinding Background}"
                                   VerticalAlignment="Stretch"
                                   HorizontalAlignment="Stretch" />

                        <Path x:Name="PART_outline_P"
                              Visibility="Collapsed"
                              Stretch="Fill"
                              Stroke="{TemplateBinding BorderBrush}"
                              Fill="Transparent"
                              StrokeThickness="2"
                              Data="F1M56,33C58,33 60,33 62,33 61.667,33.667 61.333,34.333 61,35 57.794,34.859 53.856,36.079 56,33z M49,24C54.364,24.735 53.554,24.821 56,28 53.807,30.696 55.287,29.902 51,31 50,30 49,29 48,28 48.333,26.667 48.667,25.333 49,24z M62,22C63.666,22.333 65.333,22.667 67,23 66.333,27.571 65.935,27.376 64,30 63,29.333 62,28.667 61,28 61,27.667 61,27.333 61,27 61.333,25.333 61.667,23.666 62,22z M46,15C46.667,15 47.333,15 48,15 47.333,17.333 46.667,19.667 46,22 45.333,22 44.667,22 44,22 44.667,19.667 45.333,17.333 46,15z M63,13C64.923,14.392 63.599,13.101 65,15 64.333,14.333 63.667,13.667 63,13z M55,12C56.666,12.667 58.333,13.333 60,14 60,15.333 60,16.667 60,18 59.333,18 58.667,18 58,18 54.722,21.928 52.838,16.561 52,14 53,13.333 54,12.667 55,12z M128,1C128.667,1 129.333,1 130,1 128.882,10.058 122.793,12.326 122,23 126.364,22.028 126.876,21.206 131,22 130,23.333 129,24.667 128,26 110.659,32.752 112.704,45.252 103,59 95.769,69.245 82.761,82.131 72,89 72.621,101.092 82.373,112.463 90,118 90.333,118 90.667,118 91,118 93.274,107.421 107.464,106.386 104,92 101.667,87.667 99.333,83.333 97,79 98,78 99,77 100,76 122.812,77.152 112.786,100.488 115,114 116.666,115.666 118.333,117.333 120,119 127.359,142.373 118.776,160.626 106,168 110.337,176.877 114.918,188.188 121,197 127.441,206.332 140.794,210.508 148,220 146.506,223.067 146.885,223.215 144,225 113.08,236.802 62.376,138.34 36,147 34.077,151.751 32.347,152.761 28,155 17.556,150.255 9.333,141.565 9,127 13.999,120.001 19,112.999 24,106 22.667,102.667 21.333,99.333 20,96 7.555,96.019 4.392,90.889 1,82 1.465,74.486 3.768,68.82 9,66 19.848,56.341 31.922,71.946 38,77 37.406,83.299 36.792,87.413 39,92 41.333,89.667 43.667,87.333 46,85 81.009,67.269 105.228,31.536 128,1z" />

                        <TextBlock x:Name="PART_percentage_text"
                                   VerticalAlignment="Center"
                                   HorizontalAlignment="Center"
                                   FontSize="16"
                                   FontWeight="ExtraBlack"
                                   Foreground="{TemplateBinding TextForeground}"/>


    </style>

</resourcedictionary>
18 Drag the control into the main interface of WpfPSDemo and customize the properties. The code is as follows:
using System;
using System.Collections.Generic;
using System.Linq;
using System.Text;
using System.Windows;
using System.Windows.Controls;
using System.Windows.Data;
using System.Windows.Documents;
using System.Windows.Input;
using System.Windows.Media;
using System.Windows.Media.Imaging;
using System.Windows.Navigation;
using System.Windows.Shapes;

namespace WpfCustomProgressControl
{

    [TemplatePart(Name = "PART_mask", Type = typeof(Rectangle))]
    [TemplatePart(Name = "PART_container", Type = typeof(Grid))]
    [TemplatePart(Name = "PART_percentage_text", Type = typeof(TextBlock))]
    [TemplatePart(Name = "PART_foreground_P", Type = typeof(Path))]
    [TemplatePart(Name = "PART_outline_P", Type = typeof(Path))]

    public class CustomProgressControl : ProgressBar
    {
        static CustomProgressControl()
        {
            DefaultStyleKeyProperty.OverrideMetadata(typeof(CustomProgressControl), new FrameworkPropertyMetadata(typeof(CustomProgressControl)));

        }

        Rectangle mask;
        Grid container;
        TextBlock percentageText;
        Path foreground_P;
        Path outline_P;

        #region TextForeground 文本
        public SolidColorBrush TextForeground
        {
            get { return (SolidColorBrush)GetValue(TextForegroundProperty); }
            set { SetValue(TextForegroundProperty, value); }
        }

        public static readonly DependencyProperty TextForegroundProperty =
            DependencyProperty.Register("TextForeground", typeof(SolidColorBrush),
                                typeof(CustomProgressControl),
                                new FrameworkPropertyMetadata(new SolidColorBrush(Colors.DarkGray)));
        #endregion

        public override void OnApplyTemplate()
        {
            base.OnApplyTemplate();


            foreground_P = this.Template.FindName("PART_foreground_P", this) as Path;
            outline_P = this.Template.FindName("PART_outline_P", this) as Path;
            mask = this.Template.FindName("PART_mask", this) as Rectangle;
            container = this.Template.FindName("PART_container", this) as Grid;
            percentageText = this.Template.FindName("PART_percentage_text", this) as TextBlock;
            if (foreground_P != null)
            {
                foreground_P.Visibility = Visibility.Visible;
                outline_P.Visibility = Visibility.Visible;
            }
            Width = double.IsNaN(Width) ? 50 : Width;
            Height = double.IsNaN(Height) ? 135 : Height;

            Minimum = double.IsNaN(Minimum) ? 0 : Minimum;
            Maximum = double.IsNaN(Maximum) ? 100 : Maximum;

            if (mask != null)
            {
                var percentageValue = Value / Maximum;
                var awayMargin = percentageValue * Height;
                var percentageString = string.Empty;

                if (percentageValue > 0)
                    percentageString = (percentageValue * 100).ToString("##");
                else if (percentageValue == 0)
                    percentageString = "0";

                percentageText.Text = string.Format("{0}%", string.IsNullOrEmpty(percentageString) ? "0" : percentageString);

                mask.Margin = new Thickness(0, 0, 0, awayMargin);
            }

            container.Clip = new RectangleGeometry
            {
                Rect = new Rect(0, 0, Width, Height)
            };

            mask.Width = Width;
            mask.Height = Height;
        }

        protected override void OnValueChanged(double oldValue, double newValue)
        {
            base.OnValueChanged(oldValue, newValue);

            if (Value < Minimum)
            {
                Value = Minimum;
            }

            if (Value > Maximum)
            {
                Value = Maximum;
            }

            if (mask != null)
            {
                var percentageValue = Value / Maximum;
                var awayMargin = percentageValue * Height;
                var percentageString = string.Empty;

                if (percentageValue > 0)
                    percentageString = (percentageValue * 100).ToString("##");
                else if (percentageValue == 0)
                    percentageString = "0";

                percentageText.Text = string.Format("{0}%", string.IsNullOrEmpty(percentageString) ? "0" : percentageString);
                //蒙板来变更进度
                mask.Margin = new Thickness(0, 0, 0, awayMargin);

            }
        }
    }
} <Window
xmlns="http://schemas.microsoft.com/winfx/2006/xaml/presentation"
xmlns:x="http://schemas.microsoft.com/winfx/2006/xaml"
xmlns:ed="http://schemas.microsoft.com/expression/2010/drawing"
x:Class="WpfPSDemo.MainWindow"
x:Name="Window" BorderThickness="0"
Title="MainWindow"
Width="430" Height="480" xmlns:my="clr-namespace:WpfCustomProgressControl;assembly=WpfCustomProgressControl">
<my:CustomProgressControl Name="customProgressControl1" Width="200" Height="200" Value="50" Background="Yellow" Foreground="Red" BorderBrush="red" />
</Window>
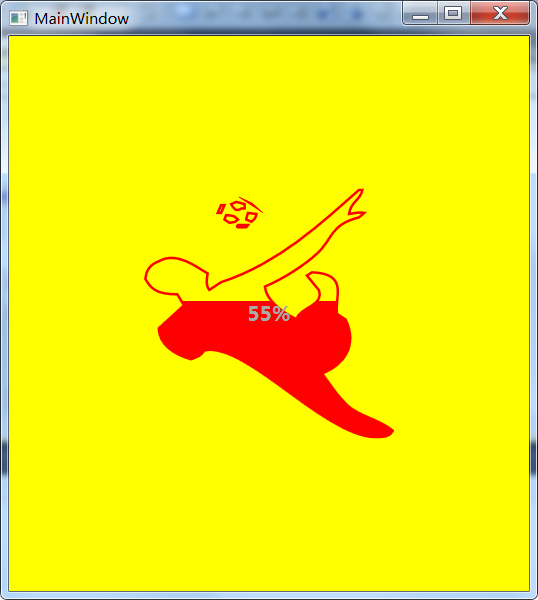
############################################################## net! ######### ######

Hot AI Tools

Undresser.AI Undress
AI-powered app for creating realistic nude photos

AI Clothes Remover
Online AI tool for removing clothes from photos.

Undress AI Tool
Undress images for free

Clothoff.io
AI clothes remover

AI Hentai Generator
Generate AI Hentai for free.

Hot Article

Hot Tools

Notepad++7.3.1
Easy-to-use and free code editor

SublimeText3 Chinese version
Chinese version, very easy to use

Zend Studio 13.0.1
Powerful PHP integrated development environment

Dreamweaver CS6
Visual web development tools

SublimeText3 Mac version
God-level code editing software (SublimeText3)

Hot Topics
 How do I use Photoshop for creating social media graphics?
Mar 18, 2025 pm 01:41 PM
The article details using Photoshop for social media graphics, covering setup, design tools, and optimization techniques. It emphasizes efficiency and quality in graphic creation.
 How do I prepare images for web use in Photoshop (file size, resolution, color space)?
Mar 13, 2025 pm 07:28 PM
Article discusses preparing images for web use in Photoshop, focusing on optimizing file size, resolution, and color space. Main issue is balancing image quality with quick loading times.
 How do I calibrate my monitor for accurate color in Photoshop?
Mar 13, 2025 pm 07:31 PM
Article discusses calibrating monitors for accurate color in Photoshop, tools for calibration, effects of improper calibration, and recalibration frequency. Main issue is ensuring color accuracy.
 How do I use Photoshop's Content-Aware Fill and Content-Aware Move tools effectively?
Mar 13, 2025 pm 07:35 PM
Article discusses using Photoshop's Content-Aware Fill and Move tools effectively, offering tips on selecting source areas, avoiding mistakes, and adjusting settings for optimal results.
 How do I use Photoshop's video editing capabilities?
Mar 18, 2025 pm 01:37 PM
The article explains how to use Photoshop for video editing, detailing steps to import, edit, and export videos, and highlighting key features like the Timeline panel, video layers, and effects.
 How do I create animated GIFs in Photoshop?
Mar 18, 2025 pm 01:38 PM
Article discusses creating and optimizing animated GIFs in Photoshop, including adding frames to existing GIFs. Main focus is on balancing quality and file size.
 How do I prepare images for web using Photoshop (optimize file size, resolution)?
Mar 18, 2025 pm 01:35 PM
Article discusses optimizing images for web using Photoshop, focusing on file size and resolution. Main issue is balancing quality and load times.
 How can I master advanced selection techniques in Photoshop (e.g., Select and Mask)?
Mar 12, 2025 pm 02:07 PM
This article details advanced Photoshop selection techniques. It emphasizes mastering the Select and Mask workspace, strategic tool use (Quick Selection, Object Selection, Lasso tools, Brush), Refine Edge settings, and efficient workflows including


