[HTML element] How to embed images
The
img element allows us to embed images in HTML documents.
To embed an image, you need to use the src and alt attributes. The code is as follows:
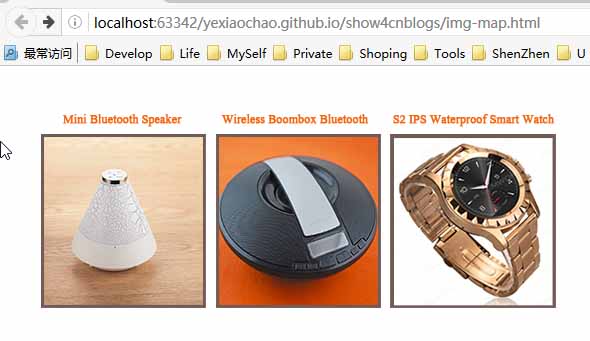
<img src="../img/example/img-map.jpg" alt="Products Image" width="580" height="266" />
Display effect:

1 Embedding images in hyperlinks
#A common use of the img element is to create it in conjunction with the a element An image-based hyperlink, the code is as follows:
XML/HTML CodeCopy content to clipboard
<a href="otherpage.html">
    <img src="../img/example/img-map.jpg" ismap alt="Products Image" width="580" height="266" />
</a>There is no difference in the way the browser displays this image. Therefore, it is important to provide visual cues to users that a particular image represents a hyperlink. The specific method can be to use CSS, and it is better to express it in the image content.
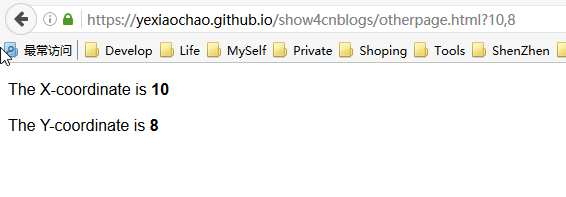
If you click on this kind of picture, the browser will navigate to the URL specified by the href attribute of the parent element a. Applying the ismap attribute to the img element creates a server-side partial response graph, meaning that the click location on the image is appended to the URL. For example, if the click is 8 pixels from the top of the image and 10 pixels from the left edge, the browser will navigate to the following address:
XML/ HTML CodeCopy content to clipboard
https://yexiaochao.github.io/show4cnblogs/otherpage.html? 10,8
The following code shows the content in otherpage.html, which contains a simple script to display the coordinates of the clicked location:
XML/HTML CodeCopy the content to the clipboard
<body>
<p>The X-coordinate is <b><span id="xco">??</span></b></p>
<p>The Y-coordinate is <b><span id="yco">??</span></b></p>
<script type="application/javascript">
var coords = window.location.href.split('?')[1].split(',');
document.getElementById("xco").innerHTML = coords[0];
document.getElementById("yco").innerHTML = coords[1];
</script>
</body>You can see it The effect of mouse click:

Server-side partition response graph usually means that the server will respond differently according to the different areas the user clicks on the image, such as returning different response information. If the ismap attribute on the img element is omitted, the coordinates of the mouse click will not be included in the request URL.
2 Create a client partition response graph
We can create a client partition response graph by clicking on different areas on an image Let the browser navigate to a different URL. This process does not need to be bootstrapped through a server, so elements are used to define the various areas on the image and the behavior they represent. The key element of the client-side partition response graph is map. The map element contains one or more area elements, each of which represents a clickable area on the image.
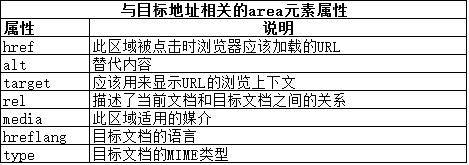
The attributes of the area element can be divided into two categories. The first category deals with the URL that the browser will navigate to after the image area represented by the area is clicked by the user. The diagram below illustrates this class of properties, which are similar to corresponding properties seen on other elements.

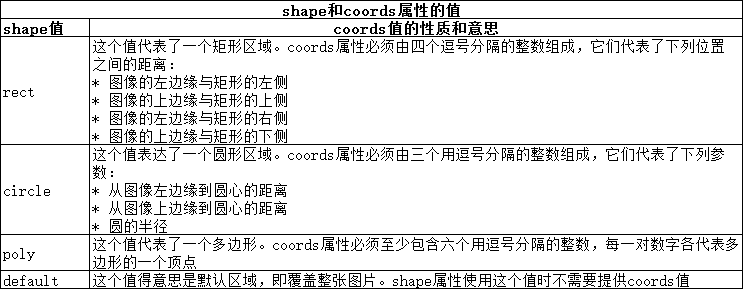
The second category contains more interesting attributes: shape and coords attributes. You can use these attributes to indicate various areas of the image that the user can click on. The shape and coords properties work together. The meaning of the coords attribute depends on the value of the shape attribute, as shown in the figure below:

After introducing these elements, for example, the code is as follows:
XML/HTML CodeCopy the content to the clipboard
<body>
<img src="../img/example/img-map.jpg" ismap alt="Products Image" usemap="#mymap" width="580" height="266" />
<map name="mymap">
<area href="javascript:show_page(1)" shape="rect" coords="'34,60,196,230" alt="product 1" />
<area href="javascript:show_page(2)" shape="rect" coords="'210,60,370,230" alt="product 2" />
<area href="javascript:show_page(3)" shape="rect" coords="'383,60,545,230" alt="product 3" />
</map>
<script type="application/javascript">
function show_page(num){
//通过对话框显示产品,表示对应的跳转页面
alert("This is product "+num);
}
</script>
</body>The display effect is the same, just click the corresponding For product pictures, the corresponding product name will pop up, indicating the jumped product page.
The above [HTML element] implementation method of embedding images is all the content shared by the editor. I hope it can give you a reference, and I also hope that everyone will support the PHP Chinese website.
For more [HTML element] implementation methods of embedded images, please pay attention to the PHP Chinese website for related articles!

Hot AI Tools

Undresser.AI Undress
AI-powered app for creating realistic nude photos

AI Clothes Remover
Online AI tool for removing clothes from photos.

Undress AI Tool
Undress images for free

Clothoff.io
AI clothes remover

Video Face Swap
Swap faces in any video effortlessly with our completely free AI face swap tool!

Hot Article

Hot Tools

Notepad++7.3.1
Easy-to-use and free code editor

SublimeText3 Chinese version
Chinese version, very easy to use

Zend Studio 13.0.1
Powerful PHP integrated development environment

Dreamweaver CS6
Visual web development tools

SublimeText3 Mac version
God-level code editing software (SublimeText3)

Hot Topics
 1390
1390
 52
52
 Building an Ethereum app using Redwood.js and Fauna
Mar 28, 2025 am 09:18 AM
With the recent climb of Bitcoin’s price over 20k $USD, and to it recently breaking 30k, I thought it’s worth taking a deep dive back into creating Ethereum
 Vue 3
Apr 02, 2025 pm 06:32 PM
It's out! Congrats to the Vue team for getting it done, I know it was a massive effort and a long time coming. All new docs, as well.
 Can you get valid CSS property values from the browser?
Apr 02, 2025 pm 06:17 PM
I had someone write in with this very legit question. Lea just blogged about how you can get valid CSS properties themselves from the browser. That's like this.
 A bit on ci/cd
Apr 02, 2025 pm 06:21 PM
I'd say "website" fits better than "mobile app" but I like this framing from Max Lynch:
 Stacked Cards with Sticky Positioning and a Dash of Sass
Apr 03, 2025 am 10:30 AM
The other day, I spotted this particularly lovely bit from Corey Ginnivan’s website where a collection of cards stack on top of one another as you scroll.
 Using Markdown and Localization in the WordPress Block Editor
Apr 02, 2025 am 04:27 AM
If we need to show documentation to the user directly in the WordPress editor, what is the best way to do it?
 Comparing Browsers for Responsive Design
Apr 02, 2025 pm 06:25 PM
There are a number of these desktop apps where the goal is showing your site at different dimensions all at the same time. So you can, for example, be writing
 Why are the purple slashed areas in the Flex layout mistakenly considered 'overflow space'?
Apr 05, 2025 pm 05:51 PM
Questions about purple slash areas in Flex layouts When using Flex layouts, you may encounter some confusing phenomena, such as in the developer tools (d...


