
 Web Front-end
PS Tutorial
The third part of the series on the skillful use of photoshop for front-end engineer skills - cutting pictures
Web Front-end
PS Tutorial
The third part of the series on the skillful use of photoshop for front-end engineer skills - cutting pictures
The third part of the series on the skillful use of photoshop for front-end engineer skills - cutting pictures

Previous words
In addition to using photoshop for measurements, front-end engineers must also use this software for cutting. This article is the third article in the series of clever uses of photoshop - picture cutting
Picture cutting information
Which pictures need to be cut out in web page production? ? Mainly divided into two categories, one is decorative pictures, the other is content pictures
[1] Modified pictures
Modified pictures mainly modify the content of the web page, generally It is made as a sprite image, used in the background attribute, and is usually saved in png24 (IE6 does not support translucency) and png8 formats. Decorative pictures mainly include the following categories:
1. Icons, logos
2. Buttons, text, etc. with special effects (if the fonts designed by the designer are not very common, put the text When the picture is cut out)
3. Non-solid color background
【2】Contentual picture
A picture is worth a thousand words, and the "picture" here refers to the content Sexual images mainly provide content for web pages and are generally used in the tag. Content pictures are rich in color, generally saved in JPG format, and require certain compression. Content pictures mainly include the following categories:
1. Banner, advertising pictures
2. Pictures in articles
[Note] Some content pictures are server data , no need to cut the image, just use placeholder
Steps to cut the image
【1】Hide the text and leave only the background
If there are special effects on the text that cannot be written in code, then cut out the text and background together
1. If the text is an independent layer, hide the text image
First find the text layer, and then remove the eye icon
 |
 |
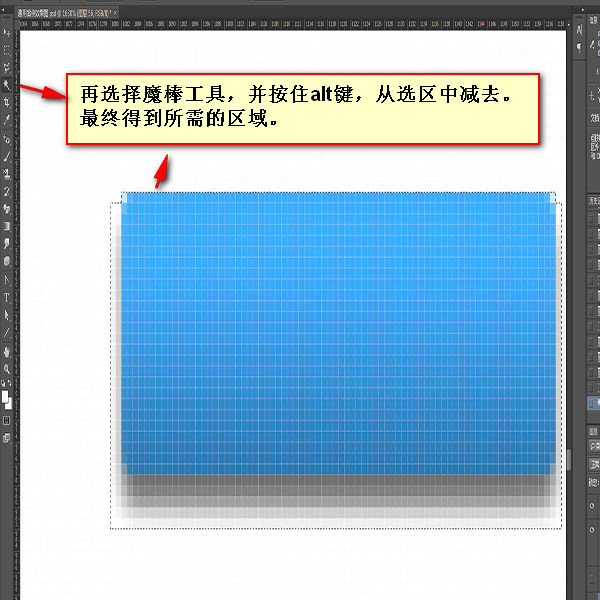
## 2. If the text and background are merged, the tiled background covers the text
a. If the background can be stretched, use the rectangular marquee tool Draw a small rectangular frame on the background, use the Free Transform Tool (ctrl+t) to stretch the background to cover the text, then double-click or press the Enter key |
 |
 |
||||||||
 |
 |
 |
 |
 |
 |
 |
 |
 |
#【2】
Move the tool to select the required layer (ctrl+click the rectangular area of the layer), and an ant line will appear
Merge layers (ctrl+e) (optional)
Check automatic selection, and then merge the multiple layers you need 【4】Copy layer (ctrl+c) ->Create new file (ctrl+n), and press OK->Paste layer (ctrl+v)
 |
 |
 |
 |
 |
 |
 |
 |
 # #
【Cut irregular small icons】 The cutting method is similar to that of png8 [Note] When selecting small hollow icons, be sure to cancel [Continuous] ]
|


Hot AI Tools

Undresser.AI Undress
AI-powered app for creating realistic nude photos

AI Clothes Remover
Online AI tool for removing clothes from photos.

Undress AI Tool
Undress images for free

Clothoff.io
AI clothes remover

AI Hentai Generator
Generate AI Hentai for free.

Hot Article
Hot Tools

Notepad++7.3.1
Easy-to-use and free code editor

SublimeText3 Chinese version
Chinese version, very easy to use

Zend Studio 13.0.1
Powerful PHP integrated development environment

Dreamweaver CS6
Visual web development tools

SublimeText3 Mac version
God-level code editing software (SublimeText3)
Hot Topics
 1378
1378
 52
52

 How do I use Photoshop for creating social media graphics?
Mar 18, 2025 pm 01:41 PM
How do I use Photoshop for creating social media graphics?
Mar 18, 2025 pm 01:41 PM
The article details using Photoshop for social media graphics, covering setup, design tools, and optimization techniques. It emphasizes efficiency and quality in graphic creation.
 What is the reason why PS keeps showing loading?
Apr 06, 2025 pm 06:39 PM
What is the reason why PS keeps showing loading?
Apr 06, 2025 pm 06:39 PM
PS "Loading" problems are caused by resource access or processing problems: hard disk reading speed is slow or bad: Use CrystalDiskInfo to check the hard disk health and replace the problematic hard disk. Insufficient memory: Upgrade memory to meet PS's needs for high-resolution images and complex layer processing. Graphics card drivers are outdated or corrupted: Update the drivers to optimize communication between the PS and the graphics card. File paths are too long or file names have special characters: use short paths and avoid special characters. PS's own problem: Reinstall or repair the PS installer.
 How do I prepare images for web using Photoshop (optimize file size, resolution)?
Mar 18, 2025 pm 01:35 PM
How do I prepare images for web using Photoshop (optimize file size, resolution)?
Mar 18, 2025 pm 01:35 PM
Article discusses optimizing images for web using Photoshop, focusing on file size and resolution. Main issue is balancing quality and load times.
 How do I prepare images for print using Photoshop (resolution, color profiles)?
Mar 18, 2025 pm 01:36 PM
How do I prepare images for print using Photoshop (resolution, color profiles)?
Mar 18, 2025 pm 01:36 PM
The article guides on preparing images for print in Photoshop, focusing on resolution, color profiles, and sharpness. It argues that 300 PPI and CMYK profiles are essential for quality prints.
 What are the common questions about exporting PDF on PS
Apr 06, 2025 pm 04:51 PM
What are the common questions about exporting PDF on PS
Apr 06, 2025 pm 04:51 PM
Frequently Asked Questions and Solutions when Exporting PS as PDF: Font Embedding Problems: Check the "Font" option, select "Embed" or convert the font into a curve (path). Color deviation problem: convert the file into CMYK mode and adjust the color; directly exporting it with RGB requires psychological preparation for preview and color deviation. Resolution and file size issues: Choose resolution according to actual conditions, or use the compression option to optimize file size. Special effects issue: Merge (flatten) layers before exporting, or weigh the pros and cons.
 How do I use Photoshop's video editing capabilities?
Mar 18, 2025 pm 01:37 PM
How do I use Photoshop's video editing capabilities?
Mar 18, 2025 pm 01:37 PM
The article explains how to use Photoshop for video editing, detailing steps to import, edit, and export videos, and highlighting key features like the Timeline panel, video layers, and effects.
 How do I create animated GIFs in Photoshop?
Mar 18, 2025 pm 01:38 PM
How do I create animated GIFs in Photoshop?
Mar 18, 2025 pm 01:38 PM
Article discusses creating and optimizing animated GIFs in Photoshop, including adding frames to existing GIFs. Main focus is on balancing quality and file size.
 How to set password protection for export PDF on PS
Apr 06, 2025 pm 04:45 PM
How to set password protection for export PDF on PS
Apr 06, 2025 pm 04:45 PM
Export password-protected PDF in Photoshop: Open the image file. Click "File"> "Export"> "Export as PDF". Set the "Security" option and enter the same password twice. Click "Export" to generate a PDF file.
