Photoshop series - cropping pictures
Crop Photos
After you use Adobe Bridge to classify the photos, the first thing you will probably do is crop the photos. There are many different ways to crop photos in Photoshop CS2. We'll start with the basic common options, and then we'll learn some faster and more convenient methods.
Step 1
Press the C key on the keyboard to select the Crop Tool (of course) You can often select it directly from the ToolBox, but this is only recommended if you like to spend a lot of time)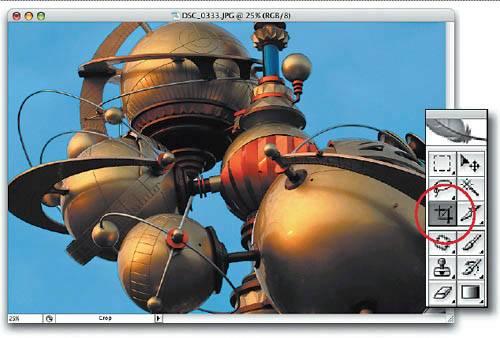
Step 2
Click on your photo and select the area that needs to be cropped. The area that will be cropped appears dark (shaded). You don't have to worry about selecting the area you want to crop the first time, because you can modify the edges by clicking and dragging the points that appear in the middle of each corner and each edge. 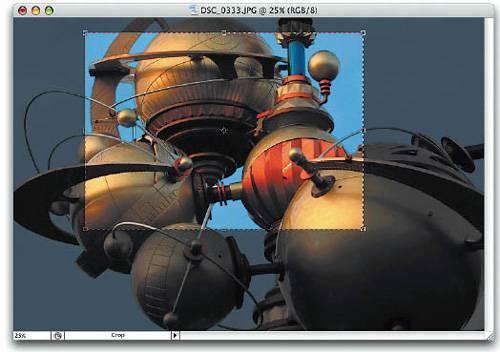
Tips
If you don’t see a shadow in the area that needs to be cropped, (Operation in the previous step), you can switch this shadow display effect off/on through the backslash key (\) on the keyboard. When you click the backslash key (\), the edges of the area will still be displayed, but the shadow effect will be turned off.
Step 3
When you see the edge of the cropping area, you can move the mouse to this edge a little outside of it (you'll see the mouse arrow change into two arrows). Just click and drag the edge of the area and it will rotate in the direction of your choice (this is a great way to save time if your photo is crooked, since you can crop and rotate the photo at the same time). 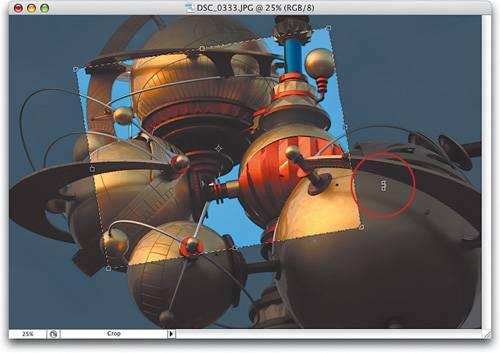
##Step 4
After you get what you want When you want to crop the edges, press Enter to crop your image.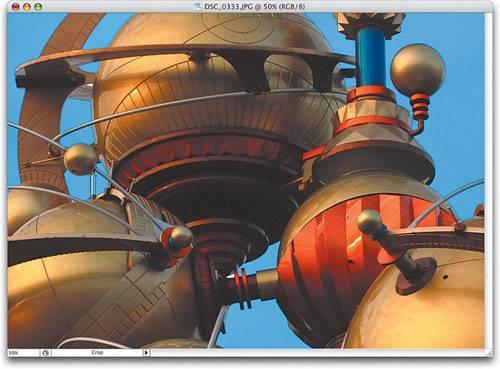
If you select a cropping area and then decide not to If you need to crop, you can press the Escape key on the keyboard or select "No" on the Options Bar. Or just click on another tool in the toolbox and you'll see a dialog box asking if you want to crop the image. Click the “Don’t Crop” button to cancel cropping.
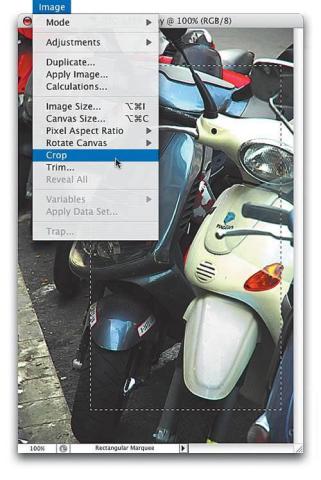
## 's skills# Another method that often uses a rectangular box tool (Rectangular Marquee Tool, M ) Select an area on the photo that you want to keep. With your selection area active, go to the Image menu and select Crop. The portion outside your selection area will be cropped immediately. Press Control+D to deselect.
 For more Photoshop series - cropping pictures, please pay attention to the PHP Chinese website for related articles!

Hot AI Tools

Undresser.AI Undress
AI-powered app for creating realistic nude photos

AI Clothes Remover
Online AI tool for removing clothes from photos.

Undress AI Tool
Undress images for free

Clothoff.io
AI clothes remover

AI Hentai Generator
Generate AI Hentai for free.

Hot Article

Hot Tools

Notepad++7.3.1
Easy-to-use and free code editor

SublimeText3 Chinese version
Chinese version, very easy to use

Zend Studio 13.0.1
Powerful PHP integrated development environment

Dreamweaver CS6
Visual web development tools

SublimeText3 Mac version
God-level code editing software (SublimeText3)

Hot Topics
 How do I use Photoshop for creating social media graphics?
Mar 18, 2025 pm 01:41 PM
The article details using Photoshop for social media graphics, covering setup, design tools, and optimization techniques. It emphasizes efficiency and quality in graphic creation.
 How do I prepare images for web use in Photoshop (file size, resolution, color space)?
Mar 13, 2025 pm 07:28 PM
Article discusses preparing images for web use in Photoshop, focusing on optimizing file size, resolution, and color space. Main issue is balancing image quality with quick loading times.
 How do I use Photoshop's Content-Aware Fill and Content-Aware Move tools effectively?
Mar 13, 2025 pm 07:35 PM
Article discusses using Photoshop's Content-Aware Fill and Move tools effectively, offering tips on selecting source areas, avoiding mistakes, and adjusting settings for optimal results.
 How do I prepare images for web using Photoshop (optimize file size, resolution)?
Mar 18, 2025 pm 01:35 PM
Article discusses optimizing images for web using Photoshop, focusing on file size and resolution. Main issue is balancing quality and load times.
 How do I use Photoshop's video editing capabilities?
Mar 18, 2025 pm 01:37 PM
The article explains how to use Photoshop for video editing, detailing steps to import, edit, and export videos, and highlighting key features like the Timeline panel, video layers, and effects.
 How do I calibrate my monitor for accurate color in Photoshop?
Mar 13, 2025 pm 07:31 PM
Article discusses calibrating monitors for accurate color in Photoshop, tools for calibration, effects of improper calibration, and recalibration frequency. Main issue is ensuring color accuracy.
 How do I create animated GIFs in Photoshop?
Mar 18, 2025 pm 01:38 PM
Article discusses creating and optimizing animated GIFs in Photoshop, including adding frames to existing GIFs. Main focus is on balancing quality and file size.
 How do I prepare images for print using Photoshop (resolution, color profiles)?
Mar 18, 2025 pm 01:36 PM
The article guides on preparing images for print in Photoshop, focusing on resolution, color profiles, and sharpness. It argues that 300 PPI and CMYK profiles are essential for quality prints.


