Photoshop plugin for reading and writing ICO icon files
This is a file format plug-in I wrote for Photoshop, IcoFormat, which is used to read and write Windows icon files (extensions ICO, CUR). The PS plug-in for the icon file format was written by a foreigner many years ago, but the plug-in I provide now has better functions, and there are enough reasons to replace the plug-in provided by the foreigner.
I don’t remember the characteristics of the foreigner’s plug-in very clearly. The comparison is probably as follows based on memory:
(1) The ICO file cannot be displayed when the foreigner’s plug-in is selected in the file dialog box. . It may be because there is a problem with the writing of his PiPL resources. My plugin doesn't have this problem.
(2) Foreigner’s plug-in cannot preview when opening a file containing multiple images, but I provide a preview image on the dialog box, which is more user-friendly.
(3) Foreigner’s plug-in cannot handle the transparent part of the icon very well (in memory), but with my plug-in, you can set the transparent part very well.
(4) The foreigner’s plug-in cannot save the multi-image anti-aliased icons of the XP system, but my plug-in can save the anti-aliased icons and automatically generate images of other qualities and standard sizes (I think this is the most important reason to replace foreigners’ plug-ins).
(5) The octree algorithm is used when downgrading the image. The quality of the downgraded image is better than the method used by software such as IconWorkshop.
(6) My plug-in is scripting-aware (that is, the plug-in parameters will be stored in the PS script system), and the user's settings can be remembered during runtime.
(7) My plug-in can open and save cursor (CUR) files, but foreigners’ plug-ins seem not to be able to. And I may continue to develop other functions such as importing icons from PE files in the future.
The following is a brief explanation and introduction to this plug-in. This plug-in has a total of 4 dialog boxes, namely the About dialog box, the image selection dialog box (when opening a file), the transparent part setting dialog box, and the image saving option setting dialog box. I will show them one by one below.
(1) Image selection dialog box
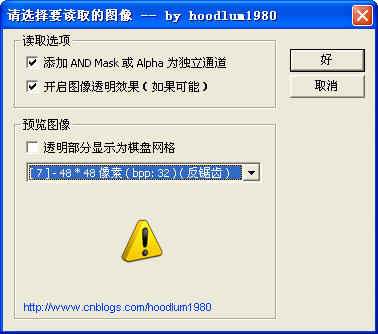
When an icon containing multiple images is opened, an image selection dialog box will pop up:

The main purpose here is to ask the user to select an image to open from the file. "Add AND MASK or Alhpa as an independent channel" means that if it is an icon below 32 BPP, AND MASK (black and white Two-color bitmap (white means transparent) is added to the new channel in PS. If it is a 32 BPP icon, the Alpha channel will be added as a new channel in PS. "Whether to display the checkerboard grid" is for the image preview on the dialog box. If checked, the callback function in PS is actually called for drawing, otherwise it is drawn through the GDI function of WIN32.
(2) Image quality selection dialog box
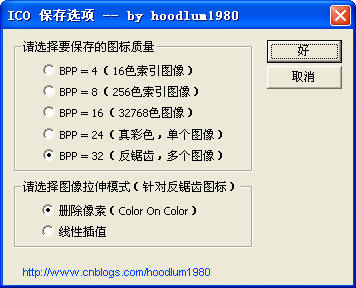
When saving a file, different dialog boxes will pop up depending on the image mode. If the current image mode is RGB mode, the following dialog box will pop up, asking the user to set what quality icon to save. If you select the anti-aliased icon, I will automatically add images of other sizes and color qualities to the file (the final file may contain 3 to 12 images, depending on the size of the file and the standard image size) Determined by the relationship), the anti-aliased icons generated by this plug-in are completely generated with reference to MSDN's requirements for icons used in XP systems, so the anti-aliased icons generated by this plug-in can be directly imported into the Windows application project of VS for use. Regarding anti-aliased icons, you can refer to my previous article.

gersgo’d 32BPP anti-aliased icons are only valid because here only 32 BPP is involved and the image needs to be reduced. The so-called deletion of pixels means that when pixels overlap, only a certain pixel on the image will be taken. Linear interpolation refers to taking a linear interpolation among four pixels on the source image. In principle, deleting pixels requires less operation than linear interpolation, and the scaling quality of linear interpolation may be better, but in practice it is difficult to feel much difference.
If you select 16 BPP, the saved image is an X-5-5-5 distribution image. The image degradation algorithm used when selecting 4 BPP or 8 BPP images is the octree algorithm (which I introduced in a previous article). Since the octree algorithm may mutate the image into all the same color when the number of colors is small, I did not provide an option to save as a monochrome image (minimum BPP is 4). The picture below shows the image quality effect after downgrading and saving an icon:

With this plug-in, you can easily convert PNG images into anti-aliased icons. The method is: open the PNG image in PS, and then save it as an ICO file.
(3) AND MASK Settings Dialog Box
When saving a file, if the image is in index mode, the user is required to set the transparent part (AND MASK part). The default option is to use the transparency information directly from the PS document itself, but this dialog box also allows you to choose other ways to set the transparency information.

There are many settings here. You can use the drop-down box to switch, and different input interfaces may be provided below. You can set the transparent color to black, white, foreground, background, the color of a certain sampling point, a specified RGB color, or the alpha channel (white means transparent), or specify an index in the color table.
ious
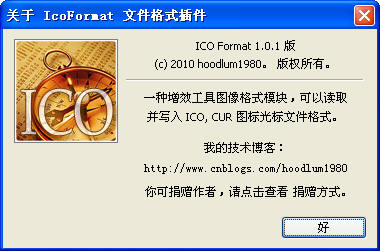
You can see it in the PS menu: Help-About Plug-in-ICO..., this dialog box It is also carefully designed and written by me, and it is quite beautiful. When you move the mouse in this dialog box, you can see the feedback of my blog URL to the mouse. You can click on the URL to call the default browser to open the URL. This is achieved through the CallBack Suite provided by PS, which I introduced in my previous tutorial on how to write PS filters.
Starting from the image file format viewer, to AlphaBlend and anti-aliased icons, to the octree algorithm for generating indexed images, the purpose of publishing these articles is to prepare the technology for this plug-in. Developing this plug-in requires a lot of effort, including studying ICO file formats, PS SDK, etc. The referenced materials (such as the octree algorithm) have been introduced in previous blog posts and are omitted here. 
(7)Installation method: Copy the "IcoFormat.8BI" file to Photoshop's file format plug-in directory ①, for example, C:\Program Files\Adobe\Photoshop CS\ Plug-in\File Format\, then restart PS. Check if there is the following menu in the PS menu: "Help-About Plug-in-ICO...", it means the plug-in is installed successfully. (8) Update record (BUG level: H: extremely important; M: medium; L: unimportant): 8.1 M: Save as quality below 32BPP At that time, the logic of setting ANDMASK was adjusted (all alpha channels less than 255 are set to transparent) to avoid showing harsh shadows. 2010-12-17.
8.2 H: Fixed the bug that when saving the 32BPP anti-aliased icon and selecting linear interpolation, the Alpha channel also uses linear interpolation (the correct method is that the Alpha channel is still generated by deleting pixels). This bug causes that when generating images of other sizes, pixels that should not be transparent may be mistakenly made transparent. It is worth mentioning that this BUG was introduced in 8.1. 2010-12-18 2:04:15.
8.3 L: Fixed the following BUG, open the index image in the icon, and uncheck the "Turn on image transparency effect" option, but the result is sometimes still applied transparency. 2010-12-18 3:36:08.
8.4 H: Adjusted the plug-in's PIPL resource so that the filter can obtain the document's transparent information directly from PS (the user is no longer required to explicitly provide additional channels). Adjusted the logically inaccurate part of the linear interpolation code and prevented pixels from being combined with the transparent parts (black) of the source image. 2010-12-19 0:55:23.
8.5 M: Adjusted the logic for generating 32 BPP icons, downgrading images directly from the data in the PS document (the original method occasionally lost colors when generating index images, the reason is unknown). 2010-12-19 1:41:08.
8.6 L: Added option to store anti-aliased icons as single images at 32 BPP. 2010-12-22 2:05:30.
8.7 L: When reading index images, the method of setting transparency is changed to the previous method. It can ensure that the application of transparency is more accurate. For 16-color images, transparency will be applied correctly. For 256-color images, try to find colors that are not used in the image as transparent colors, so transparency may not be applied. The main disadvantage of this method is that when saving as, the 16-color indexed image may be upgraded to a 256-color image. 2010-12-23 2:57:17.
8.8 L: Slightly adjusted the linear mapping method for reading pixel values of 16 BPP images (little impact). 2010-12-24 18:48.
(9) Acknowledgments:
## by Chris Cox (Adobe employee)] Chris Cox (Adobe employee) responded to my questions on the official forum. The URL of the Photoshop SDK section of the Adobe forum: http://forums.adobe.com/community/photoshop/photoshop_sdk (10) Reference materials: 10.1 Octree algorithm (address omitted). 10.2 Photoshop SDK (6.0, CS). 10.3 ICONPRO (example provided in MSDN technical documentation). (11) Introduction to the terms used in this article 11.1 BPP (Bits Per Pixel) That is the bit depth of the image. Its meaning is to describe the number of bits used for each pixel (one byte contains 8 bits). For example, for an RGB true color bitmap, each pixel is represented by three bytes, and its BPP = 24. A black-and-white image (a binary bitmap) has a bit depth of 1. A 16-color-indexed image has a bit-depth of 4 (each byte represents two pixels), and a 256-color-indexed image has a bit depth of 8 (each byte represents one pixel). Usually the bit depth divided by 8 represents the number of bytes per pixel. The grayscale image we often refer to is not actually a proprietary format, but a special 256-color index image whose palette is characterized by R, G, B for each color The three components are equal, and the 256 palette colors range from (0, 0, 0) to (255, 255, 255), so the value of its image data is still essentially a color index, but it can also be understood as The brightness of grayscale. 11.2 Anti-Alias (AntiAlias) This is my personal translation, which may not be accurate enough. It may be called anti-aliasing to be more in line with more people's habits. This is a technique that uses semi-transparent pixels to eliminate aliasing. First of all, we need to understand that the reason for the jagged feeling is that the display uses a dense matrix grid to present the image. GDI sets the dot matrix pixels according to the computer image algorithm (essentially turning the mathematical analog signal into a discretized digital signal). signal), the straight lines of this presentation type look jagged, a bit like stairs. Non-smooth mutations in adjacent pixels create a jagged appearance. More complex techniques for rendering straight lines require the use of partially transparent pixels and opaque pixels. Pixels are set to either a solid color or a blended color with the background color (depending on their proximity to the line). This rendering method is called anti-aliasing, and it produces visually smoother, softer straight lines. The anti-aliasing icon mentioned in this article refers to the 32 BPP image. That is, each pixel is represented by 4 bytes, which represent R, G, B, A (alpha) respectively. There is one more Alpha channel than the ordinary RGB bitmap, which is used to describe the transparency of the pixel. Therefore, you can specify the translucency of pixels to create a soft blend with the background, that is, to achieve an anti-aliasing effect. ① The PS plug-in directory usually refers to $(PS INSTALL DIR)\Plug-Ins. As long as you put the third-party plug-in files (.8B*) in this directory, PS will scan it when it starts. And try to load the 8B* files in this directory. The type of plug-in is not determined by the suffix name, but is specified by its PIPL attribute. In this directory, you can create corresponding subdirectories according to plug-in types. For example, filter (Filter), file format (File Format), but note that as long as the file is placed in the plug-in directory of PS, PS will try to load it. The plug-in directory can be obtained by searching the following location in the registry:
HKEY_LOCAL_MACHINE\SOFTWARE\Adobe\Photoshop\(version number, such as 8.0)\PluginPath
But for PS For the Chinese version of CS, this value maintains the English version path (not Chineseized), so it is wrong, so this creates a small obstacle for us to provide a simpler and easier-to-use installation tool for the plug-in. For the English version, it can be thought of as the Plug-Ins subdirectory under the PS installation directory.
For more related articles about the Photoshop plug-in for reading and writing ICO icon files, please pay attention to the PHP Chinese website!

Hot AI Tools

Undresser.AI Undress
AI-powered app for creating realistic nude photos

AI Clothes Remover
Online AI tool for removing clothes from photos.

Undress AI Tool
Undress images for free

Clothoff.io
AI clothes remover

AI Hentai Generator
Generate AI Hentai for free.

Hot Article

Hot Tools

Notepad++7.3.1
Easy-to-use and free code editor

SublimeText3 Chinese version
Chinese version, very easy to use

Zend Studio 13.0.1
Powerful PHP integrated development environment

Dreamweaver CS6
Visual web development tools

SublimeText3 Mac version
God-level code editing software (SublimeText3)

Hot Topics
 How do I use Photoshop for creating social media graphics?
Mar 18, 2025 pm 01:41 PM
The article details using Photoshop for social media graphics, covering setup, design tools, and optimization techniques. It emphasizes efficiency and quality in graphic creation.
 How do I prepare images for web use in Photoshop (file size, resolution, color space)?
Mar 13, 2025 pm 07:28 PM
Article discusses preparing images for web use in Photoshop, focusing on optimizing file size, resolution, and color space. Main issue is balancing image quality with quick loading times.
 How do I use Photoshop's Content-Aware Fill and Content-Aware Move tools effectively?
Mar 13, 2025 pm 07:35 PM
Article discusses using Photoshop's Content-Aware Fill and Move tools effectively, offering tips on selecting source areas, avoiding mistakes, and adjusting settings for optimal results.
 How do I prepare images for web using Photoshop (optimize file size, resolution)?
Mar 18, 2025 pm 01:35 PM
Article discusses optimizing images for web using Photoshop, focusing on file size and resolution. Main issue is balancing quality and load times.
 How do I use Photoshop's video editing capabilities?
Mar 18, 2025 pm 01:37 PM
The article explains how to use Photoshop for video editing, detailing steps to import, edit, and export videos, and highlighting key features like the Timeline panel, video layers, and effects.
 How do I calibrate my monitor for accurate color in Photoshop?
Mar 13, 2025 pm 07:31 PM
Article discusses calibrating monitors for accurate color in Photoshop, tools for calibration, effects of improper calibration, and recalibration frequency. Main issue is ensuring color accuracy.
 How do I create animated GIFs in Photoshop?
Mar 18, 2025 pm 01:38 PM
Article discusses creating and optimizing animated GIFs in Photoshop, including adding frames to existing GIFs. Main focus is on balancing quality and file size.
 How do I prepare images for print using Photoshop (resolution, color profiles)?
Mar 18, 2025 pm 01:36 PM
The article guides on preparing images for print in Photoshop, focusing on resolution, color profiles, and sharpness. It argues that 300 PPI and CMYK profiles are essential for quality prints.


