 Web Front-end
 PS Tutorial
 PhotoShop algorithm principle analysis series - pixelation - fragmentation
PhotoShop algorithm principle analysis series - pixelation - fragmentation
Continuing with the popularity of the previous article, let’s continue talking about some slightly simpler algorithms.
This article will talk about the fragmentation algorithm. Let’s post a few renderings first:

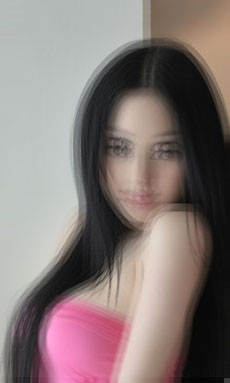

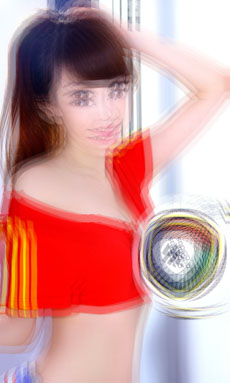
This is a destructive filter. The reason for using beautiful women is that 90% of the people who create images are men, perverted men.
Regarding the principle of the fragment filter, the information available on the Internet is: Create four copies of the image that are offset from each other, producing an effect similar to ghosting.
With the above sentence, we can start.
Analysis: Through the comparison of the above images, especially the eyes, it can be seen that the processed image should look like a single eye has become 4 eyes. Therefore, the network The statement above is reliable.
So where is the center of the offset and what is the number of offsets? In which directions are the 4 offsets offsets? These questions are also very simple. You can Then PS for verification:
The specific steps are as follows: Open an image and fill a 2*2 pixel red area in the place where the color of the image is relatively monotonous (such as the arm of the above-mentioned beauty). , then copy the layer, apply a fragment filter to the copied layer, and adjust the layer transparency to 50%. You can get the following image by partially zooming in:
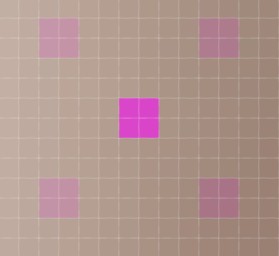 ## With such an effect, you can easily draw the conclusion:
The center of the offset is centered on each pixel, and the four offsets are symmetrical about the center, with a slope of 45 Degrees are evenly arranged in a circle, with horizontal and vertical offsets of 45 degrees each, and an offset of 4 pixels.
Then the question of how to superimpose can be guessed, it is to take the average of the accumulated values after four offsets.
Based on this idea, I wrote the following algorithm:
private void CmdFragment_Click(object sender, EventArgs e)
{    int X, Y, Z, XX, YY;    int Width, Height, Stride;    int Speed, Index;    int SumR, SumG, SumB;
    Bitmap Bmp = (Bitmap)Pic.Image;    if (Bmp.PixelFormat != PixelFormat.Format24bppRgb) throw new Exception("不支持的图像格式.");

    Width = Bmp.Width; Height = Bmp.Height; Stride = (int)((Bmp.Width * 3 + 3) & 0XFFFFFFFC);    byte[] ImageData = new byte[Stride * Height];                                    // 用于保存图像数据,(处理前后的都为他)
    byte[] ImageDataC = new byte[Stride * Height];                                   // 用于保存克隆的图像数据
    int[] OffsetX = new int[] { 4, -4, -4, 4 };                                      // 每个点的偏移量
    int[] OffsetY = new int[] { -4, -4, 4, 4 };    fixed (byte* P = &ImageData[0], CP = &ImageDataC[0])
    {        byte* DataP = P, DataCP = CP;
        BitmapData BmpData = new BitmapData();
        BmpData.Scan0 = (IntPtr)DataP;                                              //  设置为字节数组的的第一个元素在内存中的地址
        BmpData.Stride = Stride;
        Bmp.LockBits(new Rectangle(0, 0, Bmp.Width, Bmp.Height), ImageLockMode.ReadWrite | ImageLockMode.UserInputBuffer, PixelFormat.Format24bppRgb, BmpData);

        Stopwatch Sw = new Stopwatch();                                             //  只获取计算用时        Sw.Start();
        System.Buffer.BlockCopy(ImageData, 0, ImageDataC, 0, Stride * Height);     //  填充克隆数据

        for (Y = 0; Y < Height; Y++)
        {
            Speed = Y * Stride;            for (X = 0; X < Width; X++)
            {
                SumB = 0; SumG = 0; SumR = 0;                for (Z = 0; Z < 4; Z++)                                           //  累积取样点的取样和                {
                    XX = X + OffsetX[Z];
                    YY = Y + OffsetY[Z];                    if (XX < 0)                                                    //   注意越界
                        XX = 0;                    else if (XX >= Width)
                        XX = Width - 1;                    if (YY < 0)
                        YY = 0;                    else if (YY >= Height)
                        YY = Height - 1;
                    Index = YY * Stride + XX * 3;
                    SumB += DataCP[Index];
                    SumG += DataCP[Index + 1];
                    SumR += DataCP[Index + 2];
                }

                DataP[Speed] = (byte)((SumB+2) >> 2);    //  求平均值(Sum+2)/4,为什么要+2,就为了四舍五入。比如如果计算结果为108.6,则取像素109更为合理
                DataP[Speed + 1] = (byte)((SumG + 2) >> 2);
                DataP[Speed + 2] = (byte)((SumR + 2) >> 2);
                Speed += 3;                                                     //  跳往下一个像素            }
        }
        Sw.Stop();        this.Text = "计算用时: " + Sw.ElapsedMilliseconds.ToString() + " ms";
        Bmp.UnlockBits(BmpData);                         //  必须先解锁,否则Invalidate失败     }
Pic.Invalidate();}In the algorithm, OffsetX and OffsetY are the offsets of the sampling point pixels respectively. Similarly, since this filter involves field operations, pixel backup needs to be done before processing, but the backup data is not expanded here. Therefore, the coordinates of the sampling point need to be verified in the internal code to see if it exceeds its range. If it exceeds the range, it is usually within the range of the image filter algorithm. There are 3 processing methods:
(1) If it exceeds, it is considered to be its closest boundary value, that is, repeated edge pixels. This part of the code is the if...else if part posted above.
(2) Return can be described by the following code:
while (XX >= Width)
    XX = XX - Width;while (XX < 0)
    XX = XX + Width;while (YY >= Height)
    YY = YY - Height;while (YY < 0)
YY = YY + Height;(3 ) Calculate only the pixels within the image range:
 if (XX >= 0 && XX < Width && YY >= 0 && YY < Height)
 {
       // 累加计算
}Of course, to do this, you must use a variable to record how much has been done qualifying calculations.
Friends who are interested can change the code and give it a try.
In the above code snippet, DataP[Speed] = (byte)((SumB+2) >> 2); The reason for adding 2 to SumB is to round the result, so that it is more accurate Reasonable. After testing, the above code is 100% consistent with the effect of PS processing. It shows that our guess is completely correct. You can also further expand the algorithm: Think further, why does it have to be 4 ghost images? It has to be an angle of 45 degrees. It has to be 4 The horizontal and vertical offset of pixels. I give the picture below for interested readers to develop on their own. In the picture, the angle is 32 degrees, the radius is 10, and the number of fragments is 7, which can produce an effect similar to the following (You can use my Imageshop to verify): 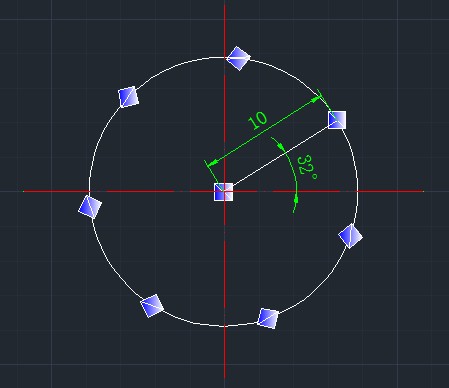

Hot AI Tools

Undresser.AI Undress
AI-powered app for creating realistic nude photos

AI Clothes Remover
Online AI tool for removing clothes from photos.

Undress AI Tool
Undress images for free

Clothoff.io
AI clothes remover

AI Hentai Generator
Generate AI Hentai for free.

Hot Article

Hot Tools

Notepad++7.3.1
Easy-to-use and free code editor

SublimeText3 Chinese version
Chinese version, very easy to use

Zend Studio 13.0.1
Powerful PHP integrated development environment

Dreamweaver CS6
Visual web development tools

SublimeText3 Mac version
God-level code editing software (SublimeText3)

Hot Topics
 1376
1376
 52
52
 How do I use Photoshop for creating social media graphics?
Mar 18, 2025 pm 01:41 PM
The article details using Photoshop for social media graphics, covering setup, design tools, and optimization techniques. It emphasizes efficiency and quality in graphic creation.
 How do I use Photoshop's Content-Aware Fill and Content-Aware Move tools effectively?
Mar 13, 2025 pm 07:35 PM
Article discusses using Photoshop's Content-Aware Fill and Move tools effectively, offering tips on selecting source areas, avoiding mistakes, and adjusting settings for optimal results.
 How do I prepare images for web use in Photoshop (file size, resolution, color space)?
Mar 13, 2025 pm 07:28 PM
Article discusses preparing images for web use in Photoshop, focusing on optimizing file size, resolution, and color space. Main issue is balancing image quality with quick loading times.
 How do I calibrate my monitor for accurate color in Photoshop?
Mar 13, 2025 pm 07:31 PM
Article discusses calibrating monitors for accurate color in Photoshop, tools for calibration, effects of improper calibration, and recalibration frequency. Main issue is ensuring color accuracy.
 How do I prepare images for print using Photoshop (resolution, color profiles)?
Mar 18, 2025 pm 01:36 PM
The article guides on preparing images for print in Photoshop, focusing on resolution, color profiles, and sharpness. It argues that 300 PPI and CMYK profiles are essential for quality prints.
 How do I prepare images for web using Photoshop (optimize file size, resolution)?
Mar 18, 2025 pm 01:35 PM
Article discusses optimizing images for web using Photoshop, focusing on file size and resolution. Main issue is balancing quality and load times.
 How do I create animated GIFs in Photoshop?
Mar 18, 2025 pm 01:38 PM
Article discusses creating and optimizing animated GIFs in Photoshop, including adding frames to existing GIFs. Main focus is on balancing quality and file size.
 How do I use Photoshop's video editing capabilities?
Mar 18, 2025 pm 01:37 PM
The article explains how to use Photoshop for video editing, detailing steps to import, edit, and export videos, and highlighting key features like the Timeline panel, video layers, and effects.


