photoshop remove background
This tutorial was written a long time ago. I found it after sorting out my computer. Anyway, I wrote it, so I’ll post it here. The Photoshop CS version used in this example.
Note: There are other simpler processing methods for the pictures in this tutorial. Here I just use this picture to talk about the more general channel cutout method.
Comparison of before and after effects
When processing pictures, cutout is a common problem that everyone encounters. For those with neat edges and strong pixel contrast, you can use Use the magic wand or path tool to cut out the image. But for characters with long hair, it’s impossible to use these tools. In fact, there are many ways to cut out pictures, and different pictures have different cutout methods. Below, the author recommends one of the most commonly used and most effective methods to everyone - the channel cutout method.
Tips: The channel cutout method uses the channel information of the image itself to select the part that needs to be cut out.
1. Start Photoshop, import the picture to be processed, click the "Pen" tool, set the properties
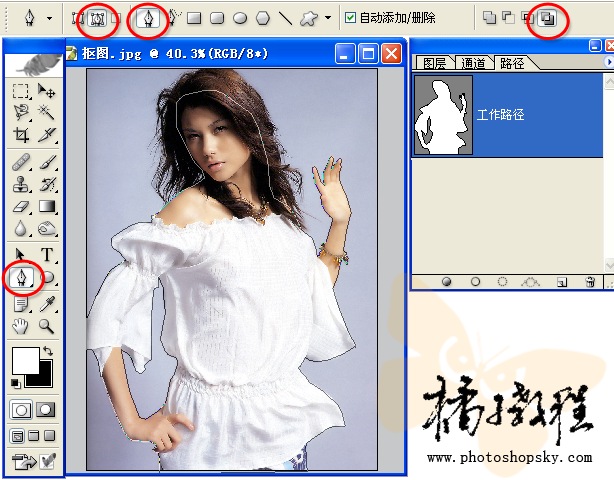
and outline the main body of the person in the picture. . Be careful not to get the broken hair caught in it, because it will be specially processed later.
Tips: When using the "pen" tool to draw the picture, move it slightly inward so that there will be no edges in the final product.
2. Select "Window → Path" to open the "Path" panel. At this time, you will find that there is an additional "Working Path" in the Path panel. Click the "Load Path as Selection" button to close it. The path is converted into a selection. 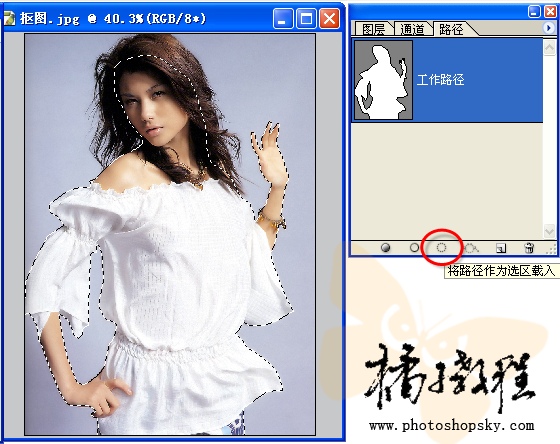
3. Select "Window → Layers" to open the layers panel, click on the "Background" layer, right-click, click the "Copy Layer" command to create a new "Background Copy" ". Click "Background Copy" and click the "Add Layer Mask" button
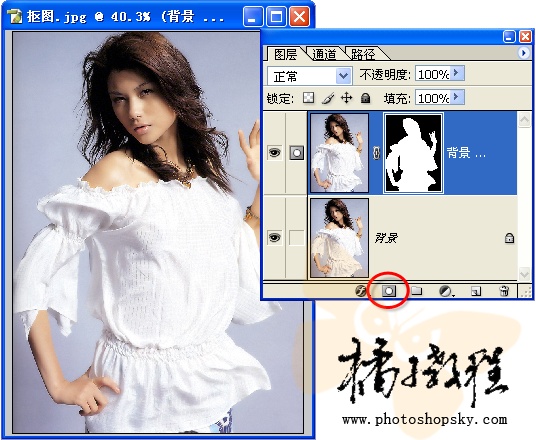
Tips: Layer masks are easy to change and cannot be changed. Destroy the advantages of the original layer.
4. Select "Window → Channel" to open the "Channel" panel, drag the "green" channel to the "New" button under the channel panel, and make a copy
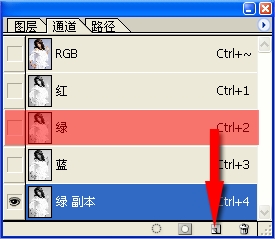
Tips: In principle, you should choose a channel with a large contrast between light and dark for copy processing. The "blue" channel of this picture has a greater contrast between light and dark than the "green" channel, but due to the quality of the picture The reason is that there is a loss in the "blue" channel, which will affect the final cutout effect. If the quality of this picture is very high, the "blue" channel is the best choice.
5. Click "Green Copy" and press the shortcut key Ctrl+L to adjust the color levels. Pull the black slider on the left to the right, and pull the white slider on the right to the left. This reduces the For the mid-tone part, increase the dark tones and highlights to make the hair and background well separated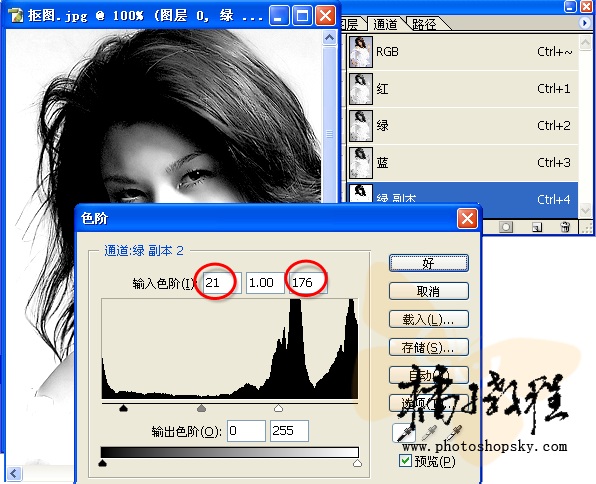
6. Press the shortcut key Ctrl+I to invert the "Green Copy" channel, and click " "Brush" tool, attribute settings
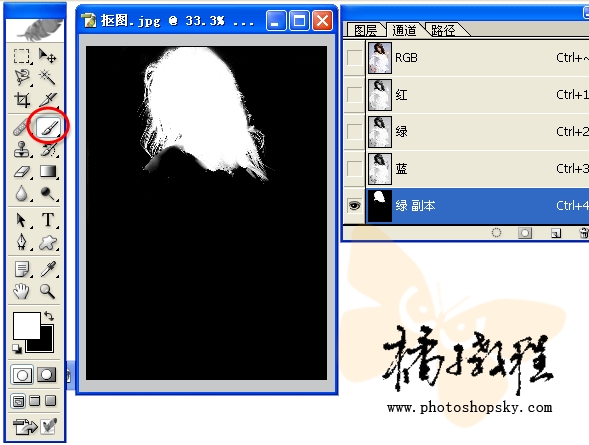
Use a black brush to blacken the area outside the hair (that is, the areas that do not need to be selected), and then use a white brush to Apply white where needed in the hair.
7. Click the "Load Channel as Selection" button on the "Channel" panel to get the "Green Copy" selection.
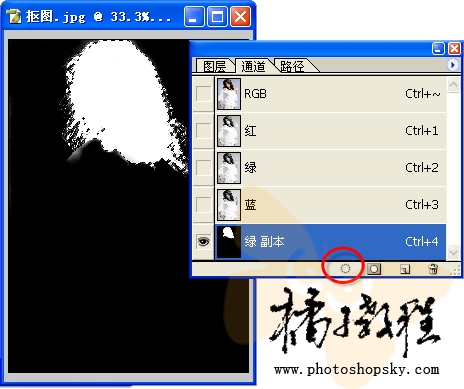
8. Return to the "Layer" panel, double-click the "Background Layer" and change it to a normal "Layer 0" ”
9. Click the “Add Layer Mask” button to add a layer mask to “Layer 0”
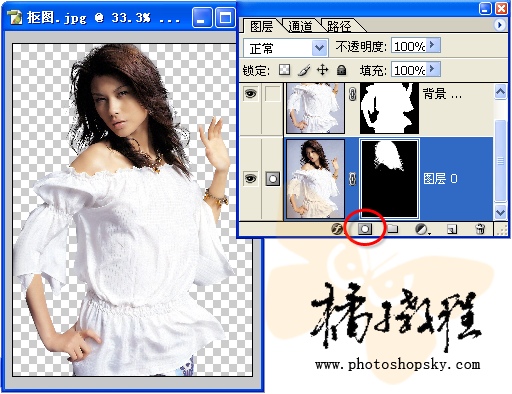
This beautiful MM is separated from this picture.
Tips: If there is a bad connection between the subject and the hair, you can use a black brush to process the mask. This is why I chose the layer mask at that time.
All the work is done now, now you can paste the cut out MM into any background.
Tips: When changing the background for MM, pay attention to whether the direction of the background light source and the character's lighting direction are consistent to ensure coordination and not look stiff.
For more photoshop background removal related articles, please pay attention to the PHP Chinese website!

Hot AI Tools

Undresser.AI Undress
AI-powered app for creating realistic nude photos

AI Clothes Remover
Online AI tool for removing clothes from photos.

Undress AI Tool
Undress images for free

Clothoff.io
AI clothes remover

Video Face Swap
Swap faces in any video effortlessly with our completely free AI face swap tool!

Hot Article

Hot Tools

Notepad++7.3.1
Easy-to-use and free code editor

SublimeText3 Chinese version
Chinese version, very easy to use

Zend Studio 13.0.1
Powerful PHP integrated development environment

Dreamweaver CS6
Visual web development tools

SublimeText3 Mac version
God-level code editing software (SublimeText3)

Hot Topics
 1387
1387
 52
52
 What is the reason why PS keeps showing loading?
Apr 06, 2025 pm 06:39 PM
PS "Loading" problems are caused by resource access or processing problems: hard disk reading speed is slow or bad: Use CrystalDiskInfo to check the hard disk health and replace the problematic hard disk. Insufficient memory: Upgrade memory to meet PS's needs for high-resolution images and complex layer processing. Graphics card drivers are outdated or corrupted: Update the drivers to optimize communication between the PS and the graphics card. File paths are too long or file names have special characters: use short paths and avoid special characters. PS's own problem: Reinstall or repair the PS installer.
 What are the common questions about exporting PDF on PS
Apr 06, 2025 pm 04:51 PM
Frequently Asked Questions and Solutions when Exporting PS as PDF: Font Embedding Problems: Check the "Font" option, select "Embed" or convert the font into a curve (path). Color deviation problem: convert the file into CMYK mode and adjust the color; directly exporting it with RGB requires psychological preparation for preview and color deviation. Resolution and file size issues: Choose resolution according to actual conditions, or use the compression option to optimize file size. Special effects issue: Merge (flatten) layers before exporting, or weigh the pros and cons.
 How to solve the problem of loading when PS is always showing that it is loading?
Apr 06, 2025 pm 06:30 PM
PS card is "Loading"? Solutions include: checking the computer configuration (memory, hard disk, processor), cleaning hard disk fragmentation, updating the graphics card driver, adjusting PS settings, reinstalling PS, and developing good programming habits.
 How to speed up the loading speed of PS?
Apr 06, 2025 pm 06:27 PM
Solving the problem of slow Photoshop startup requires a multi-pronged approach, including: upgrading hardware (memory, solid-state drive, CPU); uninstalling outdated or incompatible plug-ins; cleaning up system garbage and excessive background programs regularly; closing irrelevant programs with caution; avoiding opening a large number of files during startup.
 How to set password protection for export PDF on PS
Apr 06, 2025 pm 04:45 PM
Export password-protected PDF in Photoshop: Open the image file. Click "File"> "Export"> "Export as PDF". Set the "Security" option and enter the same password twice. Click "Export" to generate a PDF file.
 How to use PS Pen Tool
Apr 06, 2025 pm 10:15 PM
The Pen Tool is a tool that creates precise paths and shapes, and is used by: Select the Pen Tool (P). Sets Path, Fill, Stroke, and Shape options. Click Create anchor point, drag the curve to release the Create anchor point. Press Ctrl/Cmd Alt/Opt to delete the anchor point, drag and move the anchor point, and click Adjust curve. Click the first anchor to close the path to create a shape, and double-click the last anchor to create an open path.
 How to solve the problem of loading when the PS opens the file?
Apr 06, 2025 pm 06:33 PM
"Loading" stuttering occurs when opening a file on PS. The reasons may include: too large or corrupted file, insufficient memory, slow hard disk speed, graphics card driver problems, PS version or plug-in conflicts. The solutions are: check file size and integrity, increase memory, upgrade hard disk, update graphics card driver, uninstall or disable suspicious plug-ins, and reinstall PS. This problem can be effectively solved by gradually checking and making good use of PS performance settings and developing good file management habits.
 How to draw vector PS
Apr 06, 2025 pm 10:00 PM
Vector diagrams are images created using mathematical curves with the advantages of scalability, clarity, and small file size. Drawing vector graphics requires using vector editing software to create images by creating shapes, combining shapes, adding colors, adding text, grouping and layers.


