How to write a Photoshop filter (1)
# But the source code is missing. And we're going to ask, how do we program a Photoshop filter from scratch? How do we build the simplest basic framework of the PS filter plug-in, and then continue to add the functions we want on this basis? Here, I will answer a question posed to me by a netizen as an example, starting from the most basic construction project. This example (also the problem of this netizen) is that he wants to make the simplest filter, which is to just fill the image with "red". For PS users, this is of course a very simple and easy thing. It only requires a shortcut key operation (filters are usually used to complete more complex tasks). We will start from this most basic example to explain how to write filters. mirror process. A source code download link for the example will be attached at the end of the article.
(1) The development tool we use is Visual Studio .NET 2005 version, paired with Photoshop SDK CS (essentially a distribution package composed of some C++ code and resources and other files). The development languages used are C and C++.
Is it okay to use C# or other languages? At present, it seems that it is not feasible. Therefore, to develop Photoshop filters, developers must have a good foundation in C and C++, which is the most important. Of course it would be better if the developer is familiar with image processing and basic knowledge of digital signal processing.
(2) After preparing the tools, we open VS2005 and create a new project. We choose Win32 of Visual C++ as the project template. For the project name, we enter the name of the filter we want to create, such as the "FillRed" filter, which means that this filter is used to fill in red, as shown below:
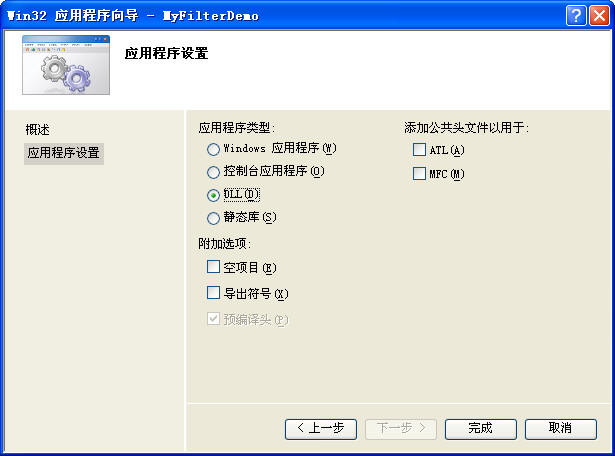
After clicking OK, on the pop-up settings dialog box, click "Application Settings", select "DLL" in the application type, and then click OK. 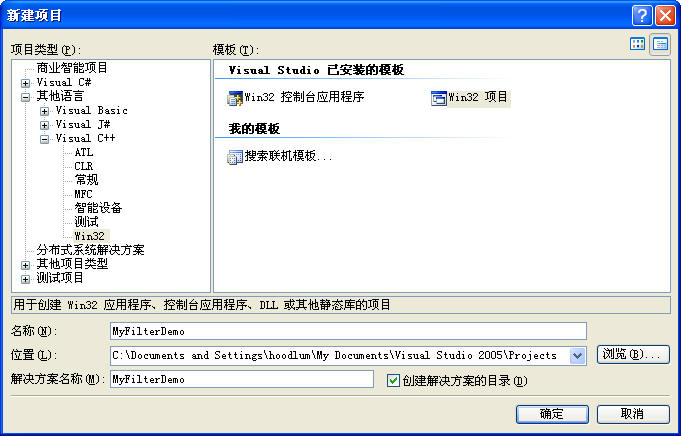
(a) In general, I like to change the character set used by the project to "use multi-byte character set", which allows us to use char* and directly use double The string type of the quote. Of course, Unicode can also be used, but the string functions used by the two will be different. You can set it up as you like.
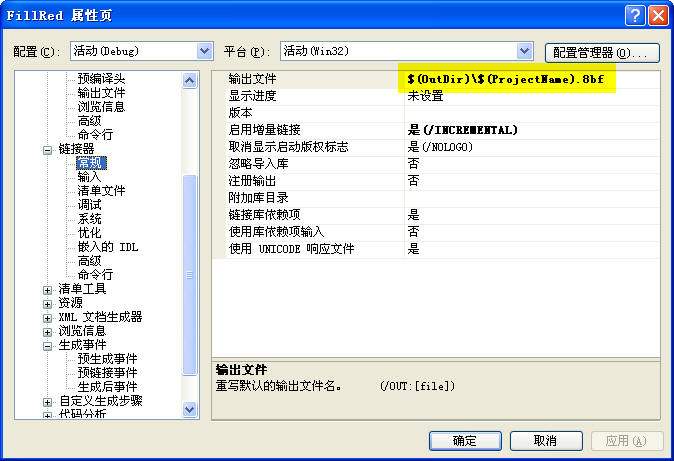
(b) The project has been output as DLL by default. Since the extension of Photoshop’s filter file is 8bf, we set the extension of the output file to 8bf in Linker->General. Change it to as shown below.
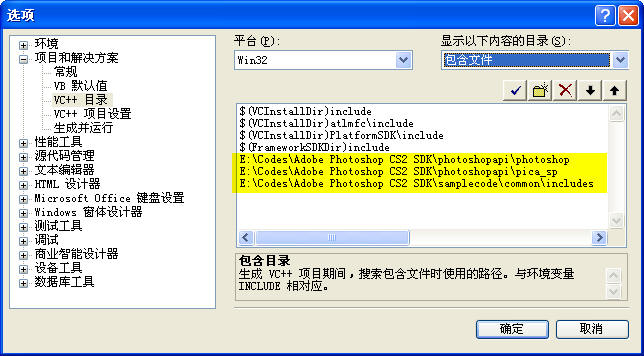
 # (C) Click the tool- "option below, in the pop-up dialog box, select" Project and Solution "-" VC ++ directory, and in the right drop box Select "Include Files": Add several Photoshop SDK folders to the VC++ include directory of the option. This will make it easier for us to compile the project without reporting an error that the file cannot be found. As shown below:
The code of this source file is replaced with the following:
// FillRed.cpp : 定义 DLL 应用程序的入口点。
//

#include "stdafx.h"
#include "PiFilter.h"
#include <stdio.h>

#ifdef _MANAGED
#pragma managed(push, off)
#endif


#ifndef DLLExport
#define DLLExport extern "C" __declspec(dllexport)
#endif

//=======================================
//        全局变量
//=======================================
//dll instance
HINSTANCE        dllInstance;
FilterRecord*    gFilterRecord;
int32*            gData;
int16*            gResult;
SPBasicSuite*    sSPBasic = NULL;
#define            TILESIZE    128 //贴片大小:128 * 128
Rect            m_Tile;            //当前图像贴片(128*128)


//=======================================
//        函数列表
//=======================================
//辅助函数,拷贝矩形
void CopyPsRect(Rect* src, Rect* dest);
//辅助函数,把一个矩形置为空矩形
void ZeroPsRect(Rect* dest);
void DoParameters();
void DoPrepare();
void DoStart();
void DoContinue();
void DoFinish();


//辅助函数,拷贝矩形
void CopyPsRect(Rect* src, Rect* dest)
{
    dest->left = src->left;
    dest->top = src->top;
    dest->right = src->right;
    dest->bottom = src->bottom;
}

//辅助函数,把一个矩形置为空矩形
void ZeroPsRect(Rect* dest)
{
    dest->left = 0;
    dest->top = 0;
    dest->right = 0;
    dest->bottom = 0;
}

//DLLMain
BOOL APIENTRY DllMain( HMODULE hModule,
                       DWORD  ul_reason_for_call,
                       LPVOID lpReserved
                     )
{
    dllInstance = static_cast<HINSTANCE>(hModule);
    return TRUE;
}

#ifdef _MANAGED
#pragma managed(pop)
#endif

//===================================================================================================
//------------------------------------ 滤镜被ps调用的函数 -------------------------------------------
//===================================================================================================
DLLExport void PluginMain(const int16 selector,    void * filterRecord, int32 *data, int16 *result)
{
    gData = data;
    gResult = result;

    if (selector == filterSelectorAbout)
    {
        //显示关于对话框
        MessageBox(GetActiveWindow(), "FillRed Filter: 填充红色-- by hoodlum1980", "关于 FillRed", MB_OK);
    }
    else
    {
        gFilterRecord = (FilterRecordPtr)filterRecord;
        sSPBasic = gFilterRecord->sSPBasic;
    }

    switch (selector)
    {
        case filterSelectorAbout:
            //DoAbout();
            break;
        case filterSelectorParameters:
            DoParameters();
            break;
        case filterSelectorPrepare:
            DoPrepare();
            break;
        case filterSelectorStart:
            DoStart();
            break;
        case filterSelectorContinue:
            DoContinue();
            break;
        case filterSelectorFinish:
            DoFinish();
            break;
        default:
            *gResult = filterBadParameters;
            break;
    }
}

//这里准备参数,就这个滤镜例子来说,我们暂时不需要做任何事
void DoParameters()
{
}

//在此时告诉PS(宿主)滤镜需要的内存大小
void DoPrepare()
{
    if(gFilterRecord != NULL)
    {
        gFilterRecord->bufferSpace = 0;
        gFilterRecord->maxSpace = 0;
    }
}

//inRect     : 滤镜请求PS发送的矩形区域。
//outRect    : 滤镜通知PS接收的矩形区域。
//filterRect : PS通知滤镜需要处理的矩形区域。

//由于我们是使用固定的红色进行填充,实际上我们不需要请求PS发送数据
//所以这里可以把inRect设置为NULL,则PS不向滤镜传递数据。
void DoStart()
{
    if(gFilterRecord == NULL)
        return;

    //我们初始化第一个Tile,然后开始进行调用
    m_Tile.left = gFilterRecord->filterRect.left;
    m_Tile.top = gFilterRecord->filterRect.top;
    m_Tile.right = min(m_Tile.left + TILESIZE, gFilterRecord->filterRect.right);
    m_Tile.bottom = min(m_Tile.top + TILESIZE, gFilterRecord->filterRect.bottom);

    //设置inRect, outRect
    ZeroPsRect(&gFilterRecord->inRect); //我们不需要PS告诉我们原图上是什么颜色,因为我们只是填充
    CopyPsRect(&m_Tile, &gFilterRecord->outRect);

    //请求全部通道(则数据为interleave分布)
    gFilterRecord->inLoPlane = 0;
    gFilterRecord->inHiPlane = 0;
    gFilterRecord->outLoPlane = 0;
    gFilterRecord->outHiPlane = (gFilterRecord->planes -1);
}

//这里对当前贴片进行处理,注意如果用户按了Esc,下一次调用将是Finish
void DoContinue()
{
    if(gFilterRecord == NULL)
        return;

    //定位像素
    int planes = gFilterRecord->outHiPlane - gFilterRecord->outLoPlane + 1; //通道数量
    uint8 *pData=(uint8*)gFilterRecord->outData;

    //扫描行宽度(字节)
    int stride = gFilterRecord->outRowBytes;

    //我们把输出矩形拷贝到 m_Tile
    CopyPsRect(&gFilterRecord->outRect, &m_Tile);
    for(int j = 0; j< (m_Tile.bottom - m_Tile.top); j++)
    {
        for(int i = 0; i< (m_Tile.right - m_Tile.left); i++)
        {
            //为了简单明了,我们默认把图像当作RGB格式(实际上不应这样做)
            //pData[ i*planes + j*stride + 0 ] = 0;    //Red
            //pData[ i*planes + j*stride + 1 ] = 0;    //Green
            pData[ i*planes + j*stride + 2 ] = 255;    //Blue
        }
    }

    //判断是否已经处理完毕
    if(m_Tile.right >= gFilterRecord->filterRect.right && m_Tile.bottom >= gFilterRecord->filterRect.bottom)
    {
        //处理结束
        ZeroPsRect(&gFilterRecord->inRect);
        ZeroPsRect(&gFilterRecord->outRect);
        ZeroPsRect(&gFilterRecord->maskRect);
        return;
    }
    //设置下一个tile
    if(m_Tile.right < gFilterRecord->filterRect.right)
    {
        //向右移动一格
        m_Tile.left = m_Tile.right;
        m_Tile.right = min(m_Tile.right + TILESIZE, gFilterRecord->filterRect.right);

    }
    else
    {
        //向下换行并回到行首处
        m_Tile.left = gFilterRecord->filterRect.left;
        m_Tile.right = min(m_Tile.left + TILESIZE, gFilterRecord->filterRect.right);
        m_Tile.top = m_Tile.bottom;
        m_Tile.bottom = min(m_Tile.bottom + TILESIZE, gFilterRecord->filterRect.bottom);
    }

    ZeroPsRect(&gFilterRecord->inRect);
    CopyPsRect(&m_Tile, &gFilterRecord->outRect);
    //请求全部通道(则数据为interleave分布)
    gFilterRecord->inLoPlane = 0;
    gFilterRecord->inHiPlane = 0;
    gFilterRecord->outLoPlane = 0;
    gFilterRecord->outHiPlane = (gFilterRecord->planes -1);
}

//处理结束,这里我们暂时什么也不需要做
void DoFinish()
{
}void DoFinish();
//Auxiliary function, copy rectangle
void CopyPsRect(Rect* src, Rect* dest )
{
dest->left = src->left;
dest->top = src->top;
dest->right = src-> right;
dest->bottom = src-> ;bottom;
}
//Auxiliary function, set a rectangle to an empty rectangle
void ZeroPsRect(Rect*## dest){
dest
-> left = 0; dest
-> top = 0; dest
-> right = 0; dest
->bottom = 0;}
//DLLMain
##BOOL APIENTRY DllMain( HMODULE hModule, ){
dllInstance
=
static_cast<HINSTANCE>(hModule); return
TRUE;}#ifdef _MANAGED
#pragma
managed(pop) #endif
##//
============== ================================================== ====================================
// ------------------------------------ The function called by ps for the filter ---- ---------------------------------------
//==================================== ================================================== =============
##DLLExport void PluginMain( const int16 selector, void * filterRecord, int32 *data, int16 *result){
gData
= data; gResult
= result;
if (selector == filterSelectorAbout) // #"
FillRed Filter: Fill Red -- by hoodlum1980", "
About FillRed", MB_OK); } else { gFilterRecord = (FilterRecordPtr)filterRecord; sSPBasic
= gFilterRecord->
sSPBasic; }
switch (selector) #//DoAbout();
##
break; case
filterSelectorParameters: DoParameters(); filterSelectorPrepare: DoPrepare();
break; filterSelectorStart: DoStart()
##; # Case FilterselectorContinue:
Docontinue (); break;
##; filterBadParameters;
break; Prepare the parameters here. For this filter example, we don’t need to do anything for now
void
DoParameters(){}//At this time tell PS (host) the memory size required for the filter
void
DoPrepare()
{
if(gFilterRecord !=
NULL) gFilterRecord‐>
bufferSpace
gFilterRecord
->maxSpace =
0;
}
}//inRect : The filter requests the rectangular area sent by PS.
//
outRect : The rectangular area that the filter notifies PS to receive. //filterRect: The rectangular area that the PS notification filter needs to process. //Since we use a fixed red color for filling, we actually don’t need to request PS to send data
// So here you can set inRect to NULL, then PS will not pass data to the filter. ##void DoStart(){
if
(gFilterRecord == NULL)
return;
//
We initialize the first Tile and then start calling
## m_Tile.left
= gFilterRecord- >filterRect.left;
m_Tile.top = gFilterRecord
->filterRect.top ; m_Tile.right = min(m_Tile.left
+ TILESIZE, gFilterRecord->
filterRect.right);m_Tile.bottom = min(m_Tile.top + TILESIZE, gFilterRecord->filterRect.bottom);
//Set inRect, outRect
ZeroPsRect(&gFilterRecord->inRect); //We don’t need PS to tell us What color is on the original image, because we just fill in
## CopyPsRect(&m_Tile, & gFilterRecord->outRect);
//Request all channels (then The data is interleave distribution)
## gFilterRecord->inLoPlane = 0; gFilterRecord
->inHiPlane = 0; gFilterRecord
->outLoPlane = 0; gFilterRecord
->outHiPlane = (gFilterRecord- >planes -1);}
//The current patch is processed here. Note that if the user presses Esc, the next call will be Finish
void DoContinue( ){
if(gFilterRecord == NULL) ##;
//
Positioning pixel
int
planes = gFilterRecord->outHiPlane - gFilterRecord->outLoPlane + 1; //Number of channels (uint8*)gFilterRecord->
outData;//Scan line width (bytes)
int stride = gFilterRecord->outRowBytes;
//We copy the output rectangle to m_Tile
## CopyPsRect(&gFilterRecord->outRect, &m_Tile);
for(int j = 0; j< (m_Tile.bottom - m_Tile.top); j++) {
#(
int i = 0; i < (m_Tile.right - m_Tile.left); i++) { //
For the sake of simplicity and clarity, we default to treating the image as RGB format (actually this should not be done)
///pData[ i*planes + j*stride + 0 ] = 0; #pData[ i*planes + j*stride + 1 ] = 0;
//Green
#*planes + j*stride
+ 2 ] = 255; //Blue## Has it been processed? if(m_Tile.right >= gFilterRecord->filterRect.right && m_Tile.bottom >= gFilterRecord-> Filterrect.bottom)
{
##// ## Treatment ended # Zeropsrect (
&gFilterRecord->inRect); ZeroPsRect(&
gFilterRecord->outRect); ZeroPsRect(&
gFilterRecord->maskRect);
##if(m_Tile.right
< gFilterRecord- >filterRect.right)
{ //Move one space to the right m_Tile.left = m_Tile.right;
m_Tile.right
+ TILESIZE, gFilterRecord->filterRect.right);
else
# { // # # m_Tile.left = gFilterRecord
->
filterRect.left; m_Tile.right =
min(m_Tile.left + TILESIZE, gFilterRecord->
filterRect.right); m_Tile.top = m_Tile.bottom; m_Tile.bottom =
min(m_Tile.bottom + TILESIZE, gFilterRecord->filterRect.bottom); } ZeroPsRect(
&gFilterRecord->
inRect);CopyPsRect(&m_Tile, &gFilterRecord->outRect);
//Request all channels (the data is interleave distributed)
gFilterRecord-> ;inLoPlane = 0;
gFilterRecord->inHiPlane = 0;
gFilterRecord->outLoPlane = 0;
gFilterRecord->outHiPlane = (gFilterRecord->planes -1 );
}
//The processing is over, we don’t need to do anything here for now
void DoFinish()
{
}
Note]Please be careful when operating the code of filter processing data, once Pointer out of bounds will cause Photoshop program to crash!
For details about the main code of this filter, please see the code comments and the explanation in my previous article. And the official documentation of PS SDK. We will not elaborate on the principle of the code here, because it is very simple. All the above codes need to reference the header files in ps sdk.## (4) At this time, the project can be successfully compiled. But the next step is to invest in PIPL resources.
must be inserted into the PIPL resource for the filter to be correctly recognized and loaded by Photoshop. According to the documentation provided by PS, PIPL is pronounced as "pipple", which means Plug-In Property List. It is a flexible, extensible data structure used to represent plug-in module metadata (metadata). pipl includes all the information for Photoshop to recognize and load plug-in modules, including some tags, various static properties that control each plug-in, etc. Your filter can contain one or more "pipl" structures.
The process of inserting pipl resources for filters is as follows. First, we need to add a *.r (Macintosh Rez file) file to the project, and then use cl.exe to compile this file into a *.rr file. Finally, use CnvtPipl.Exe, a resource conversion tool provided by Ps SDK, to convert the *.rr file into a *.pipl file, then add a *.rc resource file for the filter, and include the pipl file at the end of the rc file.
ps sdk has provided us with a common r file, including common attribute definitions, which is the PIGeneral.r file.
(a) Next we will add an r file to the project, right-click the "Resource Files" folder in the resource manager, click to add a new file, and enter "FillRed.r" as the file name. Double-click the file to open it and copy the following content:
// ADOBE SYSTEMS INCORPORATED
// Copyright  1993 - 2002 Adobe Systems Incorporated
// All Rights Reserved
//
// NOTICE:  Adobe permits you to use, modify, and distribute this
// file in accordance with the terms of the Adobe license agreement
// accompanying it.  If you have received this file from a source
// other than Adobe, then your use, modification, or distribution
// of it requires the prior written permission of Adobe.
//-------------------------------------------------------------------------------
#define plugInName            "FillRed Filter"
#define    plugInCopyrightYear "2009"
#define plugInDescription \
    "FillRed Filter.\n\t - http:\\www.cnblogs.com\hoodlum1980"

#include "E:\Codes\Adobe Photoshop CS2 SDK\samplecode\common\includes\PIDefines.h"

#ifdef __PIMac__
    #include "Types.r"
    #include "SysTypes.r"
    #include "PIGeneral.r"
    #include "PIUtilities.r"
    #include "DialogUtilities.r"
#elif defined(__PIWin__)
    #define Rez
    #include "PIGeneral.h"
    #include "E:\Codes\Adobe Photoshop CS2 SDK\samplecode\common\resources\PIUtilities.r"
    #include "E:\Codes\Adobe Photoshop CS2 SDK\samplecode\common\resources\WinDialogUtils.r"
#endif

resource 'PiPL' ( 16000, "FillRed", purgeable )
{
    {
        Kind { Filter },
        Name { plugInName },
        Category { "Demo By hoodlum1980" },
        Version { (latestFilterVersion << 16) | latestFilterSubVersion },
        #ifdef __PIWin__
            CodeWin32X86 { "PluginMain" },
        #else
            CodeMachOPowerPC { 0, 0, "PluginMain" },
        #endif

        SupportedModes
        {
            noBitmap, doesSupportGrayScale,
            noIndexedColor, doesSupportRGBColor,
            doesSupportCMYKColor, doesSupportHSLColor,
            doesSupportHSBColor, doesSupportMultichannel,
            doesSupportDuotone, doesSupportLABColor
        },

        EnableInfo
        {
            "in (PSHOP_ImageMode, GrayScaleMode, RGBMode,"
            "CMYKMode, HSLMode, HSBMode, MultichannelMode,"
            "DuotoneMode, LabMode,"
            "Gray16Mode, RGB48Mode, CMYK64Mode, Lab48Mode)"
        },

        PlugInMaxSize { 2000000, 2000000 },

        FilterCaseInfo {
            {    /* array: 7 elements */
                /* Flat data, no selection */
                inStraightData,
                outStraightData,
                doNotWriteOutsideSelection,
                doesNotFilterLayerMasks,
                doesNotWorkWithBlankData,
                copySourceToDestination,
                /* Flat data with selection */
                inStraightData,
                outStraightData,
                doNotWriteOutsideSelection,
                doesNotFilterLayerMasks,
                doesNotWorkWithBlankData,
                copySourceToDestination,
                /* Floating selection */
                inStraightData,
                outStraightData,
                doNotWriteOutsideSelection,
                doesNotFilterLayerMasks,
                doesNotWorkWithBlankData,
                copySourceToDestination,
                /* Editable transparency, no selection */
                inStraightData,
                outStraightData,
                doNotWriteOutsideSelection,
                doesNotFilterLayerMasks,
                doesNotWorkWithBlankData,
                copySourceToDestination,
                /* Editable transparency, with selection */
                inStraightData,
                outStraightData,
                doNotWriteOutsideSelection,
                doesNotFilterLayerMasks,
                doesNotWorkWithBlankData,
                copySourceToDestination,
                /* Preserved transparency, no selection */
                inStraightData,
                outStraightData,
                doNotWriteOutsideSelection,
                doesNotFilterLayerMasks,
                doesNotWorkWithBlankData,
                copySourceToDestination,
                /* Preserved transparency, with selection */
                inStraightData,
                outStraightData,
                doNotWriteOutsideSelection,
                doesNotFilterLayerMasks,
                doesNotWorkWithBlankData,
                copySourceToDestination
            }
        }
    }
};
在FillRed.r文件中我们可以看到我们定义了滤镜的名称,所在的滤镜分组名称(Category),可以启用的图像模式等信息。然后右键点击该文件,在该文件的自定义生成规则的命令行中,点击编辑,输入以下内容:
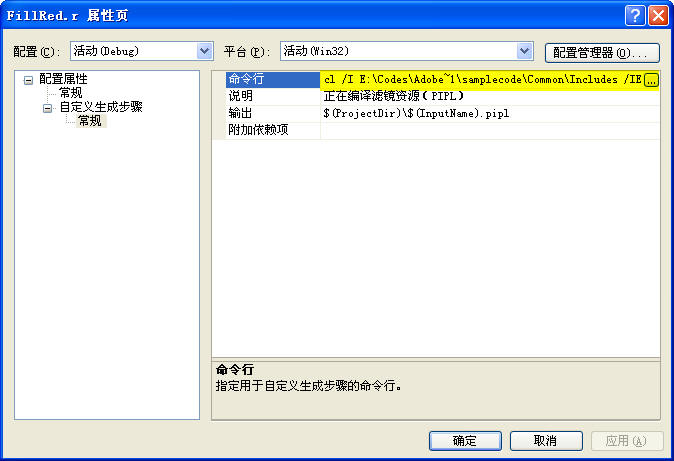
在“命令行”一栏点击编辑按钮,在弹出的窗口中输入以下两行:
cl /I E:\Codes\Adobe~1\samplecode\Common\Includes /IE:\Codes\Adobe~1\PhotoshopAPI\Photoshop /IE:\Codes\Adobe~1\PhotoshopAPI\PICA_SP /IE:\Codes\Adobe~1\samplecode\Common\Resources /EP /DWIN32=1 /Tc"$(InputPath)" > "$(ProjectDir)\$(InputName).rr"
Cnvtpipl.exe "$(ProjectDir)\$(InputName).rr" "$(ProjectDir)\$(InputName).pipl"
其中,第一行表示使用 CL.EXE 把该文件编译为 *.rr文件,上面的“/I”选项表示需要的包含目录。
第二行表示使用PS SDK中的 Cnvtpipl.exe 工具把 rr文件编译为 pipl文件,请注意为了简单,我把该工具复制到了项目的源文件所在文件夹下面。它位于SDK的路径是:“\samplecode\resources\cnvtpipl.exe”。
(b)下面我们为项目添加一个 rc文件,同样右键点击“资源文件”,添加一个FillRed.rc文件。
这是一个windows的资源文件,我们暂时还不需要任何资源,所以我们直接用文本方式打开IDE自动生成的RC文件,在结尾处添加下面的一行:
//

#endif    // APSTUDIO_INVOKED

#endif    // 英语(美国)资源
/////////////////////////////////////////////////////////////////////////////


#ifndef APSTUDIO_INVOKED
/////////////////////////////////////////////////////////////////////////////
//
// 从 TEXTINCLUDE 3 资源生成。
//
#include "FillRed.pipl"

/////////////////////////////////////////////////////////////////////////////
#endif    // 不是 APSTUDIO_INVOKED
(5)我们编译项目,即可在项目的输出目录中看到 生成 FillRed.8bf 文件,下面我们把这个文件复制到 Photoshop的滤镜文件夹下面,例如我的Photoshop CS的滤镜所在目录是:“D:\Program Files\Adobe\Photoshop CS\增效工具\滤镜”

最后我们启动Photoshop,Photoshop会扫描插件目录,并把我们的滤镜加载到相应的菜单上,我们选择一个矩形选区,然后点击我们制作的滤镜相应菜单,即可看到效果,如下图所示。注意,下面的例子的效果是我仅仅把蓝通道填充了255。
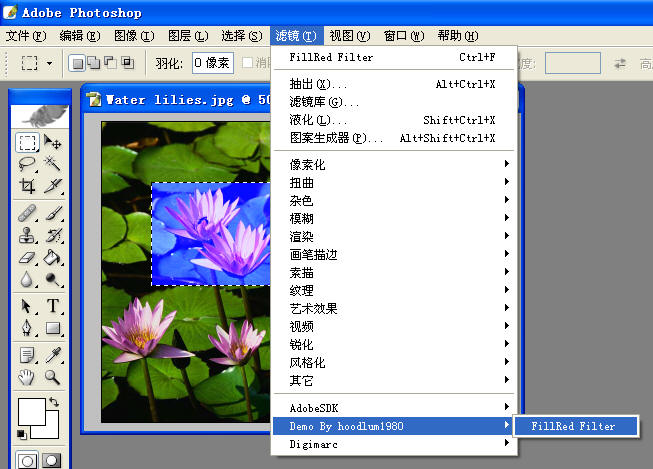
In the help menu of Photoshop-In the sub-menu of the Efficiency Incretionary Tools-, you can see the "FillRED FILTER ..." we wrote. When clicking it MessageBox.
For example, the directory of Photoshop SDK needs to be adjusted according to the specific environment. The resource conversion tools provided by PS SDK are also included in the project folder. (Note: The attachment does not contain the complete PS SDK) http://files.cnblogs.com/hoodlum1980/FillRed.rar
This section describes the establishment of a basic filter framework from project creation to embedding pipl resources. But its function is very basic and simple. In the future, we may need to continue to enrich this example, including introducing dialog resources for it, letting PS cache and read our parameters for our filter, including in Dialog surface drawing filter preview graphics and so on.
For more related articles on how to write a Photoshop filter (1), please pay attention to the PHP Chinese website!

Hot AI Tools

Undresser.AI Undress
AI-powered app for creating realistic nude photos

AI Clothes Remover
Online AI tool for removing clothes from photos.

Undress AI Tool
Undress images for free

Clothoff.io
AI clothes remover

Video Face Swap
Swap faces in any video effortlessly with our completely free AI face swap tool!

Hot Article

Hot Tools

Notepad++7.3.1
Easy-to-use and free code editor

SublimeText3 Chinese version
Chinese version, very easy to use

Zend Studio 13.0.1
Powerful PHP integrated development environment

Dreamweaver CS6
Visual web development tools

SublimeText3 Mac version
God-level code editing software (SublimeText3)

Hot Topics
 1386
1386
 52
52
 What is the reason why PS keeps showing loading?
Apr 06, 2025 pm 06:39 PM
PS "Loading" problems are caused by resource access or processing problems: hard disk reading speed is slow or bad: Use CrystalDiskInfo to check the hard disk health and replace the problematic hard disk. Insufficient memory: Upgrade memory to meet PS's needs for high-resolution images and complex layer processing. Graphics card drivers are outdated or corrupted: Update the drivers to optimize communication between the PS and the graphics card. File paths are too long or file names have special characters: use short paths and avoid special characters. PS's own problem: Reinstall or repair the PS installer.
 How to solve the problem of loading when PS is always showing that it is loading?
Apr 06, 2025 pm 06:30 PM
PS card is "Loading"? Solutions include: checking the computer configuration (memory, hard disk, processor), cleaning hard disk fragmentation, updating the graphics card driver, adjusting PS settings, reinstalling PS, and developing good programming habits.
 What are the common questions about exporting PDF on PS
Apr 06, 2025 pm 04:51 PM
Frequently Asked Questions and Solutions when Exporting PS as PDF: Font Embedding Problems: Check the "Font" option, select "Embed" or convert the font into a curve (path). Color deviation problem: convert the file into CMYK mode and adjust the color; directly exporting it with RGB requires psychological preparation for preview and color deviation. Resolution and file size issues: Choose resolution according to actual conditions, or use the compression option to optimize file size. Special effects issue: Merge (flatten) layers before exporting, or weigh the pros and cons.
 How to set password protection for export PDF on PS
Apr 06, 2025 pm 04:45 PM
Export password-protected PDF in Photoshop: Open the image file. Click "File"> "Export"> "Export as PDF". Set the "Security" option and enter the same password twice. Click "Export" to generate a PDF file.
 How to speed up the loading speed of PS?
Apr 06, 2025 pm 06:27 PM
Solving the problem of slow Photoshop startup requires a multi-pronged approach, including: upgrading hardware (memory, solid-state drive, CPU); uninstalling outdated or incompatible plug-ins; cleaning up system garbage and excessive background programs regularly; closing irrelevant programs with caution; avoiding opening a large number of files during startup.
 How to use PS Pen Tool
Apr 06, 2025 pm 10:15 PM
The Pen Tool is a tool that creates precise paths and shapes, and is used by: Select the Pen Tool (P). Sets Path, Fill, Stroke, and Shape options. Click Create anchor point, drag the curve to release the Create anchor point. Press Ctrl/Cmd Alt/Opt to delete the anchor point, drag and move the anchor point, and click Adjust curve. Click the first anchor to close the path to create a shape, and double-click the last anchor to create an open path.
 How to solve the problem of loading when the PS opens the file?
Apr 06, 2025 pm 06:33 PM
"Loading" stuttering occurs when opening a file on PS. The reasons may include: too large or corrupted file, insufficient memory, slow hard disk speed, graphics card driver problems, PS version or plug-in conflicts. The solutions are: check file size and integrity, increase memory, upgrade hard disk, update graphics card driver, uninstall or disable suspicious plug-ins, and reinstall PS. This problem can be effectively solved by gradually checking and making good use of PS performance settings and developing good file management habits.
 How to pull the vertical reference line of PS
Apr 06, 2025 pm 08:18 PM
Pull vertical guides in Photoshop: Enable ruler view (View > ruler). Hover the mouse over the vertical edge of the ruler, and then the cursor becomes a vertical line with double arrows and hold and drag the mouse to pull out the reference line. Click Delete by dragging the guide, or hovering it into a cross.


