In the previous article, we explained how to create a Photoshop filter project and how to embed PIPL resources for the filter so that the filter can be recognized and loaded by PS. And we have established the simplest and most basic filter framework. In this article, we will refine the calling process between filters and PS. We will introduce a dialog box resource for filters so that users can configure custom parameters for filters. And we will see the difference in the process when the user initiates a filter call from different menu positions. Then we will also introduce the read and write support of the PS script description system for our filter parameters, and store our parameters in the PS script system. , and read these parameters in subsequent calls.
(1) Design our filter parameters.
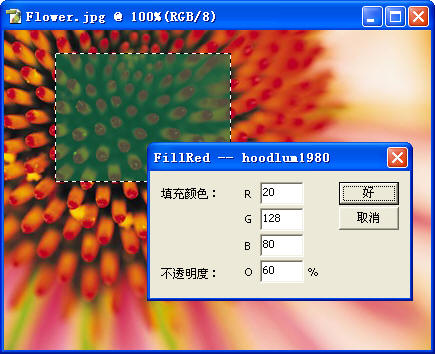
Our filter completes the most basic task, which is just "filling", so we can configure the fill color. In addition, we can also set the opacity of the fill color. Therefore, we introduce the following parameters and define it as a struct, including an RGB fill color and an opacity (0~100):
//======================================
//        定义我们的参数
//======================================
typedef struct _MYPARAMS
{
    COLORREF fillColor; //填充颜色
    int      opacity;    //百分比(0~100)
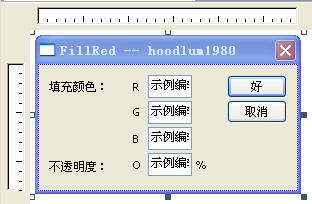
} MYPARAMS;(2) Now we add a dialog resource. The edit dialog module is shown below. Then we set the control ID for the main control.
[Note] After editing the resource file, since VC will rewrite the rc file, before compiling the project, we need to manually open the rc file and re-add #include "FillRed.pipl" ourselves.
Otherwise, the compiled filter will not be correctly identified and loaded to the filter menu by PS.
For this we add ParamDlg.h and ParamDlg.cpp files to the project. 
(c)当用户点击“最近滤镜”菜单时,将从 prepare 调用开始,这样表示我们不需要显示对话框,而是直接取此前的缓存参数。为此我们引入 ReadParams 和 WriteParams 函数。即使用PS提供的回调函数集使我们的参数和PS Scripting System进行交换数据。
下面我们主要看一下DoContinue函数发生的变化。主要是对算法进行了改动,对 inRect , inHiPlane 这两个数据进行了变动,以请求PS发送数据。在DoStart()函数中设置了第一个贴片,对inRect 和 inHiPlane 的改动是同样的。同时,在DoStart函数中, 根据事先设置过的标志,来决定是否显示对话框。
//DLLMain
BOOL APIENTRY DllMain( HMODULE hModule,
                       DWORD  ul_reason_for_call,
                       LPVOID lpReserved
                     )
{
    dllInstance = static_cast<HINSTANCE>(hModule);

    if (ul_reason_for_call == DLL_PROCESS_ATTACH || ul_reason_for_call == DLL_THREAD_ATTACH)
    {
        //在DLL被加载时,初始化我们的参数!
        gParams.fillColor = RGB(0, 0, 255);
        gParams.opacity = 100;
    }
    return TRUE;
}

#ifdef _MANAGED
#pragma managed(pop)
#endif


//===================================================================================================
//------------------------------------ 滤镜被ps调用的函数 -------------------------------------------
//===================================================================================================
DLLExport void PluginMain(const int16 selector,    void * filterRecord, int32 *data, int16 *result)
{
    gData = data;
    gResult = result;
    gFilterRecord = (FilterRecordPtr)filterRecord;

    if (selector == filterSelectorAbout)
        sSPBasic = ((AboutRecord*)gFilterRecord)->sSPBasic;
    else
        sSPBasic = gFilterRecord->sSPBasic;

    switch (selector)
    {
        case filterSelectorAbout:
            DoAbout();
            break;
        case filterSelectorParameters:
            DoParameters();
            break;
        case filterSelectorPrepare:
            DoPrepare();
            break;
        case filterSelectorStart:
            DoStart();
            break;
        case filterSelectorContinue:
            DoContinue();
            break;
        case filterSelectorFinish:
            DoFinish();
            break;
        default:
            *gResult = filterBadParameters;
            break;
    }
}

//显示关于对话框
void DoAbout()
{
    AboutRecord    *aboutPtr = (AboutRecord*)gFilterRecord;
    PlatformData *platform = (PlatformData*)(aboutPtr->platformData);
    HWND hwnd = (HWND)platform->hwnd;
    MessageBox(hwnd, "FillRed Filter: 填充颜色 -- by hoodlum1980", "关于 FillRed", MB_OK);
}

//这里准备参数,就这个滤镜例子来说,我们暂时不需要做任何事
void DoParameters()
{
    //parameter调用说明,用户点击的是原始菜单,要求显示对话框
    m_ShowUI = TRUE;

    //设置参数地址
    if(gFilterRecord->parameters == NULL)
        gFilterRecord->parameters = (Handle)(&gParams);
}

//在此时告诉PS(宿主)滤镜需要的内存大小
void DoPrepare()
{
    if(gFilterRecord != NULL)
    {
        gFilterRecord->bufferSpace = 0;
        gFilterRecord->maxSpace = 0;

        //设置参数地址
        if(gFilterRecord->parameters == NULL)
            gFilterRecord->parameters = (Handle)(&gParams);
    }
}

//inRect     : 滤镜请求PS发送的矩形区域。
//outRect    : 滤镜通知PS接收的矩形区域。
//filterRect : PS通知滤镜需要处理的矩形区域。

//由于我们是使用固定的红色进行填充,实际上我们不需要请求PS发送数据
//所以这里可以把inRect设置为NULL,则PS不向滤镜传递数据。
void DoStart()
{
    BOOL showDialog;

    if(gFilterRecord == NULL)
        return;
     //从Scripting System 中读取参数值到gParams中。
    OSErr err = ReadParams(&showDialog);
    //是否需要显示对话框
    if(!err && showDialog)
    {
        PlatformData* platform = (PlatformData*)(gFilterRecord->platformData);

        HWND hWndParent = (HWND)platform->hwnd;

        //显示对话框
        int nResult = DialogBoxParam(dllInstance, MAKEINTRESOURCE(IDD_PARAMDLG),hWndParent,(DLGPROC)ParamDlgProc, 0);

        if(nResult == IDCANCEL)
        {
            //选择了取消
            ZeroPsRect(&gFilterRecord->inRect);
            ZeroPsRect(&gFilterRecord->outRect);
            ZeroPsRect(&gFilterRecord->maskRect);

            WriteParams();

            //注意: (1)如果通知 PS 用户选择了取消,将使PS不会发起 Finish调用!
            //      (2)只要 start 调用成功,则PS保证一定发起 Finish 调用。
            *gResult = userCanceledErr;
            return;
        }
    }

    //我们初始化第一个Tile,然后开始进行调用
    m_Tile.left = gFilterRecord->filterRect.left;
    m_Tile.top = gFilterRecord->filterRect.top;
    m_Tile.right = min(m_Tile.left + TILESIZE, gFilterRecord->filterRect.right);
    m_Tile.bottom = min(m_Tile.top + TILESIZE, gFilterRecord->filterRect.bottom);

    //设置inRect, outRect
    //ZeroPsRect(&gFilterRecord->inRect); //我们不需要PS告诉我们原图上是什么颜色,因为我们只是填充
    CopyPsRect(&m_Tile, &gFilterRecord->inRect);//现在我们需要请求和outRect一样的区域
    CopyPsRect(&m_Tile, &gFilterRecord->outRect);

    //请求全部通道(则数据为interleave分布)
    gFilterRecord->inLoPlane = 0;
    gFilterRecord->inHiPlane = (gFilterRecord->planes -1);;
    gFilterRecord->outLoPlane = 0;
    gFilterRecord->outHiPlane = (gFilterRecord->planes -1);
}

//这里对当前贴片进行处理,注意如果用户按了Esc,下一次调用将是Finish
void DoContinue()
{
    int index;    //像素索引

    if(gFilterRecord == NULL)
        return;

    //定位像素
    int planes = gFilterRecord->outHiPlane - gFilterRecord->outLoPlane + 1; //通道数量

    //填充颜色
    uint8 r = GetRValue(gParams.fillColor);
    uint8 g = GetGValue(gParams.fillColor);
    uint8 b = GetBValue(gParams.fillColor);
    int opacity = gParams.opacity;

    uint8 *pDataIn  = (uint8*)gFilterRecord->inData;
    uint8 *pDataOut = (uint8*)gFilterRecord->outData;

    //扫描行宽度(字节)
    int stride = gFilterRecord->outRowBytes;

    //我们把输出矩形拷贝到 m_Tile
    CopyPsRect(&gFilterRecord->outRect, &m_Tile);
    for(int j = 0; j< (m_Tile.bottom - m_Tile.top); j++)
    {
        for(int i = 0; i< (m_Tile.right - m_Tile.left); i++)
        {
            index = i*planes + j*stride;
            //为了简单明了,我们默认把图像当作RGB格式(实际上不应这样做)
            pDataOut[ index   ] =
              (uint8)((pDataIn[ index   ]*(100-opacity) + r*opacity)/100);    //Red
            pDataOut[ index+1 ] =
              (uint8)((pDataIn[ index+1 ]*(100-opacity) + g*opacity)/100);    //Green
            pDataOut[ index+2 ] =
              (uint8)((pDataIn[ index+2 ]*(100-opacity) + b*opacity)/100);    //Blue
        }
    }

    //判断是否已经处理完毕
    if(m_Tile.right >= gFilterRecord->filterRect.right && m_Tile.bottom >= gFilterRecord->filterRect.bottom)
    {
        //处理结束
        ZeroPsRect(&gFilterRecord->inRect);
        ZeroPsRect(&gFilterRecord->outRect);
        ZeroPsRect(&gFilterRecord->maskRect);
        return;
    }
    //设置下一个tile
    if(m_Tile.right < gFilterRecord->filterRect.right)
    {
        //向右移动一格
        m_Tile.left = m_Tile.right;
        m_Tile.right = min(m_Tile.right + TILESIZE, gFilterRecord->filterRect.right);

    }
    else
    {
        //向下换行并回到行首处
        m_Tile.left = gFilterRecord->filterRect.left;
        m_Tile.right = min(m_Tile.left + TILESIZE, gFilterRecord->filterRect.right);
        m_Tile.top = m_Tile.bottom;
        m_Tile.bottom = min(m_Tile.bottom + TILESIZE, gFilterRecord->filterRect.bottom);
    }

    //ZeroPsRect(&gFilterRecord->inRect);
    CopyPsRect(&m_Tile, &gFilterRecord->inRect);//现在我们需要请求和outRect一样的区域
    CopyPsRect(&m_Tile, &gFilterRecord->outRect);
    //请求全部通道(则数据为interleave分布)
    gFilterRecord->inLoPlane = 0;
    gFilterRecord->inHiPlane = (gFilterRecord->planes -1);;
    gFilterRecord->outLoPlane = 0;
    gFilterRecord->outHiPlane = (gFilterRecord->planes -1);
}

//处理结束,这里我们暂时什么也不需要做
void DoFinish()
{
    //清除需要显示UI的标志
    m_ShowUI = FALSE;
    //记录参数
    WriteParams();
}(5)从PS Scripting System中读写我们的参数,我们为项目添加 ParamsScripting.h 和 ParamsScripting.cpp,代码如下。引入ReadParams 和 WriteParams 方法,该节主要涉及 PS 的描述符回调函数集,比较复杂,但在这里限于精力原因,我也不做更多解释了。具体可以参考我以前发布的相关随笔中有关讲解PS回调函数集的一篇文章以及代码注释。其相关代码如下:
#include "stdafx.h"
#include "ParamsScripting.h"
#include <stdio.h>

OSErr ReadParams(BOOL* showDialog)
{
    OSErr                err   = noErr;
    PIReadDescriptor    token = NULL;   //读操作符
    DescriptorKeyID        key   = NULL;    //uint32,即char*,键名
    DescriptorTypeID    type  = NULL;
    int32                flags = 0;
    int32                intValue;        //接收返回值
    char                text[128];

    //需要读取的keys
    DescriptorKeyIDArray keys = { KEY_FILLCOLOR, KEY_OPACITY, NULL };

    if (showDialog != NULL)
        *showDialog = m_ShowUI;


    // For recording and playback 用于录制和播放动作
    PIDescriptorParameters* descParams = gFilterRecord->descriptorParameters;

    if (descParams == NULL)
        return err;

    ReadDescriptorProcs* readProcs = gFilterRecord->descriptorParameters->readDescriptorProcs;

    if (readProcs == NULL)
        return err;

    if (descParams->descriptor != NULL)
    {
        //打开描述符token
        token = readProcs->openReadDescriptorProc(descParams->descriptor, keys);

        if (token != NULL)
        {
            while(readProcs->getKeyProc(token, &key, &type, &flags) && !err)
            {
                switch (key)
                {
                    case KEY_FILLCOLOR: //读取填充颜色
                        err = readProcs->getIntegerProc(token, &intValue);
                        if (!err) gParams.fillColor = intValue;
                        break;

                    case KEY_OPACITY:    //读取不透明度
                        err = readProcs->getIntegerProc(token, &intValue);
                        if (!err) gParams.opacity = intValue;
                        break;

                    default:
                        err = readErr;
                        break;
                }
            }

            //关闭描述符token
            err = readProcs->closeReadDescriptorProc(token);
            //释放描述符
            gFilterRecord->handleProcs->disposeProc(descParams->descriptor);

            descParams->descriptor = NULL;
        }

        //播放动作时的选项,是否需要显示对话框
        *showDialog = descParams->playInfo == plugInDialogDisplay;
    }
    return err;
}

//写参数
OSErr WriteParams()
{
    OSErr                err = noErr;
    PIWriteDescriptor    token = NULL;
    PIDescriptorHandle    h;

    PIDescriptorParameters*    descParams = gFilterRecord->descriptorParameters;

    if (descParams == NULL)
        return err;

    WriteDescriptorProcs* writeProcs = gFilterRecord->descriptorParameters->writeDescriptorProcs;

    if (writeProcs == NULL)
        return err;

    //打开写描述符token
    token = writeProcs->openWriteDescriptorProc();

    if (token != NULL)
    {
        //写入填充颜色
        writeProcs->putIntegerProc(token, KEY_FILLCOLOR, (int32)gParams.fillColor);
        //写入不透明度
        writeProcs->putIntegerProc(token, KEY_OPACITY,   (int32)gParams.opacity);

        //释放描述符
        gFilterRecord->handleProcs->disposeProc(descParams->descriptor);

        //关闭token
        writeProcs->closeWriteDescriptorProc(token, &h);

        //恢复描述符
        descParams->descriptor = h;

        //录制选项
        descParams->recordInfo = plugInDialogOptional;
    }
    else
    {
        return errMissingParameter;
    }
    return err;
}(6)这样我们就完整支持了参数读写,我们可以在执行滤镜时,点击“好”按钮,即可将参数更新到PS脚本系统,下次调用时会自动从脚本系统中读取上一次的参数值,并使用读取出的值初始化对话框。而当我们点击“最近滤镜”命令时,滤镜将会采用脚本系统中的参数,并且不显示对话框。

(7)下面是源代码的下载链接:
http://files.cnblogs.com/hoodlum1980/FillRed.rar
【注意】为了节省空间,提供源码时,我将覆盖以前的项目版本,也就是说在原有基础上增量更新而不再保留历史版本。
(8)总结:
这一节主要讲解为滤镜引入自定义参数以及相关的对话框资源,然后为参数增加PS脚本系统的读写支持。
到目前为止,这个滤镜已经具有比较完整的框架了,也能够被动作录制和回放。
(a)但美中不足的是,对“动作录制和回放”的支持还不够完备,我们将看到当把滤镜录制为动作时,其对话框选项的勾选框是没有的,也就是我们没法设置对话框显示的“显示”,“不显示”,“安静”三种模式,这是因为我们还没有为滤镜引入必须的事件,描述符键等相关的“术语”(aete)资源。
(b)我们还希望为滤镜的对话框引入“预览”机制,即我们希望在对话框上显示一小块图片供用户预览效果,这样用户就可以根据视觉反馈方便的调节滤镜参数。
在此后,我们将有可能进一步讲解PS的回调函数集,例如如何让PS为我们申请内存,如何更新PS的进度条,如何更完善的处理用户交互,以及引入“预览”支持,引入aete资源等相关内容。
(9)最后更新:把RGB三个通道共用一个不透明度参数,调整为可以单独每个通道的合成不透明度。因此对话框做了相应修改。
更多How to write a Photoshop filter (2)相关文章请关注PHP中文网!


