How to write a Photoshop filter -- add a thumbnail to the dialog box
In the previous article, we explained to add term resources to the filter, so that our filter can be perceived and described by the PS's scripting system, which is friendly to support the "action" panel of PS. In this article, we will further refine the previous DEMO, such as adding a small thumbnail for real-time preview on the parameter dialog box. The introduction of the dialog box is mainly to give users an opportunity and interface to set or adjust the image processing algorithm used by the filter. Usually as a measure of UI friendliness, a preview should be provided on the dialog box, so that the impact of the parameters on the results can be intuitively fed back to the user and guide them to adjust the parameters. Instead of requiring users to repeatedly execute filter commands to see the effect and then adjust parameters.
You should not be difficult to add a function of "adding a tap picture" before, but when I tried to do this, I quickly found that it was far more difficult than the explanation in the article I wrote in the past. Because when we try to use the callback function provided by PS to display thumbnails, we must be completely clear about the interface details provided by PS, including parameter settings that affect scaling, data distribution, scan lines and other details. There can't be any mistakes, otherwise we may see abnormal display, or even accidentally cause the memory to go out of bounds.
Before introducing thumbnails, I first made some interesting improvements to the filter algorithm and made a little enhancement to make it more practical.
(1) Introduce "pixel random dithering" parameters and algorithms.
When we set the pixels before, the input and output positions were completely consistent, that is, Dest(i, j) = f (Src(i, j)).
Now we consider making a little change to the above formula and randomly dithering the source pixels, that is, Dest(i, j) = f (Src(i+dx, j+dy)).
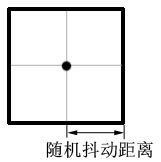
We set the jitter distance to the distance (pixel) parameter, so that when we take the source pixel, we randomly select a point as the source pixel within the square with the current pixel as the center and extending the distance to the periphery. This gives them a "dissolving" or "eroding" effect in the resulting graph. As shown in the figure below:

# Therefore, we added the distance parameter to the filter parameter, indicating the random jitter distance in the figure above. In this way, when we set the pixel at the (i, j) position, the source pixel coordinates we take are:
x = i + rand()%(2*distance+1) - distance;
y = j + rand ()%(2*distance + 1) -dance;
In actual processing, we also need to consider the above results x, Y may exceed the valid data boundary, so it is necessary Limit x, y to inside filterRect.
and because we use the tile processing method, our adjustment requires a little skill. We will change the inRect we request from PS, that is, every time we patch, outRect will remain the same as before, and we will try to expand inRect by distance pixels to all sides. This will ensure that we can get valid data every time we patch. (when the patch is inside the filterRect), unless the patch is on the edge of the filterRect.
It must be noted that since inRect is "larger" than outRect, at this time the pixels of the two Rects are no longer the same size and completely overlapping, but have a certain Move ! In the code we must consider the offset relationship between the two rectangles. You can refer to my source code here, so I won’t explain the processing method in detail.
(2) Add “Thumbnail” (Proxy) to the dialog box.
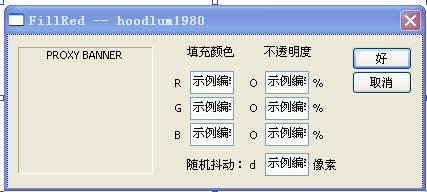
We added a parameter, and then left a small area on the left side of the dialog box to display thumbnails. For convenience, I placed a hidden STATIC control (Proxy Banner) in the thumbnail position. Its main function The usefulness is that I can get the bounds (client area coordinates) of the "thumbnail" at runtime. The modified dialog box is as shown below:

## When displaying thumbnails, we use the displayPixels callback function in gFilterRecord. The prototype of this function is as follows (typedef of function pointer): typedef MACPASCAL OSErr (*DisplayPixelsProc) ( const PSPixelMap *source, const VRect *srcRect,
int32 dstRow,int32 dstCol, void * platformContext);
The first parameter is a pointer to a PSPixelMap structure to describe a pixel data area. It is equivalent to the source image in BitBlt. The srcRect parameter describes the source image. Rectangle;
dstRow and dstCol describe the "target row" and "target column" coordinates of the target area. Please pay attention to the difference between their logical meaning and the parameters we usually use. Here dstRow is equivalent to destY, and dstCol is equivalent to the destX parameter, that is, (dstCol, dstRow) is the starting coordinate in the target area. This needs to be noted.
The last parameter platformContext is HDC in windows system.
typedef struct PSPixelMap
{
    int32 version;
    VRect bounds;
    int32 imageMode;
    int32 rowBytes;
    int32 colBytes;
    int32 planeBytes;
    void *baseAddr;

    //---------------------------------------------------------------------------
    // Fields new in version 1:
    //---------------------------------------------------------------------------
    PSPixelMask *mat;
    PSPixelMask *masks;

    // Use to set the phase of the checkerboard:
    int32 maskPhaseRow;
    int32 maskPhaseCol;

    //---------------------------------------------------------------------------
    // Fields new in version 2:
    //---------------------------------------------------------------------------
    PSPixelOverlay *pixelOverlays;
    unsigned32 colorManagementOptions;

} PSPixelMap;#
◆ version: Structure version.For the PS CS version, it requires us to set it to 1. Future versions of PS may expand it and bump up this version number.
◆ bounds: the rectangle occupied by the pixel data.
◆ imageMode: The image mode of the data area.
It supports the following modes: grayscale, RGB, CMYK, Lab.
◆ rowBytes: The number of bytes between adjacent rows. Equivalent to the scan line width (important), in bytes, must be set correctly.
◆ colBytes: The distance in bytes of pixel data in adjacent columns. Since the data is "centrally distributed", the value of this attribute mainly depends on the color depth of the pixel. For a normal 24-bit depth image that uses one byte per pixel per channel, this distance is 1 byte.
planeBytes: The distance in bytes between adjacent channels.
Since the data is "centrally distributed", this attribute is usually rowBytes * image height.
◆ baseAddr: starting address of the data area.
I have mentioned in previous articles that the inData and outData provided to us by PS are channel cross-distributed (interleave). The distribution requirements of the data in PSPixelMap here are different. It requires the data to be distributed centrally in channels.
例如对于RGB图像来说, 当我们请求所有通道时,inData/outData中的数据分布是:
R | G | B | R | G | B | R | G | B | ..... (interleave)
G | G | ... B | B | B .... (centralized distribution)
That is to say, for inData and outData, all channel data are cross-distributed, and the data of the same channel (plane) is distributed The area exists in leaps and bounds.
For PSPixelmap, the data of the same channel (Plane) is concentrated, first list all the first channel data, then list all the second channel data, and so on.
At the same time, when we perform pixel positioning and prediction buffer size, just like ordinary Bitmap pixel positioning, we must use the inRowBytes attribute (equivalent to the scan line width) in the filter parameters to position between "rows". You cannot assume or calculate the "row width" yourself.
[Note] We must know the details of the data distribution so that we can correctly locate the pixels at the specified position.
# (2.2) Control Scaling: Inputrate and Inputpadding Properties in FilterRecord;## Because the image size of PS processing is diverse, Therefore, one of the problems we must face when displaying thumbnails is the scaling problem. In most cases, since the thumbnails are only qualitative display, the requirements for data accuracy can be reduced, and taking into account performance factors, the size of the thumbnails can generally be set smaller. When the original image (filterRect) is larger than the thumbnail ( bannerRect) is large, we want the image to be shrunk and displayed on the thumbnail. When the original image is smaller than the thumbnail, we just use the actual original image size (i.e. scaling factor = 1). So now we need to understand how to reduce the original image to thumbnail size. In GDI we know that we can use the StretchBlt
function to complete scaling. Here we obtain the source image data from the inData passed to us by PS. When we want to get the reduced original image, we complete the reduction by setting the inputRate (sampling rate) attribute in the FilterRecord parameter.================================ It is defined as the Long type in PS:
Typedef Long Fixed; ## but the actual significance of Fixed in PS is a (fixed -point) decimal. The so-called Fixed is relative to float (floating point decimal). The position of the decimal point in float is not fixed, so it is called floating point. Fixed disassembles a decimal into an integer part and a decimal part, and stores them into a high 16-bit and a low 16-bit respectively. That is, its meaning is "16.16".
For example, assuming that there is a decimal number 3.00F; then the corresponding Fixed number is 0x00030000;
The method of converting from floating point to Fixed type is:
#Fixed _fixed = ( Fixed ) ( _factor * 0x10000
) ;
The method to convert from Fixed type to floating point type is (Remarks: 1 / 0x10000 = 0.0000152587890625 ):
##
Fixed_fixed;
##double _factor = _fixed * 0.0000152587890625 ;
=========================== inputRate represents the sampling rate, which is a logical Decimal, we set its value to realize that the obtained inData is the scaling result of the original image. By default, the inputRate set by PS is 1, and there is no scaling. When we obtain the thumbnail data, we need to calculate the scaling factor (factor), and then set the inputRate to factor (note the data type conversion method).
## # Inrect.richt * Inputrate, Inrect.bottom * InputRate) ## For example, when inputrate is 2.0, each two pixel samples, then inRECT, The relationship of inData is shown in the following figure:
## We need to divide the coordinates of the inRect (pink rectangular area) we want by inputRate (assuming inputRate = 2 in the picture) to get the inRect (blue rectangle in the picture above) that needs to be submitted to PS. Then we use the advanceProc callback function to get inData as the image data on the right side in the above figure. It can be seen that its size has been reduced by half in both directions.
[Note 1] When the thumbnail is processed and the dialog box is closed, the inputRate must be restored to 0x00010000 (1.0). Otherwise it will continue to affect inData in subsequent actual processing! Cause the processing to produce unexpected results.
[Note 2] Filter parameters must consider the impact of image scaling. Parameters related to scaling should also be mapped to the thumbnail size accordingly (for example, the random jitter distance in this example should be reduced proportionally). Parameters that have nothing to do with scaling (such as opacity percentage and fill color in this example) can be ignored.
# (2.2.2) int16 inputpadding;When PS provides indata, it can be supplemented. You can specify the value of the filled pixels (0~255), or set it to the following options (they are defined as negative numbers to distinguish them from the user-set pixel values):
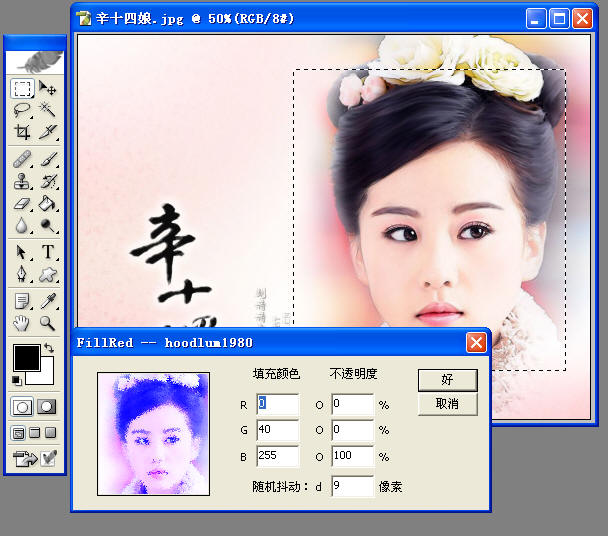
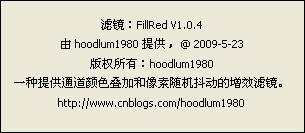
plugInWantsEdgeReplication: 复制边缘像素。 plugInDoesNotWantPadding:随机值(不确定的值)。 plugInWantsErrorOnBoundsException:(默认值)请求边界外数据时标记一个错误。 当请求区域超出边界,PS将使用上述选项设置 inData 的数据。 (2.2.3)显示缩略图。 为了显示缩略图,我们需要请求PS为我们分配缓冲区。我们首先需要预测我们的缓冲区的大小,并在Prepare调用时通知 PS 我们的需求。 考虑到当用户在对话框上进行参数调整时,我们应该实时的更新缩略图显示,以反馈当前参数效果。所以我们需要两份缩略图数据,一份是缩略图的原始数据,它作为算法的输入,在创建对话框时获取到源图数据,然后在整个对话框生命期间保持数据不会改变。另一份是我们用于处理 WM_PAINT 消息时使用的绘制数据,即可以实时改变的缩略图实际显示数据。 因此我们评估缩略图的尺寸,然后使用以下估计值: bufferSize = 缩略图最大宽度 * 缩略图最大高度 * 通道数 * 2; 在 Prepare 调用期间,我们把这个值(bufferSize)设置到 FilterRecord 的 bufferSpace 和 maxSpace 属性中,这表示我们(PlugIn)和PS(Host)进行内存需求“协商”,使 PS 了解到我们预期的内存开销,然后尝试准备足够内存以供我们后续的申请。 真正显示对话框是在 start 调用中,我们在对话框的初始化消息时准备请PS为我们申请缓冲区。基本方式如下: 我们使用 lockProc 锁定缓冲区这块内存,主要是防止操作系统在我们处理数据期间进行内存整理,从而破坏缓冲区资源。 【注意】这里加锁和解锁使用的是“引用计数”机制,即解锁次数 必须 匹配加锁次数才能使缓冲区真正得到解锁。 为了显示缩略图,并能够实时反馈用户的调节,我们准备了下面的四个函数(其中CreateProxyBuffer 和 UpdateProxy 难度最大): ● CreateProxyBuffer 计算缩略图实际大小和缩放因子,委托PS为我们申请缓冲区,同时也初始化了原始数据(即把inData拷贝到PsPixelMap中),在处理 WM_INITDIALOG 时调用。 ● UpdateProxy 当用户在对话框上修改了某个参数时(WM_COMMAND)被调用,用于更新缩略图显示数据,并刷新缩略图显示。会引起对 PaintProxy 函数的间接调用。 ● PaintProxy 绘制缩略图,通过 displayPixels 回调函数完成,在处理 WM_PAINT 消息时调用。 ● DeleteProxyBuffer 释放我们申请的缓冲区,在对话框退出前(WM_DESTROY)调用。 现在总结一下上面四个函数的调用时机,使我们对这四个函数的分工具有一个明确的认识,如下表: ##Window message Event ##Called function illustrate Window drawing PaintProxy Paint thumbnail WM_DESTROY Exit dialog ##DeleteProxyBuffer Release thumbnail buffer 【注意】把 inData 拷贝到 PSPixelMap, 是一个难度很大,并且特别需要注意的地方。两块数据的通道数据的分布不同,因此像素定位方式也完全不同。并且涉及到缓冲区大小的计算和申请。 复制缓冲区时是使用指针进行访问的,而这非常容易因为引发错误(将导致PS进程崩溃)。 在CreateProxyBuffer中,我们的主要任务是分配缓冲区,然后把源图数据(inData)相应的拷贝到我们的缓冲区(绘制时设置给PSPixelMap结构)。由于这是一个有难度的地方,因此我特别把这个函数代码放在此处展示,代码如下: 在上面的函数(CreateProxyBuffer)中,我们首先按照下面的方法计算出缩略图的缩放因子: factor = ceiling (max(原图宽度 / 缩略图宽度, 原图高度 / 缩略图高度)); 然后我们计算了缩略图的起始点坐标(m_ProxyData.left, m_ProxyData.top)和采用上述缩放因子后的缩略图实际尺寸(m_ProxyData.width, m_ProxyData.height)。请注意,我们把 factor 向上取整(ceiling),这会使缩略图的实际尺寸是小于等于其 BANNER 尺寸的。通过设置左上角坐标,我们使缩略图的位置在 BANNER 矩形中居中。 然后我们委托 PS 为我们分配两块同样大小的缓冲区 data0 和 data1(一个原图数据拷贝,一个是用于即时显示)并锁定它们。我们使用了PS提供的 advanceState 回调去请求原图数据,我在此前的文章中已经介绍过这个最重要的回调函数之一,它的作用是请求 Photoshop 立即更新滤镜参数(FilterRecord)结构中的相关数据,包括inData,outData等等。请注意在上面的代码中,我们是逐个通道进行复制的,即我们每次请求PS为我们发送一个通道的数据,然后我们把这批数据一次性的完全拷贝到缓冲区(使用memcpy),这样就完成了通道数据的“集中分布”。其中每个通道字节数(planeBytes)计算方法如下: 每个通道字节数(planeBytes) = 单一通道的扫描行宽度(inRowBytes) * 缩略图的图像高度(inRect高度); 我们把缩略图数据的信息并保存在m_ProxyData参数中。在 PaintProxy 中,我们只需要把这些信息再设置并提交给 displayProxy 回调函数即可。显示缩略图(PaintProxy,UpdateProxy)的主要逻辑和代码原理,限于篇幅这里不详细讲述,可参考附件中的源代码。最后我们可以看下滤镜的对话框运行效果如下: 当在上面的滤镜对话框中使用鼠标拖动或者键盘改变文本框数值时,左侧缩略图将会实时更新以反应当前的参数效果。在参数设置对话框中,我模拟了一个Photoshop中常见的UI特性,当你把鼠标悬停在数值文本框的左侧标签上时,光标变为一个拖动箭头的形状,这时按下鼠标,左右拖动,可以看到相应文本框的数据发生变化(这和操作滑杆控件非常类似)。在上面这个对话框中,你能够看到我如何模拟了PS的这种UI效果(在Photoshop看似朴素的外表下,隐藏着非常多让人惊叹的 UI 效果,而这只是它们中的其中一个,向强大的Photoshop致敬!)。 (3)增加一个我们自己定义的“关于对话框”。 For the sake of briefly, I just popped up a MessageBox in "About". We can customize a dialog box. Here I have also adopted PS’s suggestions and styles for dialog boxes, that is, there is no title bar, no buttons, and the initial position of the dialog box is in the middle of its parent window (the upper 1/3 ) place. The user presses Escape, Enter key or clicks anywhere with the mouse to exit the dialog box. The About dialog box of my filter is as follows (click the menu in PS: Help-> About Plug-in-> FillRed Filter... ):
在上面的代码中我们可以看到, PS CALLBACK Suites的用法 和 COM 组件的 QueryInterface 的使用方法是完全类似的:先声明想获取的回调函数集(callback Suite,一个含有一组PS内部的函数指针的struct)的一个指针,然后把该指针的地址传递给 BasicSuite 的 AcquireSuite 函数,成功以后我们就可以通过该指针去调用PS提供给插件的相应回调函数。 (4)总结。 到目前为止,我们已经完整的讲解了有关制作一个Photoshop滤镜的主要技术环节,从(1)创建项目,到(2)添加UI资源,再到(3)使Photoshop Scripting System知道我们的滤镜,并支持“动作”面板的对话框选项,以及本篇重点讲述的添加在对话框上的缩略图。涵盖了制作 Photoshop 滤镜插件的流程和重要知识,而Photoshop插件开发的技术细节以及插件种类仍然是非常繁复众多的,有待进一步的研究。 One of the main reasons why we develop Photoshop plug-ins is that PS is an important software in the field of graphics processing, which opens the plug-in extension interface for third parties. As third-party developers, we can extend PS in the form of plug-ins according to our own needs and in accordance with PS's conventions. Based on the important user base of PS, expansion and research will be more practical. The basic technology of making filters has been introduced, and the remaining work will mainly focus on the search and exploration of image processing algorithms. This example is based on the development of Windows programs based on Platform SDK, but the focus is on PS plug-in development, so some technical details of Windows program development are not explained in detail. For more information on how to write a Photoshop filter -- adding thumbnails to the dialog box, please pay attention to the PHP Chinese website for related articles! AI-powered app for creating realistic nude photos Online AI tool for removing clothes from photos. Undress images for free AI clothes remover Generate AI Hentai for free. Easy-to-use and free code editor Chinese version, very easy to use Powerful PHP integrated development environment Visual web development tools God-level code editing software (SublimeText3) The article details using Photoshop for social media graphics, covering setup, design tools, and optimization techniques. It emphasizes efficiency and quality in graphic creation. Article discusses preparing images for web use in Photoshop, focusing on optimizing file size, resolution, and color space. Main issue is balancing image quality with quick loading times. Article discusses using Photoshop's Content-Aware Fill and Move tools effectively, offering tips on selecting source areas, avoiding mistakes, and adjusting settings for optimal results. Article discusses optimizing images for web using Photoshop, focusing on file size and resolution. Main issue is balancing quality and load times. The article explains how to use Photoshop for video editing, detailing steps to import, edit, and export videos, and highlighting key features like the Timeline panel, video layers, and effects. Article discusses calibrating monitors for accurate color in Photoshop, tools for calibration, effects of improper calibration, and recalibration frequency. Main issue is ensuring color accuracy. Article discusses creating and optimizing animated GIFs in Photoshop, including adding frames to existing GIFs. Main focus is on balancing quality and file size. The article guides on preparing images for print in Photoshop, focusing on resolution, color profiles, and sharpness. It argues that 300 PPI and CMYK profiles are essential for quality prints.//获取 buffer 回调函数集指针
BufferProcs *bufferProcs = gFilterRecord->bufferProcs;
//请PS为我们申请内存
bufferProcs->allocateProc(bufferSize, &m_ProxyData.bufferId0);
//请PS为我们锁定内存(禁止内存整理)
//[ 1 ]函数返回被锁定的内存起始地址。
//[ 2 ]第二个参数是BOOL moveHigth,对windows平台将被忽略。
m_ProxyData.data0 = bufferProcs->lockProc(m_ProxyData.bufferId0, TRUE);
//=============================
// 这里是处理和更新缓冲区的期间
//=============================
//使用结束后,释放和解锁缓冲区。
//解锁
gFilterRecord->bufferProcs->unlockProc(m_ProxyData.bufferId0);
//释放内存
gFilterRecord->bufferProcs->freeProc(m_ProxyData.bufferId0);
WM_INITDIALOG Create Dialog CreateProxyBuffer Apply for thumbnail buffer and initialize ##WM_COMMAND ##WM_PAINTPainProxy //定义描述缩略图数据的结构(在CommonDefine.h中定义)
typedef struct _PROXYDATA
{
int left;//缩略图左上角客户区坐标
int top;
int width;//缩略图实际尺寸(像素)
int height;
int rowbytes; //扫描行宽度(bytes)
int planebytes; //通道间的距离(bytes)
float factor; //原图和缩略图之间的缩放因子
Ptr data0; //缩放后的原始数据块(即inData的一份拷贝),通过设置inputRate。
Ptr data1; //缩放后的显示数据块(用于即时性更新缩略图)
BufferID bufferId0; //data0的bufferId
BufferID bufferId1; //data1的bufferId
} PROXYDATA;
//用于缩略图缓冲区数据的参数
PROXYDATA m_ProxyData;
//申请缩略图内存,并申请缩略图数据
void CreateProxyBuffer()
{
int filterWidth = gFilterRecord->filterRect.right - gFilterRecord->filterRect.left;
int filterHeight = gFilterRecord->filterRect.bottom - gFilterRecord->filterRect.top;
int bannerWidth = m_RectBanner.right - m_RectBanner.left;
int bannerHeight = m_RectBanner.bottom - m_RectBanner.top;
float f1 = (float)filterWidth / bannerWidth;
float f2 = (float)filterHeight / bannerWidth;
m_ProxyData.factor = max(f1, f2);
//如果原图比缩略图小
if(m_ProxyData.factor < 1.0f)
{
m_ProxyData.factor = 1.0f;
m_ProxyData.width = filterWidth;
m_ProxyData.height = filterHeight;
}
else
{
//原图比缩略图大,则计算缩略图的实际尺寸
//把factor去除小数部分!因为我们不知道怎么把小数部分转换到Fixed的LOWORD。
m_ProxyData.factor = (int)(m_ProxyData.factor + 1.0f);
m_ProxyData.width = (int)(filterWidth / m_ProxyData.factor);
m_ProxyData.height = (int)(filterHeight / m_ProxyData.factor);
}
//设置缩略图左上角坐标(居中显示)
m_ProxyData.left = m_RectBanner.left + (bannerWidth - m_ProxyData.width)/2;
m_ProxyData.top = m_RectBanner.top + (bannerHeight - m_ProxyData.height)/2;
//想PS请求原始数据,用于填充data0
gFilterRecord->inRect.left = (int)(gFilterRecord->filterRect.left / m_ProxyData.factor);
gFilterRecord->inRect.top = (int)(gFilterRecord->filterRect.top / m_ProxyData.factor);
gFilterRecord->inRect.right = (int)(gFilterRecord->filterRect.right / m_ProxyData.factor);
gFilterRecord->inRect.bottom = (int)(gFilterRecord->filterRect.bottom / m_ProxyData.factor);
//通知 P S我们希望的补充数据(未知区域的填充数据)
gFilterRecord->inputPadding = 255; //plugInWantsEdgeReplication;
//通知 PS 输入采样率
//PS中,Fixed数字是用DWORD表示小数,HIWORDF表示整数部分,LOWORD表示小数部分。即 "ffff.ffff"
WORD hiword = (WORD)(m_ProxyData.factor);
gFilterRecord->inputRate = (hiword << 16);
//现在我们请求第一个通道的数据,以从PS那里获取一些必须的信息
gFilterRecord->inLoPlane = 0;
gFilterRecord->inHiPlane = 0;
//请求PS为我们更新InData
gFilterRecord->advanceState();
//现在我们委托PS申请缓存空间,为了简单,我们假设内存充裕,不会失败
int inHeight = gFilterRecord->inRect.bottom - gFilterRecord->inRect.top;
//扫描行宽度 * inRect高度 * 通道数
int bufferSize = gFilterRecord->inRowBytes * inHeight * gFilterRecord->planes;
//获取 buffer 回调函数集指针
BufferProcs *bufferProcs = gFilterRecord->bufferProcs;
//请PS为我们申请内存
bufferProcs->allocateProc(bufferSize, &m_ProxyData.bufferId0);
bufferProcs->allocateProc(bufferSize, &m_ProxyData.bufferId1);
//请PS为我们锁定内存(禁止内存整理)
//[ 1 ]函数返回被锁定的内存起始地址。
//[ 2 ]第二个参数是BOOL moveHigth,对windows平台将被忽略。
m_ProxyData.data0 = bufferProcs->lockProc(m_ProxyData.bufferId0, TRUE);
m_ProxyData.data1 = bufferProcs->lockProc(m_ProxyData.bufferId1, TRUE);
//注意提供给displayPixels函数的数据不是interleave分布,而是一个通道0,通道1,通道2(集中分布)!
//也就是 R R R R | G G G G | B B B B |
//现在我们把得到的通道interleave分布的数据转换为通道集中分布
uint8* p0=(uint8*)m_ProxyData.data0;
//我们复制第一个通道的数据到data0起始处
m_ProxyData.planebytes = gFilterRecord->inRowBytes * inHeight;
memcpy(p0,(void*)gFilterRecord->inData, m_ProxyData.planebytes);
//复制其他通道
for(int i=1; i<gFilterRecord->planes; i++)
{
gFilterRecord->inLoPlane = i;
gFilterRecord->inHiPlane = i;
//请求PS为我们更新InData
gFilterRecord->advanceState();
memcpy(p0 + i * m_ProxyData.planebytes,(void*)gFilterRecord->inData, m_ProxyData.planebytes);
}
//设置扫描行宽度
m_ProxyData.rowbytes = gFilterRecord->inRowBytes;
}
 ## This is an ordinary dialog box, but what I mainly want to introduce is that when the mouse moves to the URL of my blog, the cursor turns into a (IDC_HAND) hand shape, and you can click to open the URL using the default browser. It is done using the corresponding function in PS's callback function set. So here I will demonstrate a standard usage of PS callback suites:
 char url[256];
//函数集指针
PSGetFileListSuite4 *suite;
//获取GetFileList 回调函数集(callback suite)的指针
SPErr err = sSPBasic->AcquireSuite(
kPSGetFileListSuite, //suite name
kPSGetFileListSuiteVersion4, //suite version
(const void**)&suite //suite pointer
);
if(err) return TRUE;
//获取网址
GetDlgItemText(hDlg, IDC_STATIC_MYBLOG, url, sizeof(url));
//用默认浏览器打开网址
suite->BrowseUrl(url);
//释放suite
sSPBasic->ReleaseSuite(kPSGetFileListSuite, kPSGetFileListSuiteVersion4);
Hot AI Tools

Undresser.AI Undress

AI Clothes Remover

Undress AI Tool

Clothoff.io

AI Hentai Generator

Hot Article

Hot Tools

Notepad++7.3.1

SublimeText3 Chinese version

Zend Studio 13.0.1

Dreamweaver CS6

SublimeText3 Mac version

Hot Topics
 How do I use Photoshop for creating social media graphics?
Mar 18, 2025 pm 01:41 PM
 How do I prepare images for web use in Photoshop (file size, resolution, color space)?
Mar 13, 2025 pm 07:28 PM
 How do I use Photoshop's Content-Aware Fill and Content-Aware Move tools effectively?
Mar 13, 2025 pm 07:35 PM
 How do I prepare images for web using Photoshop (optimize file size, resolution)?
Mar 18, 2025 pm 01:35 PM
 How do I use Photoshop's video editing capabilities?
Mar 18, 2025 pm 01:37 PM
 How do I calibrate my monitor for accurate color in Photoshop?
Mar 13, 2025 pm 07:31 PM
 How do I create animated GIFs in Photoshop?
Mar 18, 2025 pm 01:38 PM
 How do I prepare images for print using Photoshop (resolution, color profiles)?
Mar 18, 2025 pm 01:36 PM


