PhotoShop performance optimization
Now as Photoshop versions become higher and higher, the functions are becoming more and more powerful, and often powerful functions require a computer with good configuration to run, such as HDR, image synthesis or 3D and video and other similar functions, as well as processing comparison When dealing with large-size images, if the computer configuration is not strong enough, it will often be very laggy. At this time, it is very important to set up the performance of Photoshop. The article forwarded today is translated from abroad. It mainly introduces 10 steps to To optimize the performance of Photoshop software, let’s take a look and set it up together.
1. Memory usage Photoshop is a 64-bit native application, so it can use whatever memory you provide it with. When processing larger size images, more memory would be beneficial. By default, Photoshop will allocate 70% of the memory for its use, but you can change this value through the menu Edit > Preferences > Performance. After the value is changed, restart Photoshop to take effect. This is probably the most effective way to improve Photoshop performance. 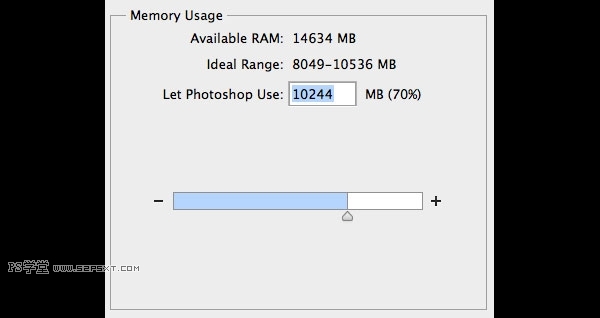
Photoshop's performance settings show how much memory you let Photoshop use.
2. Use a scratch disk When your memory is fully used, your computer's hard drive will carry the remaining workload. By default, your scratch disk is the system (boot) partition, which is usually already loaded with your installed applications and operating system. It is recommended that you add all free hard disks as scratch disks. Under the menu Edit>Preferences>Performance, you can open the scratch disk options window, and click the up and down arrows on the right to prioritize the hard disks according to their usage. You can also consider the following aspects: •Solid state drives (SSD) will be faster than traditional hard drives (HDD). •As a scratch disk, internal drives are faster than external drives. •When using an external driver, if you have the capability, make sure you are using USB3.0, Firewire or Thunderbolt
You can allocate and prioritize in Photoshop's Performance Settings window.
3. Efficiency indicator If you select Efficiency in the lower status bar of the document window, you can see the efficiency level of Photoshop. If it displays 100%, it means the highest efficiency. You can improve efficiency by reducing the number of layers and Smart Objects, but this may disrupt your workflow since editable source layers are not retained. 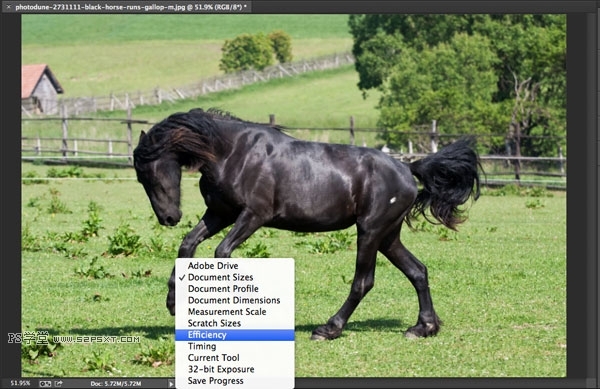
When you open a Photoshop document, the status bar will be displayed at the bottom of the document window.
4. Cache and History When you open images in Photoshop, the cache stores low-resolution versions of the images so you can quickly redraw them. There are 8 different levels of cache. The higher the cache level, the longer it will take Photoshop to open the file (use a cache level that is too high, it will cause the file to open very slowly). That is, the higher the cache level, the faster Photoshop will process the file once it is opened. You can find History & Cache under the menu Edit > Preferences > Performance. If your document image is small and has many layers (web design, UI design), you can use "Document Smaller". If your document image is large and has few layers (digital painting, image post-processing, etc.), you can select "Large document". Otherwise select "Default". A large number of history pages can reduce performance. Its variation range is 1-1000. If you are doing everything in non-destructive editing mode, this can be lowered to 5. If you are a digital artist and use the brush tool a lot, I recommend you choose 100. 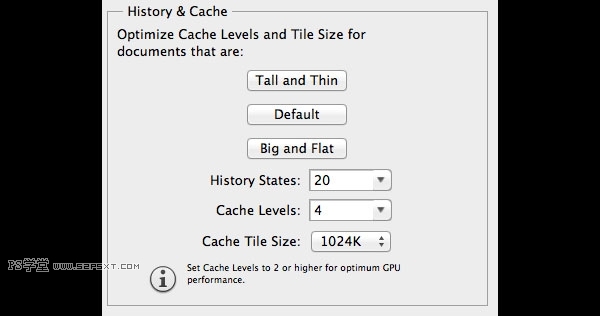
5. Reduce image resolution Before you work in Photoshop, it will be to your advantage if the purpose of your document is clear. Don't create a 2-megapixel image if you know it will only be used on pages that are 600px wide. Make sure you resize your image first before using filters, adjustments and effects. 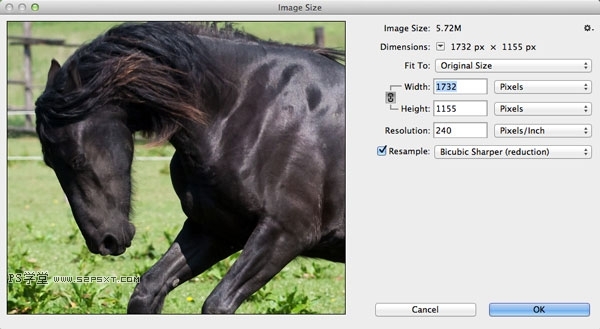
6. Close unnecessary documents This should go without saying. Opening several documents at the same time will not only be confusing, but also reduce the efficiency of Photoshop. Your goal should be 100% work efficiency (you can refer to the efficiency status bar introduced earlier). 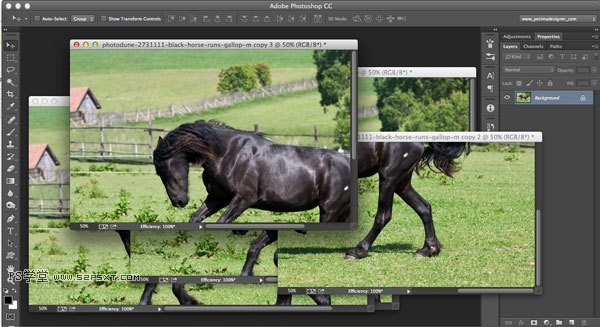
7. Store and auto-save in the background You can find this option in Edit>Preferences>File Handling. If you enable Background Storage, you can continue working in Photoshop while storing large files. You can see the storage progress in the status bar. If you turn it off, you won't be able to use automatic storage either. Autosave will save to a scratch disk, which may cause problems if your scratch disk has no free space. You can also set the auto-save interval from every 5 minutes to every hour. 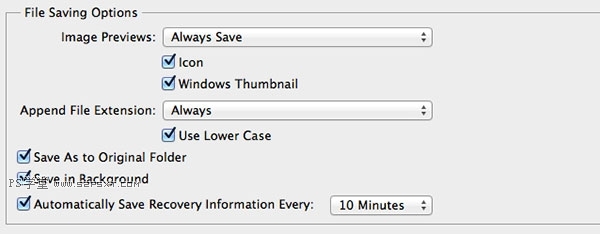
Photoshop’s file storage options
8. Clear history and clipboard You can quickly clear all history and clipboard through Edit>Clean>All any information. This is useful if you have a lot of history or have copied larger-sized images. Once a file is selected and copied, the file will be saved to the clipboard and take up valuable memory space. 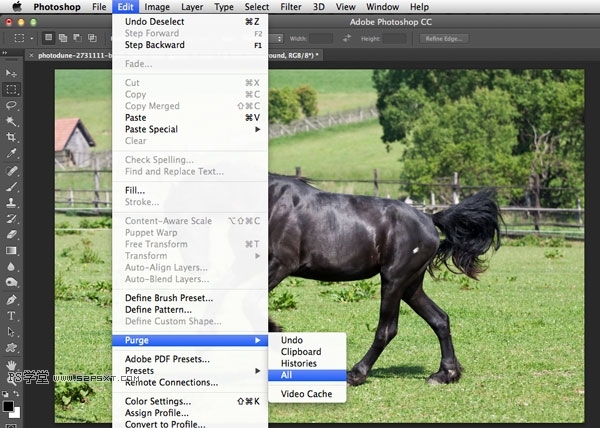
9. Turn off layer panel previews and thumbnails For layers, channels, and paths, you can turn off previews (Layer Panel Menu > Panel Options > None). Turning off layer preview thumbnails will speed up Photoshop, but may make it harder for you to find layers. If you're used to naming and grouping layers, you won't be able to find them even if you turn off thumbnails. 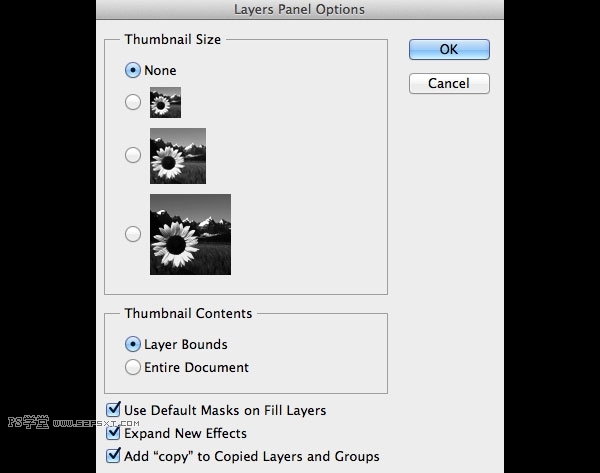
10. Use layers wisely First, it is recommended to set the status bar to display the document size. The first size is the minimum achievable combined file size of the document, and the other size after "/" is the current document size. If you have several layers, the current document size will definitely be larger than the minimum size. One of the most important things to remember is that adjustment layers are definitely better to use than copy layers because adjustment layers add little to the size of your document. Flattening the layers can reduce the file size to a minimum, but this is a very drastic change since you will lose all of your non-destructively edited layers. Under File > Scripts you will find the following items, which can also reduce the size of the document without flattening layers.
•Delete all empty layers
•Flat all layer effects
•Flat all masks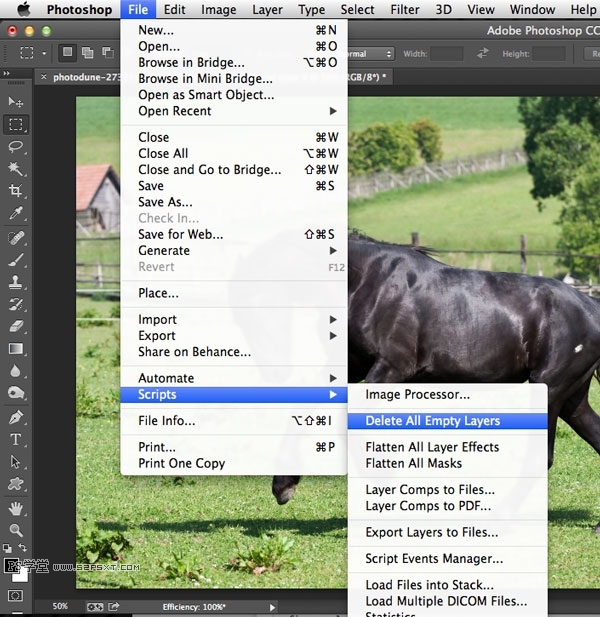
Summary
Please click on the 10 above After the performance is set up in the steps, the software operation will take a big step forward. Although the skill pictures shown above are in English, they can also be used in CS5 and above versions. Just compare and find them. I hope that through the above 10 steps, you can better optimize the performance of your Photoshop software.
For more PhotoShop performance optimization related articles, please pay attention to the PHP Chinese website!

Hot AI Tools

Undresser.AI Undress
AI-powered app for creating realistic nude photos

AI Clothes Remover
Online AI tool for removing clothes from photos.

Undress AI Tool
Undress images for free

Clothoff.io
AI clothes remover

Video Face Swap
Swap faces in any video effortlessly with our completely free AI face swap tool!

Hot Article

Hot Tools

Notepad++7.3.1
Easy-to-use and free code editor

SublimeText3 Chinese version
Chinese version, very easy to use

Zend Studio 13.0.1
Powerful PHP integrated development environment

Dreamweaver CS6
Visual web development tools

SublimeText3 Mac version
God-level code editing software (SublimeText3)

Hot Topics
 1386
1386
 52
52
 What is the reason why PS keeps showing loading?
Apr 06, 2025 pm 06:39 PM
PS "Loading" problems are caused by resource access or processing problems: hard disk reading speed is slow or bad: Use CrystalDiskInfo to check the hard disk health and replace the problematic hard disk. Insufficient memory: Upgrade memory to meet PS's needs for high-resolution images and complex layer processing. Graphics card drivers are outdated or corrupted: Update the drivers to optimize communication between the PS and the graphics card. File paths are too long or file names have special characters: use short paths and avoid special characters. PS's own problem: Reinstall or repair the PS installer.
 What are the common questions about exporting PDF on PS
Apr 06, 2025 pm 04:51 PM
Frequently Asked Questions and Solutions when Exporting PS as PDF: Font Embedding Problems: Check the "Font" option, select "Embed" or convert the font into a curve (path). Color deviation problem: convert the file into CMYK mode and adjust the color; directly exporting it with RGB requires psychological preparation for preview and color deviation. Resolution and file size issues: Choose resolution according to actual conditions, or use the compression option to optimize file size. Special effects issue: Merge (flatten) layers before exporting, or weigh the pros and cons.
 How to solve the problem of loading when PS is always showing that it is loading?
Apr 06, 2025 pm 06:30 PM
PS card is "Loading"? Solutions include: checking the computer configuration (memory, hard disk, processor), cleaning hard disk fragmentation, updating the graphics card driver, adjusting PS settings, reinstalling PS, and developing good programming habits.
 How to set password protection for export PDF on PS
Apr 06, 2025 pm 04:45 PM
Export password-protected PDF in Photoshop: Open the image file. Click "File"> "Export"> "Export as PDF". Set the "Security" option and enter the same password twice. Click "Export" to generate a PDF file.
 How to speed up the loading speed of PS?
Apr 06, 2025 pm 06:27 PM
Solving the problem of slow Photoshop startup requires a multi-pronged approach, including: upgrading hardware (memory, solid-state drive, CPU); uninstalling outdated or incompatible plug-ins; cleaning up system garbage and excessive background programs regularly; closing irrelevant programs with caution; avoiding opening a large number of files during startup.
 How to use PS Pen Tool
Apr 06, 2025 pm 10:15 PM
The Pen Tool is a tool that creates precise paths and shapes, and is used by: Select the Pen Tool (P). Sets Path, Fill, Stroke, and Shape options. Click Create anchor point, drag the curve to release the Create anchor point. Press Ctrl/Cmd Alt/Opt to delete the anchor point, drag and move the anchor point, and click Adjust curve. Click the first anchor to close the path to create a shape, and double-click the last anchor to create an open path.
 How to solve the problem of loading when the PS opens the file?
Apr 06, 2025 pm 06:33 PM
"Loading" stuttering occurs when opening a file on PS. The reasons may include: too large or corrupted file, insufficient memory, slow hard disk speed, graphics card driver problems, PS version or plug-in conflicts. The solutions are: check file size and integrity, increase memory, upgrade hard disk, update graphics card driver, uninstall or disable suspicious plug-ins, and reinstall PS. This problem can be effectively solved by gradually checking and making good use of PS performance settings and developing good file management habits.
 How to pull the vertical reference line of PS
Apr 06, 2025 pm 08:18 PM
Pull vertical guides in Photoshop: Enable ruler view (View > ruler). Hover the mouse over the vertical edge of the ruler, and then the cursor becomes a vertical line with double arrows and hold and drag the mouse to pull out the reference line. Click Delete by dragging the guide, or hovering it into a cross.


