Analysis of Java Thread Pool Execution Principle
Feb 23, 2017 am 10:42 AMThe previous article has analyzed the creation of the thread pool. It is understood that the thread pool has both preset templates and a variety of parameters to support flexible customization.
This article will focus on the life cycle of the thread pool and analyze the process of the thread pool executing tasks.
Thread pool status
First understand the two parameters that run through the thread pool code:
runState: thread pool running status
workerCount: The number of worker threads
The thread pool uses a 32-bit int to save runState and workerCount at the same time, of which the upper 3 bits are runState and the remaining 29 bits are workerCount. RunStateOf and workerCountOf are used repeatedly in the code to obtain runState and workerCount.
private final AtomicInteger ctl = new AtomicInteger(ctlOf(RUNNING, 0));
private static final int COUNT_BITS = Integer.SIZE - 3;
private static final int CAPACITY   = (1 << COUNT_BITS) - 1;
// 线程池状态
private static final int RUNNING    = -1 << COUNT_BITS;
private static final int SHUTDOWN   =  0 << COUNT_BITS;
private static final int STOP       =  1 << COUNT_BITS;
private static final int TIDYING    =  2 << COUNT_BITS;
private static final int TERMINATED =  3 << COUNT_BITS;
// ctl操作
private static int runStateOf(int c)     { return c & ~CAPACITY; }
private static int workerCountOf(int c)  { return c & CAPACITY; }
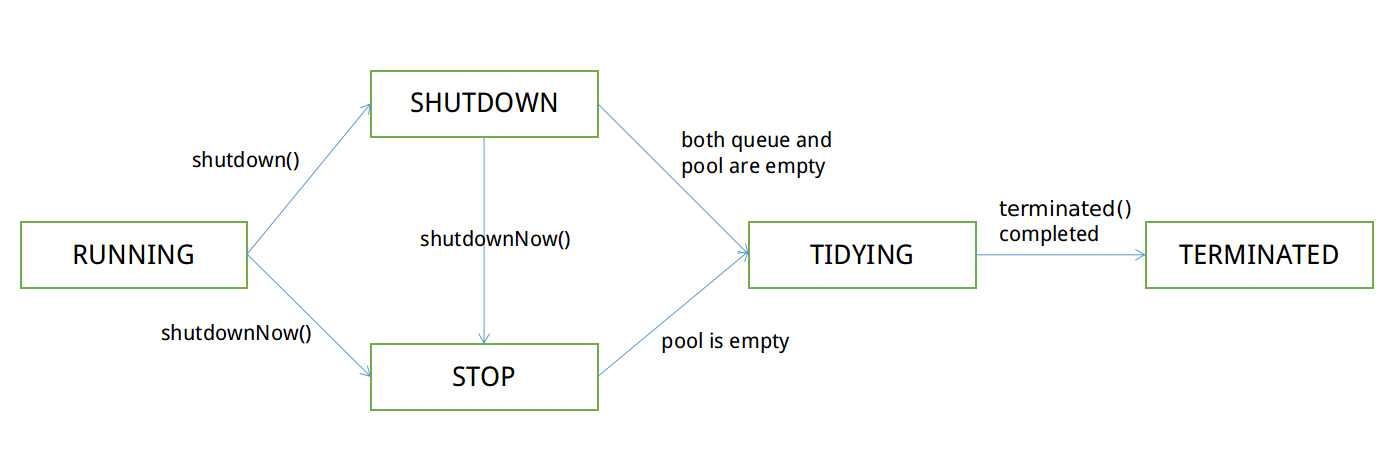
private static int ctlOf(int rs, int wc) { return rs | wc; }RUNNING: Can receive new tasks, can execute tasks in the waiting queue
SHUTDOWN: Cannot receive new tasks, can execute tasks in the waiting queue
STOP: Cannot receive new tasks, cannot execute tasks in the waiting queue, and try to terminate all running tasks
TIDYING: All tasks have been terminated, execute terminated()
TERMINATED: The execution of terminated() is completed
The thread pool status starts from RUNNING by default and ends in the TERMINATED status. There is no need to go through each status in the middle, but the status cannot be rolled back. The following are possible paths and change conditions for state changes: 
##Figure 1 Thread pool state change path
AbstractQueuedSynchronizer,简称AQS,是Java并发包里一系列同步工具的基础实现,原理是根据状态位来控制线程的入队阻塞、出队唤醒来处理同步。
AQS will not discuss it here. You only need to know that Worker wraps Thread and it performs tasks.
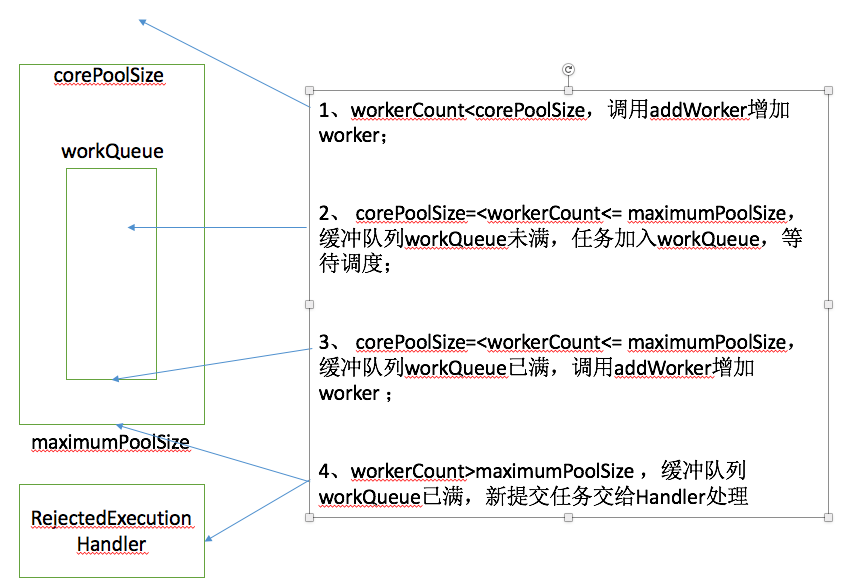
Calling execute will create a Worker according to the situation of the thread pool. The following four situations can be summarized: 
Figure 2 Worker in the thread pool Four possibilities
public void execute(Runnable command) {
    if (command == null)
        throw new NullPointerException();
    int c = ctl.get();
    //1
    if (workerCountOf(c) < corePoolSize) {
        if (addWorker(command, true))
            return;
        c = ctl.get();
    }
    //2
    if (isRunning(c) && workQueue.offer(command)) {
        int recheck = ctl.get();
        if (! isRunning(recheck) && remove(command))
            //3
            reject(command);
        else if (workerCountOf(recheck) == 0)
            //4
            addWorker(null, false);
    }
    //5
    else if (!addWorker(command, false))
        //6
        reject(command);
}
Mark 2 corresponds to the second situation, check whether the thread pool is running, and add the task to the waiting queue. Mark 3 checks the thread pool status again. If the thread pool is suddenly in a non-running state, delete the task just added to the waiting queue and hand it over to the RejectedExecutionHandler for processing. Mark 4 finds that there is no worker, so it first adds a worker with an empty task.
Mark 5 corresponds to the third situation. No more tasks can be added to the waiting queue. Call addWorker to add one for processing.
Mark 6 corresponds to the fourth situation. The core of addWorker is passed in false and the return call fails, which means that the workerCount has exceeded the maximumPoolSize, so it is handed over to RejectedExecutionHandler for processing.
private boolean addWorker(Runnable firstTask, boolean core) {
        //1
        retry:
        for (;;) {
            int c = ctl.get();
            int rs = runStateOf(c);
            // Check if queue empty only if necessary.
            if (rs >= SHUTDOWN &&
                ! (rs == SHUTDOWN &&
                   firstTask == null &&
                   ! workQueue.isEmpty()))
                return false;
            for (;;) {
                int wc = workerCountOf(c);
                if (wc >= CAPACITY ||
                    wc >= (core ? corePoolSize : maximumPoolSize))
                    return false;
                if (compareAndIncrementWorkerCount(c))
                    break retry;
                c = ctl.get();  // Re-read ctl
                if (runStateOf(c) != rs)
                    continue retry;
                // else CAS failed due to workerCount change; retry inner loop
            }
        }
        //2
        boolean workerStarted = false;
        boolean workerAdded = false;
        Worker w = null;
        try {
            w = new Worker(firstTask);
            final Thread t = w.thread;
            if (t != null) {
                final ReentrantLock mainLock = this.mainLock;
                mainLock.lock();
                try {
                    // Recheck while holding lock.
                    // Back out on ThreadFactory failure or if
                    // shut down before lock acquired.
                    int rs = runStateOf(ctl.get());
                    if (rs < SHUTDOWN ||
                        (rs == SHUTDOWN && firstTask == null)) {
                        if (t.isAlive()) // precheck that t is startable
                            throw new IllegalThreadStateException();
                        workers.add(w);
                        int s = workers.size();
                        if (s > largestPoolSize)
                            largestPoolSize = s;
                        workerAdded = true;
                    }
                } finally {
                    mainLock.unlock();
                }
                if (workerAdded) {
                    t.start();
                    workerStarted = true;
                }
            }
        } finally {
            if (! workerStarted)
                addWorkerFailed(w);
        }
        return workerStarted;
    }
The second code marked 2 is relatively simple. Create a new Worker object and add the Worker to the workers (Set collection). After successfully adding, start the thread in the worker. In finally, it is judged whether the thread is started successfully. If it is not successful, addWorkerFailed is called directly.
private void addWorkerFailed(Worker w) {
        final ReentrantLock mainLock = this.mainLock;
        mainLock.lock();
        try {
            if (w != null)
                workers.remove(w);
            decrementWorkerCount();
            tryTerminate();
        } finally {
            mainLock.unlock();
        }
}Worker(Runnable firstTask) {
setState(-1); // inhibit interrupts until runWorker
this.firstTask = firstTask;
this.thread = getThreadFactory().newThread(this);
}
public void run() {
runWorker(this);
}Copy after login
Worker uses ThreadFactory to create Thread in the constructor, and calls runWorker in the run method, which seems to be the place where the task is actually executed. Worker(Runnable firstTask) {
setState(-1); // inhibit interrupts until runWorker
this.firstTask = firstTask;
this.thread = getThreadFactory().newThread(this);
}
public void run() {
runWorker(this);
}final void runWorker(Worker w) {
Thread wt = Thread.currentThread();
Runnable task = w.firstTask;
w.firstTask = null;
w.unlock(); // allow interrupts
boolean completedAbruptly = true;
try {
//1
while (task != null || (task = getTask()) != null) {
w.lock();
//2
if ((runStateAtLeast(ctl.get(), STOP) ||
(Thread.interrupted() &&
runStateAtLeast(ctl.get(), STOP))) &&
!wt.isInterrupted())
wt.interrupt();
try {
//3
beforeExecute(wt, task);
Throwable thrown = null;
try {
task.run();
} catch (RuntimeException x) {
thrown = x; throw x;
} catch (Error x) {
thrown = x; throw x;
} catch (Throwable x) {
thrown = x; throw new Error(x);
} finally {
afterExecute(task, thrown);
}
} finally {
task = null;
//4
w.completedTasks++;
w.unlock();
}
}
completedAbruptly = false; //5
} finally {
//6
processWorkerExit(w, completedAbruptly);
}
}
Mark 2 is a more complex judgment, which ensures that the thread pool is interrupted in the STOP state, and the thread is not interrupted in the non-STOP state. If you don’t understand Java’s interrupt mechanism, read this article on how to end a Java thread correctly.
Mark 3 calls the run method and actually executes the task. Two methods, beforeExecute and afterExecute, are provided before and after execution, which are implemented by subclasses.
The completedTasks in mark 4 counts how many tasks the worker has executed, and is finally added to the completedTaskCount variable. You can call the corresponding method to return some statistical information.
The variable completedAbruptly marked 5 indicates whether the worker terminated abnormally. Execution here means normal execution. Subsequent methods require this variable.
Mark 6 ends by calling processWorkerExit, which will be analyzed later.
Then let’s look at the getTask method of the worker getting the task from the waiting queue:
private Runnable getTask() {
    boolean timedOut = false; // Did the last poll() time out?
    for (;;) {
        int c = ctl.get();
        int rs = runStateOf(c);
        //1
        // Check if queue empty only if necessary.
        if (rs >= SHUTDOWN && (rs >= STOP || workQueue.isEmpty())) {
            decrementWorkerCount();
            return null;
        }
        int wc = workerCountOf(c);
        //2
        // Are workers subject to culling?
        boolean timed = allowCoreThreadTimeOut || wc > corePoolSize;
        if ((wc > maximumPoolSize || (timed && timedOut))
            && (wc > 1 || workQueue.isEmpty())) {
            if (compareAndDecrementWorkerCount(c))
                return null;
            continue;
        }
       //3
        try {
            Runnable r = timed ?
                workQueue.poll(keepAliveTime, TimeUnit.NANOSECONDS) :
                workQueue.take();
            if (r != null)
                return r;
            timedOut = true;
        } catch (InterruptedException retry) {
            timedOut = false;
        }
    }
}标记1检查线程池的状态,这里就体现出SHUTDOWN和STOP的区别。如果线程池是SHUTDOWN状态,还会先处理完等待队列的任务;如果是STOP状态,就不再处理等待队列里的任务了。
标记2先看allowCoreThreadTimeOut这个变量,false时worker空闲,也不会结束;true时,如果worker空闲超过keepAliveTime,就会结束。接着是一个很复杂的判断,好难转成文字描述,自己看吧。注意一下wc>maximumPoolSize,出现这种可能是在运行中调用setMaximumPoolSize,还有wc>1,在等待队列非空时,至少保留一个worker。
标记3是从等待队列取任务的逻辑,根据timed分为等待keepAliveTime或者阻塞直到有任务。
最后来看结束worker需要执行的操作:
private void processWorkerExit(Worker w, boolean completedAbruptly) {
   //1
    if (completedAbruptly) // If abrupt, then workerCount wasn't adjusted
        decrementWorkerCount();
  //2
    final ReentrantLock mainLock = this.mainLock;
    mainLock.lock();
    try {
        completedTaskCount += w.completedTasks;
        workers.remove(w);
    } finally {
        mainLock.unlock();
    }
   //3
    tryTerminate();
    int c = ctl.get();
    //4
    if (runStateLessThan(c, STOP)) {
        if (!completedAbruptly) {
            int min = allowCoreThreadTimeOut ? 0 : corePoolSize;
            if (min == 0 && ! workQueue.isEmpty())
                min = 1;
            if (workerCountOf(c) >= min)
                return; // replacement not needed
        }
        addWorker(null, false);
    }
}正常情况下,在getTask里就会将workerCount减一。标记1处用变量completedAbruptly判断worker是否异常退出,如果是,需要补充对workerCount的减一。
标记2将worker处理任务的数量累加到总数,并且在集合workers中去除。
标记3尝试终止线程池,后续会研究。
标记4处理线程池还是RUNNING或SHUTDOWN状态时,如果worker是异常结束,那么会直接addWorker。如果allowCoreThreadTimeOut=true,并且等待队列有任务,至少保留一个worker;如果allowCoreThreadTimeOut=false,workerCount不少于corePoolSize。
总结一下worker:线程池启动后,worker在池内创建,包装了提交的Runnable任务并执行,执行完就等待下一个任务,不再需要时就结束。
线程池的关闭
线程池的关闭不是一关了事,worker在池里处于不同状态,必须安排好worker的”后事”,才能真正释放线程池。ThreadPoolExecutor提供两种方法关闭线程池:
shutdown:不能再提交任务,已经提交的任务可继续运行;
shutdownNow:不能再提交任务,已经提交但未执行的任务不能运行,在运行的任务可继续运行,但会被中断,返回已经提交但未执行的任务。
public void shutdown() {
    final ReentrantLock mainLock = this.mainLock;
    mainLock.lock();
    try {
        checkShutdownAccess();   //1 安全策略机制
        advanceRunState(SHUTDOWN);   //2
        interruptIdleWorkers();   //3
        onShutdown(); //4 空方法,子类实现
    } finally {
        mainLock.unlock();
    }
    tryTerminate();   //5
}shutdown将线程池切换到SHUTDOWN状态,并调用interruptIdleWorkers请求中断所有空闲的worker,最后调用tryTerminate尝试结束线程池。
public List<Runnable> shutdownNow() {
    List<Runnable> tasks;
    final ReentrantLock mainLock = this.mainLock;
    mainLock.lock();
    try {
        checkShutdownAccess();
        advanceRunState(STOP);
        interruptWorkers();
        tasks = drainQueue();  //1
    } finally {
        mainLock.unlock();
    }
    tryTerminate();
    return tasks;
}shutdownNow和shutdown类似,将线程池切换为STOP状态,中断目标是所有worker。drainQueue会将等待队列里未执行的任务返回。
interruptIdleWorkers和interruptWorkers实现原理都是遍历workers集合,中断条件符合的worker。
上面的代码多次出现调用tryTerminate,这是一个尝试将线程池切换到TERMINATED状态的方法。
final void tryTerminate() {
    for (;;) {
        int c = ctl.get();
        //1
        if (isRunning(c) ||
            runStateAtLeast(c, TIDYING) ||
            (runStateOf(c) == SHUTDOWN && ! workQueue.isEmpty()))
            return;
        //2
        if (workerCountOf(c) != 0) { // Eligible to terminate
            interruptIdleWorkers(ONLY_ONE);
            return;
        }
       //3
        final ReentrantLock mainLock = this.mainLock;
        mainLock.lock();
        try {
            if (ctl.compareAndSet(c, ctlOf(TIDYING, 0))) {
                try {
                    terminated();
                } finally {
                    ctl.set(ctlOf(TERMINATED, 0));
                    termination.signalAll();
                }
                return;
            }
        } finally {
            mainLock.unlock();
        }
        // else retry on failed CAS
    }
}标记1检查线程池状态,下面几种情况,后续操作都没有必要,直接return。
RUNNING(还在运行,不能停)
TIDYING或TERMINATED(已经没有在运行的worker)
SHUTDOWN并且等待队列非空(执行完才能停)
标记2在worker非空的情况下又调用了interruptIdleWorkers,你可能疑惑在shutdown时已经调用过了,为什么又调用,而且每次只中断一个空闲worker?你需要知道,shutdown时worker可能在执行中,执行完阻塞在队列的take,不知道要结束,所有要补充调用interruptIdleWorkers。每次只中断一个是因为processWorkerExit时,还会执行tryTerminate,自动中断下一个空闲的worker。
标记3是最终的状态切换。线程池会先进入TIDYING状态,再进入TERMINATED状态,中间提供了terminated这个空方法供子类实现。
调用关闭线程池方法后,需要等待线程池切换到TERMINATED状态。awaitTermination检查限定时间内线程池是否进入TERMINATED状态,代码如下:
public boolean awaitTermination(long timeout, TimeUnit unit)
    throws InterruptedException {
    long nanos = unit.toNanos(timeout);
    final ReentrantLock mainLock = this.mainLock;
    mainLock.lock();
    try {
        for (;;) {
            if (runStateAtLeast(ctl.get(), TERMINATED))
                return true;
            if (nanos <= 0)
                return false;
            nanos = termination.awaitNanos(nanos);
        }
    } finally {
        mainLock.unlock();
    }
}后言
以上就是Java 线程池执行原理分析 的内容,更多相关内容请关注PHP中文网(www.php.cn)!

Hot Article

Hot tools Tags

Hot Article

Hot Article Tags

Notepad++7.3.1
Easy-to-use and free code editor

SublimeText3 Chinese version
Chinese version, very easy to use

Zend Studio 13.0.1
Powerful PHP integrated development environment

Dreamweaver CS6
Visual web development tools

SublimeText3 Mac version
God-level code editing software (SublimeText3)

Hot Topics
 Break or return from Java 8 stream forEach?
Feb 07, 2025 pm 12:09 PM
Break or return from Java 8 stream forEach?


