 WeChat Applet
 WeChat Development
 Develop automatic message replies and custom menus for WeChat public accounts
Develop automatic message replies and custom menus for WeChat public accounts
Message reply
Process the request and respond
1) Follow
and also refer to the official website documentation: https ://mp.weixin.qq.com/wiki
When WeChat users follow public accounts, they can be given appropriate prompts. It can be a welcome message or a help tip. The sample code is as follows:
 class EventHandler : IHandler
    {        /// <summary>
        /// 请求的xml        /// </summary>
        private string RequestXml { get; set; }        /// <summary>
        /// 构造函数        /// </summary>
        /// <param name="requestXml"></param>
        public EventHandler(string requestXml)
        {            this.RequestXml = requestXml;
        }        /// <summary>
        /// 处理请求        /// </summary>
        /// <returns></returns>
        public string HandleRequest()
        {            string response = string.Empty;
            EventMessage em = EventMessage.LoadFromXml(RequestXml);            if (em.Event.Equals("subscribe",StringComparison.OrdinalIgnoreCase))
            {                //回复欢迎消息
                TextMessage tm = new TextMessage();
                tm.ToUserName = em.FromUserName;
                tm.FromUserName = em.ToUserName;
                tm.CreateTime = Common.GetNowTime();
                tm.Content = "欢迎您关注我们,我是服务小二,有事您开口~\n\n";
                response = tm.GenerateContent();
            }            return response;
        }
}The official introduction is as follows
Follow/Unfollow events
Users are in When following or unfollowing a public account, WeChat will push this event to the URL filled in by the developer. It is convenient for developers to send welcome messages to users or unbind accounts.
If the WeChat server does not receive a response within five seconds, it will disconnect and re-initiate the request, retrying three times in total.
Regarding retry message duplication, it is recommended to use FromUserName + CreateTime to deduplicate messages.
If the server cannot guarantee to process and reply within five seconds, you can directly reply with an empty string. The WeChat server will not do anything with this and will not initiate a retry.
Push XML packet example:
<xml>
<ToUserName><![CDATA[toUser]]></ToUserName>
<FromUserName><![CDATA[FromUser]]></FromUserName>
<CreateTime>123456789</CreateTime>
<MsgType><![CDATA[event]]></MsgType>
<Event><![CDATA[subscribe]]></Event>
</xml>
Copy after login |
Parameter description:
| Parameters | Description |
|---|---|
| ToUserName | Developer WeChat ID |
| FromUserName | Sender account (an OpenID) |
| CreateTime | Message creation time (integer) |
| MsgType | Message type, event |
| Event | Event type, subscribe(subscription), unsubscribe(cancel subscription) |
也可使用微信在线接口调试工具测试是否正常:取消/关注事件接口在线调试
2)问候
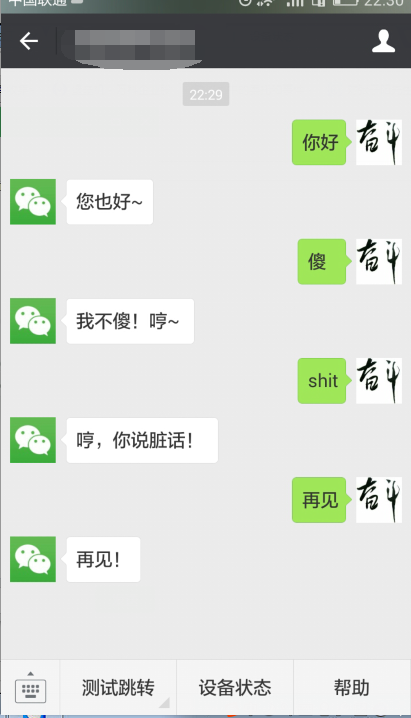
简单的交流问候,比如你好、帮助等等,跟我们使用微信聊天一样,不过回应是由我们的程序响应。具体功能,可以根据自己的需要进行添加。
微信本来就是沟通的平台。这个案例,可以用于在线服务机器人,类似于淘宝的客服机器人,可是我们这个是微信版的。
其实,很简单,获取请求消息,根据关键字来匹配回应。当然这里可能要做的工作很多,如何支持智能匹配,如何支持模糊匹配等。
 /// <summary>
    /// 文本信息处理类    /// </summary>
    public class TextHandler : IHandler
    {        /// <summary>
        /// 请求的XML        /// </summary>
        private string RequestXml { get; set; }        /// <summary>
        /// 构造函数        /// </summary>
        /// <param name="requestXml">请求的xml</param>
        public TextHandler(string requestXml)
        {            this.RequestXml = requestXml;
        }        /// <summary>
        /// 处理请求        /// </summary>
        /// <returns></returns>
        public string HandleRequest()
        {            string response = string.Empty;
            TextMessage tm = TextMessage.LoadFromXml(RequestXml);            string content = tm.Content.Trim();            if (string.IsNullOrEmpty(content))
            {
                response = "您什么都没输入,没法帮您啊,%>_<%。";
            }            else
            {                if (content.StartsWith("tq", StringComparison.OrdinalIgnoreCase))
                {                    string cityName = content.Substring(2).Trim();
                    response = WeatherHelper.GetWeather(cityName);
                }                else
                {
                    response = HandleOther(content);
                }
            }
            tm.Content = response;            //进行发送者、接收者转换
            string temp = tm.ToUserName;
            tm.ToUserName = tm.FromUserName;
            tm.FromUserName = temp;
            response = tm.GenerateContent();            return response;
        }        /// <summary>
        /// 处理其他消息        /// </summary>
        /// <param name="tm"></param>
        /// <returns></returns>
        private string HandleOther(string requestContent)
        {            string response = string.Empty;            if (requestContent.Contains("你好") || requestContent.Contains("您好"))
            {
                response = "您也好~";
            }            else if (requestContent.Contains("傻"))
            {
                response = "我不傻!哼~ ";
            }            else if (requestContent.Contains("shit") || requestContent.Contains("小王八蛋"))
            {
                response = "哼,你说脏话! ";
            }            else if (requestContent.Contains("是谁"))
            {
                response = "我是大哥大,有什么能帮您的吗?~";
            }            else if (requestContent.Contains("再见"))
            {
                response = "再见!";
            }            else if (requestContent.Contains("bye"))
            {
                response = "Bye!";
            }            else if (requestContent.Contains("谢谢"))
            {
                response = "不客气!嘿嘿";
            }            else if (requestContent == "h" || requestContent == "H" || requestContent.Contains("帮助"))
            {
                response = @"有事找警察";
            }            else
            {
                response = "您说的,可惜,我没明白啊,试试其他关键字吧。";
            }            return response;
        }
}实现效果如图所示:

自定义菜单
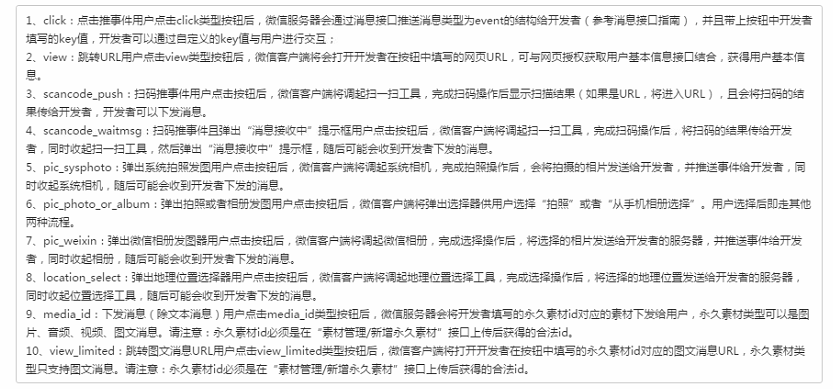
首先呢,我们要了解下微信公众号开发里面菜单有哪些类型呢?
自定义菜单接口可实现多种类型按钮,如下:

请注意,3到8的所有事件,仅支持微信iPhone5.4.1以上版本,和Android5.4以上版本的微信用户,旧版本微信用户点击后将没有回应,开发者也不能正常接收到事件推送。9和10,是专门给第三方平台旗下未微信认证(具体而言,是资质认证未通过)的订阅号准备的事件类型,它们是没有事件推送的,能力相对受限,其他类型的公众号不必使用。
接口调用请求说明
http请求方式:POST(请使用https协议) http://www.php.cn/
click和view的请求示例
 {     "button":[
     {
          "type":"click",          "name":"今日歌曲",          "key":"V1001_TODAY_MUSIC"
      },
      {           "name":"菜单",           "sub_button":[
           {
               "type":"view",               "name":"搜索",               "url":"http://www.php.cn/"
            },
            {               "type":"view",               "name":"视频",               "url":"http://www.php.cn/"
            },
            {               "type":"click",               "name":"赞一下我们",               "key":"V1001_GOOD"
            }]
       }]
}参数说明
| 参数 | 是否必须 | 说明 |
|---|---|---|
| button | 是 | 一级菜单数组,个数应为1~3个 |
| sub_button | 否 | 二级菜单数组,个数应为1~5个 |
| type | 是 | 菜单的响应动作类型 |
| name | 是 | 菜单标题,不超过16个字节,子菜单不超过60个字节 |
| key | click等点击类型必须 | 菜单KEY值,用于消息接口推送,不超过128字节 |
| url | view类型必须 | 网页链接,用户点击菜单可打开链接,不超过1024字节 |
| media_id | media_id类型和view_limited类型必须 | 调用新增永久素材接口返回的合法media_id |
当然也可以使用在线调试接口调试菜单是否设置正确:我要在线调试菜单接口
详细步骤
1、首先获取access_token
access_token是公众号的全局唯一票据,公众号调用各接口时都需使用access_token。正常情况下access_token有效期为7200秒,重复获取将导致上次获取的access_token失效。
公众号可以使用AppID和AppSecret调用本接口来获取access_token。AppID和AppSecret可在开发模式中获得(需要已经成为开发者,且帐号没有异常状态)。注意调用所有微信接口时均需使用https协议。
接口调用请求说明
http请求方式: GET
https://api.weixin.qq.com/cgi-bin/menu/create?access_token=ACCESS_TOKEN
参数说明
| 参数 | 是否必须 | 说明 |
|---|---|---|
| grant_type | 是 | 获取access_token填写client_credential |
| appid | 是 | 第三方用户唯一凭证 |
| secret | 是 | 第三方用户唯一凭证密钥,既appsecret |
返回说明
正常情况下,微信会返回下述JSON数据包给公众号:
{"access_token":"ACCESS_TOKEN","expires_in":7200}| 参数 | 说明 |
|---|---|
| access_token | 获取到的凭证 |
| expires_in | 凭证有效时间,单位:秒 |
错误时微信会返回错误码等信息,JSON数据包示例如下(该示例为AppID无效错误):
{"errcode":40013,"errmsg":"invalid appid"}
创建自定义菜单
自定义菜单能够帮助公众号丰富界面,让用户更好更快地理解公众号的功能。
目前自定义菜单最多包括3个一级菜单,每个一级菜单最多包含5个二级菜单。一级菜单最多4个汉字,二级菜单最多7个汉字,多出来的部分将会以“...”代替。请注意,创建自定义菜单后,由于微信客户端缓存,需要24小时微信客户端才会展现出来。建议测试时可以尝试取消关注公众账号后再次关注,则可以看到创建后的效果。
3、查询菜单
使用接口创建自定义菜单后,开发者还可使用接口查询自定义菜单的结构。
请求说明
http请求方式:GET
https://api.weixin.qq.com/cgi-bin/token?grant_type=client_credential&appid=APPID&secret=APPSECRET
返回说明
对应创建接口,正确的Json返回结果:
{"menu":{"button":[{"type":"click","name":"今日歌曲","key":"V1001_TODAY_MUSIC","sub_button":[]},{"type":"click","name":"歌手简介","key":"V1001_TODAY_SINGER","sub_button":[]},{"name":"菜单","sub_button":[{"type":"view","name":"搜索","url":"http://www.soso.com/","sub_button":[]},{"type":"view","name":"视频","url":"http://v.qq.com/","sub_button":[]},{"type":"click","name":"赞一下我们","key":"V1001_GOOD","sub_button":[]}]}]}}4、删除菜单
使用接口创建自定义菜单后,开发者还可使用接口删除当前使用的自定义菜单。
请求说明
http请求方式:GET
https://api.weixin.qq.com/cgi-bin/menu/get?access_token=ACCESS_TOKEN
返回说明
对应创建接口,正确的Json返回结果:
{"errcode":0,"errmsg":"ok"}5、事件处理
用户点击自定义菜单后,如果菜单按钮设置为click类型,则微信会把此次点击事件推送给开发者,注意view类型(跳转到URL)的菜单点击不会上报。
推送XML数据包示例:
<xml>
<ToUserName><![CDATA[toUser]]></ToUserName>
<FromUserName><![CDATA[FromUser]]></FromUserName>
<CreateTime>123456789</CreateTime>
<MsgType><![CDATA[event]]></MsgType>
<Event><![CDATA[CLICK]]></Event>
<EventKey><![CDATA[EVENTKEY]]></EventKey>
</xml>
参数说明:
| 参数 | 描述 |
|---|---|
| ToUserName | 开发者微信号 |
| FromUserName | 发送方帐号(一个OpenID) |
| CreateTime | 消息创建时间 (整型) |
| MsgType | 消息类型,event |
| Event | 事件类型,CLICK |
| EventKey | 事件KEY值,与自定义菜单接口中KEY值对应 |
实例讲解
我们将会在上一篇的基础上,添加自定义菜单的功能
1、获取access_token
首先需要得到AppId和AppSecret
当你成为开发者后,自然能够在,开发者模式,便可看到这两个值,可以重置。
然后调用按照二.1中所示,进行操作。
注意:access_token有过期时间,如果过期,需要重新获取。
private static DateTime GetAccessToken_Time;
        /// <summary>
        /// 过期时间为7200秒
        /// </summary>
        private static int Expires_Period = 7200;
        /// <summary>
        ///
        /// </summary>
        private static string mAccessToken;
        /// <summary>
        ///
        /// </summary>
        public static string AccessToken
        {
            get
            {
                //如果为空,或者过期,需要重新获取
                if (string.IsNullOrEmpty(mAccessToken) || HasExpired())
                {
                    //获取
                    mAccessToken = GetAccessToken(AppID, AppSecret);
                }

                return mAccessToken;
            }
        }
        /// <summary>
        ///
        /// </summary>
        /// <param name="appId"></param>
        /// <param name="appSecret"></param>
        /// <returns></returns>
        private static string GetAccessToken(string appId, string appSecret)
        {
            string url = string.Format("https://api.weixin.qq.com/cgi-bin/token?grant_type=client_credential&appid={0}&secret={1}", appId, appSecret);
            string result = HttpUtility.GetData(url);

            XDocument doc = XmlUtility.ParseJson(result, "root");
            XElement root = doc.Root;
            if (root != null)
            {
                XElement access_token = root.Element("access_token");
                if (access_token != null)
                {
                    GetAccessToken_Time = DateTime.Now;
                    if (root.Element("expires_in")!=null)
                    {
                        Expires_Period = int.Parse(root.Element("expires_in").Value);
                    }
                    return access_token.Value;
                }
                else
                {
                    GetAccessToken_Time = DateTime.MinValue;
                }
            }

            return null;
        }
        /// <summary>
        /// 判断Access_token是否过期
        /// </summary>
        /// <returns>bool</returns>
        private static bool HasExpired()
        {
            if (GetAccessToken_Time != null)
            {
                //过期时间,允许有一定的误差,一分钟。获取时间消耗
                if (DateTime.Now > GetAccessToken_Time.AddSeconds(Expires_Period).AddSeconds(-60))
                {
                    return true;
                }
            }
            return false;
}2、设置菜单
菜单需根据需要,按照实际要求进行设定。
这里我们只做简单的演示。
然后还提供了友情链接,这里提供了view类型的菜单,直接可以跳转至URL页面,为跳转做个好的演示。
具体菜单如下:
{

    "button": [
        {
            "name": "测试跳转",
            "sub_button": [
                {
                    "type": "view",
                    "name": "搜索",
                    "url": "http://www.baidu.com/"
                },
                {
                    "type": "view",
                    "name": "视频",
                    "url": "http://v.qq.com/"
                },
                {
                    "type": "click",
                    "name": "赞一下我们",
                    "key": "BTN_GOOD"
                }
            ]
        },
        {
            "type": "view",
            "name": "设备状态",
            "url": "http://vanrui.com/weixin"
        },
        {
            "type": "click",
            "name": "帮助",
            "key": "BTN_HELP"
        }
    ]
}3、管理菜单
因为菜单的变更没有那么频繁,因此通过txt文件来设置菜单,并通过管理界面来管理菜单。
主要的管理功能:
1)从文件加载菜单
2)创建菜单。即将菜单通知微信服务端,并更新至微信客户端
3)查询菜单。获取当前系统的菜单。
4)删除菜单。从微信服务器删除菜单,也可以删除后再创建。
实现代码如下:
public class MenuManager
    {        /// <summary>
        /// 菜单文件路径        /// </summary>
        private static readonly string Menu_Data_Path = System.AppDomain.CurrentDomain.BaseDirectory + "/Data/menu.txt";        /// <summary>
        /// 获取菜单        /// </summary>
        public static string GetMenu()
        {            string url = string.Format("http://www.php.cn/{0}", Context.AccessToken);            return HttpUtility.GetData(url);
        }        /// <summary>
        /// 创建菜单        /// </summary>
        public static void CreateMenu(string menu)
        {            string url = string.Format("http://www.php.cn/{0}", Context.AccessToken);            //string menu = FileUtility.Read(Menu_Data_Path);            HttpUtility.SendHttpRequest(url, menu);
        }        /// <summary>
        /// 删除菜单        /// </summary>
        public static void DeleteMenu()
        {            string url = string.Format("http://www.php.cn/{0}", Context.AccessToken);
            HttpUtility.GetData(url);
        }        /// <summary>
        /// 加载菜单        /// </summary>
        /// <returns></returns>
        public static string LoadMenu()
        {            return FileUtility.Read(Menu_Data_Path);
        }
}4、基本方法
上面的代码,其实我们对一些公共功能做了封装。如进行get请求、POST提交等操作,读取文件等。
这里我们提供进行get、Post提交的方法案例代码,如果使用,建议优化。
using System;using System.Collections.Generic;using System.IO;using System.Linq;using System.Net;using System.Text;using System.Threading.Tasks;namespace WeChat.Utility
{    /// <summary>
    /// 帮助类    /// </summary>
    class HttpUtility
    {        /// <summary>
        /// 发送请求        /// </summary>
        /// <param name="url">Url地址</param>
        /// <param name="data">数据</param>
        public static string SendHttpRequest(string url, string data)
        {            return SendPostHttpRequest(url, "application/x-www-form-urlencoded", data);
        }        /// <summary>
        ///
        /// </summary>
        /// <param name="url"></param>
        /// <returns></returns>
        public static string GetData(string url)
        {            return SendGetHttpRequest(url, "application/x-www-form-urlencoded");
        }        /// <summary>
        /// 发送请求        /// </summary>
        /// <param name="url">Url地址</param>
        /// <param name="method">方法(post或get)</param>
        /// <param name="method">数据类型</param>
        /// <param name="requestData">数据</param>
        public static string SendPostHttpRequest(string url, string contentType, string requestData)
        {
            WebRequest request = (WebRequest)HttpWebRequest.Create(url);
            request.Method = "POST";            byte[] postBytes = null;
            request.ContentType = contentType;
            postBytes = Encoding.UTF8.GetBytes(requestData);
            request.ContentLength = postBytes.Length;            using (Stream outstream = request.GetRequestStream())
            {
                outstream.Write(postBytes, 0, postBytes.Length);
            }            string result = string.Empty;            using (WebResponse response = request.GetResponse())
            {                if (response != null)
                {                    using (Stream stream = response.GetResponseStream())
                    {                        using (StreamReader reader = new StreamReader(stream, Encoding.UTF8))
                        {
                            result = reader.ReadToEnd();
                        }
                    }

                }
            }            return result;
        }        /// <summary>
        /// 发送请求        /// </summary>
        /// <param name="url">Url地址</param>
        /// <param name="method">方法(post或get)</param>
        /// <param name="method">数据类型</param>
        /// <param name="requestData">数据</param>
        public static string SendGetHttpRequest(string url, string contentType)
        {
            WebRequest request = (WebRequest)HttpWebRequest.Create(url);
            request.Method = "GET";
            request.ContentType = contentType;            string result = string.Empty;            using (WebResponse response = request.GetResponse())
            {                if (response != null)
                {                    using (Stream stream = response.GetResponseStream())
                    {                        using (StreamReader reader = new StreamReader(stream, Encoding.UTF8))
                        {
                            result = reader.ReadToEnd();
                        }
                    }
                }
            }            return result;
        }
    }
}class XmlUtility
{ /// <summary>
///
/// </summary>
/// <param name="json"></param>
/// <param name="rootName"></param>
/// <returns></returns>
public static XDocument ParseJson(string json,string rootName)
{ return JsonConvert.DeserializeXNode(json, rootName);
}
}5、事件处理
设置了菜单,这下需要处理事件了。跟我们之前设计ASPX或者WinForm一样,都要绑定按钮的事件。这里只是通过XML消息将请求传递过来。
通过“2、设置菜单"中具体的菜单内容,我们便已经知道需要进行哪些事件处理了。对于按钮类型为view的,无须处理,它会自动跳转至指定url.
需要处理的点击事件:
1)赞一下
2)帮助
这个还要沿用上章中的事件处理器EventHandler来扩展处理。
具体的实现代码吧:
class EventHandler : IHandler
    {
        /// <summary>
        /// 请求的xml
        /// </summary>
        private string RequestXml { get; set; }
        /// <summary>
        /// 构造函数
        /// </summary>
        /// <param name="requestXml"></param>
        public EventHandler(string requestXml)
        {
            this.RequestXml = requestXml;
        }
        /// <summary>
        /// 处理请求
        /// </summary>
        /// <returns></returns>
        public string HandleRequest()
        {
            string response = string.Empty;
            EventMessage em = EventMessage.LoadFromXml(RequestXml);
            if (em != null)
            {
                switch (em.Event.ToLower())
                {
                    case ("subscribe"):
                        response = SubscribeEventHandler(em);
                        break;
                    case "click":
                        response = ClickEventHandler(em);
                        break;
                }
            }

            return response;
        }
        /// <summary>
        /// 关注
        /// </summary>
        /// <param name="em"></param>
        /// <returns></returns>
        private string SubscribeEventHandler(EventMessage em)
        {
            //回复欢迎消息
            TextMessage tm = new TextMessage();
            tm.ToUserName = em.FromUserName;
            tm.FromUserName = em.ToUserName;
            tm.CreateTime = Common.GetNowTime();
            tm.Content = "欢迎您关注我们,我是服务小二,有事您说话~\n\n";
            return tm.GenerateContent();
        }
        /// <summary>
        /// 处理点击事件
        /// </summary>
        /// <param name="em"></param>
        /// <returns></returns>
        private string ClickEventHandler(EventMessage em)
        {
            string result = string.Empty;
            if (em != null && em.EventKey != null)
            {
                switch (em.EventKey.ToUpper())
                {
                    case "BTN_GOOD":
                        result = btnGoodClick(em);
                        break;
                    case "BTN_HELP":
                        result = btnHelpClick(em);
                        break;
                }
            }

            return result;
        }
        /// <summary>
        /// 赞一下
        /// </summary>
        /// <param name="em"></param>
        /// <returns></returns>
        private string btnGoodClick(EventMessage em)
        {
            //回复欢迎消息
            TextMessage tm = new TextMessage();
            tm.ToUserName = em.FromUserName;
            tm.FromUserName = em.ToUserName;
            tm.CreateTime = Common.GetNowTime();
            tm.Content = @"谢谢您的支持!";
            return tm.GenerateContent();
        }
        /// <summary>
        /// 帮助
        /// </summary>
        /// <param name="em"></param>
        /// <returns></returns>
        private string btnHelpClick(EventMessage em)
        {
            //回复欢迎消息
            TextMessage tm = new TextMessage();
            tm.ToUserName = em.FromUserName;
            tm.FromUserName = em.ToUserName;
            tm.CreateTime = Common.GetNowTime();
            tm.Content = @"有事找警察~";
            return tm.GenerateContent();
}调试效果
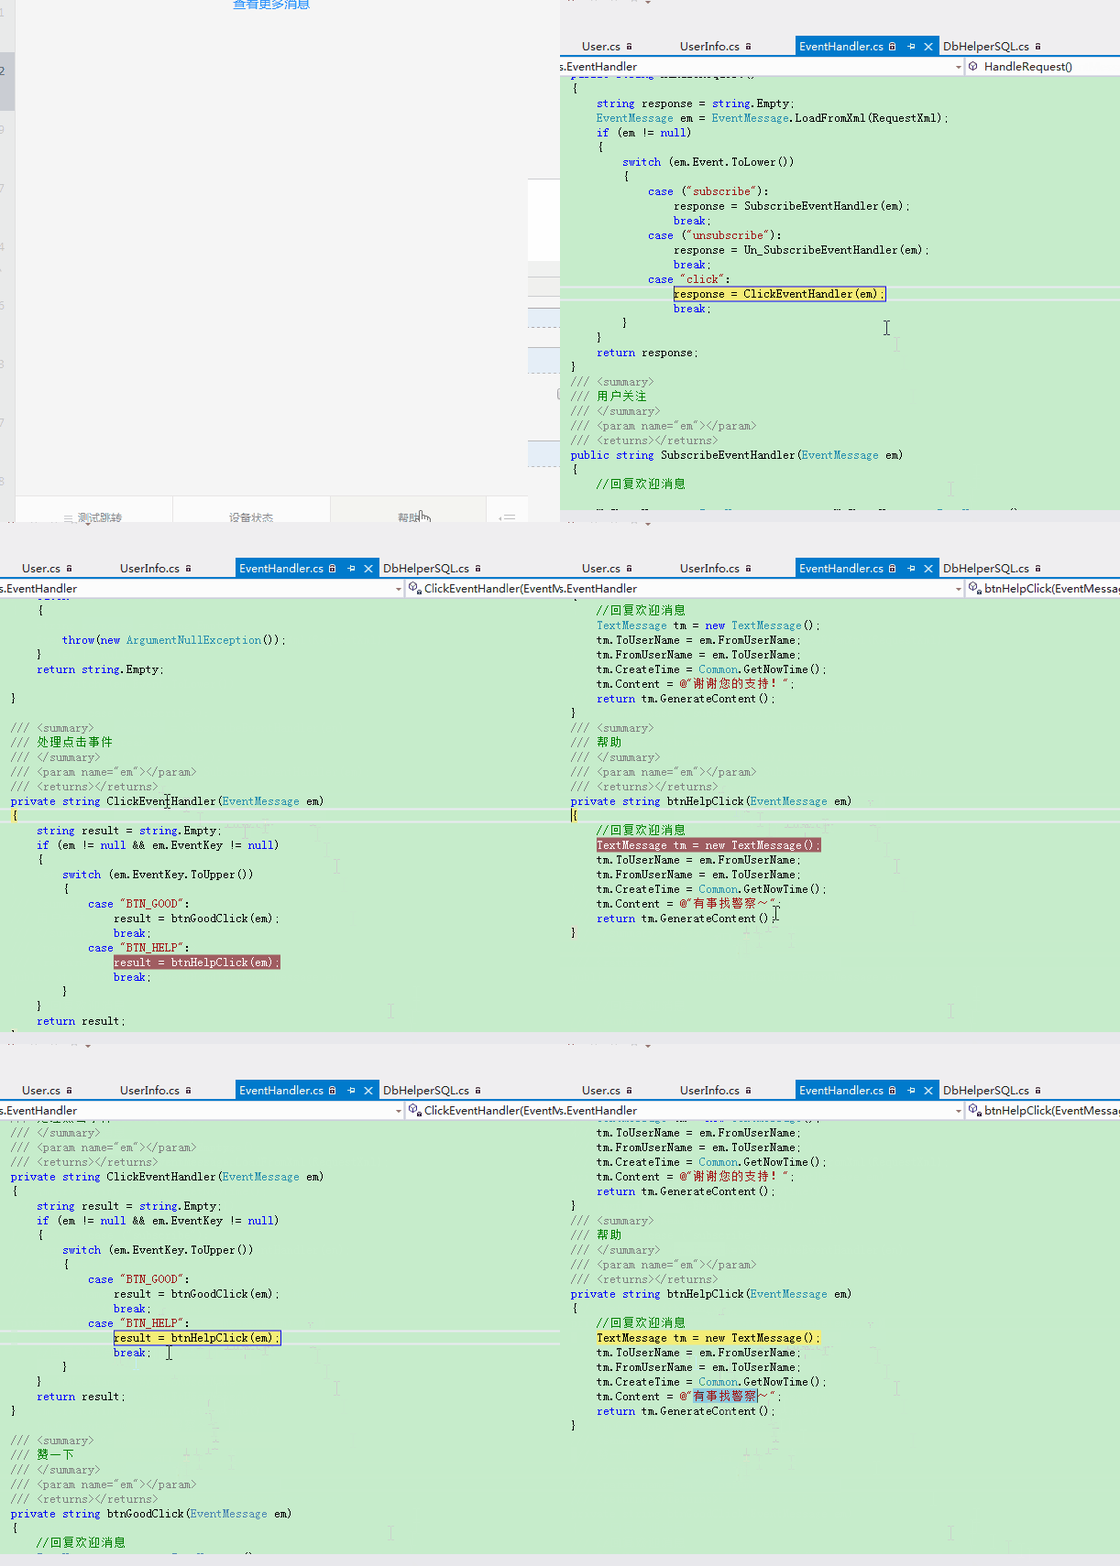
图中点击的帮助菜单,如果大家仔细观察,会发现后面断点进入第二次了,这是因为前面提到的,微信服务器5秒未回复,就会重复尝试发3次请求,所以就会有多次进入断点的效果。

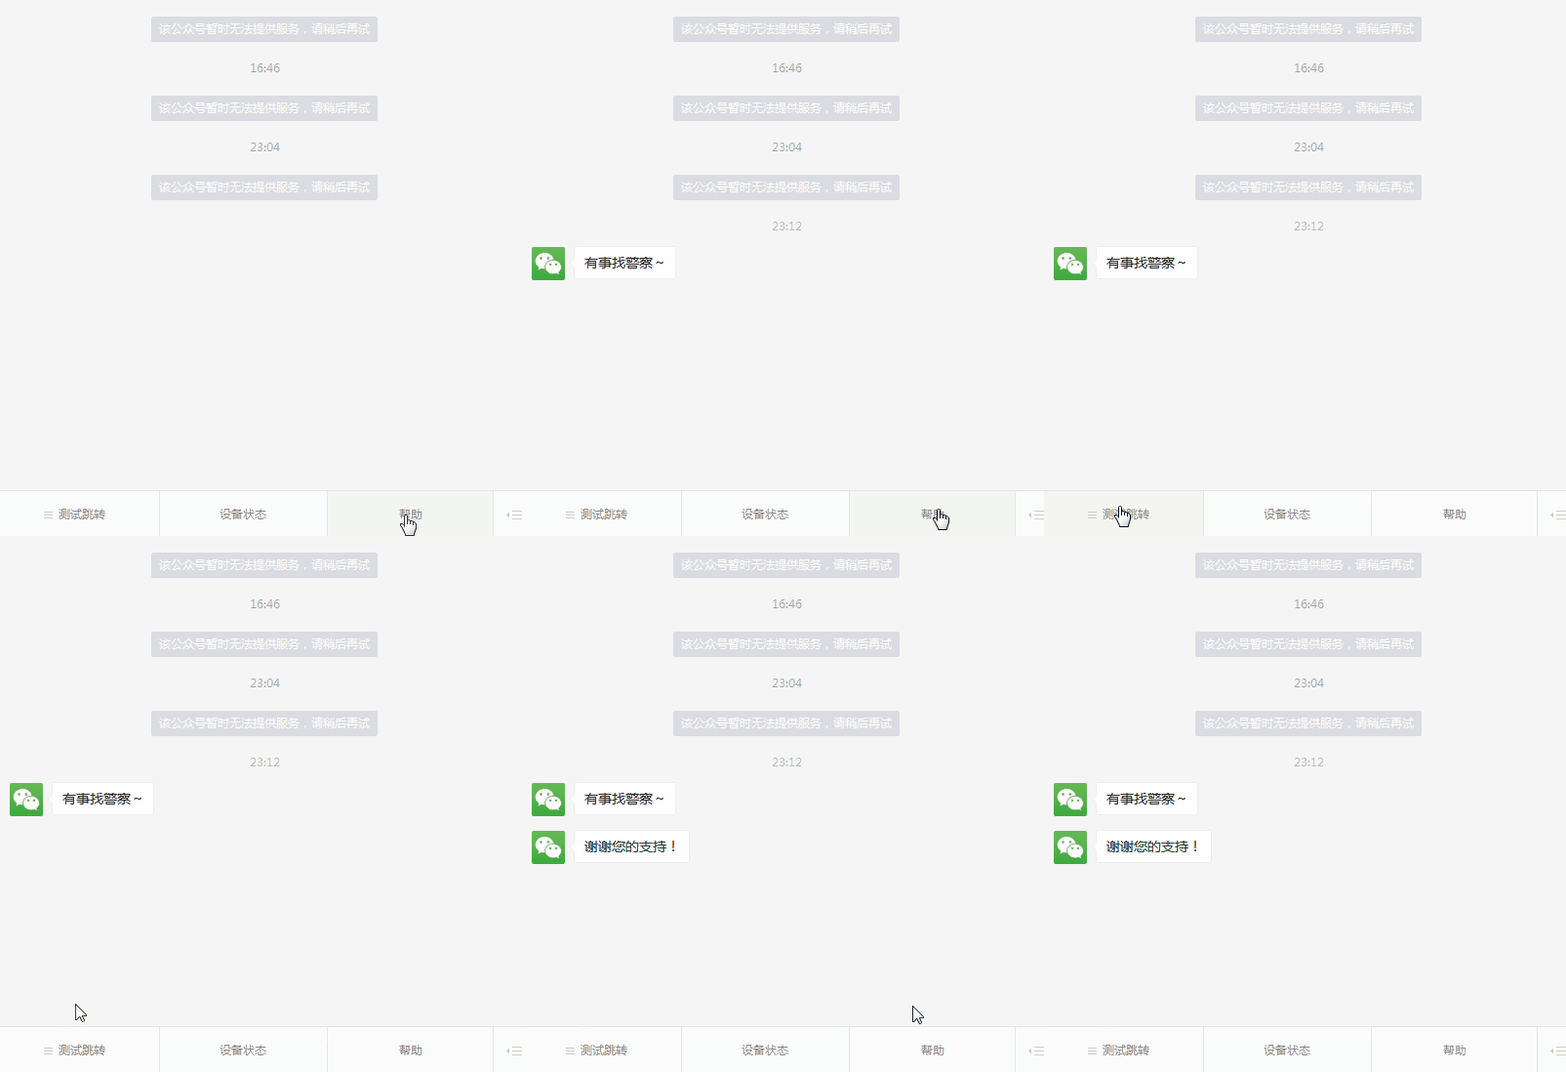
最终效果

Demo下载
链接:点我下载 密码:41dt
Git地址:https://github.com/XiaoYong666/-Demo
更多微信公众号开发自动消息回复和自定义菜单 相关文章请关注PHP中文网!

Hot AI Tools

Undresser.AI Undress
AI-powered app for creating realistic nude photos

AI Clothes Remover
Online AI tool for removing clothes from photos.

Undress AI Tool
Undress images for free

Clothoff.io
AI clothes remover

AI Hentai Generator
Generate AI Hentai for free.

Hot Article

Hot Tools

Notepad++7.3.1
Easy-to-use and free code editor

SublimeText3 Chinese version
Chinese version, very easy to use

Zend Studio 13.0.1
Powerful PHP integrated development environment

Dreamweaver CS6
Visual web development tools

SublimeText3 Mac version
God-level code editing software (SublimeText3)

Hot Topics
 1377
1377
 52
52

