WeChat applet Nginx environment configuration
Detailed explanation of WeChat Mini Program Server environment configuration
Main content:
1. SSL free certificate application steps
2. Nginx HTTPS configuration
3. TLS 1.2 upgrade process
WeChat applet requires using https to send requests, then the web server must be configured to support https, which needs to be done first Applying for an SSL certificate
applet also requires that the version of TLS (Transport Layer Security Protocol) is at least 1.2. After configuring https, If the version of TLS is lower, it involves upgrade issues
So the main steps for server-side environment configuration:
Apply for SSL certificate
Configure the web server to support https (I am using nginx)
Upgrade to TLS 1.2
SSL Certificate Application
https You need to use an SSL certificate. The price of this certificate is between three and five thousand to more than ten thousand per year. For small teams or those who want to get familiar with small For users of the program, the price is still relatively high. In this case, you can choose a free certificate. In addition, you can also consider cloud services, such as Wild Dog, LeanCloud these mature ones Service platforms all support https. If these platforms can meet your business needs, you will save a lot of trouble
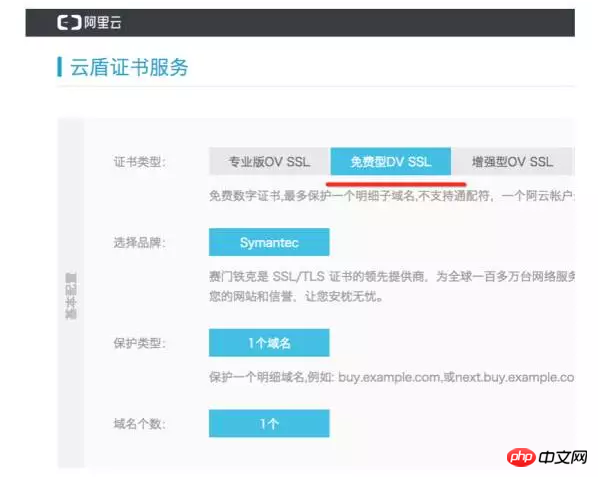
Free Certificate: Symantec Free DV SSL on Alibaba Cloud
Application process
wanwang.aliyun.com
Log in to the console, click Security-> Certificate Service in the left menu, There is a Purchase Certificate button in the upper right corner of this page. Click to enter the purchase page, select Free DV SSL, and purchase the

0 yuan. Just go through the purchase process. After completion, return to the Certificate Service page. You can see a certificate
## in the list.  #First perform the "
" operation, fill in your domain name and basic information and then "
Complete" the connection will change to " Progress ", click and follow the prompts, mainly to verify your own server. I chose file verification, download a file and upload it to my server, wait for verification After the verification is OK, it will take about 10 minutes You can download the SSL certificate from left to right
Nginx HTTPS configurationUpload the certificate to the nginx directory, for example
/usr/local/nginx/cert
Modify
conf/nginx.confConfigure HTTPS server block and add SSL configuration
# HTTPS server
#
server {
 listen  443 ssl;
 server_name localhost;
 ......

 ssl on;
 ssl_certificate /usr/local/nginx/cert/213994146300992.pem;
 ssl_certificate_key /usr/local/nginx/cert/213994146300992.key;
 ssl_session_timeout 5m;
 ssl_ciphers ECDHE-RSA-AES128-GCM-SHA256:ECDHE:ECDH:AES:HIGH:!NULL:!aNULL:!MD5:!ADH:!RC4;
 ssl_protocols TLSv1 TLSv1.1 TLSv1.2;
 ssl_prefer_server_ciphers on;


 location / {
  root html;
  index index.html index.htm;
 }

 ......

}
Reload the configuration file and use
to access your domain name in the browser to see if you can access it normally
View TLS version
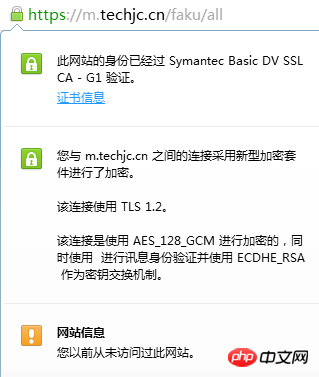
After accessing the https url, there will be a small green lock icon in front of the address bar. Click it to view the TLS version information
 If it does not reach
, you need to upgradeThe operating environment below is centos linux
1) Check the openssl version
https://www.openssl.org/source/
The following versions need to be upgraded. The previous versions have officially stopped maintenance2) Upgrade openssl
Go to the official website to download the new version
https://www.openssl.org/source/
For example, download to
/usr/localUpgrade
cd /usr/local
tar zxvf openssl-1.0.2j.tar.gz
cd openssl-1.0.2j
./config --prefix=/usr/local/openssl
make && make install
mv /usr/bin/openssl \
 /usr/bin/openssl.OFF
mv /usr/include/openssl \
 /usr/include/openssl.OFF
ln -s \
 /usr/local/openssl/bin/openssl \
 /usr/bin/openssl
ln -s \
 /usr/local/openssl/include/openssl \
 /usr/include/openssl
echo "/usr/local/openssl/lib"\
 >>/etc/ld.so.conf
ldconfig -v
Verification
openssl version -a
3) Recompile nginx
After upgrading
OpenSSL, nginx needs to be recompiled, otherwise TLS will still be the old versionThe following is the basic installation. If you need more, please adjust it yourself
Software used
- openssl
- Has been installed previously
- pcre
下载地址
http://www.pcre.org/
例如下载到 /usr/local

cd /usr/local
tar -zxv -f pcre-8.39.tar.gz
cd pcre-8.39
./configure --prefix=/usr/local/pcre/
make && make install
下载地址
http://www.zlib.net/
例如下载到 /usr/local

cd /usr/local
tar -zxv -f zlib-1.2.10.tar.gz
cd zlib-1.2.10
./configure --prefix=/usr/local/zlib/
make && make install
tar zxvf nginx-1.10.3.tar.gz
cd nginx-1.10.3

./configure --prefix=/data/nginx --with-http_ssl_module --with-openssl=/usr/local/openssl
tar -zxvf nginx-1.10.2.tar.gz
cd nginx-1.10.2

./configure \
--user=用户 \
--group=组 \
--prefix=/usr/local/nginx \
--with-http_ssl_module \
--with-openssl=/usr/local/openssl-1.0.2j \
--with-pcre=/usr/local/pcre-8.39 \
--with-zlib=/usr/local/zlib-1.2.10 \
--with-http_stub_status_module \
--with-threads

make && make install
After the compilation is completed, remember to modify the configuration file and add SSL related information
Then start nginx and visit https url to verify the TSL version again
Problems encountered when compiling and installing Nginx:The error message is as follows:
/bin/sh: line 2: ./config: No such file or directory
make[1]: *** [/usr/local/ssl/.openssl/include/openssl/ssl.h] Error 127
make[1]: Leaving directory `/usr/local/src/nginx-1.10.2‘
make: *** [build] Error 2
需要说明的是,我这里编译所使用的Nginx源码是1.10.2的。根据报错信息我们知道,出错是因为Nginx在编译时并不能在/usr/local/ssl/.openssl/ 这个目录找到对应的文件,其实我们打开/usr/local/ssl/这个目录可以发现这个目录下是没有.openssl目录的,因此我们修改Nginx编译时对openssl的路径选择就可以解决这个问题了
解决方案:
打开nginx源文件下的/root/nginx-1.10.2/auto/lib/openssl/conf文件
找到这么一段代码:
CORE_INCS="$CORE_INCS $OPENSSL/.openssl/include"
CORE_DEPS="$CORE_DEPS $OPENSSL/.openssl/include/openssl/ssl.h"
CORE_LIBS="$CORE_LIBS $OPENSSL/.openssl/lib/libssl.a"
CORE_LIBS="$CORE_LIBS $OPENSSL/.openssl/lib/libcrypto.a"
CORE_LIBS="$CORE_LIBS $NGX_LIBDL"
修改成以下代码:
CORE_INCS="$CORE_INCS $OPENSSL/.openssl/include"
CORE_DEPS="$CORE_DEPS $OPENSSL/include/openssl/ssl.h"
CORE_LIBS="$CORE_LIBS $OPENSSL/lib/libssl.a"
CORE_LIBS="$CORE_LIBS $OPENSSL/lib/libcrypto.a"
CORE_LIBS="$CORE_LIBS $NGX_LIBDL"
然后再进行Nginx的编译安装即可
感谢阅读,希望能帮助到大家,谢谢大家对本站的支持!
更多微信小程序 Nginx环境配置相关文章请关注PHP中文网!

Hot AI Tools

Undresser.AI Undress
AI-powered app for creating realistic nude photos

AI Clothes Remover
Online AI tool for removing clothes from photos.

Undress AI Tool
Undress images for free

Clothoff.io
AI clothes remover

Video Face Swap
Swap faces in any video effortlessly with our completely free AI face swap tool!

Hot Article

Hot Tools

Notepad++7.3.1
Easy-to-use and free code editor

SublimeText3 Chinese version
Chinese version, very easy to use

Zend Studio 13.0.1
Powerful PHP integrated development environment

Dreamweaver CS6
Visual web development tools

SublimeText3 Mac version
God-level code editing software (SublimeText3)


