
This article is the beginning and end of the canvas API series. After this article, all canvas properties and methods will be finished. Oh, no, they should be most commonly used, and there are also some uncommon properties and methods. Due to various reasons, I won’t introduce them. The focus in the later stage is to write more practical examples of canvas. Well, I think this is the most practical. As the saying goes, an example is worth a thousand words. Without further ado, let’s take a look. Here are the remaining properties and methods!
1. createPattern
createPattern(image,"repeat|repeat-x|repeat-y|no-repeat") Repeats the specified element in the specified direction
Parameters: image refers to a practical picture, canvas Or the way the second parameter of the video object represents repetition
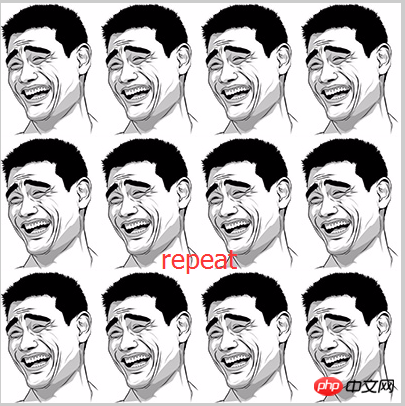
Looking at the following parameters, it is easy to think of background-repeat in css. I have to say something about the first parameter. This is different from background. It is not a referenced image. address, but a picture object. Pay special attention here. Let’s look at the performance of these repetition methods respectively:
var aImg = new Image();
aImg.src = '4.jpg';
aImg.onload = function(){
    draw(this);
}
function draw(obj){
    //这里为了演示方便,把其他的先注释
    //var bg = ctx.createPattern(obj,"repeat");
    //var bg = ctx.createPattern(obj,"repeat-x");
    //var bg = ctx.createPattern(obj,"repeat-y");
    var bg = ctx.createPattern(obj,"no-repeat");
    ctx.fillStyle = bg;
    ctx.fillRect(0,0,400,400);
}
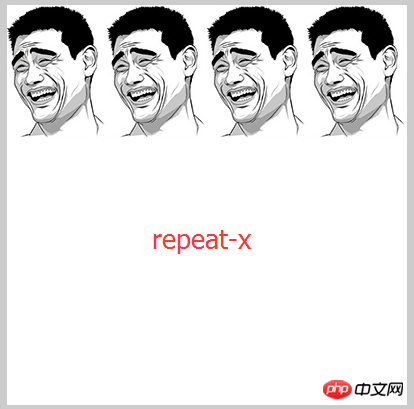
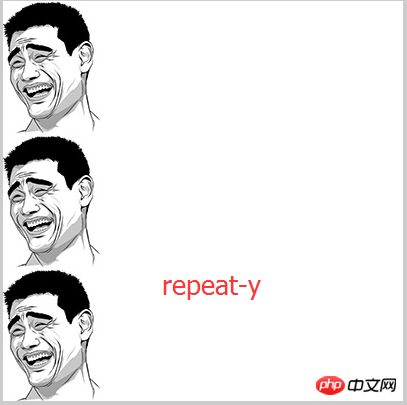
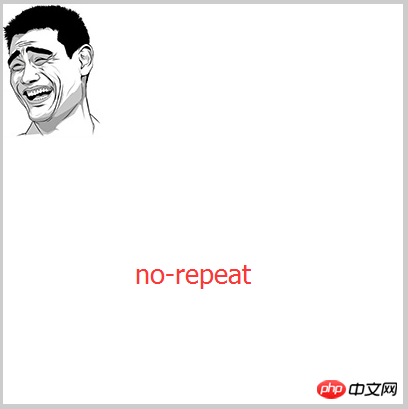
Well, the effect is the same as the background-repeat of css, so it’s easy to understand, but canvas does not have background-position. Well, this effect is like this, there is nothing to say!
See here for specific effects——canvas background repetition
2. gloableCompositeOperation
gloableCompositeOperation() Sets or returns how to draw a new image onto an existing image
Parameters:
source-over By default, the source image is displayed over the target image.
source-atop Displays the source image on top of the target image. The parts of the source image that lie outside the target image are invisible.
source-in Display the source image in the target image. Only the portion of the source image within the destination image is displayed; the destination image is transparent.
source-out Display the source image outside the target image. Only the portion of the source image other than the target image will be displayed, and the target image will be transparent.
destination-over Displays the destination image above the source image.
destination-atop Displays the destination image on top of the source image. Portions of the target image outside the source image will not be displayed.
destination-in Displays the destination image within the source image. Only the portion of the target image within the source image will be displayed; the source image is transparent.
destination-out Displays the destination image outside the source image. Only the portion of the target image outside the source image is displayed; the source image is transparent.
lighter Display the source image + target image, that is, the intersecting graphics are filled in successively to increase the brightness
copy Display the source image. Ignore the target image, that is, only display the source image
xor Use XOR operation to combine the source image and the target image, that is, the intersection part is transparent
Uncommonly used:
multiply Multiply the pixels of the source image by the pixels of the target image
screen
overlay
darken Deepen, fill in the intersecting parts successively to reduce the brightness
lighten Add Bright, the intersecting parts of the graphics are filled successively to increase the brightness
color-dodge Adjust the bottom layer to the top layer, that is, adjust the target image above the source image
color-burn Adjust the bottom layer to the top layer, and then reverse Turn
hard-light Move the bottom layer to the top layer, then multiply the effect with the screen
soft-light
difference
exclusion
hue
saturation
color
luminosity
Due to poor English, the meaning of some commonly used parameters is not easy to explain, in order not to mislead everyone. , I won’t translate it. If someone has better English, take a look at the explanation of gloableCompositeOperation parameters here. If you can translate it more clearly, I hope you can tell me the meaning of the translation. Thank you very much. English is a flaw! But I will give you the subsequent running results for your reference!
There are many parameters. Let’s take a look at the commonly used ones first. The first eight are easy to understand, and they are just the opposite. First, we need to understand, what is the target graphic? What is a source graphic?
Target image = the drawing you have placed on the canvas; source image = the drawing you intend to place on the canvas. This is the official explanation. If you don’t understand this explanation, we can understand it this way, that is, the image drawn first is the target graphic, and the image drawn later is the source image, for example:
//目标图像
ctx.fillStyle="red";
ctx.fillRect(20,20,75,50);
ctx.globalCompositeOperation="source-over";
//源图像
ctx.fillStyle="blue";
ctx.fillRect(50,50,75,50);
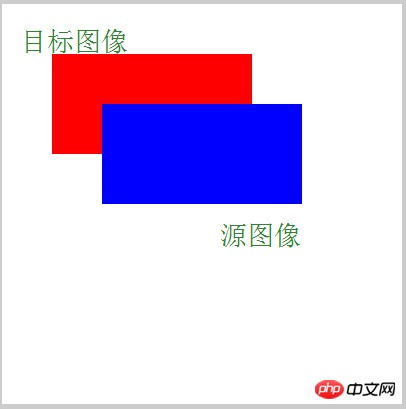
##Of course, the position of this gloableCompositeOperation is not fixed. It can be placed in front of the target image or behind the target image, but it cannot be placed behind the source image (you know). If the meaning of the parameters is not easy to understand, look at the picture below to see what it looks like:
var arr = ['source-over','source-atop','source-in','source-out','destination-over','destination-atop','destination-in','destination-out','lighter','copy','xor','multiply','screen','overlay','darken','lighten','color-dodge','color-burn','hard-light','soft-light','difference','exclusion','hue','saturation','color','luminosity'];
for(var i=0;i<arr.length;i++){
document.write("<p id='p_" + i + "' style='float:left;'>" + arr[i] + ":<br>");
var canvas = document.createElement("canvas");
canvas.width = 120;
canvas.height = 100;
canvas.style.border = "1px solid #000";
canvas.style.marginRight = '10px';
document.getElementById("p_" + i).appendChild(canvas);
var ctx = canvas.getContext("2d");
ctx.fillStyle="red";
ctx.fillRect(10,10,50,50);
ctx.globalCompositeOperation=arr[i];
ctx.beginPath();
ctx.fillStyle="green";
ctx.fillRect(30,30,50,50);
ctx.fill();
document.write("</p>");
}红与绿
红与蓝
具体效果你也可以看这里 —— canvas图形组合模式
里面的代码我故意把canvas的代码留在上面,方便你们查看,不知道你看到这些参数有什么感想,我的第一感觉就是有些熟悉比clip好用,也让我第一时间想到了这一个效果:
ctx.fillStyle="red";
ctx.arc(150,150,100,0,360*Math.PI/180,false);
ctx.fill();
ctx.globalCompositeOperation="xor";
ctx.beginPath();
ctx.arc(150,150,80,0,360*Math.PI/180,false);
ctx.fill();
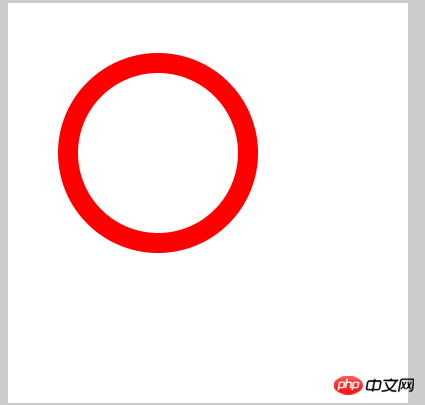
如果配合前面的扇形方法,很容易做一个圆形进度条什么的,当然,还有很多属性可以有大的作用,比如说裁切一个图形,发挥的发达的大脑吧,这里我就不演示了
3、setLineDash
setLineDash(arr) 在画布上画一条虚线
参数:arr 表示的是一个数组集合,里面的参数可以有多个,这里面的参数很有意思,举个栗子说明:
ctx.beginPath();
ctx.moveTo(0,100);
ctx.lineTo(400, 100);
ctx.setLineDash([10,20]);
ctx.stroke();
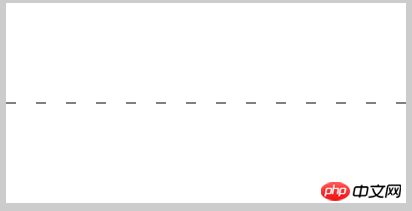
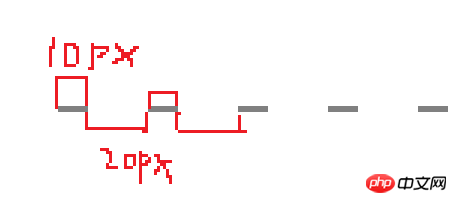
对比代码看图,如果有2个参数,则第一个参数表示虚线的线宽,第二个参数表示虚线的线与线的距离,后面一直循环
如果是3个参数呢?
ctx.beginPath();
ctx.moveTo(0,100);
ctx.lineTo(400, 100);
ctx.setLineDash([10,20,30]);
ctx.stroke();
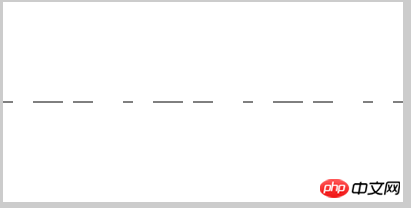
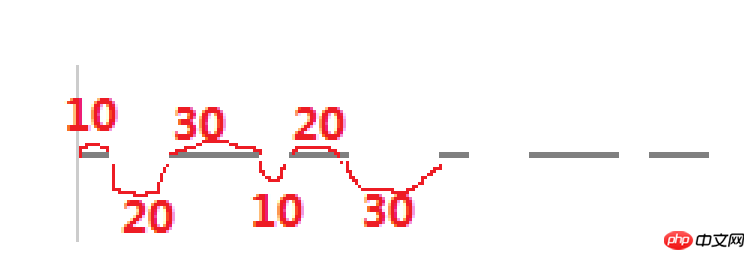
此时会这样,第一条线长为10,然后间距为20,第2条线长为30,然后间距为10,第3条线长20,然后间距为30,到处为一个循环,后面重复
那么4个参数就好理解了,
ctx.beginPath();
ctx.moveTo(0,100);
ctx.lineTo(400, 100);
ctx.setLineDash([10,20,30,40]);
ctx.stroke();
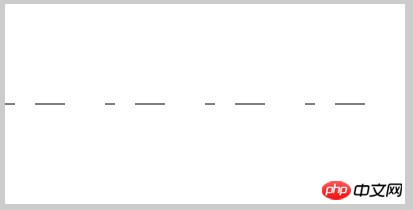
规律和上面的一样,只是循环的长度要长一些,更多参数的规则也是这样的,那么一个参数是否有效呢
ctx.beginPath();
ctx.moveTo(0,100);
ctx.lineTo(400, 100);
ctx.setLineDash([10]);
ctx.stroke();
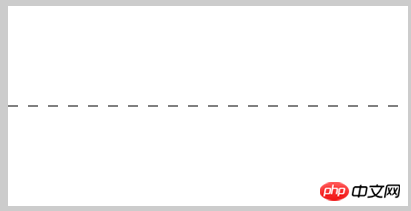
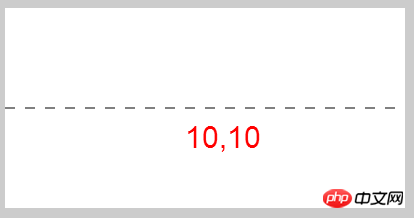
显然是有效的,此时线宽为10,间距为10,这就是华丽的分割线的做法
它还有一个兄弟用法,这个是设置虚线,那么就会有一个获取虚线
getLineDash() 获取当前虚线的样式
它没有参数,它得到的结果就是设置虚线的线宽数组arr,我们看一下怎么用:
ctx.beginPath();
ctx.moveTo(0,100);
ctx.lineTo(400, 100);
ctx.setLineDash([10]);
var txt = ctx.getLineDash();
ctx.stroke();
ctx.fillStyle = 'red';
ctx.font = "30px Arial";
ctx.fillText(txt,180,140);
ctx.beginPath();
ctx.moveTo(0,100);
ctx.lineTo(400, 100);
ctx.setLineDash([10,20]);
var txt = ctx.getLineDash();
ctx.stroke();
ctx.fillStyle = 'red';
ctx.font = "30px Arial";
ctx.fillText(txt,180,140);
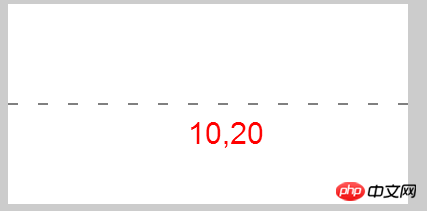
从这两组图可以看出,当只有一个参数数,会默认为2个一样的参数
4、isPointInPath
isPointInPath(x,y) 指定点是否在路径区域中,如果在则返回true,不在则返回false
参数: x,y表示指定的坐标点
举个栗子:
var canvas = document.getElementById("canvas");
        var ctx = canvas.getContext("2d");

        ctx.beginPath();
        ctx.fillStyle = 'red';
        ctx.rect(50,50,100,100);
        ctx.fill();

        canvas.onclick = function(ev){
            var ev = ev || event;
            ctx.clearRect(200,0,200,200);
            var l = ev.clientX - canvas.offsetLeft;
            var t = ev.clientY - canvas.offsetTop;
            if(ctx.isPointInPath(l,t)){
                ctx.font = "40px Arial";
                ctx.fillText((l+','+t),200,120);
            }
        }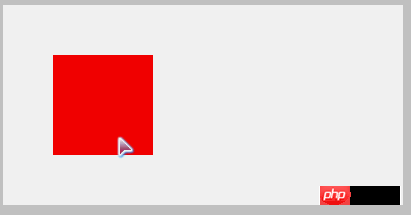
看看这个gif图,当点击红色区域时,我将坐标打印出来,如果点击的地方不在红色区域,则不显示坐标,具体效果看这里 —— canvas判断是否在路径区域
这里有一点需要注意,就是在绘制矩形时,不能用fillRect或strokeRect,为什么呢?因为这里判断是是否在指定的路径中,而fillRect或strokeRect此时已经不是路径了,而是变成了填充过的图形,所以这里必须先用Rect()定义一下路径,再填充,这样才能回去到指定图形的路径,此点须知!
还有一个方法:
isPointInStroke(x,y) 指定点是否在路径中,如果在则返回true,不在则返回false
此方法跟上面的方法很相似,不同点在于,isPointInPath是在一个区域中,不管是用fill还是stroke,但是isPointInStroke只能用stroke填充,且指定的区域是在线框上,看下面的例子:
var canvas = document.getElementById("canvas");
        var ctx = canvas.getContext("2d");

        ctx.beginPath();
        ctx.strokeStyle = 'red';
        ctx.lineWidth = 5;
        ctx.rect(50,50,100,100);
        ctx.stroke();
        canvas.onclick = function(ev){
            var ev = ev || event;
            ctx.clearRect(200,0,200,200);
            var l = ev.clientX - canvas.offsetLeft;
            var t = ev.clientY - canvas.offsetTop;
            if(ctx.isPointInStroke(l,t)){
                ctx.font = "40px Arial";
                ctx.fillText((l+','+t),200,120);
            }
        }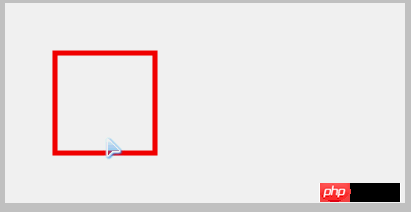
从这个gif中可以看出端倪来,只有点到线框才会触发,具体效果看这里 —— canvas 判断是否在线框中
这2个方法的基本用法就是这样,但是会有一个问题,就是目前只有一个图形在上面,如果有2个图形在上面,而且分别的方法不一样,比如说,一个是区域路径,一个是线框路径,分别点击他们,弹出不同的值,我们看行不行:
var canvas = document.getElementById("canvas");
        var ctx = canvas.getContext("2d");

        ctx.beginPath();
        ctx.strokeStyle = 'red';
        ctx.lineWidth = 5;
        ctx.rect(50,50,100,100);
        ctx.stroke();
        ctx.closePath();
        ctx.beginPath();
        ctx.fillStyle = 'green';
        ctx.rect(200,50,100,100);
        ctx.fill();
        ctx.closePath();

        canvas.onclick = function(ev){
            var ev = ev || event;
            var l = ev.clientX - canvas.offsetLeft;
            var t = ev.clientY - canvas.offsetTop;
            if(ctx.isPointInStroke(l,t)){
                console.log('线框路径');
            }
        }
        canvas.onclick = function(ev){
            var ev = ev || event;
            var l = ev.clientX - canvas.offsetLeft;
            var t = ev.clientY - canvas.offsetTop;
            if(ctx.isPointInPath(l,t)){
                console.log('区域路径');
            }
        }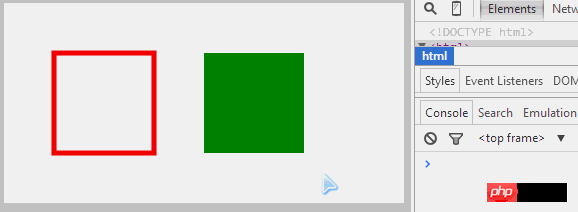
看看console里面的提示,当点击区域路径的时候,触发了操作,但是点击线框路径时,无论我怎么点击,都无济于事,这是为什么呢?把2图形的执行顺序颠倒一下,发现效果也相反了,说明谁最后绘制就执行谁,其实这也是可以理解的,因为此时的ctx指的是当前的路径,它不能分当前路径一,路径二什么的,如果要实现多个图形执行不同的事件,又改如何做呢?由于实现方法有点复杂,就在这里留一个思考题?你们先思考一下,该怎么弄?我会到后期单独写一篇文章,专门来说这个的解决方案,供大家参考!
恩,到处所有该讲的canvas API就全部讲完了,看了这一系列的文章,不知道你是否对canvas有了那么一点点的感觉,是否canvas已经不那么神秘了,如果你嘴上不说,心里觉得,恩,好像有点感觉了,那我的目的就达到了,要是你还能写一些效果,那恭喜你,距离大神你有近了一步,如果有时间,有能力,我希望能多写一下有点深度的canvas实例给大家参考,但愿能对大家有帮助!
以上就是canvas API ,通俗的canvas基础知识(六) 的内容,更多相关内容请关注PHP中文网(www.php.cn)!
 What are the production methods of html5 animation production?
 win10 system disk occupied 100%
 cad2012 serial number and key
 What does formatting a mobile phone mean?
 How to use insertBefore in javascript
 What are the differences between hibernate and mybatis
 How to convert nef to jpg format
 How to buy and sell Bitcoin on Ouyi platform
 The purpose of memcpy in c


